2009 NISSAN ARMADA engine
[x] Cancel search: enginePage 164 of 465
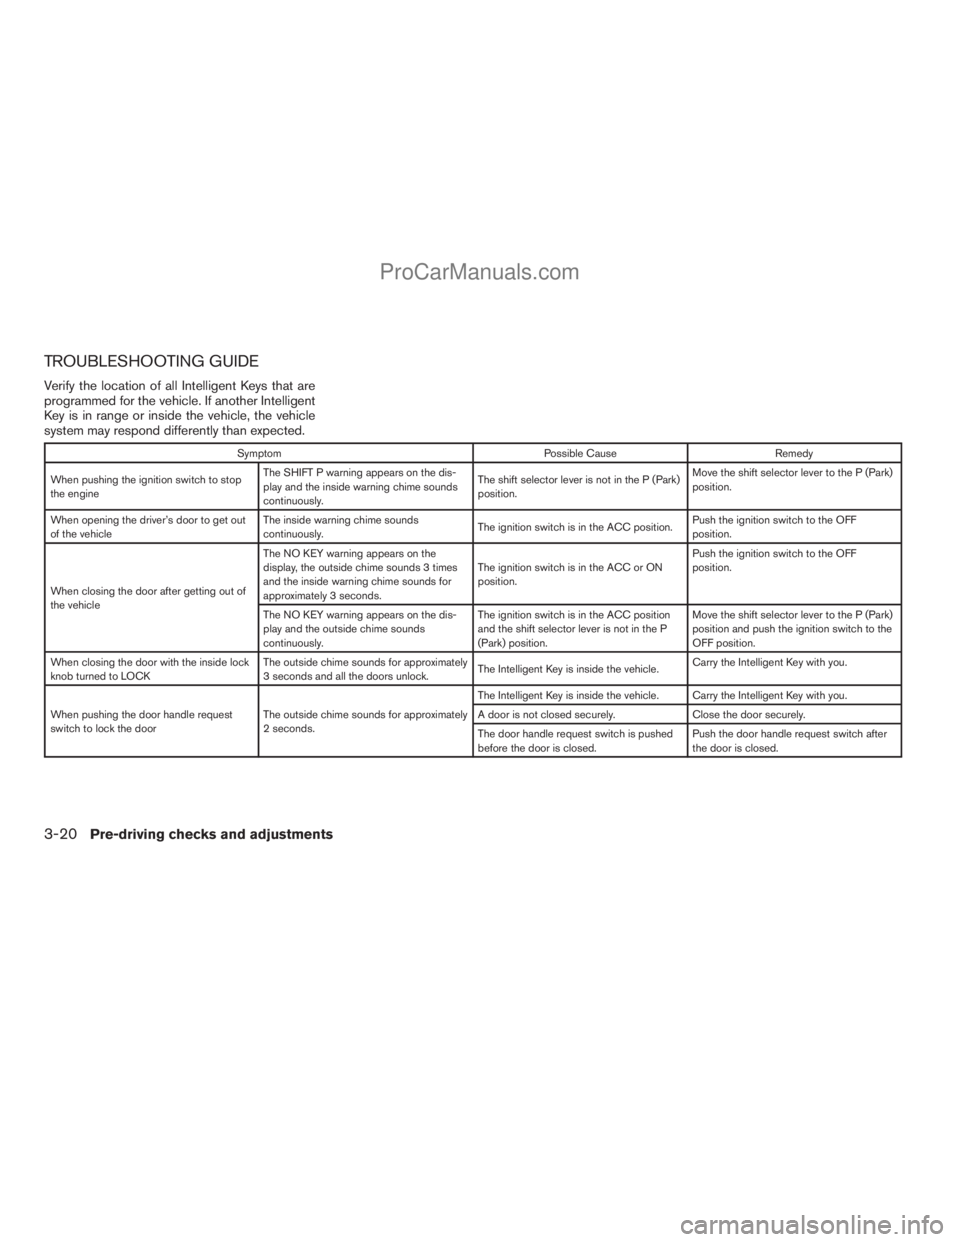
TROUBLESHOOTING GUIDE
Verify the location of all Intelligent Keys that are
programmed for the vehicle. If another Intelligent
Key is in range or inside the vehicle, the vehicle
system may respond differently than expected.
Symptom Possible Cause Remedy
When pushing the ignition switch to stop
the engineThe SHIFT P warning appears on the dis-
play and the inside warning chime sounds
continuously.The shift selector lever is not in the P (Park)
position.Move the shift selector lever to the P (Park)
position.
When opening the driver’s door to get out
of the vehicleThe inside warning chime sounds
continuously.The ignition switch is in the ACC position.Push the ignition switch to the OFF
position.
When closing the door after getting out of
the vehicleThe NO KEY warning appears on the
display, the outside chime sounds 3 times
and the inside warning chime sounds for
approximately 3 seconds.The ignition switch is in the ACC or ON
position.Push the ignition switch to the OFF
position.
The NO KEY warning appears on the dis-
play and the outside chime sounds
continuously.The ignition switch is in the ACC position
and the shift selector lever is not in the P
(Park) position.Move the shift selector lever to the P (Park)
position and push the ignition switch to the
OFF position.
When closing the door with the inside lock
knob turned to LOCKThe outside chime sounds for approximately
3 seconds and all the doors unlock.The Intelligent Key is inside the vehicle.Carry the Intelligent Key with you.
When pushing the door handle request
switch to lock the doorThe outside chime sounds for approximately
2 seconds.The Intelligent Key is inside the vehicle. Carry the Intelligent Key with you.
A door is not closed securely. Close the door securely.
The door handle request switch is pushed
before the door is closed.Push the door handle request switch after
the door is closed.
3-20Pre-driving checks and adjustments
ZREVIEW COPYÐ2009 Armada(wzw)
Owners ManualÐUSA_English(nna)
02/26/08Ðdebbie
X
ProCarManuals.com
Page 165 of 465
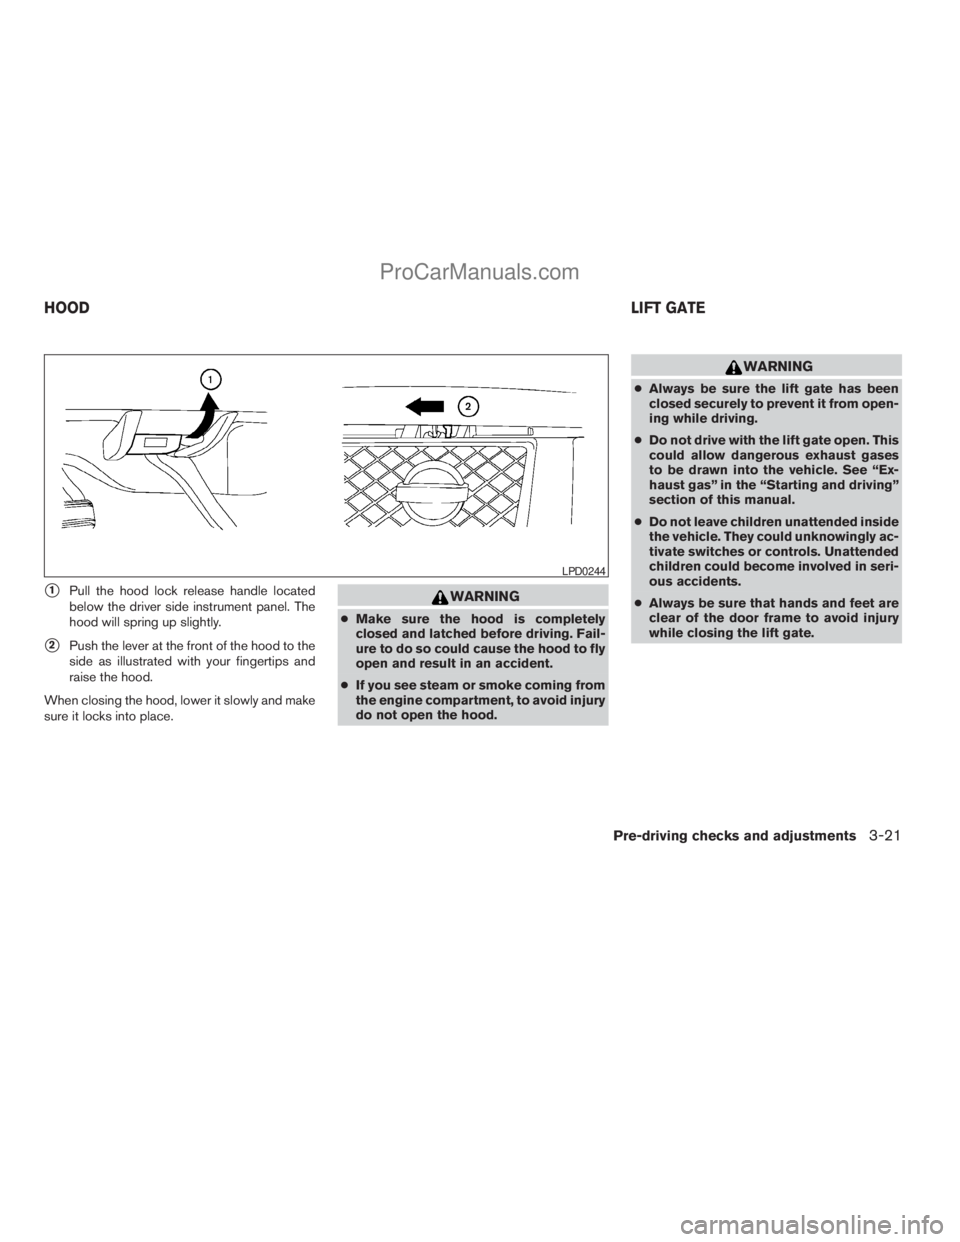
s1Pull the hood lock release handle located
below the driver side instrument panel. The
hood will spring up slightly.
s2Push the lever at the front of the hood to the
side as illustrated with your fingertips and
raise the hood.
When closing the hood, lower it slowly and make
sure it locks into place.
WARNING
cMake sure the hood is completely
closed and latched before driving. Fail-
ure to do so could cause the hood to fly
open and result in an accident.
cIf you see steam or smoke coming from
the engine compartment, to avoid injury
do not open the hood.
WARNING
cAlways be sure the lift gate has been
closed securely to prevent it from open-
ing while driving.
cDo not drive with the lift gate open. This
could allow dangerous exhaust gases
to be drawn into the vehicle. See “Ex-
haust gas” in the “Starting and driving”
section of this manual.
cDo not leave children unattended inside
the vehicle. They could unknowingly ac-
tivate switches or controls. Unattended
children could become involved in seri-
ous accidents.
cAlways be sure that hands and feet are
clear of the door frame to avoid injury
while closing the lift gate.
LPD0244
HOODLIFT GATE
Pre-driving checks and adjustments3-21
ZREVIEW COPYÐ2009 Armada(wzw)
Owners ManualÐUSA_English(nna)
02/26/08Ðdebbie
X
ProCarManuals.com
Page 171 of 465
WARNING
cGasoline is extremely flammable and
highly explosive under certain condi-
tions. You could be burned or seriously
injured if it is misused or mishandled.
Always stop the engine and do not
smoke or allow open flames or sparks
near the vehicle when refueling.
cDo not attempt to top off the fuel tank
after the fuel pump nozzle shuts off
automatically. Continued refueling may
cause fuel overflow, resulting in fuel
spray and possibly a fire.
cUse only an original equipment type
fuel-filler cap as a replacement. It has a
built-in safety valve needed for proper
operation of the fuel system and emis-
sion control system. An incorrect cap
can result in a serious malfunction and
possible injury. It could also cause the
malfunction indicator light to come on.
cNever pour fuel into the throttle body to
attempt to start your vehicle.cDo not fill a portable fuel container in
the vehicle or trailer. Static electricity
can cause an explosion of flammable
liquid, vapor or gas in any vehicle or
trailer. To reduce the risk of serious
injury or death when filling portable fuel
containers:
– Always place the container on the
ground when filling.
– Do not use electronic devices when
filling.
– Keep the pump nozzle in contact
with the container while you are fill-
ing it.
– Use only approved portable fuel con-
tainers for flammable liquid.
CAUTION
cOnly vehicles with the E-85 filler door
label can operate on E-85. Fuel system
or other damage can occur if E-85 is
used in vehicles that are not designed
to run on E-85.
cIf fuel is spilled on the vehicle body,
flush it away with water to avoid paint
damage.cTighten until the fuel-filler cap clicks.
Failure to tighten the fuel-filler cap
properly may cause the
Mal-
function Indicator Light (MIL) to illumi-
nate. If the
light illuminates be-
cause the fuel-filler cap is loose or
missing, tighten or install the cap and
continue to drive the vehicle.
The
light should turn off after a
few driving trips. If the
light
does not turn off after a few driving
trips, have the vehicle inspected by a
NISSAN dealer.
cFor additional information, see the
“Malfunction Indicator Light (MIL)” in
the “Instruments and Controls” section
earlier in this manual.
Pre-driving checks and adjustments3-27
ZREVIEW COPYÐ2009 Armada(wzw)
Owners ManualÐUSA_English(nna)
02/26/08Ðdebbie
X
ProCarManuals.com
Page 183 of 465
When you use this system, make sure the engine
is running.
If you use the system with the engine not
running (ignition ON or ACC) for a long
time, it will discharge the battery, and the
engine will not start.
Reference symbols:
ENTER button — This is a button on the control
panel.
“Display” key — This is a select key on the screen.
By selecting this key, you can proceed to the next
function.
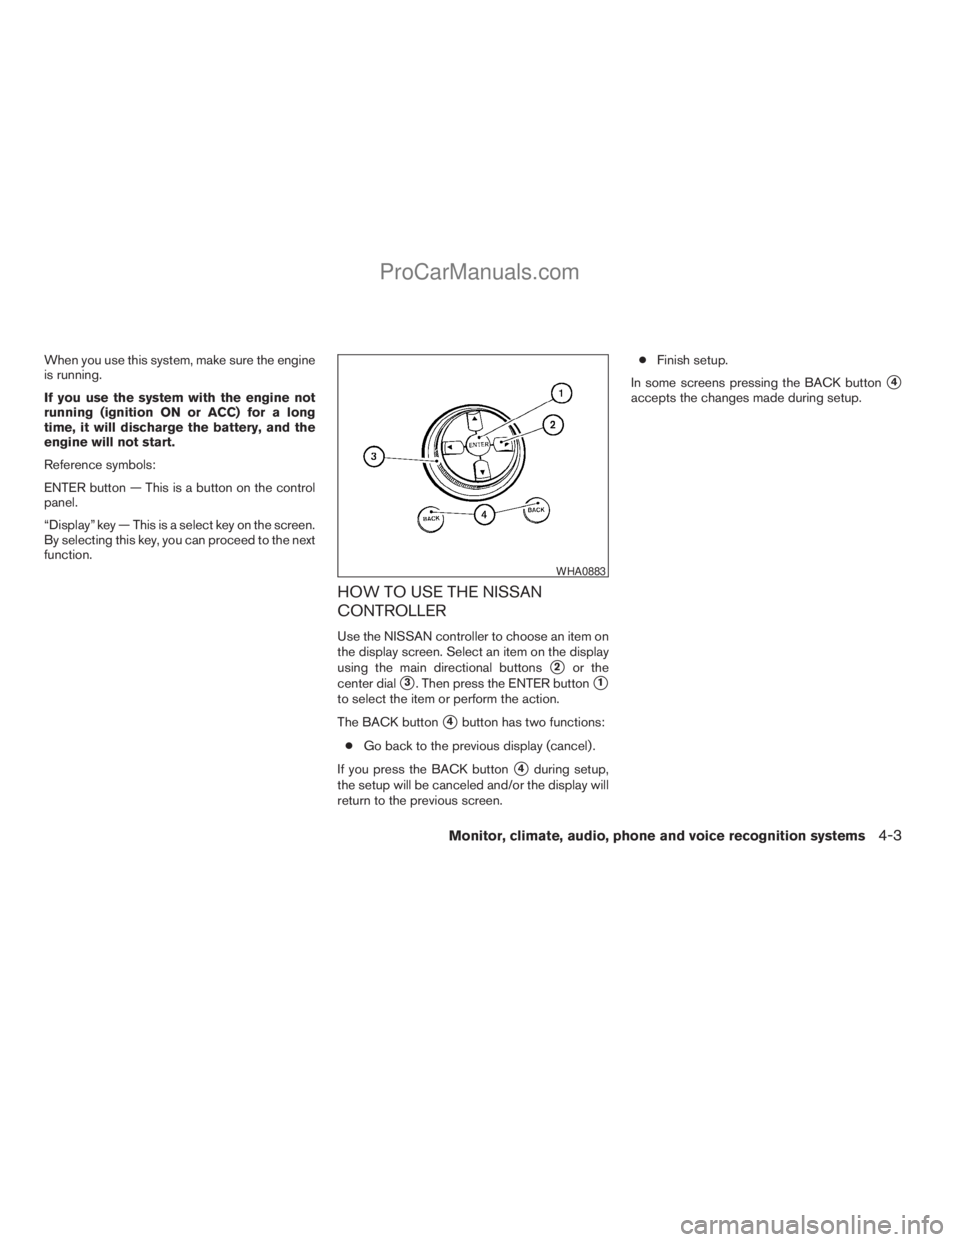
HOW TO USE THE NISSAN
CONTROLLER
Use the NISSAN controller to choose an item on
the display screen. Select an item on the display
using the main directional buttons
s2or the
center dial
s3. Then press the ENTER buttons1
to select the item or perform the action.
The BACK button
s4button has two functions:
cGo back to the previous display (cancel) .
If you press the BACK button
s4during setup,
the setup will be canceled and/or the display will
return to the previous screen.cFinish setup.
In some screens pressing the BACK button
s4
accepts the changes made during setup.
WHA0883
Monitor, climate, audio, phone and voice recognition systems4-3
ZREVIEW COPYÐ2009 Armada(wzw)
Owners ManualÐUSA_English(nna)
02/26/08Ðdebbie
X
ProCarManuals.com
Page 197 of 465
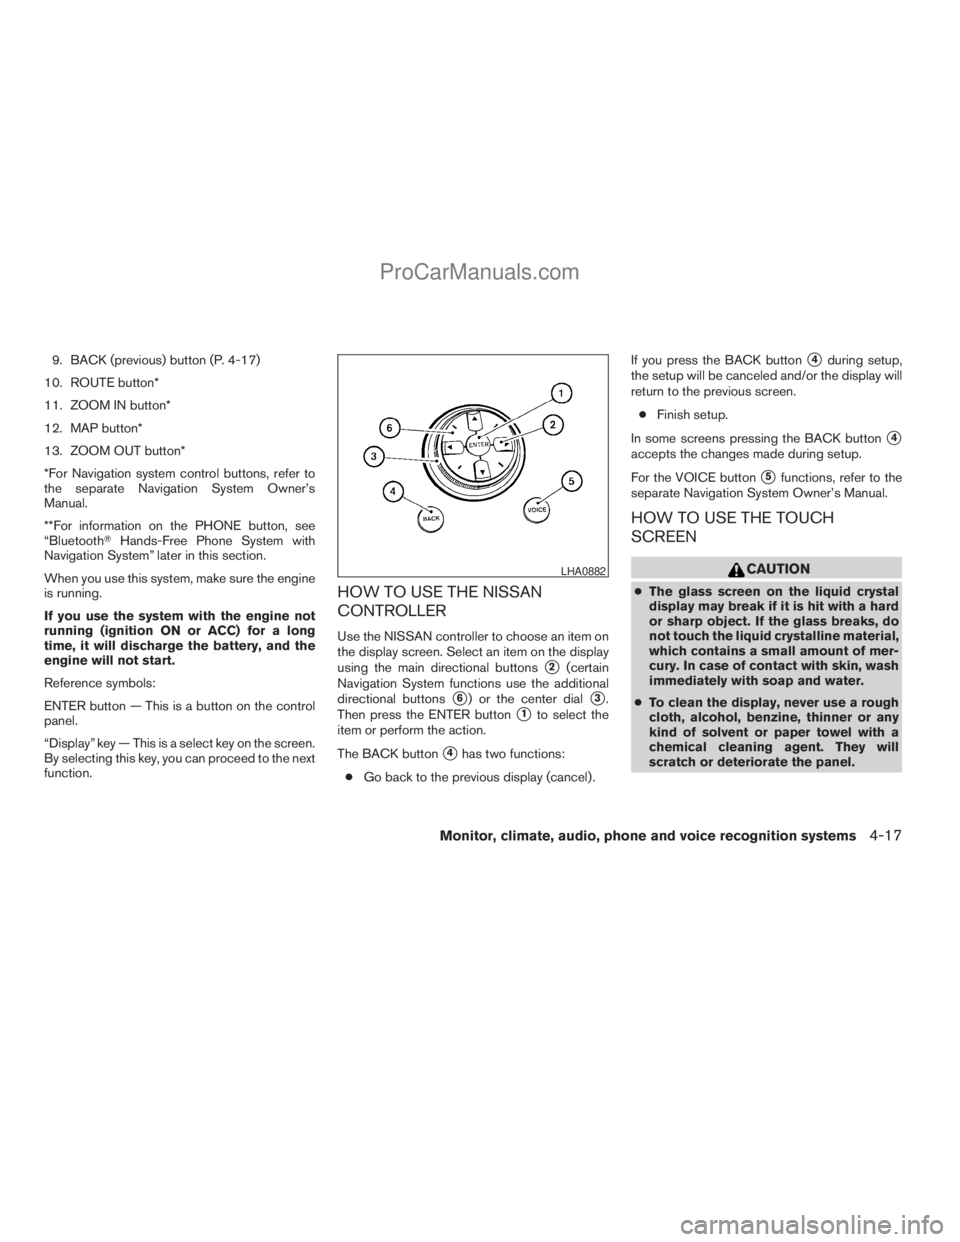
9. BACK (previous) button (P. 4-17)
10. ROUTE button*
11. ZOOM IN button*
12. MAP button*
13. ZOOM OUT button*
*For Navigation system control buttons, refer to
the separate Navigation System Owner’s
Manual.
**For information on the PHONE button, see
“BluetoothTHands-Free Phone System with
Navigation System” later in this section.
When you use this system, make sure the engine
is running.
If you use the system with the engine not
running (ignition ON or ACC) for a long
time, it will discharge the battery, and the
engine will not start.
Reference symbols:
ENTER button — This is a button on the control
panel.
“Display” key — This is a select key on the screen.
By selecting this key, you can proceed to the next
function.
HOW TO USE THE NISSAN
CONTROLLER
Use the NISSAN controller to choose an item on
the display screen. Select an item on the display
using the main directional buttons
s2(certain
Navigation System functions use the additional
directional buttons
s6) or the center dials3.
Then press the ENTER button
s1to select the
item or perform the action.
The BACK button
s4has two functions:
cGo back to the previous display (cancel) .If you press the BACK button
s4during setup,
the setup will be canceled and/or the display will
return to the previous screen.
cFinish setup.
In some screens pressing the BACK button
s4
accepts the changes made during setup.
For the VOICE button
s5functions, refer to the
separate Navigation System Owner’s Manual.
HOW TO USE THE TOUCH
SCREEN
CAUTION
cThe glass screen on the liquid crystal
display may break if it is hit with a hard
or sharp object. If the glass breaks, do
not touch the liquid crystalline material,
which contains a small amount of mer-
cury. In case of contact with skin, wash
immediately with soap and water.
cTo clean the display, never use a rough
cloth, alcohol, benzine, thinner or any
kind of solvent or paper towel with a
chemical cleaning agent. They will
scratch or deteriorate the panel.
LHA0882
Monitor, climate, audio, phone and voice recognition systems4-17
ZREVIEW COPYÐ2009 Armada(wzw)
Owners ManualÐUSA_English(nna)
02/26/08Ðdebbie
X
ProCarManuals.com
Page 216 of 465
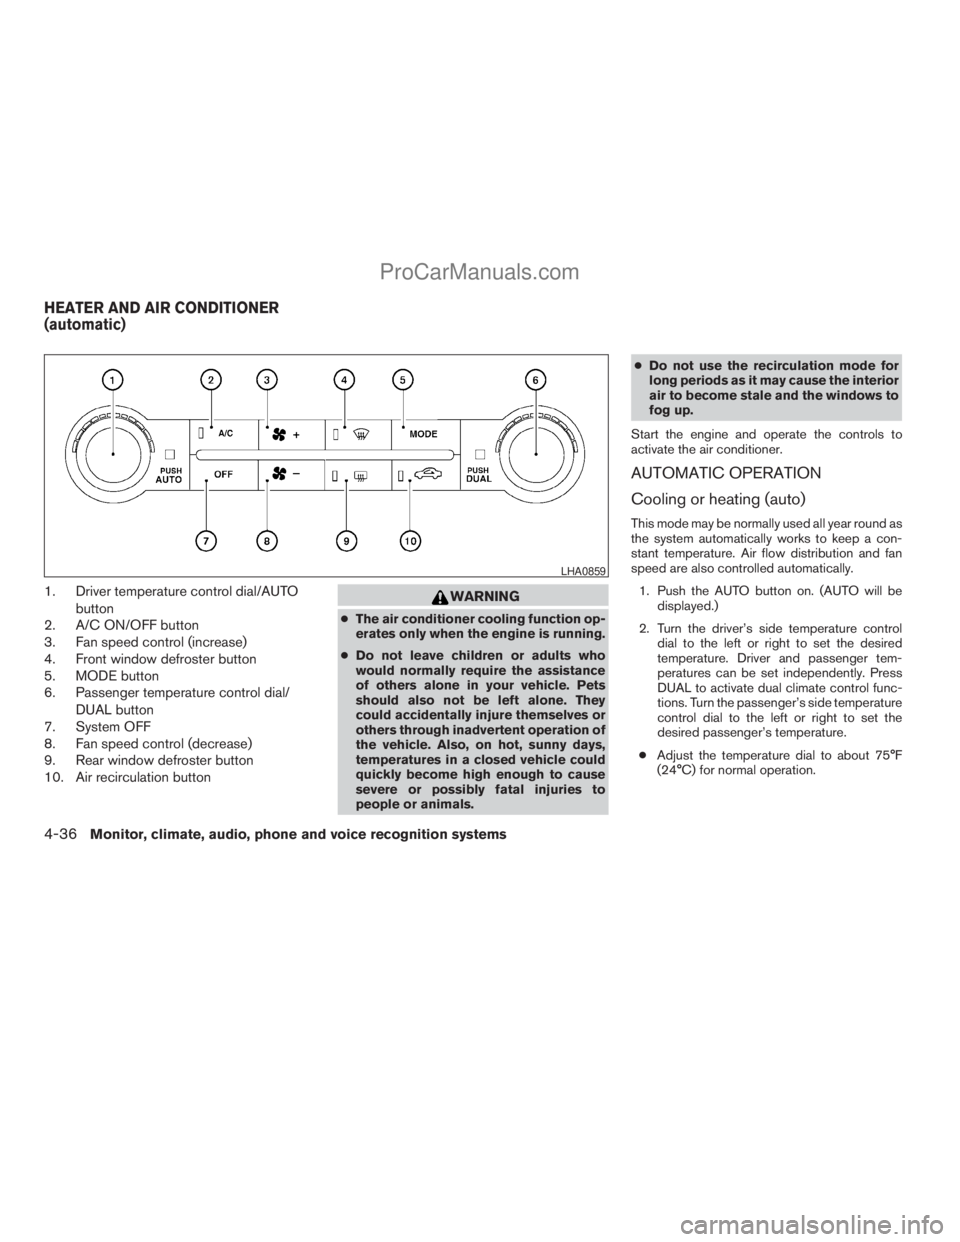
1. Driver temperature control dial/AUTO
button
2. A/C ON/OFF button
3. Fan speed control (increase)
4. Front window defroster button
5. MODE button
6. Passenger temperature control dial/
DUAL button
7. System OFF
8. Fan speed control (decrease)
9. Rear window defroster button
10. Air recirculation buttonWARNING
cThe air conditioner cooling function op-
erates only when the engine is running.
cDo not leave children or adults who
would normally require the assistance
of others alone in your vehicle. Pets
should also not be left alone. They
could accidentally injure themselves or
others through inadvertent operation of
the vehicle. Also, on hot, sunny days,
temperatures in a closed vehicle could
quickly become high enough to cause
severe or possibly fatal injuries to
people or animals.cDo not use the recirculation mode for
long periods as it may cause the interior
air to become stale and the windows to
fog up.
Start the engine and operate the controls to
activate the air conditioner.
AUTOMATIC OPERATION
Cooling or heating (auto)
This mode may be normally used all year round as
the system automatically works to keep a con-
stant temperature. Air flow distribution and fan
speed are also controlled automatically.
1. Push the AUTO button on. (AUTO will be
displayed.)
2. Turn the driver’s side temperature control
dial to the left or right to set the desired
temperature. Driver and passenger tem-
peratures can be set independently. Press
DUAL to activate dual climate control func-
tions. Turn the passenger’s side temperature
control dial to the left or right to set the
desired passenger’s temperature.
cAdjust the temperature dial to about 75°F
(24°C) for normal operation.
LHA0859
HEATER AND AIR CONDITIONER
(automatic)
4-36Monitor, climate, audio, phone and voice recognition systems
ZREVIEW COPYÐ2009 Armada(wzw)
Owners ManualÐUSA_English(nna)
02/26/08Ðdebbie
X
ProCarManuals.com
Page 217 of 465
cThe temperature of the passenger compart-
ment will be maintained automatically. Air
flow distribution, fan speed and A/C on/off
are also controlled automatically.
cA visible mist may be seen coming from the
ventilators in hot, humid conditions as the air
is cooled rapidly. This does not indicate a
malfunction.
Dehumidified defrosting or defogging
1. Push the defroster control buttonto
turn the system on. The display will show the
defrost icon.
2. Turn the temperature dial to the left or right
to set the desired temperature.
cTo quickly remove ice from the outside of the
windows, press the fan control speed button
until it reaches the maximum speed
.
cAs soon as possible after the windshield is
clean, push the AUTO button to return to the
auto mode.
cWhen the defroster control button
is
activated, the air conditioner will automati-
cally be turned on at outside temperatures
above 36°F (2°C) . If in defrost mode for
more than one minute, the air conditioning
system will continue to operate until the fan
control is turned OFF, the vehicle is shut off,or the A/C button is pressed even if the air
flow MODE control button is used to select a
position other than the
position. This
dehumidifies the air which helps defog the
windshield. The air recirculation mode auto-
matically turns off, allowing outside air to be
drawn into the passenger compartment to
further improve the defogging performance.
MANUAL OPERATION
Fan speed control buttons
Press the fan speed control buttons+/–
to manually control the fan speed.
Press OFF to turn the system off.
Push the AUTO button to return to automatic
control of the fan speed.
Air recirculation
Themode automatically turns off, allowing
outside air to be drawn into the passenger com-
partment to prevent fogging in defrost, floor or
def/floor modes.
Push the air recirculation button
to recir-
culate interior air inside the vehicle. Push the
AUTO button to return to automatic mode.
Air flow control
Pushing the MODE button manually controls air
flow and selects the air outlet:
— Air flows from center and side
ventilators.
— Air flows from center and side
ventilators and foot outlets.
— Air flows mainly from foot outlets.
— Air flows from defroster and foot
outlets.
— Air flows from defroster outlets.
To turn system off
Press the OFF button.
OPERATING TIPS
cWhen the engine coolant temperature and
outside air temperature are low, the air flow
from the foot outlets may not operate for a
maximum of 150 seconds. However, this is
not a malfunction. After the coolant tempera-
ture warms up, air flow from the foot outlets
will operate normally.
Monitor, climate, audio, phone and voice recognition systems4-37
ZREVIEW COPYÐ2009 Armada(wzw)
Owners ManualÐUSA_English(nna)
02/27/08Ðtbrooks
X
ProCarManuals.com
Page 218 of 465

The sunload sensors1, located on the top center
of the instrument panel, helps the system main-
tain a constant temperature. Do not put anything
on or around this sensor.Rear seat temperature and fan speed can be
controlled from both the front seat overhead con-
sole controls
sAor the rear seat overhead con-
sole controls
sB.
Press the REAR CTRL button to transfer control
of the rear climate functions to the rear passen-
gers.
To operate the rear air conditioner, the engine
must be running.
If the rear seat fan control dial is set to (0) , the air
conditioner is turned off. If it is set to any of the fan
speed positions, air is discharged from the rear
vents at the corresponding speed.
1. Rear fan speed control dial
2. Rear airflow mode buttons
3. Rear temperature control dial
LIC0836LHA0863LHA0861
REAR SEAT AIR CONDITIONER
4-38Monitor, climate, audio, phone and voice recognition systems
ZREVIEW COPYÐ2009 Armada(wzw)
Owners ManualÐUSA_English(nna)
02/26/08Ðdebbie
X
ProCarManuals.com