2009 NISSAN ARMADA remote control
[x] Cancel search: remote controlPage 262 of 465
Pressing thebutton on the front controls
turns the rear speakers on or off and enables or
disables the wireless headphones .
It is possible to operate the DVD player by remote
control.
Headphones are a wireless type and no cables
are necessary. You can use them in almost all the
ranges in the rear seat. (It is not possible to use
the headphones in the front seat.)
DISC/AUX button
Park the vehicle in a safe location and
apply the parking brake for the front seat
occupants to operate the DVD drive while
watching the images.
Press the DISC/AUX button on the instrument
panel and turn the display to the DVD mode.
When a DVD is loaded, it will be replayed auto-
matically.
The operation screen will be turned on when the
DISC/AUX button located on the instrument
panel is pressed while a DVD is being played,
and it will turn off automatically after a period of
time. To turn it on again, press the DISC/AUX
button once more.
DVD operation keys
To operate the DVD drive, touch the preferred key
(if so equipped) or select the preferred key dis-
played on the operation screen using the
NISSAN controller.
NOTE:
If the display in your vehicle is not touch
screen enabled; use the NISSAN controller
and the ENTER button to operate the fol-
lowing functions. For more information on
how to operate the NISSAN controller, see
“How to use the NISSAN controller” earlier
in this section.
PAUSE key:
Touch the “
” PAUSE key to pause the DVD.
To resume playing the DVD, touch the
“
”PLAY key.
To pause the DVD, it is also possible to press
the
button on the keypad of the remote
controller.
PLAY key:
Touch the “
” PLAY key to start playing the
DVD, for example, after pausing the DVDTo start playing the DVD, it is also possible to
press the
button on the keypad of the
remote controller.
STOP key:
Touch the “
” STOP key to stop playing the
DVD.
To stop playing the DVD, it is also possible to
press the
button on the keypad of the
remote controller.
SKIP (forward) key:
Touch the “
” SKIP key to skip the chapter(
s) of the disc forward. The chapters will advance
the number of times the “
” SKIP key is
touched.
Touch and hold the “
” SKIP key for more
than 1.5 seconds to fast forward the disc. When
the “
” SKIP key is released the disc will be
played normally.
To skip the chapter(s) forward, it is also possible
to press the
button on the keypad of the
remote controller.
4-82Monitor, climate, audio, phone and voice recognition systems
ZREVIEW COPYÐ2009 Armada(wzw)
Owners ManualÐUSA_English(nna)
02/26/08Ðdebbie
X
ProCarManuals.com
Page 263 of 465
SKIP (rewind) key:
Touch the “
” SKIP key to skip the chapter(s)
of the disc backward. The chapters will go back
the number of times the “
” SKIP key is
touched.
Touch and hold the “
” SKIP key for more
than 1.5 seconds to rewind the disc. When the
“
” SKIP key is released the disc will be
played normally.
To skip the chapter(s) backward, it is also pos-
sible to press the
button on the keypad of
the remote controller.
DVD settings
Touch the “Settings” key to adjust the following
settings while playing a DVD.
When all the changes have been made, press
BACK button to save all the settings.NOTE:
If the display in your vehicle is not touch
screen enabled; use the NISSAN controller
and the ENTER button to operate the fol-
lowing functions. For more information on
how to operate the NISSAN controller see,
“How to use the NISSAN controller” earlier
in this section.
Switch to DVD-AUX:
Switch the output source from the DVD drive to
another device connected to the auxiliary input
jacks located on the DVD player.
LHA0969LHA0970
Monitor, climate, audio, phone and voice recognition systems4-83
ZREVIEW COPYÐ2009 Armada(wzw)
Owners ManualÐUSA_English(nna)
02/26/08Ðdebbie
X
ProCarManuals.com
Page 266 of 465
REMOTE CONTROL OPERATION
For all operation precautions, see “Before oper-
ating the DVD Mobile Entertainment System”
earlier in this section.
The DVD system can also be controlled by using
the remote controller in the rear seats. See the
following items.
PWR on/off button:
With the ignition switch turned to the ACC or ON
position, press the PWR button to turn the DVD
rear display on or off.
NOTE:
The PWR button on the remote control only
turns the rear display on or off.
Insert the DVD into the slot with the label side
facing up. The DVD will be guided automatically
into the slot.
If the DVD player is off and a DVD is inserted, the
DVD player will automatically turn on.
CAUTION
Do not force the compact disc into the
slot. This could damage the player.MODE select button:
Press the MODE button to select Audio/Video
source between DVD and AUX input (input jacks
on the faceplate, Red = right channel audio input,
White = left channel audio input, and Yellow =
Video input) .
The display will show the “AUX” in the upper left
corner of the display for 4 seconds once the
Mode is changed to AUX.
To use the input jacks, refer to “Auxiliary input
jacks” in this section.
PLAY:
When the
PLAY button on the remote
control is pressed, the player will play.
In play mode, the display will briefly show
on the upper left corner of the display.
FF (Fast Forward) , REW
(Rewind):
Press
(fast forward) /(Rewind) but-
tons to carry out the fast forward or rewind pre-
sentation at 5 times normal play speed.
Press
(fast forward) /(Rewind) but-
tons again or PLAY button to resume the normal
play speed.
NEXT CHAPTER/
PREVIOUS CHAPTER:
When the
(NEXT CHAPTER) button is
pressed while the DVD is being played, the pro-
gram next to the present one will start to play from
its beginning. Press several times to skip through
programs. The DVD will advance the number of
times the button is pressed. When the
(PREVIOUS CHAPTER) button is pressed, the
program being played returns to its beginning.
Press several times to skip back through pro-
grams. The DVD will go back the number of times
the button is pressed.
PAUSE:
When the
PAUSE button on the remote
control is pressed, the player will pause playing of
the media. In pause mode, the player will
show
on the upper left corner of the dis-
play until the player is changed to another mode.
STOP:
Press the STOP button once to stop playing the
media. The display will show
in the upper
left corner of the display for 4 seconds, and the
last disc position will be stored. When the PLAY
button is pressed again, it will resume at the
stored disc track and time position.
4-86Monitor, climate, audio, phone and voice recognition systems
ZREVIEW COPYÐ2009 Armada(wzw)
Owners ManualÐUSA_English(nna)
02/26/08Ðdebbie
X
ProCarManuals.com
Page 268 of 465
The chapter/title/track number will be automati-
cally selected (if valid, based on media content) if
3 seconds expire without any keypad inputs.
The operator can cancel the input
chapter/title/track number by actuating the
CLEAR control prior to the expiration of the
3-second timer.
These functions can be used only for the DVD
discs which correspond to them.
CARE AND MAINTENANCE
Use a lightly dampened, lint free cloth to clean the
surfaces of your NISSAN Mobile Entertainment
System (DVD player face, screen, remote control,
etc.) .
Do not attempt to use the system in extreme
temperature conditions [below -4°F (-20°C) or
above 158°F (70°C)].
Do not attempt to operate the system in extreme
humidity conditions (less than 10% or more than
75%) .
CAUTION
cDo not use any solvents or cleaning
solutions when cleaning the video
system.
cDo not use excessive force on the moni-
tor screen.
cAvoid touching or scratching the moni-
tor screen as it may become dirty or
damaged.
HOW TO HANDLE THE DVD
CAUTION
cHandle a DVD by its edges. Never touch
the surface of the disc.
cTo clean a disc, wipe the surface from
the center to the outer edge using a
clean, soft cloth. Do not wipe the disc
using a circular motion.
cDo not use a conventional record
cleaner, benzine, thinner or alcohol in-
tended for industrial use.
LHA0049
4-88Monitor, climate, audio, phone and voice recognition systems
ZREVIEW COPYÐ2009 Armada(wzw)
Owners ManualÐUSA_English(nna)
02/26/08Ðdebbie
X
ProCarManuals.com
Page 270 of 465
5.If the disc cannot be ejected see your
NISSAN dealer for further assistance.
6.Re-program the radio presets.
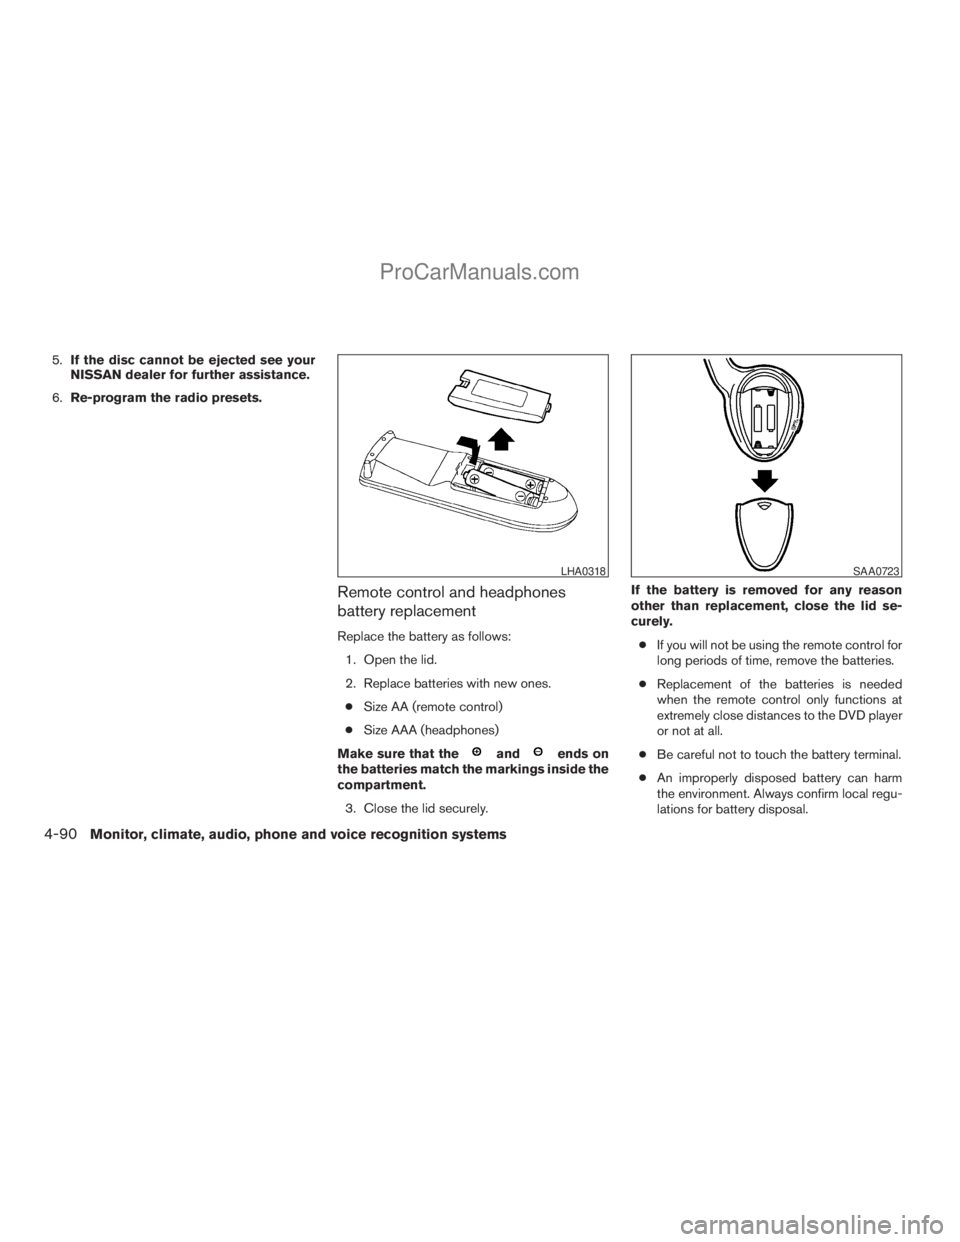
Remote control and headphones
battery replacement
Replace the battery as follows:
1. Open the lid.
2. Replace batteries with new ones.
cSize AA (remote control)
cSize AAA (headphones)
Make sure that the
andends on
the batteries match the markings inside the
compartment.
3. Close the lid securely.If the battery is removed for any reason
other than replacement, close the lid se-
curely.
cIf you will not be using the remote control for
long periods of time, remove the batteries.
cReplacement of the batteries is needed
when the remote control only functions at
extremely close distances to the DVD player
or not at all.
cBe careful not to touch the battery terminal.
cAn improperly disposed battery can harm
the environment. Always confirm local regu-
lations for battery disposal.
LHA0318SAA0723
4-90Monitor, climate, audio, phone and voice recognition systems
ZREVIEW COPYÐ2009 Armada(wzw)
Owners ManualÐUSA_English(nna)
02/26/08Ðdebbie
X
ProCarManuals.com
Page 271 of 465
cWhen changing batteries, do not let dust or
oil get on the remote control and head-
phones.
FCC Notice:
Changes or modifications not expressly ap-
proved by the party responsible for compli-
ance could void the user’s authority to op-
erate the equipment. This device complies
with Part 15 of the FCC Rules and RSS-210
of Industry Canada. Operation is subject to
the following two conditions: (1) This de-
vice may not cause harmful interference,
and (2) this device must accept any inter-
ference received, including interference
that may cause undesired operation of the
device.When installing a CB, ham radio or car phone in
your NISSAN, be sure to observe the following
precautions, otherwise the new equipment may
adversely affect the engine control system and
other electronic parts.
WARNING
cA cellular telephone should not be used
while driving so full attention may be
given to vehicle operation. Some juris-
dictions prohibit the use of cellular tele-
phones while driving.
cIf you must make a call while your ve-
hicle is in motion, the hands free cellu-
lar phone operational mode (if so
equipped) is highly recommended. Ex-
ercise extreme caution at all times so
full attention may be given to vehicle
operation.
cIf a conversation in a moving vehicle
requires you to take notes, pull off the
road to a safe location and stop your
vehicle before doing so.
CAUTION
cKeep the antenna as far away as pos-
sible from the electronic control
modules.
cKeep the antenna wire more than 8 in
(20 cm) away from the electronic con-
trol system harnesses. Do not route the
antenna wire next to any harness.
cAdjust the antenna standing-wave ratio
as recommended by the manufacturer.
cConnect the ground wire from the CB
radio chassis to the body.
cFor details, consult a NISSAN dealer.
CAR PHONE OR CB RADIO
Monitor, climate, audio, phone and voice recognition systems4-91
ZREVIEW COPYÐ2009 Armada(wzw)
Owners ManualÐUSA_English(nna)
02/26/08Ðdebbie
X
ProCarManuals.com
Page 459 of 465
F
Flashers
(See hazard warning flasher switch)......2-36
Flat tire......................6-2
Floor mat positioning aid.............7-4
Fluid
Brake fluid..................8-12
Capacities and recommended
fuel/lubricants.................9-2
Engine coolant................8-7
Engine oil...................8-8
Power steering fluid.............8-11
Window washer fluid............8-12
F.M.V.S.S. certification label..........9-11
Fog light switch.................2-35
Front air bag system
(See supplemental restraint system).....1-57
Front seats....................1-2
Front sonar system...............5-32
Fuel
Capacities and recommended
fuel/lubricants.................9-2
Fuel economy................5-20
Fuel gauge..................2-7
Fuel octane rating..............9-4
Fuel recommendation............9-3
Fuel-filler door and cap...........3-26
Fuses......................8-22
Fusible links...................8-24G
Garage door opener, HomeLinkTUniversal
Transceiver...................2-59
Gascap.....................3-26
Gauge
Automatic transmission fluid temperature
gauge.....................2-9
Engine coolant temperature gauge.....2-6
Engine oil pressure gauge..........2-8
Fuel gauge..................2-7
Odometer...................2-5
Speedometer.................2-5
Tachometer..................2-6
Trip odometer.................2-5
Voltmeter...................2-8
General maintenance..............8-2
Glass hatch...................3-26
Glove box....................2-43
Glove box lock.................2-43
H
Hands-free phone system,
BluetoothT...............4-92, 4-107
Hazard warning flasher switch.........2-36
Head restraints..................1-8
Active Head Restraint............1-9
Headlight and turn signal switch........2-32
Headlight control switch............2-32
Headlights....................8-28
Headphones
(See NISSAN mobile entertainment system). .4-79
Heated seats..................2-37Heated steering wheel.............2-37
Heater
Heater and air conditioner controls. . . .4-36
Heater operation..............4-37
Rear seat air conditioner..........4-38
HomeLinkTUniversal Transceiver.......2-59
Hood release..................3-21
Hook
Luggage hook................2-49
Horn.......................2-36
I
Ignition switch..................5-9
Immobilizer system.........2-29, 3-3, 5-11
Important vehicle information label.......9-11
In-cabin microfilter...............8-17
Increasing fuel economy............5-20
Indicator lights and audible reminders
(See warning/indicator lights and audible
reminders)....................2-13
Inside automatic anti-glare mirror.......3-29
Instrument brightness control.........2-35
Instrument panel..............0-6, 2-2
Instrument panel dimmer switch........2-35
Intelligent Key system..............3-11
Key operating range............3-12
Key operation................3-13
Mechanical key................3-3
Remote keyless entry operation......3-16
Troubleshooting guide...........3-20
Warning signals...............3-20
Interior light...................2-56
ISOFIX child restraints.............1-29
10-3
ZREVIEW COPYÐ2009 Armada(wzw)
Owners ManualÐUSA_English(nna)
02/26/08Ðdebbie
X
ProCarManuals.com
Page 460 of 465
J
Jump starting...................6-8
K
Key ........................3-2
Keyfob battery replacement..........8-25
Keyless entry
With Intelligent Key system
(See Intelligent Key system)........3-16
Keyless entry system
(See remote keyless entry system).......3-7
Keys, For Intelligent Key system.........3-2
L
Labels
Air conditioner specification label.....9-12
C.M.V.S.S. certification label........9-11
Emission control information label.....9-11
Engine serial number............9-11
F.M.V.S.S. certification label........9-11
Tire and Loading Information label.....9-12
Vehicle identification number (VIN)
plate.....................9-10
Warning labels (for SRS)..........1-64
LATCH (Lower Anchors and Tethers
for CHildren) System..............1-29
License plate
Installing the license plate.........9-12
Lift gate.....................3-21
Lift gate release.................3-25Light
Air bag warning light.........1-64, 2-18
Brake light (See stop light).........8-30
Bulb check/instrument panel........2-13
Bulb replacement..............8-30
Charge warning light............2-15
Fog light switch...............2-35
Headlight and turn signal switch......2-32
Headlight control switch..........2-32
Headlights..................8-28
Interior light.................2-56
Light bulbs..................8-28
Low tire pressure warning light......2-16
Low washer fluid warning light.......2-26
Passenger air bag and status light.....1-58
Personal lights...............2-58
Security indicator light...........2-19
Warning/indicator lights and audible
reminders..................2-13
Lights
Map lights..................2-58
Lock
Child safety rear door lock..........3-7
Door locks..................3-4
Glove box lock...............2-43
Lift gate release...............3-25
Power door locks...............3-5
Vehicle speed sensing door lock
mechanism..................3-6
Low fuel warning light......2-16, 2-17, 2-26
Low tire pressure warning light........2-16
Low washer fluid warning light.........2-26
Luggage hook..................2-49
Luggage rack (see roof rack).........2-50
Luggage (See vehicle loading information) . .9-13Luggage storage
(see vehicle loading information)........2-48
M
Maintenance
Changing the maintenance
interval.................4-7, 4-23
Displaying the maintenance notice
reminder................4-8, 4-24
General maintenance............8-2
Inside the vehicle...............8-3
Maintenance precautions..........8-5
Outside the vehicle..............8-2
Resetting the maintenance interval . .4-8, 4-24
Seat belt maintenance...........1-27
Setting.................4-7, 4-23
Under the hood and vehicle.........8-4
Malfunction indicator light...........2-19
Manual front seat adjustment..........1-2
Manual vent windows..............2-54
Map lights....................2-58
Map pocket...................2-44
Meters and gauges................2-4
Instrument brightness control.......2-35
Mirror
Automatic anti-glare inside mirror.....3-29
Outside mirror control...........3-31
Outside mirrors...............3-31
Vanity mirror.................3-29
Music Box hard-disk drive audio system . . .4-62
10-4
ZREVIEW COPYÐ2009 Armada(wzw)
Owners ManualÐUSA_English(nna)
02/26/08Ðdebbie
X
ProCarManuals.com