2009 NISSAN ARMADA ECO mode
[x] Cancel search: ECO modePage 363 of 465

CAUTION
Be sure to center the spare tire suspend-
ing plate on the wheel and then lift the
spare tire.
Jacking up vehicle and removing the
damaged tire
WARNING
cNever get under the vehicle while it is
supported only by the jack. If it is nec-
essary to work under the vehicle, sup-
port it with safety stands.
cUse only the jack provided with your
vehicle to lift the vehicle. Do not use the
jack provided with your vehicle on other
vehicles. The jack is designed for lifting
only your vehicle during a tire change.
cUse the correct jack-up points. Never
use any other part of the vehicle for jack
support.
cNever jack up the vehicle more than
necessary.
cNever use blocks on or under the jack.cDo not start or run the engine while
vehicle is on the jack. It may cause the
vehicle to move. This is especially true
for vehicles with limited slip
differentials.
cDo not allow passengers to stay in the
vehicle while it is on the jack.
cNever run the engine with a wheel(s) off
the ground. It may cause the vehicle to
move.
Always refer to the illustration for the correct
placement and jack-up points for your specific
vehicle model and jack type.
Carefully read the caution label attached to
the jack body and the following instruc-
tions.
1. Loosen each wheel nut one or two turns by
turning counterclockwise with the wheel nut
wrench.Do not remove the wheel nuts
until the tire is off the ground.NOTE:
Before jacking up the vehicle, make sure
the ignition key is in the OFF position. If the
vehicle is lifted up with the ignition key in
the ON position the auto-leveling suspen-
sion (if so equipped) will become disabled
after 60 seconds. To reset the auto-leveling
suspension, cycle the ignition key ON/OFF
one time.
In case of emergency6-5
ZREVIEW COPYÐ2009 Armada(wzw)
Owners ManualÐUSA_English(nna)
02/26/08Ðdebbie
X
ProCarManuals.com
Page 368 of 465
CAUTION
cAlways connect positive (1) to positive
(1) and negative (2) to body ground (for
example, strut mounting bolt, engine
lift bracket, etc.) — not to the battery.
cMake sure the jumper cables do not
touch moving parts in the engine com-
partment and that the cable clamps do
not contact any other metal.
5. Start the engine of the booster vehicle and
let it run for a few minutes.
6. Keep the engine speed of the booster ve-
hicle at about 2,000 rpm, and start the en-
gine of the vehicle being jump started.
CAUTION
Do not keep the starter motor engaged for
more than 10 seconds. If the engine does
not start right away, turn the key off and
wait 3 to 4 seconds before trying again.
7.
After starting the engine, carefully disconnect
the negative cable and then the positive cable.
8. Replace the vent caps (if so equipped) . Be
sure to dispose of the cloth used to cover
the vent holes as it may be contaminated
with corrosive acid.
CAUTION
Automatic transmission models cannot
be push-started or tow-started. Attempt-
ing to do so may cause transmission
damage.
WARNING
cDo not continue to drive if your vehicle
overheats. Doing so could cause engine
damage or a vehicle fire.
cTo avoid the danger of being scalded,
never remove the radiator or coolant
reservoir cap while the engine is still
hot. When the radiator or coolant reser-
voir cap is removed, pressurized hot
water will spurt out, possibly causing
serious injury.
cDo not open the hood if steam is com-
ing out.
If your vehicle is overheating (indicated by an
extremely high temperature gauge reading and
the illumination of the engine oil pressure/engine
coolant temperature high indicator light) , or if you
feel a lack of engine power, detect abnormal
noise, etc. take the following steps.
1. Move the vehicle safely off the road, apply
the parking brake and move the shift lever to
P (Park) .
Do not stop the engine.
2. Turn off the air conditioner. Open all the
windows, move the heater or air conditioner
temperature control to maximum hot and fan
control to high speed.
PUSH STARTING IF YOUR VEHICLE OVERHEATS
6-10In case of emergency
ZREVIEW COPYÐ2009 Armada(wzw)
Owners ManualÐUSA_English(nna)
02/26/08Ðdebbie
X
ProCarManuals.com
Page 370 of 465
For information about towing your vehicle behind
a recreational vehicle (RV) , refer to “Flat towing”
in the “Technical and consumer information” sec-
tion of this manual.
TOWING RECOMMENDED BY
NISSANTwo-wheel drive models
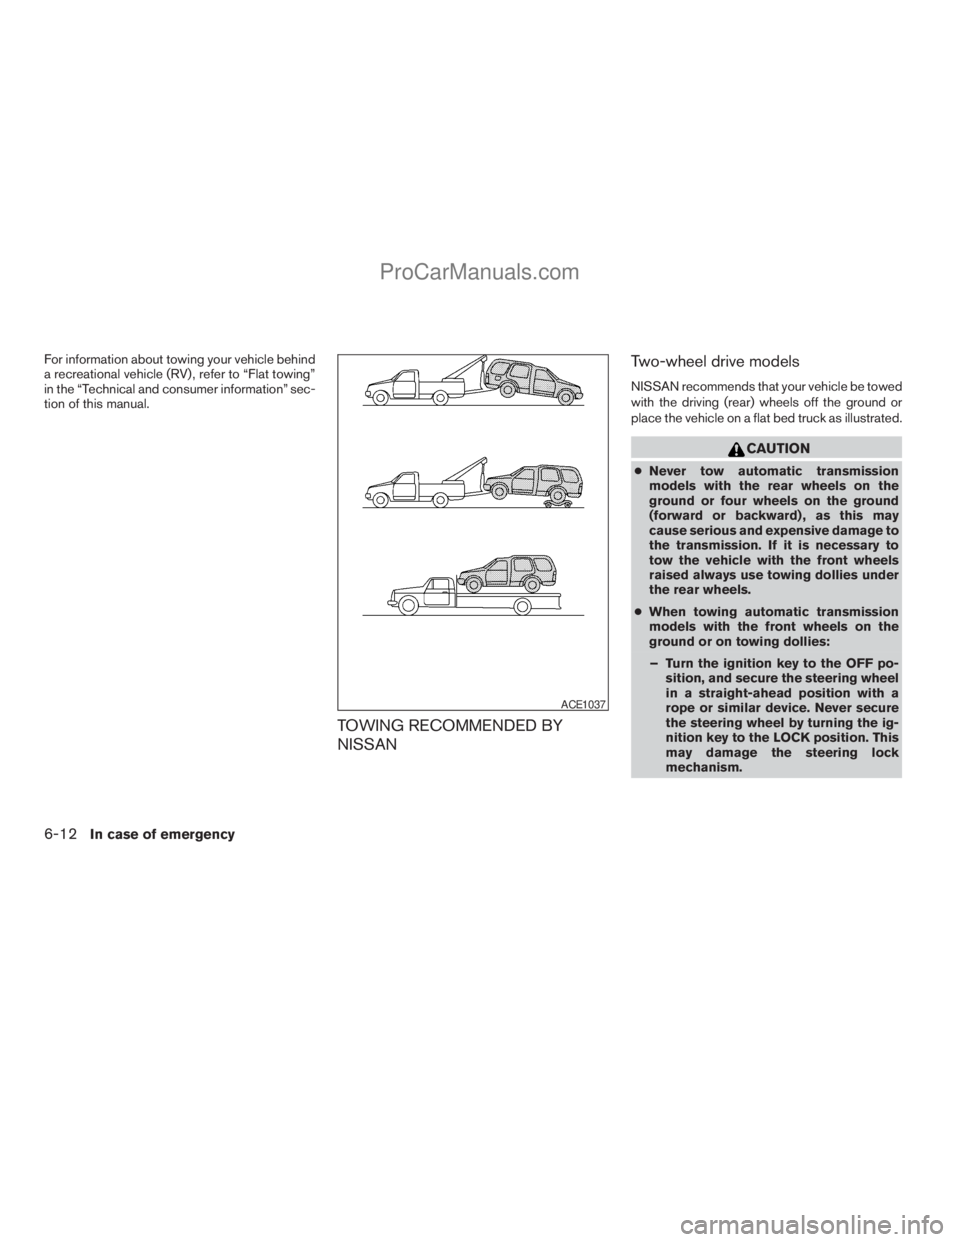
NISSAN recommends that your vehicle be towed
with the driving (rear) wheels off the ground or
place the vehicle on a flat bed truck as illustrated.
CAUTION
cNever tow automatic transmission
models with the rear wheels on the
ground or four wheels on the ground
(forward or backward) , as this may
cause serious and expensive damage to
the transmission. If it is necessary to
tow the vehicle with the front wheels
raised always use towing dollies under
the rear wheels.
cWhen towing automatic transmission
models with the front wheels on the
ground or on towing dollies:
– Turn the ignition key to the OFF po-
sition, and secure the steering wheel
in a straight-ahead position with a
rope or similar device. Never secure
the steering wheel by turning the ig-
nition key to the LOCK position. This
may damage the steering lock
mechanism.
ACE1037
6-12In case of emergency
ZREVIEW COPYÐ2009 Armada(wzw)
Owners ManualÐUSA_English(nna)
02/26/08Ðdebbie
X
ProCarManuals.com
Page 371 of 465
If the speed or distance must necessarily be
greater, remove the propeller shaft before towing
to prevent damage to the transmission.
Four-wheel drive models
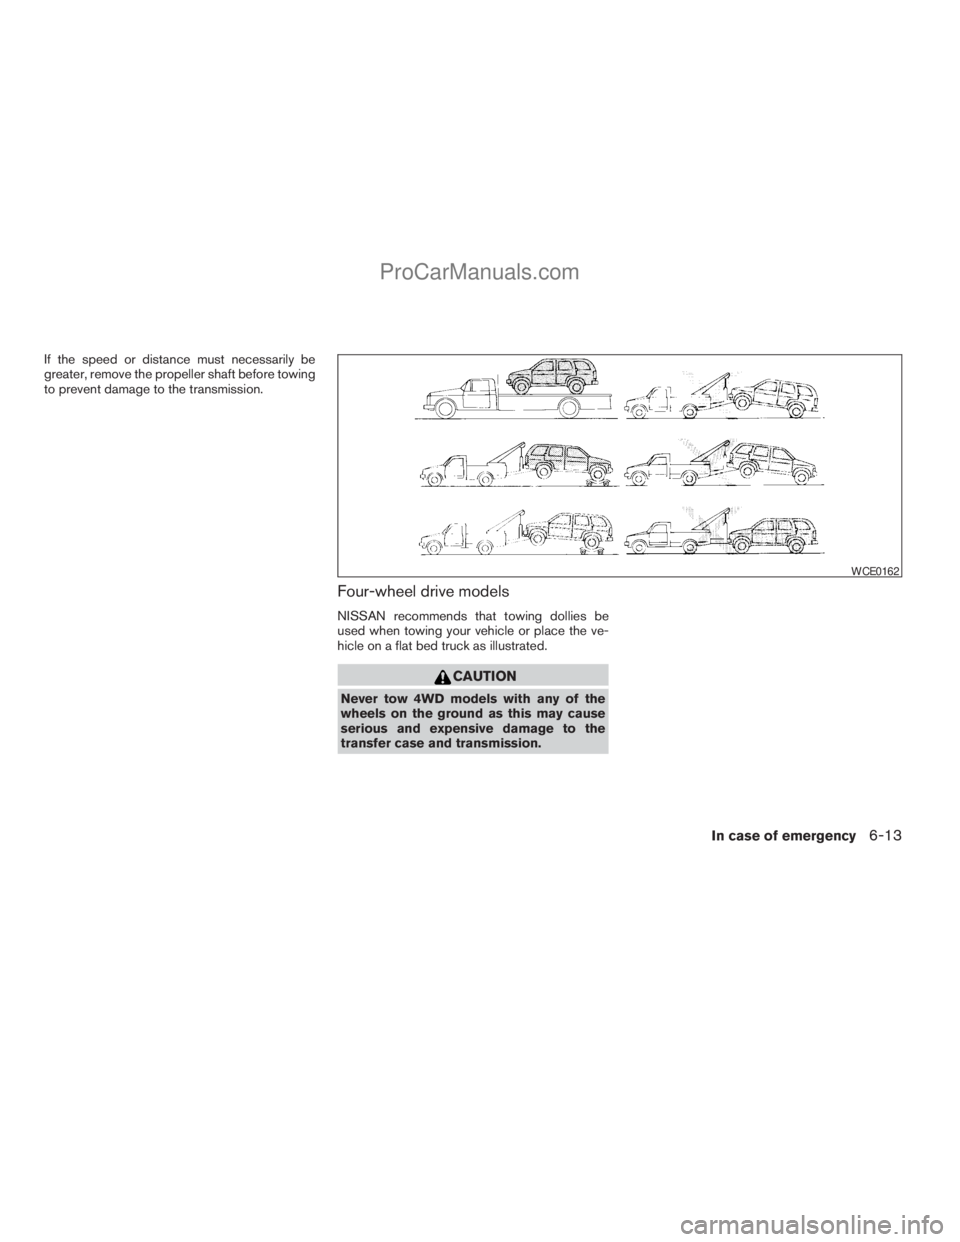
NISSAN recommends that towing dollies be
used when towing your vehicle or place the ve-
hicle on a flat bed truck as illustrated.
CAUTION
Never tow 4WD models with any of the
wheels on the ground as this may cause
serious and expensive damage to the
transfer case and transmission.
WCE0162
In case of emergency6-13
ZREVIEW COPYÐ2009 Armada(wzw)
Owners ManualÐUSA_English(nna)
02/26/08Ðdebbie
X
ProCarManuals.com
Page 376 of 465

Occasionally remove loose dust from the interior
trim, plastic parts and seats using a vacuum
cleaner or soft bristled brush. Wipe the vinyl and
leather surfaces with a clean, soft cloth damp-
ened in mild soap solution, then wipe clean with a
dry, soft cloth.
Regular care and cleaning is required in order to
maintain the appearance of the leather.
Before using any fabric protector, read the manu-
facturer’s recommendations. Some fabric pro-
tectors contain chemicals that may stain or
bleach the seat material.
Use a cloth dampened only with water to clean
the meter and gauge lens.
WARNING
Do not use water or acidic cleaners (hot
steam cleaners) on the seat. This can
damage the seat or occupant classifica-
tion sensor. This can also affect the opera-
tion of the air bag system and result in
serious personal injury.
CAUTION
cNever use benzine, thinner or any simi-
lar material.
cSmall dirt particles can be abrasive and
damaging to leather surfaces and
should be removed promptly. Do not
use saddle soap, car waxes, polishes,
oils, cleaning fluids, solvents, deter-
gents or ammonia-based cleaners as
they may damage the leather’s natural
finish.
cNever use fabric protectors unless rec-
ommended by the manufacturer.
cDo not use glass or plastic cleaner on
meter or gauge lens covers. It may dam-
age the lens cover.
FLOOR MATS
The use of genuine NISSAN floor mats can ex-
tend the life of your vehicle carpet and make it
easier to clean the interior.No matter what
mats are used, be sure they are fitted for
your vehicle and are properly positioned in
the footwell to prevent interference with
pedal operation.Mats should be maintained
with regular cleaning and replaced if they be-
come excessively worn.
Floor mat positioning aid
This vehicle includes two driver’s side front floor
mat brackets and one passenger’s side front floor
mat bracket to help keep your floor mats in place.
NISSAN floor mats have been specially designed
for your vehicle model. The driver’s side floor mat
has two grommet holes incorporated in it and the
passenger’s side has one grommet hole. Position
each mat by placing the floor mat bracket hook
through the floor mat grommet holes while cen-
tering the mat in the footwell.
Periodically check to make certain the mats are
properly positioned.
LAI0009
CLEANING INTERIOR
7-4Appearance and care
ZREVIEW COPYÐ2009 Armada(wzw)
Owners ManualÐUSA_English(nna)
02/26/08Ðdebbie
X
ProCarManuals.com
Page 413 of 465
and voice recognition systems” section,
“Tire Pressure Monitoring System
(TPMS)” in the “Starting and driving” sec-
tion, and “Flat tire” in the “In case of emer-
gency” section.
Tire inflation pressure
Check the tire pressures (including the
spare) often and always prior to long dis-
tance trips. The recommended tire pres-
sure specifications are shown on the
F.M.V.S.S./C.M.V.S.S. certification label
or the Tire and Loading Information label
under the “Cold Tire Pressure” heading.
The Tire and Loading Information label is
affixed to the driver side center pillar. Tire
pressures should be checked regularly
because:
cMost tires naturally lose air over time.
cTires can lose air suddenly when
driven over potholes or other objects
or if the vehicle strikes a curb while
parking.The tire pressures should be checked
when the tires are cold. The tires are
considered COLD after the vehicle has
been parked for 3 or more hours, or driven
less than 1 mile (1.6 km) at moderate
speeds.
Incorrect tire pressure, including un-
der inflation, may adversely affect
tire life and vehicle handling.
WARNING
cImproperly inflated tires can fail
suddenly and cause an accident.
cThe Gross Vehicle Weight Rating
(GVWR) is located on the
F.M.V.S.S./C.M.V.S.S. certifica-
tion label. The vehicle weight ca-
pacity is indicated on the Tire and
Loading Information label (if so
equipped) . Do not load your ve-
hicle beyond this capacity. Over-
loading your vehicle may result in
reduced tire life, unsafe operat-
ing conditions due to premature
tire failure, or unfavorable han-
dling characteristics and couldalso lead to a serious accident.
Loading beyond the specified ca-
pacity may also result in failure of
other vehicle components.
cBefore taking a long trip, or
whenever you heavily load your
vehicle, use a tire pressure gauge
to ensure that the tire pressures
are at the specified level.
cDo not drive your vehicle over
85 MPH (137 km/h) unless it is
equipped with high speed rated
tires. Driving faster than 85 MPH
(137 km/h) may result in tire fail-
ure, loss of control and possible
injury.
cFor additional information re-
garding tires, refer to “Important
Tire Safety Information” (US) or
“Tire Safety Information”
(Canada) in the Warranty Infor-
mation Booklet.
Maintenance and do-it-yourself8-35
ZREVIEW COPYÐ2009 Armada(wzw)
Owners ManualÐUSA_English(nna)
02/26/08Ðdebbie
X
ProCarManuals.com
Page 414 of 465
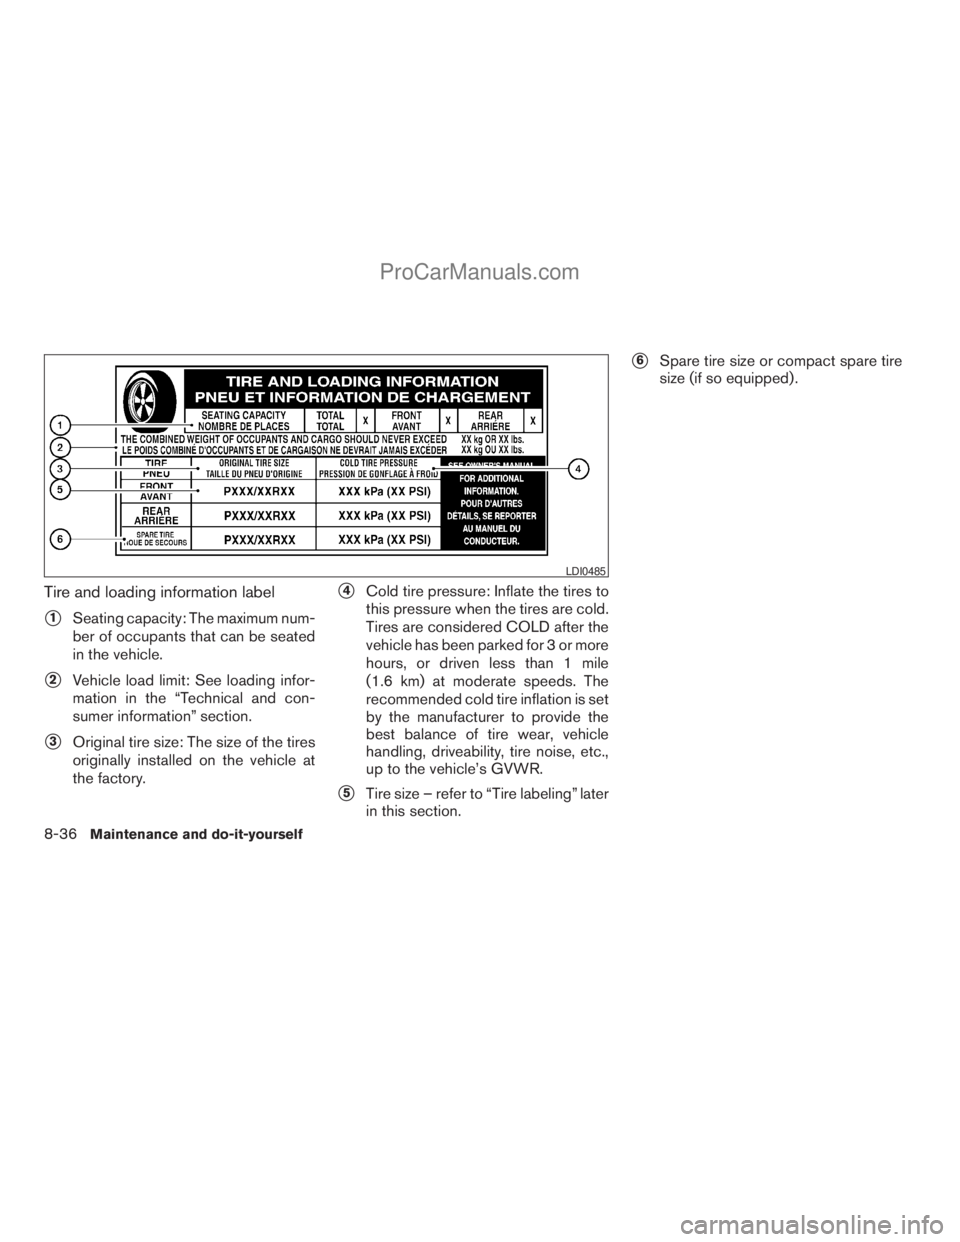
Tire and loading information label
s1Seating capacity: The maximum num-
ber of occupants that can be seated
in the vehicle.
s2Vehicle load limit: See loading infor-
mation in the “Technical and con-
sumer information” section.
s3Original tire size: The size of the tires
originally installed on the vehicle at
the factory.
s4Cold tire pressure: Inflate the tires to
this pressure when the tires are cold.
Tires are considered COLD after the
vehicle has been parked for 3 or more
hours, or driven less than 1 mile
(1.6 km) at moderate speeds. The
recommended cold tire inflation is set
by the manufacturer to provide the
best balance of tire wear, vehicle
handling, driveability, tire noise, etc.,
up to the vehicle’s GVWR.
s5Tire size – refer to “Tire labeling” later
in this section.
s6Spare tire size or compact spare tire
size (if so equipped) .
LDI0485
8-36Maintenance and do-it-yourself
ZREVIEW COPYÐ2009 Armada(wzw)
Owners ManualÐUSA_English(nna)
02/26/08Ðdebbie
X
ProCarManuals.com
Page 418 of 465
s7The word “radial”
The word “radial” is shown if the tire has
radial structure.
s8Manufacturer or brand name
Manufacturer or brand name is shown.
Other Tire-related Terminology
In addition to the many terms that are
defined throughout this section, Intended
Outboard Sidewall is (1) the sidewall that
contains a whitewall, bears white lettering
or bears manufacturer, brand, and/or
model name molding that is higher or
deeper than the same molding on the
other sidewall of the tire, or (2) the out-
ward facing sidewall of an asymmetrical
tire that has a particular side that must
always face outward when mounted on a
vehicle.
TYPES OF TIRES
WARNING
cWhen changing or replacing tires, be
sure all four tires are of the same type
(i.e., Summer, All Season or Snow) and
construction. A NISSAN dealer may be
able to help you with information about
tire type, size, speed rating and
availability.
cReplacement tires may have a lower
speed rating than the factory equipped
tires, and may not match the potential
maximum vehicle speed. Never exceed
the maximum speed rating of the tire.
cReplacing tires with those not originally
specified by NISSAN could affect the
proper operation of the low tire pres-
sure warning system.
cFor additional information regarding
tires, refer to “Important Tire Safety In-
formation” (US) or “Tire Safety Informa-
tion” (Canada) in the Warranty Informa-
tion Booklet.
All season tires
NISSAN specifies All Season tires on some mod-
els to provide good performance all year, includ-
ing snowy and icy road conditions. All Season
tires are identified by ALL SEASON and/or M&S
on the tire sidewall. Snow tires have better snow
traction than All Season tires and may be more
appropriate in some areas.
Summer tires
NISSAN specifies summer tires on some models
to provide superior performance on dry roads.
Summer tire performance is substantially re-
duced in snow and ice. Summer tires do not have
the tire traction rating “M&S” on the tire sidewall.
If you plan to operate your vehicle in snowy or icy
conditions, NISSAN recommends the use of
SNOW tires or ALL SEASON tires on all four
wheels.
Snow tires
If snow tires are needed, it is necessary to select
tires equivalent in size and load rating to the
original equipment tires. If you do not, it can
adversely affect the safety and handling of your
vehicle.
8-40Maintenance and do-it-yourself
ZREVIEW COPYÐ2009 Armada(wzw)
Owners ManualÐUSA_English(nna)
02/26/08Ðdebbie
X
ProCarManuals.com