Page 155 of 374

Symptom Possible Cause Remedy
When pushing the ignition switch to stop
the Hybrid SystemThe SHIFT P warning appears on the dis-
play and the inside warning chime sounds
continuously.The shift selector is not in the P position.Shift the shift selector to the P position.
When opening the driver’s door to get out
of the vehicleThe inside warning chime sounds
continuously.The ignition switch is in the ACC position.Push the ignition switch to the OFF
position.
The Intelligent Key is in the Intelligent Key
port.Remove the Intelligent Key from the Intelli-
gent Key port.
When closing the door after getting out of
the vehicleThe NO KEY warning appears on the
display, the outside chime sounds 3 times
and the inside warning chime sounds for
approximately 3 seconds.The ignition switch is in the ACC or ON
position.Push the ignition switch to the OFF
position.
The NO KEY warning appears on the dis-
play and the outside chime sounds
continuously.The ignition switch is in the ACC position
and the shift selector is not in the “P” (Park)
position.Move the shift selector to the “P” (Park)
position and push the ignition switch to the
OFF position.
When closing the door with the inside lock
knob turned to LOCKThe outside chime sounds for approximately
3 seconds and all the doors unlock.The Intelligent Key is inside the vehicle or
trunk.Carry the Intelligent Key with you.
When closing the trunk lidThe outside chime sounds for approximately
10 seconds and the trunk lid opens.The Intelligent Key is inside the trunk.Carry the Intelligent Key with you.
Pre-driving checks and adjustments3-23
�REVIEW COPY—2009 Altima(alt)
Owners Manual—USA_English(nna)
09/08/08—debbie
�
Page 162 of 374
button. The indicator light will turn off.To turn on the automatic anti-glare feature, press
the
button again. The indicator light will
turn on.
For information on HomeLink�Universal Trans-
ceiver operation, see “HomeLink�Universal
Transceiver” in the “Instrument and controls” sec-
tion of this manual.
For information on the compass and outside tem-
perature display, see “Compass and outside
temperature display” in the “Instrument and con-
trols” section of this manual.
NOTE:
Do not hang any objects over the sensors
�2or apply glass cleaner to the sensors.
Doing so will reduce the sensitivity of the
sensors, resulting in improper operation.
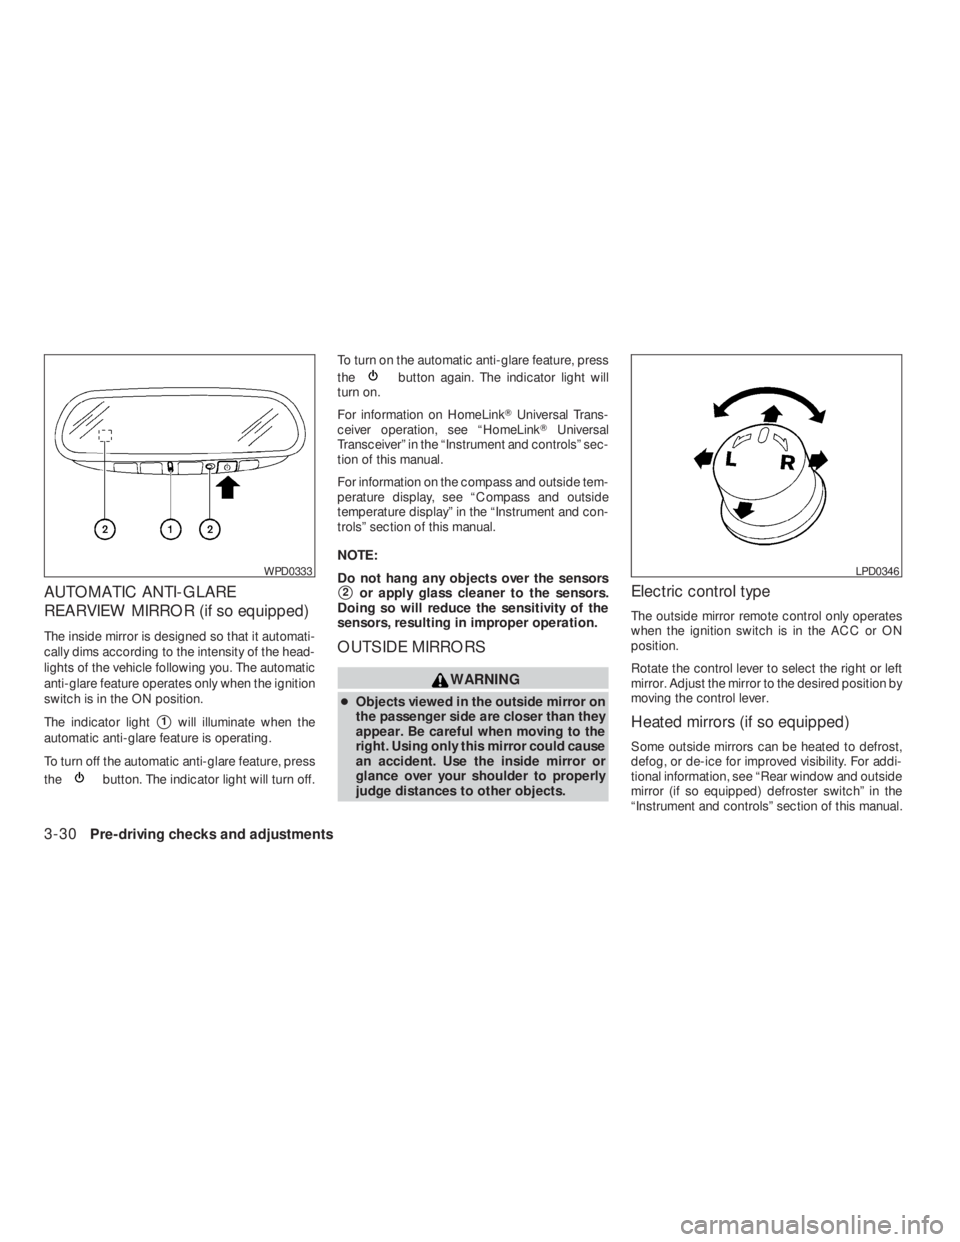
OUTSIDE MIRRORS
LPD0346
Page 164 of 374
...................4-8
How to read the displayed lines..................4-8
Adjusting the screen..........................")
button...................................4-7
RearView Monitor (if so equipped)...................4-8
How to read the displayed lines..................4-8
Adjusting the screen............................4-9
Operating tips..................................4-9
Vents...........................................4-10
Heater and air conditioner (manual)
(if so equipped)..................................4-11
Controls......................................4-11
Heater operation..............................4-12
Air conditioner operation.......................4-13
Air flow charts.................................4-14
Heater and air conditioner (automatic)
(if so equipped)..................................4-18
Automatic operation...........................4-18
Manual operation..............................4-19
Operating tips.................................4-20
Servicing air conditioner...........................4-20
Audio system (if so equipped)......................4-21
Radio........................................4-21FM radio reception............................4-21
AM radio reception............................4-21
Satellite radio reception (if so equipped).........4-22
Audio operation precautions....................4-22
FM/AM radio with compact disc (CD) player......4-27
FM/AM/SAT radio with compact disc (CD)
changer (if so equipped) . . .....................4-32
FM/AM/SAT radio with compact disc (CD)
changer (if so equipped) . . .....................4-38
CD care and cleaning..........................4-43
Steering wheel switch for audio control
(if so equipped)...............................4-44
Antenna......................................4-45
Car phone or CB radio............................4-45
Bluetooth�Hands-Free Phone System without
Navigation System (if so equipped).................4-46
Regulatory Information.........................4-48
Using the system..............................4-48
Control buttons...............................
4-50
Getting started................................4-51
List of voice commands........................4-53
Speaker adaptation (SA) mode..................4-58
Troubleshooting guide.........................4-60
�REVIEW COPY—2009 Altima(alt)
Owners Manual—USA_English(nna)
09/08/08—debbie
�
Page 168 of 374
button. The message “Re-
suming display” will appear and the Display
“ON” key will be automatically turned on, the
amber indicator will illuminate.
LHA0749
Page 169 of 374
key or thekey to choose
either the 12-hour clock display or the 24-hour
clock display.
Offset Adjust:
Touch the “–” key or the “+” key to adjust the time
by increasing or decreasing per minute.
Daylight Saving Time:
When this item is turned on, the daylight saving
time, application is enabled. To turn off daylight
saving time, touch the Daylight Saving Time “ON”
key; touch it again to enable daylight saving.
Time Zone:
Touch the “Time Zone” key, the Time Zone screen
will appear.
Select one of the following zones, depending on
the current location. Touch the “ON” key for the
particular time zone.
●Pacific zone
●Mountain zone
●Central zone
●Eastern zone
●Atlantic zone
●Newfoundland zone
LHA1005
Page 171 of 374
BUTTON
To change the display brightness, press
the
button. Pressing the button again will
change the display to the day
or the
night
display. Then, adjust the brightness
by touching the
key or thekey.
If no operation is done within 10 seconds, the
display will return to the previous display.
LHA1008
Page 172 of 374
CAUTION
There is a plastic cover over the camera.
Do not scratch the cover when cleaning
dirt or snow from the cover.
HOW TO READ THE DISPLAYED
LINES
Lines which indicate the vehicle clearance and
distances to objects with reference to the
bumper line
�Aare displayed on the monitor.They are indicated as reference distances to
objects. The lines and colors in the display indi-
cate distances from the back bumper line
�Ain
the illustration.
�11.5 ft (0.5 m) red
�23 ft (1 m) yellow
�37 ft (2 m) green
�410 ft (3 m) green
The vehicle clearance lines are wider than
the actual clearance.
Page 192 of 374

orto adjust Bass
and Treble to the desired level. You can also use
the TUNE/FF·REW button to adjust Fade and
Balance mode. Fade adjusts the sound level be-
tween the front and rear speakers and Balance
adjusts the sound between the right and left
speaker.
To turn the Beep sound off or on, press the
AUDIO button until Beep is displayed. Press the
TUNE/FF·REW button
oruntil the
desired mode is displayed. This turns on or turns
off the beep sound when audio buttons are
pressed.
Once you have adjusted the sound quality to the
desired level, press the AUDIO button repeatedly
until the radio or CD display reappears. Other-
wise, the radio or CD display will automatically
reappear after about 10 seconds.DISP (display) button:
Pressing the DISP (display) button will show text
about CD information in the audio display.
If the text information is to long to fully be dis-
played on the screen; press and hold the DISP
button for longer than 1.5 seconds to scroll
through the rest of the text.
CD display mode
To change the text displayed while playing a CD
with text, press the DISP button. The DISP button
will allow you to scroll
through CD text as follows: Track number and
Track time→Album title→Song title.
●Track number displays the track number se-
lected on the disc.
●Track time displays the amount of time the
track has played.
●Album title displays the title of the CD being
played.
●Song title displays the title of the selected
CD track.
Clock operation
Pressing the CLOCK button displays the clock
with the radio on or off. Press the CLOCK button
again to turn off the clock display.Clock set
1. Press and hold the CLOCK button for ap-
proximately 2 seconds.
2. The display will show “H-Seek M-Tune”.
3. Press the SEEK/TRACK button
orto adjust the hours.
4. Press TUNE/FF·REW button
orto adjust the minutes.
5. Press the CLOCK button again to exit the
clock set mode.
The display will return to the regular clock display
after 10 seconds, or you may press the CLOCK
button again to return to the regular clock display.
pause/mute button. Press thebutton again to resume the audio sound.
FM/AM radio operation
FM/AM band select:
Pressing the RADIO button will change the band
as follows:
AM←→FM
4-28Monitor, climate, audio, phone and voice recognition systems
�REVIEW COPY—2009 Altima(alt)
Owners Manual—USA_English(nna)
09/08/08—debbie
�