2009 NISSAN ALTIMA HYBRID driver seat adjustment
[x] Cancel search: driver seat adjustmentPage 28 of 353

1 Safety—Seats, seat belts and
supplemental restraint system
Seats............................................1-2
Front manual seat adjustment....................1-2
Front power seat adjustment
(if so equipped for driver’s seat)..................1-4
Center armrest.................................1-5
Head restraint adjustment.......................1-6
Front-seat Active Head Restraints................1-6
Seat belts........................................1-7
Precautions on seat belt usage...................1-7
Child safety...................................1-10
Pregnant women..............................1-11
Injured persons................................1-11
Three-point type seat belt with retractor..........1-11
Seat belt extenders............................1-14
Seat belt maintenance.........................1-14
Child restraints...................................1-15Precautions on child restraints..................1-15
LATCH (Lower Anchors and Tethers for
CHildren) System.............................1-17
Top tether strap child restraint..................1-18
Child restraint installation using LATCH..........1-19
Child restraint installation using the seat
belts.........................................1-23
Booster seats....................................1-29
Precautions on booster seats...................1-29
Booster seat installation........................1-32
Supplemental restraint system.....................1-34
Precautions on supplemental restraint
system.......................................1-34
Supplemental air bag warning labels.............1-48
Supplemental air bag warning light..............1-49
ZREVIEW COPYÐ2009 Altima Hybrid Electric
(ahv)
Owners ManualÐCanadian_French(fr_can)
06/14/08Ðdebbie
X
Page 30 of 353

Forward and backward
Pull the center of the bar up and hold it while you
slide the seat forward or backward to the desired
position. Release the lever to lock the seat in
position.
Reclining
To recline the seatback, pull the lever up and lean
back. To bring the seatback forward, pull the lever
up and lean your body forward. Release the lever
to lock the seatback in position.
The reclining feature allows adjustment of the
seatback for occupants of different sizes for
added comfort and to help obtain proper seat
belt fit. See “Precautions on seat belt usage” later
in this section. Also, the seatback can be reclined
to allow occupants to rest when the vehicle is
stopped and the transmission is in P (Park) .
Seat lifter (driver’s side)
Pull up or push down the adjusting lever to adjust
the seat height until the desired position is
achieved.
WRS0738WRS0739WRS0740
Safety—Seats, seat belts and supplemental restraint system1-3
ZREVIEW COPYÐ2009 Altima Hybrid Electric
(ahv)
Owners ManualÐCanadian_French(fr_can)
06/14/08Ðdebbie
X
Page 31 of 353

FRONT POWER SEAT
ADJUSTMENT (if so equipped for
driver’s seat)
Operating tips
cThe power seat motor has an auto-reset
overload protection circuit. If the motor
stops during operation, wait 30 seconds,
then reactivate the switch.cDo not operate the power seat switch for a
long period of time when the Hybrid System
is not in the READY mode. This will dis-
charge the vehicle battery.
Forward and backward
Moving the switch forward or backward will slide
the seat forward or backward to the desired
position.
Reclining
Move the recline switch backward until the de-
sired angle is obtained. To bring the seatback
forward again, move the switch forward and
move your body forward. The seatback will move
forward.
The reclining feature allows adjustment of the
seatback for occupants of different sizes for
added comfort and to help obtain proper seat
belt fit (see “Precautions on seat belt usage” later
in this section) . Also, the seatback can be re-
clined to allow occupants to rest when the ve-
hicle is stopped and the transmission is in P
(Park) .
WRS0751
1-4Safety—Seats, seat belts and supplemental restraint system
ZREVIEW COPYÐ2009 Altima Hybrid Electric
(ahv)
Owners ManualÐCanadian_French(fr_can)
06/14/08Ðdebbie
X
Page 41 of 353

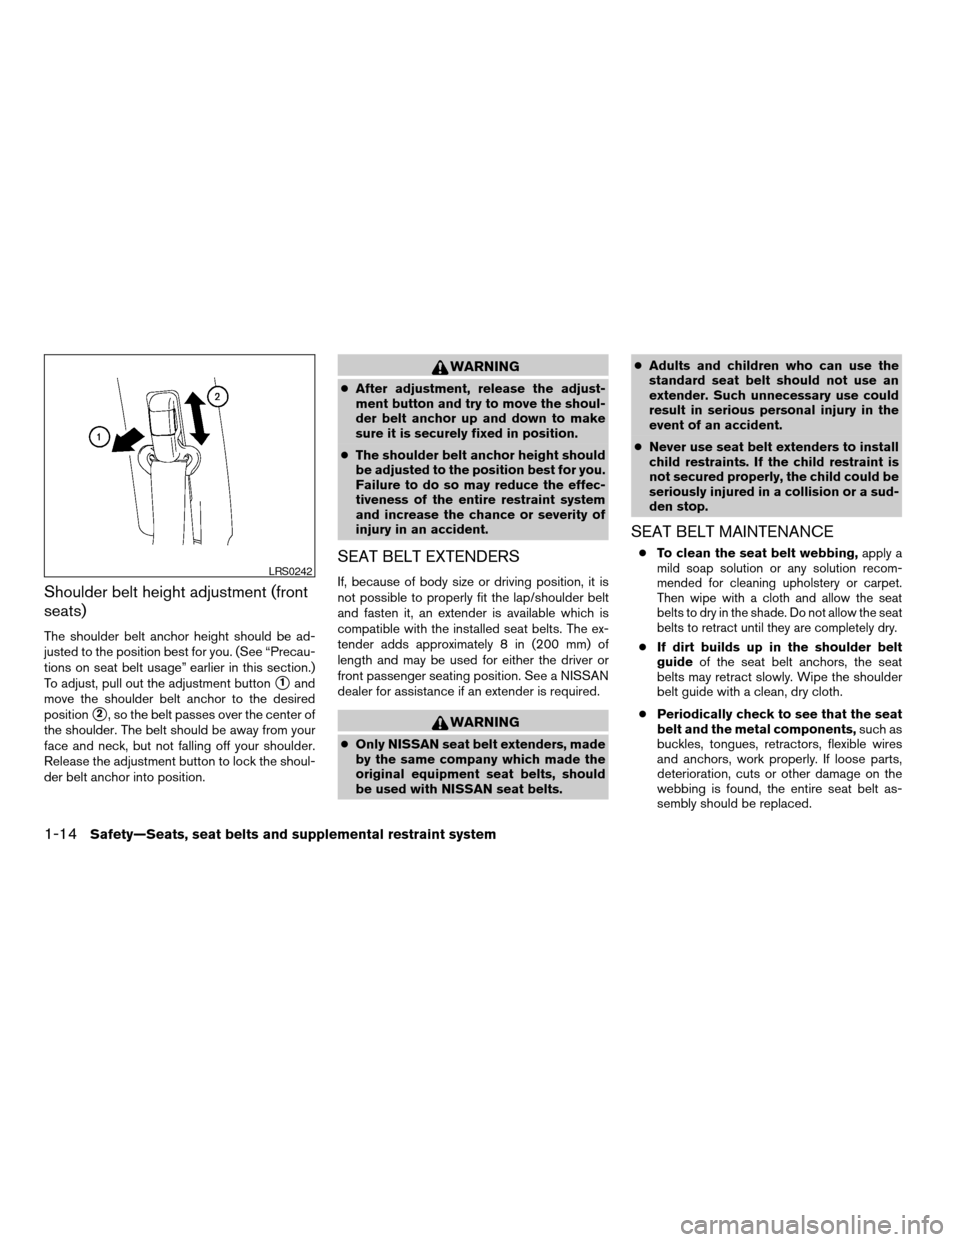
Shoulder belt height adjustment (front
seats)
The shoulder belt anchor height should be ad-
justed to the position best for you. (See “Precau-
tions on seat belt usage” earlier in this section.)
To adjust, pull out the adjustment button
s1and
move the shoulder belt anchor to the desired
position
s2, so the belt passes over the center of
the shoulder. The belt should be away from your
face and neck, but not falling off your shoulder.
Release the adjustment button to lock the shoul-
der belt anchor into position.
WARNING
cAfter adjustment, release the adjust-
ment button and try to move the shoul-
der belt anchor up and down to make
sure it is securely fixed in position.
cThe shoulder belt anchor height should
be adjusted to the position best for you.
Failure to do so may reduce the effec-
tiveness of the entire restraint system
and increase the chance or severity of
injury in an accident.
SEAT BELT EXTENDERS
If, because of body size or driving position, it is
not possible to properly fit the lap/shoulder belt
and fasten it, an extender is available which is
compatible with the installed seat belts. The ex-
tender adds approximately 8 in (200 mm) of
length and may be used for either the driver or
front passenger seating position. See a NISSAN
dealer for assistance if an extender is required.
WARNING
cOnly NISSAN seat belt extenders, made
by the same company which made the
original equipment seat belts, should
be used with NISSAN seat belts.cAdults and children who can use the
standard seat belt should not use an
extender. Such unnecessary use could
result in serious personal injury in the
event of an accident.
cNever use seat belt extenders to install
child restraints. If the child restraint is
not secured properly, the child could be
seriously injured in a collision or a sud-
den stop.
SEAT BELT MAINTENANCE
cTo clean the seat belt webbing,apply a
mild soap solution or any solution recom-
mended for cleaning upholstery or carpet.
Then wipe with a cloth and allow the seat
belts to dry in the shade. Do not allow the seat
belts to retract until they are completely dry.
cIf dirt builds up in the shoulder belt
guideof the seat belt anchors, the seat
belts may retract slowly. Wipe the shoulder
belt guide with a clean, dry cloth.
cPeriodically check to see that the seat
belt and the metal components,such as
buckles, tongues, retractors, flexible wires
and anchors, work properly. If loose parts,
deterioration, cuts or other damage on the
webbing is found, the entire seat belt as-
sembly should be replaced.
LRS0242
1-14Safety—Seats, seat belts and supplemental restraint system
ZREVIEW COPYÐ2009 Altima Hybrid Electric
(ahv)
Owners ManualÐCanadian_French(fr_can)
06/14/08Ðdebbie
X
Page 93 of 353

WARNING
cIf the light does not illuminate with the
ignition switch placed in the ON posi-
tion, have the vehicle checked by a
NISSAN dealer as soon as possible.
cIf the light illuminates while driving,
avoid sudden steering maneuvers or
abrupt braking, reduce vehicle speed,
pull off the road to a safe location and
stop the vehicle as soon as possible.
Driving with under-inflated tires may
permanently damage the tires and in-
crease the likelihood of tire failure. Se-
rious vehicle damage could occur and
may lead to an accident and could re-
sult in serious personal injury. Check
the tire pressure for all four tires. Adjust
the tire pressure to the recommended
COLD tire pressure shown on the Tire
and Loading Information label located
in the driver’s door opening to turn the
low tire pressure warning light OFF. If
the light still illuminates while driving
after adjusting the tire pressure, a tire
may be flat. If you have a flat tire, re-
place it with a spare tire as soon as
possible.cWhen a spare tire is mounted or a wheel
is replaced tire pressure will not be in-
dicated, the TPMS will not function and
the low tire pressure warning light will
flash for approximately 1 minute. The
light will remain on after 1 minute. Con-
tact your NISSAN dealer as soon as
possible for tire replacement and/or
system resetting.
cReplacing tires with those not originally
specified by NISSAN could affect the
proper operation of the TPMS.
CAUTION
cThe TPMS is not a substitute for the
regular tire pressure check. Be sure to
check the tire pressure regularly.
cIf the vehicle is being driven at speeds
of less than 16 MPH (25 km/h) , the
TPMS may not operate correctly.
cBe sure to install the specified size of
tires to the 4 wheels correctly.
Master warning light
This light comes on when various vehicle infor-
mation display warnings appear.
NISSAN Intelligent Key™
warning light
The Intelligent Key warning light warns of a mal-
function with the electrical steering lock system
or the Intelligent Key system.
After the ignition switch is placed in the ON
position, this light comes on for about 2 seconds
and then turns off.
If the light comes on while the Hybrid System is
stopped, it may not be possible to free the steer-
ing lock or to start the Hybrid System. If the light
comes on while the Hybrid System is running,
you can drive the vehicle. However, in these
cases, contact a Nissan dealer for repair as soon
as possible.
See “NISSAN Intelligent Key™” in the “Pre-
driving checks and adjustments” section.
Seat belt warning light and
chime
The light and chime remind you to fasten your
seat belts. The light illuminates whenever the
ignition switch is placed in the ON or START
position and remains illuminated until the driver’s
seat belt is fastened. At the same time, the chime
sounds for about 6 seconds unless the driver’s
seat belt is securely fastened.
2-14Instruments and controls
ZREVIEW COPYÐ2009 Altima Hybrid Electric
(ahv)
Owners ManualÐCanadian_French(fr_can)
06/16/08Ðdebbie
X
Page 135 of 353

Any key that is not given to your dealer at the time
of registration will no longer be able to start your
vehicle.
Do not allow the immobilizer system key, which
contains an electrical transponder, to come into
contact with salt water. This could affect system
function.WARNING
cAlways have the doors locked while
driving. Along with the use of seat belts,
this provides greater safety in the event
of an accident by helping to prevent
persons from being thrown from the
vehicle. This also helps keep children
and others from unintentionally open-
ing the doors, and will help keep out
intruders.
cBefore opening any door, always look
for and avoid oncoming traffic.
cDo not leave children unattended inside
the vehicle. They could unknowingly ac-
tivate switches or controls. Unattended
children could become involved in seri-
ous accidents.
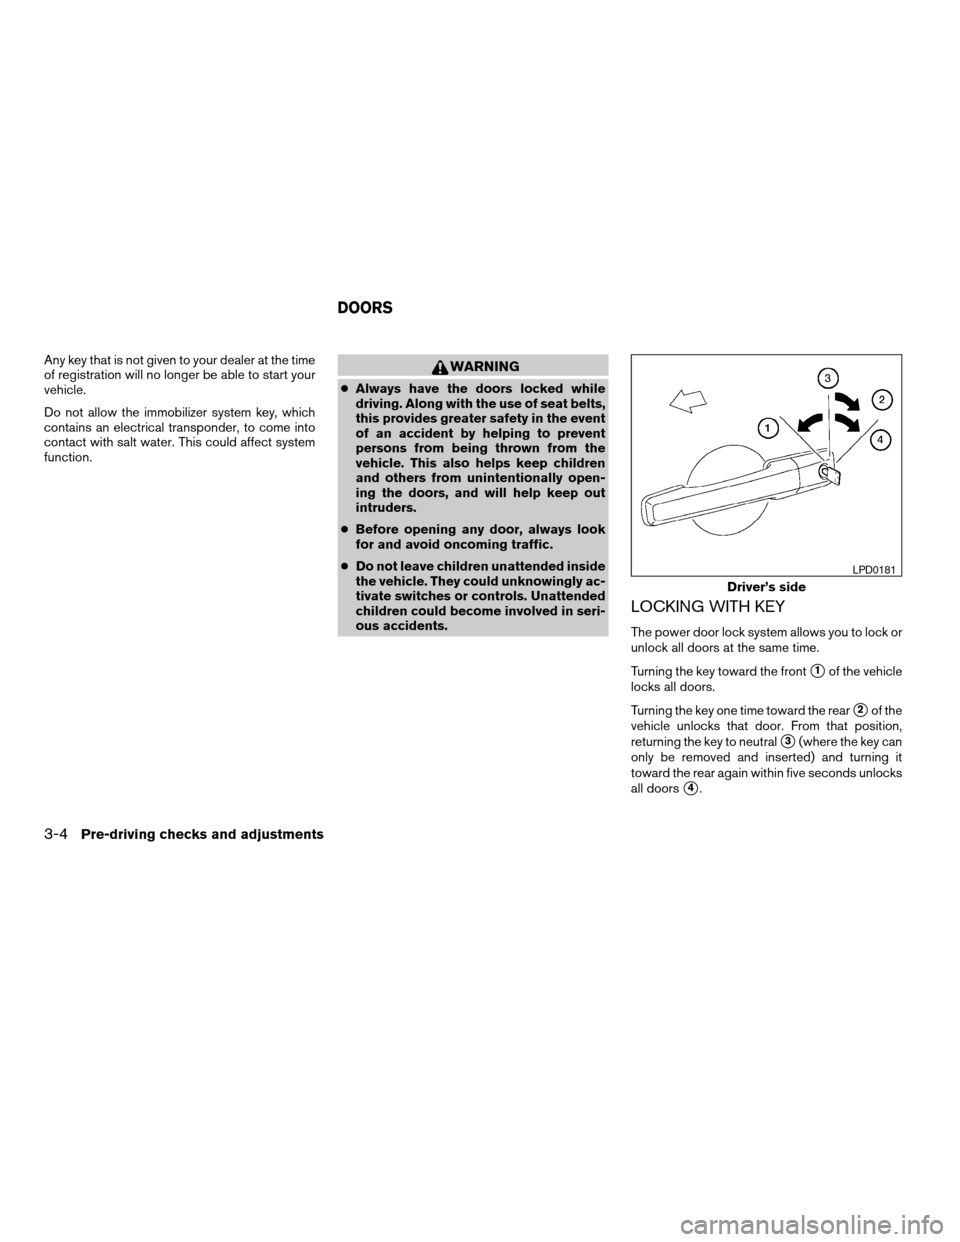
LOCKING WITH KEY
The power door lock system allows you to lock or
unlock all doors at the same time.
Turning the key toward the front
s1of the vehicle
locks all doors.
Turning the key one time toward the rear
s2of the
vehicle unlocks that door. From that position,
returning the key to neutral
s3(where the key can
only be removed and inserted) and turning it
toward the rear again within five seconds unlocks
all doors
s4.
Driver’s side
LPD0181
DOORS
3-4Pre-driving checks and adjustments
ZREVIEW COPYÐ2009 Altima Hybrid Electric
(ahv)
Owners ManualÐCanadian_French(fr_can)
06/16/08Ðdebbie
X
Page 152 of 353

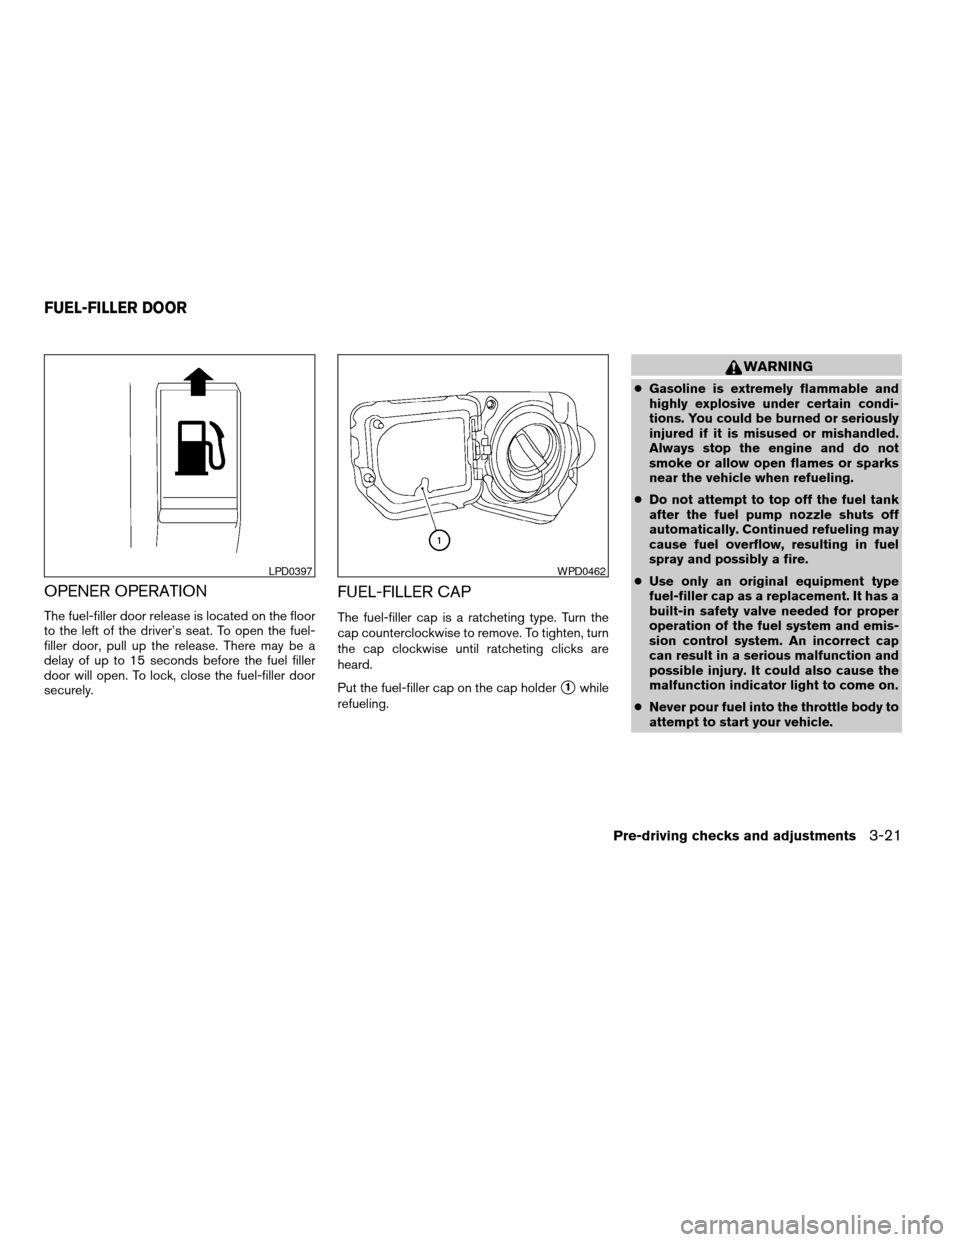
OPENER OPERATION
The fuel-filler door release is located on the floor
to the left of the driver’s seat. To open the fuel-
filler door, pull up the release. There may be a
delay of up to 15 seconds before the fuel filler
door will open. To lock, close the fuel-filler door
securely.
FUEL-FILLER CAP
The fuel-filler cap is a ratcheting type. Turn the
cap counterclockwise to remove. To tighten, turn
the cap clockwise until ratcheting clicks are
heard.
Put the fuel-filler cap on the cap holder
s1while
refueling.
WARNING
cGasoline is extremely flammable and
highly explosive under certain condi-
tions. You could be burned or seriously
injured if it is misused or mishandled.
Always stop the engine and do not
smoke or allow open flames or sparks
near the vehicle when refueling.
cDo not attempt to top off the fuel tank
after the fuel pump nozzle shuts off
automatically. Continued refueling may
cause fuel overflow, resulting in fuel
spray and possibly a fire.
cUse only an original equipment type
fuel-filler cap as a replacement. It has a
built-in safety valve needed for proper
operation of the fuel system and emis-
sion control system. An incorrect cap
can result in a serious malfunction and
possible injury. It could also cause the
malfunction indicator light to come on.
cNever pour fuel into the throttle body to
attempt to start your vehicle.
LPD0397WPD0462
FUEL-FILLER DOOR
Pre-driving checks and adjustments3-21
ZREVIEW COPYÐ2009 Altima Hybrid Electric
(ahv)
Owners ManualÐCanadian_French(fr_can)
06/16/08Ðdebbie
X