2009 NISSAN ALTIMA COUPE seat adjustment
[x] Cancel search: seat adjustmentPage 135 of 373
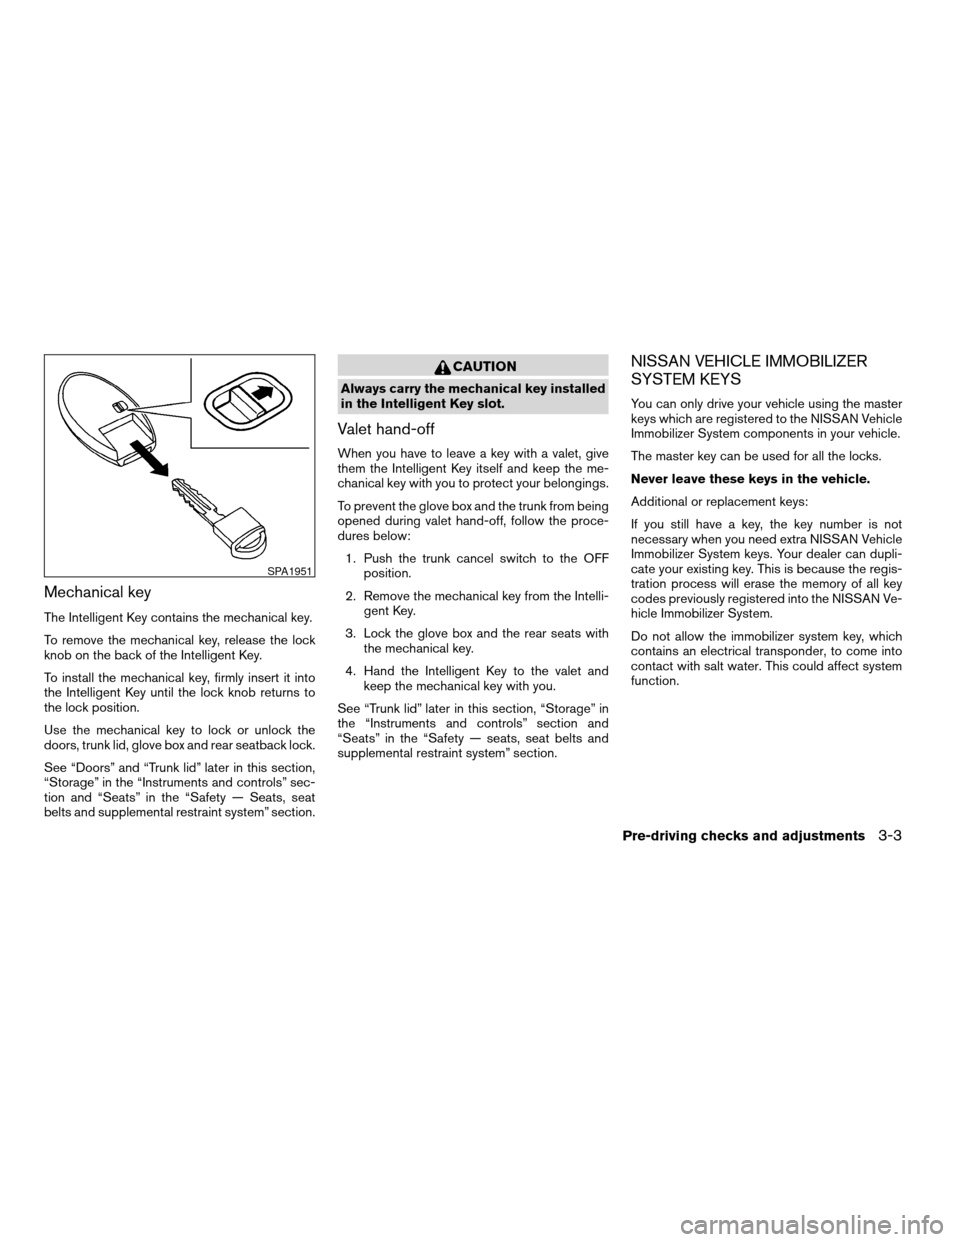
Mechanical key
The Intelligent Key contains the mechanical key.
To remove the mechanical key, release the lock
knob on the back of the Intelligent Key.
To install the mechanical key, firmly insert it into
the Intelligent Key until the lock knob returns to
the lock position.
Use the mechanical key to lock or unlock the
doors, trunk lid, glove box and rear seatback lock.
See “Doors” and “Trunk lid” later in this section,
“Storage” in the “Instruments and controls” sec-
tion and “Seats” in the “Safety — Seats, seat
belts and supplemental restraint system” section.
CAUTION
Always carry the mechanical key installed
in the Intelligent Key slot.
Valet hand-off
When you have to leave a key with a valet, give
them the Intelligent Key itself and keep the me-
chanical key with you to protect your belongings.
To prevent the glove box and the trunk from being
opened during valet hand-off, follow the proce-
dures below:
1. Push the trunk cancel switch to the OFF
position.
2. Remove the mechanical key from the Intelli-
gent Key.
3. Lock the glove box and the rear seats with
the mechanical key.
4. Hand the Intelligent Key to the valet and
keep the mechanical key with you.
See “Trunk lid” later in this section, “Storage” in
the “Instruments and controls” section and
“Seats” in the “Safety — seats, seat belts and
supplemental restraint system” section.
NISSAN VEHICLE IMMOBILIZER
SYSTEM KEYS
You can only drive your vehicle using the master
keys which are registered to the NISSAN Vehicle
Immobilizer System components in your vehicle.
The master key can be used for all the locks.
Never leave these keys in the vehicle.
Additional or replacement keys:
If you still have a key, the key number is not
necessary when you need extra NISSAN Vehicle
Immobilizer System keys. Your dealer can dupli-
cate your existing key. This is because the regis-
tration process will erase the memory of all key
codes previously registered into the NISSAN Ve-
hicle Immobilizer System.
Do not allow the immobilizer system key, which
contains an electrical transponder, to come into
contact with salt water. This could affect system
function.
SPA1951
Pre-driving checks and adjustments3-3
ZREVIEW COPYÐ2009 Altima(alt)
Owners Manual(owners)ÐUSA_English(nna)
02/03/09Ðdebbie
X
Page 136 of 373

WARNING
cAlways have the doors locked while
driving. Along with the use of seat belts,
this provides greater safety in the event
of an accident by helping to prevent
persons from being thrown from the
vehicle. This also helps keep children
and others from unintentionally open-
ing the doors, and will help keep out
intruders.
cBefore opening any door, always look
for and avoid oncoming traffic.
cDo not leave children unattended inside
the vehicle. They could unknowingly ac-
tivate switches or controls. Unattended
children could become involved in seri-
ous accidents.
LOCKING WITH KEY
The power door lock system allows you to lock or
unlock all doors at the same time.
Turning the key toward the front
s1of the vehicle
locks all doors.
Turning the key one time toward the rear
s2of the
vehicle unlocks that door. From that position,
returning the key to neutral
s3(where the key can
only be removed and inserted) and turning it
toward the rear again within 5 seconds unlocks
all doors
s4.
Opening and closing windows (if so
equipped)
The driver’s door key operation allows you to
open and close windows equipped with auto-
matic operation at the same time.
cTo open the windows, turn the door key
toward the rear of the vehicle forlonger
than 1 secondafter the door is unlocked.
Driver’s side
LPD0181
DOORS
3-4Pre-driving checks and adjustments
ZREVIEW COPYÐ2009 Altima(alt)
Owners Manual(owners)ÐUSA_English(nna)
02/03/09Ðdebbie
X
Page 156 of 373

cClosely supervise children when they
are around cars to prevent them from
playing and becoming locked in the
trunk where they could be seriously in-
jured. Keep the car locked, with the rear
seatback and trunk lid securely latched
when not in use, and prevent children’s
access to car keys.
To open the trunk lid, push the opener switch
down.
To close the trunk lid, lower and push the trunk lid
down securely.
NOTE:
You can open the trunk lid with the Intelli-
gent Key. Refer to “NISSAN Intelligent
Key™” earlier in this section.
Cancel switch (if so equipped)
When the switch, located inside the glove box, is
in the OFF position, the power to the trunk lid will
be cancelled. The trunk can only be opened with
the master key or keyfob.
The trunk lid cannot be opened when:
cusing the trunk lid release switch,
cthe trunk open request switch is pressed,
when the Intelligent Key is in range of the
vehicle or
cthe HOLD button on the Intelligent Key is
pressed.
INTERIOR TRUNK LID RELEASE
WARNING
Closely supervise children when they are
around cars to prevent them from playing
and becoming locked in the trunk where
they could be seriously injured. Keep the
car locked, with the rear seatback and
trunk lid securely latched when not in use,
and prevent children’s access to car keys.
The interior trunk lid release mechanism provides
a means of escape for children and adults in the
event they become locked inside the trunk.
LPD0395LPD0396
3-24Pre-driving checks and adjustments
ZREVIEW COPYÐ2009 Altima(alt)
Owners Manual(owners)ÐUSA_English(nna)
02/03/09Ðdebbie
X
Page 157 of 373

To open the trunk from the inside, pull the illumi-
nated release handle until the lock releases and
push up on the trunk lid. The release handle is
made of a material that glows in the dark after a
brief exposure to ambient light.
The handle is located inside the trunk compart-
ment on the interior of the trunk lid.
OPENER OPERATION
The fuel-filler door release is located on the floor
to the left of the driver’s seat. To open the fuel-
filler door, pull up the release. To lock, close the
fuel-filler door securely.FUEL-FILLER CAP
The fuel-filler cap is a ratcheting type. Turn the
cap counterclockwise to remove. To tighten, turn
the cap clockwise until ratcheting clicks are
heard.
For the Coupe model, put the fuel-filler cap on the
cap holder
s1while refueling.
For the Sedan model, loop the tether strap
around the hook
s1while refueling.
LPD0397
Coupe
LPD0448
FUEL-FILLER DOOR
Pre-driving checks and adjustments3-25
ZREVIEW COPYÐ2009 Altima(alt)
Owners Manual(owners)ÐUSA_English(nna)
02/03/09Ðdebbie
X
Page 159 of 373

TILT OPERATION
Pull the levers1all the way toward you and
adjust the steering wheel up or down
s2to the
desired position. Lock the wheel by releasing the
lever and ensure that the lever has returned to its
original position.
WARNING
Do not adjust the steering wheel while
driving. You could lose control of your
vehicle and cause an accident.
TELESCOPIC OPERATION
Pull the levers1all the way toward you and
adjust the steering wheel forward or backward in
direction
s3, to the desired position. Lock the
wheel by releasing the lever and ensure that the
lever has returned to its original position.
WARNING
Do not adjust the steering wheel any
closer to you than is necessary for proper
steering operation and comfort. The driv-
er’s air bag inflates with great force. If you
are unrestrained, leaning forward, sitting
sideways or out of position in any way, you
are at greater risk of injury or death in a
crash. You may also receive serious or
fatal injuries from the air bag if you are up
against it when it inflates. Always sit back
against the seatback and as far away as
practical from the steering wheel. Always
use the seat belts.
s1To block glare from the front, swing down the
main sun visor.
s2To block glare from the side, remove the sun
visor from the center mount and swing the
sun visor to the side.
LPD0398
Coupe shown, sedan similar
WPD0435
TILT/TELESCOPIC STEERING
COLUMNSUN VISORS
Pre-driving checks and adjustments3-27
ZREVIEW COPYÐ2009 Altima(alt)
Owners Manual(owners)ÐUSA_English(nna)
02/03/09Ðdebbie
X
Page 293 of 373

When driving in areas using road salt or other
corrosive materials, check lubrication frequently.
Lights*Clean the headlights on a regular basis.
Make sure that the headlights, stop lights, tail
lights, turn signal lights, and other lights are all
operating properly and installed securely. Also
check headlight aim.
Road wheel nuts (lug nuts)*When checking
the tires, make sure no wheel nuts are missing,
and check for any loose wheel nuts. Tighten if
necessary.
Tire rotation*Tires should be rotated every
7,500 miles (12,000 km) .
Tires*Check the pressure with a gauge often
and always prior to long distance trips. If neces-
sary, adjust the pressure in all tires, including the
spare, to the pressure specified. Check carefully
for damage, cuts or excessive wear.
Tire Pressure Monitoring System (TPMS)
transmitter componentsReplace the TPMS
transmitter grommet seal, valve core and cap
when the tires are replaced due to wear or age.
Wheel alignment and balanceIf the vehicle
should pull to either side while driving on a
straight and level road, or if you detect uneven or
abnormal tire wear, there may be a need for wheelalignment. If the steering wheel or seat vibrates at
normal highway speeds, wheel balancing may be
needed.
cFor additional information regarding tires,
refer to “Important Tire Safety Information”
(US) or “Tire Safety Information” (Canada) in
the Warranty Information Booklet.
WindshieldClean the windshield on a regular
basis. Check the windshield at least every six
months for cracks or other damage. Have a dam-
aged windshield repaired by a qualified repair
facility.
Windshield wiper blades*Check for cracks or
wear if they do not wipe properly.
Inside the vehicle
The maintenance items listed here should be
checked on a regular basis, such as when per-
forming periodic maintenance, cleaning the ve-
hicle, etc.
Additional information on the following
items with an “*” is found later in this sec-
tion.
Accelerator pedalCheck the pedal for smooth
operation and make sure the pedal does not bind
or require uneven effort. Keep the floor mat away
from the pedal.Brake pedalCheck the pedal for smooth opera-
tion. If the brake pedal suddenly goes down fur-
ther than normal, the pedal feels spongy or the
vehicle seems to take longer to stop, see a
NISSAN dealer immediately. Keep the floor mat
away from the pedal.
BrakesCheck that the brakes do not pull the
vehicle to one side when applied.
Continuously Variable Transmission (CVT)
P (Park) position mechanismOn a fairly
steep hill, check that the vehicle is held securely
with the shift selector in the P (Park) position
without applying any brakes.
Parking brakeCheck the parking brake opera-
tion regularly. The vehicle should be securely held
on a fairly steep hill with only the parking brake
applied. If the parking brake needs adjustment,
see a NISSAN dealer.
SeatsCheck seat position controls such as seat
adjusters, seatback recliner, etc., to ensure they
operate smoothly and all latches lock securely in
every position. Check that the head restraints
move up and down smoothly and the locks (if so
equipped) hold securely in all latched positions.
Seat beltsCheck that all parts of the seat belt
system (for example, buckles, anchors, adjusters
and retractors) operate properly and smoothly,
Maintenance and do-it-yourself8-3
ZREVIEW COPYÐ2009 Altima(alt)
Owners Manual(owners)ÐUSA_English(nna)
02/03/09Ðdebbie
X
Page 368 of 373

Vehicle identification number (VIN) plate . .9-9
Warning labels (for SRS)..........1-58
Language setting.................4-6
LATCH (Lower Anchors and Tethers
for CHildren) System..............1-25
License plate
Installing the license plate.........9-12
Light
Air bag warning light.........1-58, 2-14
Brake light (See stop light).........8-28
Bulb check/instrument panel........2-10
Bulb replacement..............8-28
Charge warning light............2-11
Console light................2-49
Fog light switch...............2-33
Headlight and turn signal switch......2-29
Headlight control switch..........2-29
Headlights..................8-27
Interior light.................2-48
Light bulbs..................8-27
Low tire pressure warning light......2-12
Low washer fluid warning light.......2-23
Passenger air bag and status light.....1-53
Security indicator light...........2-15
Spotlights (See map light).........2-50
Trunk light..................2-50
Warning/indicator lights and audible
reminders..................2-10
Lights
Map lights..................2-50
Lock
Child safety rear door lock..........3-6
Door locks..................3-4
Fuel-filler door lock opener lever......3-25
Glove box lock...............2-41
Power door locks...............3-5Trunk lid lock opener lever.........3-23
Low fuel warning light..........2-13, 2-23
Low tire pressure warning light........2-12
Low washer fluid warning light.........2-23
Luggage (See vehicle loading information) . .9-12
M
Maintenance
General maintenance............8-2
Inside the vehicle...............8-3
Maintenance precautions..........8-5
Outside the vehicle..............8-2
Seat belt maintenance...........1-23
Under the hood and vehicle.........8-4
Malfunction indicator light...........2-14
Manual front seat adjustment..........1-2
Map lights....................2-50
Map pocket...................2-37
Meters and gauges................2-3
Instrument brightness control.......2-32
Mirror
Automatic anti-glare inside mirror.....3-29
Inside mirror.................3-28
Outside mirrors...............3-29
Vanity mirror.................3-28
N
NISSAN Intelligent Key™............3-17
NISSAN vehicle immobilizer system . . .2-26, 3-3
NISSAN voice recognition system.......4-69O
Octane rating (See fuel octane rating).....9-4
Odometer.....................2-4
Oil
Capacities and recommended
fuel/lubricants.................9-2
Changing engine oil............8-10
Changing engine oil filter..........8-12
Checking engine oil level..........8-9
Engine oil...................8-9
Engine oil and oil filter recommendation . .9-5
Engine oil viscosity..............9-5
Outside mirrors.................3-29
Overheat
If your vehicle overheats...........6-9
Owner’s manual order form..........9-27
Owner’s manual/service manual order
information....................9-27
P
Parking
Parking brake operation..........5-18
Parking/parking on hills...........5-22
Phone, BluetoothThands-free
system..................4-46, 4-61
Power
Power door locks...............3-5
Power outlet.................2-36
Power rear windows............2-45
Power steering fluid.............8-13
Power steering system...........5-23
Power windows...............2-44
10-4
ZREVIEW COPYÐ2009 Altima(alt)
Owners Manual(owners)ÐUSA_English(nna)
02/03/09Ðdebbie
X
Page 369 of 373
Rear power windows............2-45
Precautions
Maintenance precautions..........8-5
Precautions on child
restraints............1-23, 1-33, 1-39
Precautions on seat belt usage......1-15
Precautions on supplemental restraint
system....................1-43
Precautions when starting and driving . . .5-2
Programmable features.............4-3
Push starting...................6-9
R
Radio
Car phone or CB radio...........4-45
Compact Disc (CD) changer. . . .4-34, 4-40
FM-AM radio with compact disc
(CD) player.................4-27
FM/AM/SAT radio with compact disc
(CD) changer.............4-31, 4-38
Readiness for inspection maintenance
(I/M) test.....................9-26
Rear power windows..............2-45
Rear seat.....................1-9
Rear window and outside mirror defroster
switch......................2-28
RearView Monitor................4-8
Recorders
Event data..................9-27
Refrigerant recommendation..........9-6
Registering your vehicle in another country. . .9-9
Reporting safety defects (US only)......9-25S
Safety
Child safety rear door lock..........3-6
Child seat belts........1-23, 1-33, 1-39
Reporting safety defects (US only). . . .9-25
Seat adjustment
Front manual seat adjustment........1-2
Front power seat adjustment........1-4
Rear seat adjustment.............1-9
Seat belt
Child safety.................1-18
Infants and small children.........1-18
Injured Person................1-19
Larger children...............1-18
Precautions on seat belt usage......1-15
Pregnant women..............1-19
Seat belt extenders.............1-22
Seat belt maintenance...........1-23
Seat belts..................1-15
Shoulder belt height adjustment......1-22
Three-point type with retractor.......1-19
Seat belt warning light.............2-13
Seatback pockets................2-37
Seats
Adjustment..................1-2
Front seats..................1-2
Heated seats................2-34
Manual front seat adjustment........1-2
Rear seat...................1-9
Security indicator light.............2-15
Security system (NISSAN vehicle immobilizer
system) , engine start...........2-26, 3-3
Self-adjusting brakes..............8-21
Service manual order form...........9-27Servicing air conditioner............4-20
Setup button...................4-3
Shift lock release................5-14
Shifting
Continuously Variable Transmission
(CVT)....................5-12
Manual transmission............5-16
Shoulder belt height adjustment........1-22
Spark plug replacement............8-18
Speedometer...................2-4
Spotlights (See map light)...........2-50
SRS warning label...............1-58
Starting
Before starting the engine.........5-10
Jump starting.................6-7
Precautions when starting and driving . . .5-2
Push starting.................6-9
Starting the engine.............5-10
Startup screen..................4-3
Steering
Power steering fluid.............8-13
Power steering system...........5-23
Stop light....................8-28
Storage.....................2-37
Sun visors....................3-27
Sunglasses case................2-38
Sunglasses holder...............2-38
Sunroof.....................2-46
Supplemental air bag warning light . . .1-58, 2-14
Supplemental front impact air bag system . .1-52
Supplemental restraint system
Information and warning labels.......1-58
Precautions on supplemental restraint
system....................1-43
Supplemental restraint system
(Supplemental air bag system).........1-43
10-5
ZREVIEW COPYÐ2009 Altima(alt)
Owners Manual(owners)ÐUSA_English(nna)
02/03/09Ðdebbie
X