2009 NISSAN ALTIMA COUPE battery
[x] Cancel search: batteryPage 144 of 373
cPlacing the ignition switch in the ON posi-
tion.
cLocking the doors with the remote controller.
cSwitching the room light switch to the OFF
position.
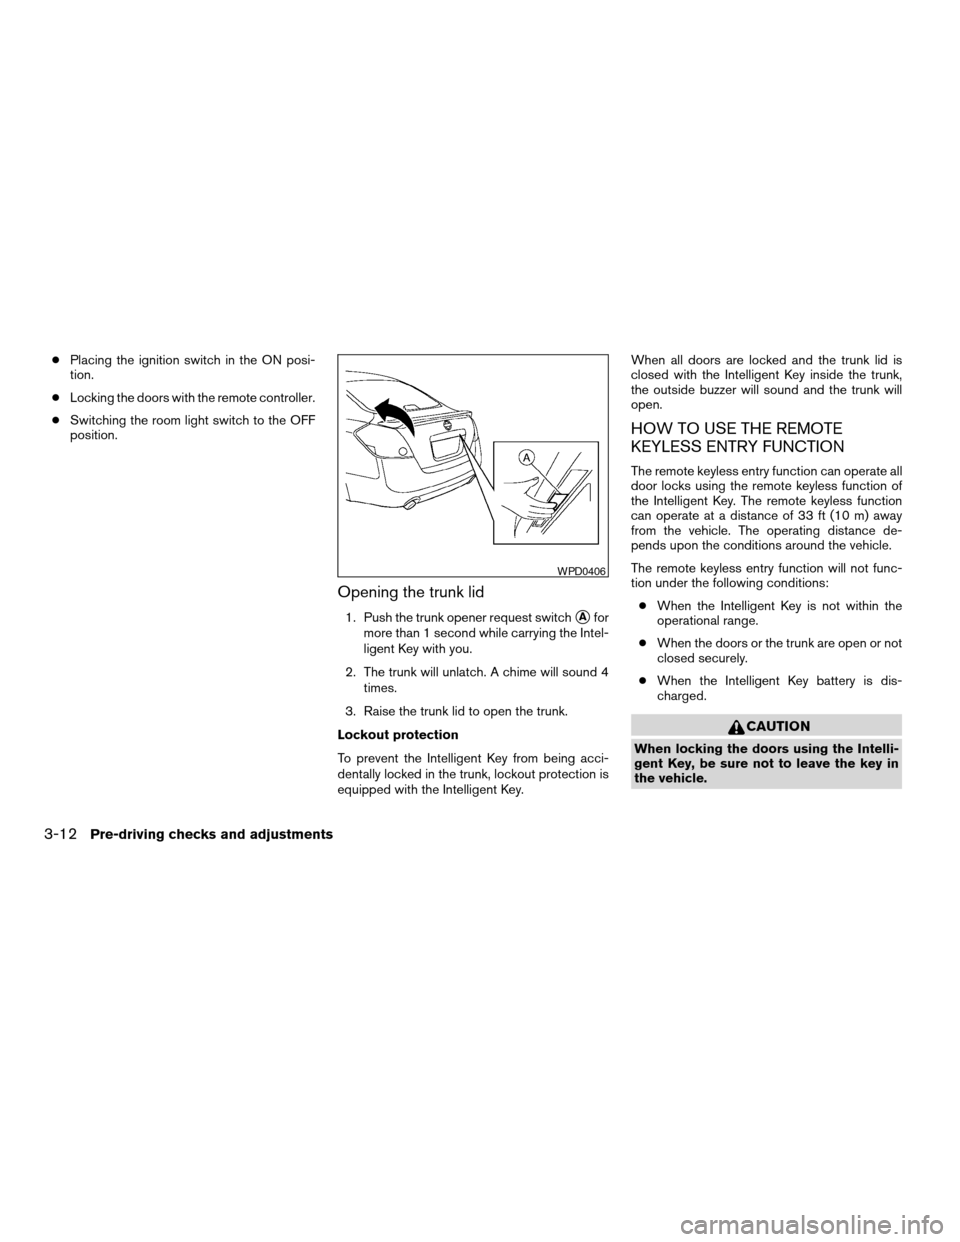
Opening the trunk lid
1. Push the trunk opener request switchsAfor
more than 1 second while carrying the Intel-
ligent Key with you.
2. The trunk will unlatch. A chime will sound 4
times.
3. Raise the trunk lid to open the trunk.
Lockout protection
To prevent the Intelligent Key from being acci-
dentally locked in the trunk, lockout protection is
equipped with the Intelligent Key.When all doors are locked and the trunk lid is
closed with the Intelligent Key inside the trunk,
the outside buzzer will sound and the trunk will
open.
HOW TO USE THE REMOTE
KEYLESS ENTRY FUNCTION
The remote keyless entry function can operate all
door locks using the remote keyless function of
the Intelligent Key. The remote keyless function
can operate at a distance of 33 ft (10 m) away
from the vehicle. The operating distance de-
pends upon the conditions around the vehicle.
The remote keyless entry function will not func-
tion under the following conditions:
cWhen the Intelligent Key is not within the
operational range.
cWhen the doors or the trunk are open or not
closed securely.
cWhen the Intelligent Key battery is dis-
charged.
CAUTION
When locking the doors using the Intelli-
gent Key, be sure not to leave the key in
the vehicle.
WPD0406
3-12Pre-driving checks and adjustments
ZREVIEW COPYÐ2009 Altima(alt)
Owners Manual(owners)ÐUSA_English(nna)
02/03/09Ðdebbie
X
Page 149 of 373
WARNING
cRadio waves could adversely affect elec-
tric medical equipment. Those who use a
pacemaker should contact the electric
medical equipment manufacturer for the
possible influences before use.
cThe Intelligent Key transmits radio
waves when the buttons are pushed.
The FAA advises the radio waves may
affect aircraft navigation and communi-
cation systems. Do not operate the In-
telligent Key while on an airplane. Make
sure the buttons are not operated unin-
tentionally when the unit is stored for a
flight.
The Intelligent Key can operate all the door locks
using the remote controller function. The operat-
ing environment and/or conditions may affect the
Intelligent Key operation.
Be sure to read the following before using the
Intelligent Key.
CAUTION
cBe sure to carry the Intelligent Key with
you when operating the vehicle.
cNever leave the Intelligent Key in the
vehicle when you leave the vehicle.The Intelligent Key is always communicating with
the vehicle as it receives radio waves. The Intel-
ligent Key transmits weak radio waves. Environ-
mental conditions may interfere with the opera-
tion of the Intelligent Key under the following
operating conditions:
cWhen operating near a location where
strong radio waves are transmitted, such as
a TV tower, power station and broadcasting
station.
cWhen in possession of wireless equipment,
such as a cellular telephone, transceiver,
and CB radio.
cWhen the Intelligent Key is in contact with or
covered by metallic materials.
cWhen any type of radio wave remote control
is used nearby.
cWhen the Intelligent Key is placed near an
electric appliance such as a personal com-
puter.
cWhen the vehicle is parked near a parking
meter.
In such cases, correct the operating conditions
before using the Intelligent Key function or use
the mechanical key.Although the life of the battery varies depending
on the operating conditions, the battery’s life is
approximately 2 years. If the battery is dis-
charged, replace it with a new one.
When the Intelligent Key battery is almost dis-
charged, insert the Intelligent Key into the Intelli-
gent Key port to start the engine. Replace the
discharged battery with a new one as soon as
possible. For more details, see “Push-button ig-
nition switch” in the “Starting and driving” sec-
tion.
Since the Intelligent Key is continuously receiving
radio waves, if the key is left near equipment
which transmits strong radio waves, such as sig-
nals from a TV and personal computer, the bat-
tery life may become shorter.
For information regarding replacement of a bat-
tery, see “Battery replacement” in the “Mainte-
nance and do-it-yourself” section.
Because the steering wheel is locked electrically,
unlocking the steering wheel with the ignition
switch in the LOCK position is impossible when
the vehicle battery is completely discharged. Un-
locking the steering wheel is impossible even if
the Intelligent Key is inserted into the Intelligent
Key port. Pay special attention that the vehicle
battery is not completely discharged.
NISSAN INTELLIGENT KEY™
WITHOUT DOOR AND TRUNK
REQUEST SWITCHES
Pre-driving checks and adjustments3-17
ZREVIEW COPYÐ2009 Altima(alt)
Owners Manual(owners)ÐUSA_English(nna)
02/03/09Ðdebbie
X
Page 150 of 373
As many as 4 Intelligent Keys can be registered
and used with one vehicle. For information about
the purchase and use of additional Intelligent
Keys, contact a NISSAN dealer.
CAUTION
cDo not allow the Intelligent Key, which
contains electrical components, to
come into contact with water or salt
water. This could affect the system
function.
cDo not drop the Intelligent Key.
cDo not strike the Intelligent Key sharply
against another object.
cDo not change or modify the Intelligent
Key.
cWetting may damage the Intelligent
Key. If the Intelligent Key gets wet, im-
mediately wipe until it is completely dry.
cDo not place the Intelligent Key for an
extended period in an area where tem-
peratures exceed 140°F (60°C) .
cDo not attach the Intelligent Key with a
key holder that contains a magnet.cDo not place the Intelligent Key near
equipment that produces a magnetic
field, such as a TV, audio equipment and
personal computers.
If an Intelligent Key is lost or stolen, NISSAN
recommends erasing the ID code of that Intelli-
gent Key from the vehicle. This may prevent the
unauthorized use of the Intelligent Key to operate
the vehicle. For information regarding the erasing
procedure, contact a NISSAN dealer.
OPERATING RANGE
The Intelligent Key functions can only be used
when the Intelligent Key is within the specified
operating range.
When the Intelligent Key battery is discharged or
strong radio waves are present near the operat-
ing location, the Intelligent Key system’s operat-
ing range becomes narrower, and the Intelligent
Key may not function properly.
The operating range is within 33 ft (10 m) of the
vehicle.
HOW TO USE THE REMOTE
KEYLESS ENTRY FUNCTION
The remote keyless entry function can operate all
door locks using the remote keyless function of
the Intelligent Key. The remote keyless function
can operate at a distance of 33 ft (10 m) away
from the vehicle. The operating distance de-
pends upon the conditions around the vehicle.
The remote keyless entry function will not func-
tion under the following conditions:
cWhen the Intelligent Key is not within the
operational range.
cWhen the doors or the trunk are open or not
closed securely.
cWhen the Intelligent Key battery is dis-
charged.
CAUTION
When locking the doors using the Intelli-
gent Key, be sure not to leave the key in
the vehicle.
3-18Pre-driving checks and adjustments
ZREVIEW COPYÐ2009 Altima(alt)
Owners Manual(owners)ÐUSA_English(nna)
02/03/09Ðdebbie
X
Page 167 of 373
When you use this system, make sure the engine
is running.
If you use the system with the engine not
running (ignition ON or ACC) for a long
time, it will use up all the battery power,
and the engine will not start.
Reference symbols:
SETUP button — This is a button on the control
panel.
“Display” key — This is a select key on the touch-
screen. By touching this key you can proceed to
the next function.
SETTING UP THE START-UP
SCREEN
With the ignition to ACC or ON, the SYSTEM
START-UP warning is displayed on the screen.
Read the warning and touch the “I agree” key
(English) or the “Enter” (Français) key.
If you do not touch the “I agree” key, the Naviga-
tion system will not proceed to the next step
display.If you do not press a button or touch a screen key
for more than 1 minute on the START-UP screen,
the screen will change to the audio screen auto-
matically.
To proceed to the next step, refer to the separate
Navigation System Owner’s Manual.
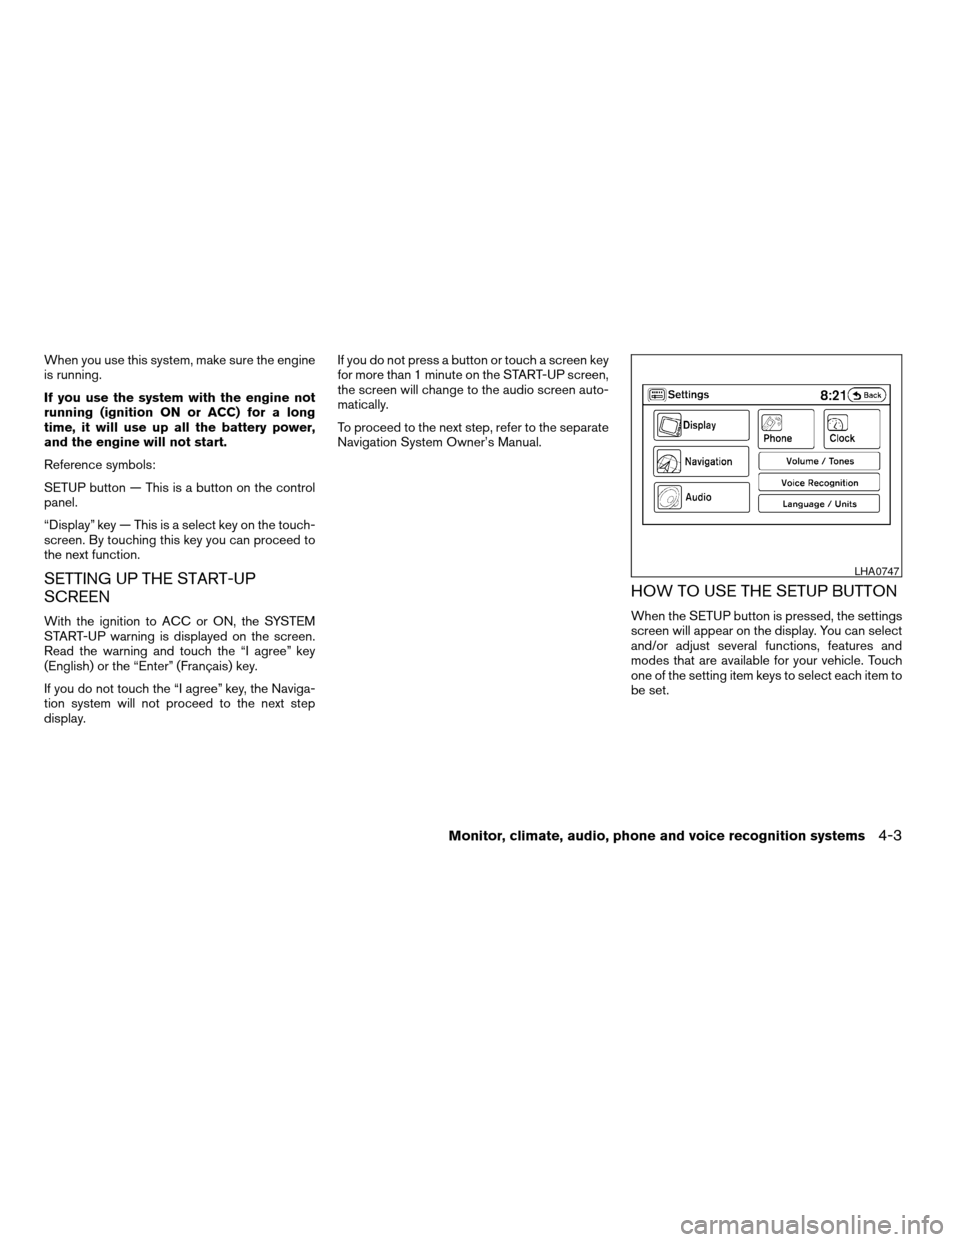
HOW TO USE THE SETUP BUTTON
When the SETUP button is pressed, the settings
screen will appear on the display. You can select
and/or adjust several functions, features and
modes that are available for your vehicle. Touch
one of the setting item keys to select each item to
be set.
LHA0747
Monitor, climate, audio, phone and voice recognition systems4-3
ZREVIEW COPYÐ2009 Altima(alt)
Owners Manual(owners)ÐUSA_English(nna)
02/03/09Ðdebbie
X
Page 186 of 373
SATELLITE RADIO RECEPTION (if so
equipped)
When the satellite radio is used for the first time
or the battery has been replaced, the satellite
radio may not work properly. This is not a mal-
function. Wait more than 10 minutes with satellite
radio ON and the vehicle outside of any metal or
large building for satellite radio to receive all of
the necessary data.
No satellite radio reception is available and “NO
SAT” is displayed when the SAT band option is
selected unless optional satellite receiver and
antenna are installed and an XMTsatellite radio
service subscription is active. Satellite radio is
not available in Alaska, Hawaii and Guam.
Satellite radio performance may be affected if
cargo carried on the roof blocks the satellite radio
signal.
If possible, do not put cargo over the satellite
antenna.
A build up of ice on the satellite radio antenna can
affect satellite radio performance. Remove the
ice to restore satellite radio reception.
AUDIO OPERATION PRECAUTIONSCompact disc (CD) player
CAUTION
cDo not force a compact disc into the CD
insert slot. This could damage the CD
and/or CD changer/player.
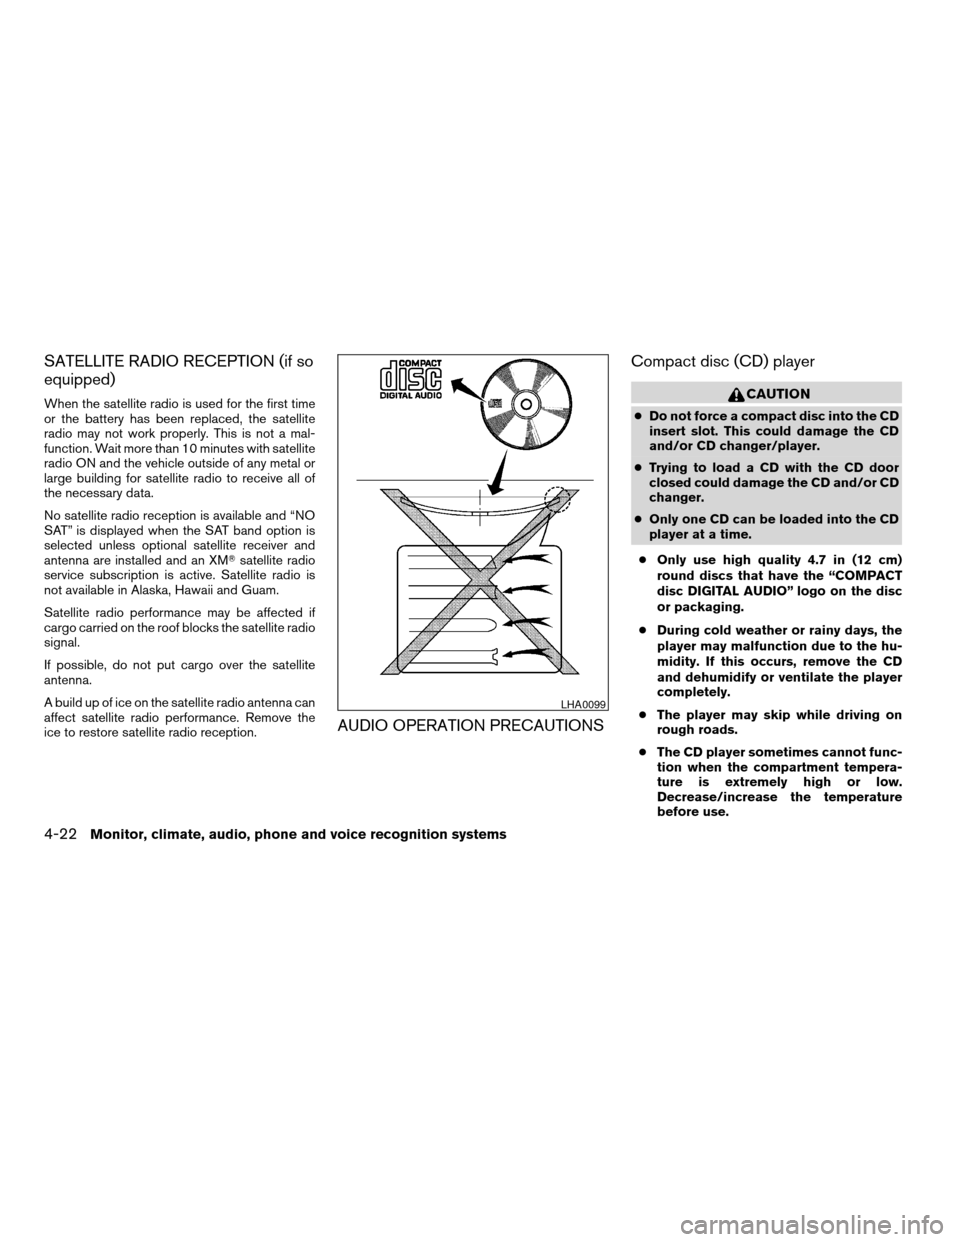
cTrying to load a CD with the CD door
closed could damage the CD and/or CD
changer.
cOnly one CD can be loaded into the CD
player at a time.
cOnly use high quality 4.7 in (12 cm)
round discs that have the “COMPACT
disc DIGITAL AUDIO” logo on the disc
or packaging.
cDuring cold weather or rainy days, the
player may malfunction due to the hu-
midity. If this occurs, remove the CD
and dehumidify or ventilate the player
completely.
cThe player may skip while driving on
rough roads.
cThe CD player sometimes cannot func-
tion when the compartment tempera-
ture is extremely high or low.
Decrease/increase the temperature
before use.
LHA0099
4-22Monitor, climate, audio, phone and voice recognition systems
ZREVIEW COPYÐ2009 Altima(alt)
Owners Manual(owners)ÐUSA_English(nna)
02/03/09Ðdebbie
X
Page 193 of 373
When the RADIO button is pressed while the
ignition switch is in the ACC or ON position, the
radio will come on at the station last played.
If a compact disc is playing when the RADIO
button is pressed, the compact disc will auto-
matically be turned off and the last radio station
played will come on.
The FM stereo indicator, ST, illuminates during
FM stereo reception. When the stereo broadcast
signal is weak, the radio automatically changes
from stereo to monaural reception.
TUNE/FF·REW (tuning)
button:
Press the TUNE/FF·REW button
orfor manual tuning. To move quickly through the
channels, hold the tuning buttons down.
SEEK (tuning) button:
Press the SEEK/TRACK button
orto tune from high to low or low to high frequen-
cies and stop at the next broadcasting station.
SCAN (tuning) button:
Press the SCAN button. SCAN illuminates in the
display window. Scan tuning begins from low to
high frequencies. Scan tuning stops for 5 sec-
onds at each broadcasting station that has suffi-cient signal strength. When scanning, SCAN
blinks in the display. Pressing the SCAN button
again during this 5 second period stops scan
tuning and the radio remains tuned to that station.
Station memory operations:
18 stations can be set for the FM and AM radio to
the A, B and C preset button in any combination
of AM or FM stations.
1. Press the PRESET A·B·C button to change
between storage banks. The radio displays
the icon A, B or C to indicate which set of
presets are active.
2. Tune to the desired station using manual
TUNE or SEEK tuning. Press and hold any of
the desired station memory buttons (1 – 6)
until a beep sound is heard. (The radio mutes
when the select button is pressed.)
3. The channel indicator will then come on and
the sound will resume. Programming is now
complete.
4. Other buttons can be set in the same man-
ner.
If the battery cable is disconnected, or if the fuse
opens, the radio memory will be canceled. In that
case, reset the desired stations.
Compact disc (CD) player operation
Place the ignition switch in the ACC or ON
position, and carefully insert the compact disc
into the slot with the label side up. The compact
disc is automatically pulled into the slot and starts
to play.
If the radio is already operating, it automatically
turns off and the compact disc begins to play.
CD button:
When the CD button is pressed with a compact
disc loaded and the radio playing, the radio turns
off and the last used compact disc starts to play.
TUNE/FF·REW (Fast For-
ward, Rewind) button:
When the TUNE/FF·REW button
oris pressed while the compact disc is playing, the
compact disc plays at an increased speed while
fast forwarding or rewinding. When the button is
released, the compact disc returns to normal play
speed.
SEEK/TRACK button:
When
is pressed while the compact disc
is playing, the next track following the present
one starts to play from the beginning.
Press
several times to skip several tracks.
Monitor, climate, audio, phone and voice recognition systems4-29
ZREVIEW COPYÐ2009 Altima(alt)
Owners Manual(owners)ÐUSA_English(nna)
02/03/09Ðdebbie
X
Page 198 of 373
TUNE/FF·REW (tuning)
button:
Press the TUNE/FF·REW button
orfor manual tuning. To move quickly through the
channels, hold the tuning buttons down.
SEEK (tuning) button:
Press the SEEK/TRACK button
orto tune from high to low or low to high frequen-
cies and stop at the next broadcasting station.
SCAN (tuning) button:
Press the SCAN button. SCAN illuminates in the
display window. Scan tuning begins from low to
high frequencies. Scan tuning stops for 5 sec-
onds at each broadcasting station that has suffi-
cient signal strength. When scanning, SCAN
blinks in the display. Pressing the SCAN button
again during this 5 second period stops scan
tuning and the radio remains tuned to that station.
Station memory operations:
18 stations can be set for the FM and AM radio to
the A, B and C preset button in any combination
of AM or FM stations.
1. Press the PRESET A·B·C button to change
between storage banks. The radio displaysthe icon A, B or C to indicate which set of
presets are active.
2. Tune to the desired station using manual
TUNE or SEEK tuning. Press and hold any of
the desired station memory buttons (1 – 6)
until a beep sound is heard. (The radio mutes
when the select button is pressed.)
3. The channel indicator will then come on and
the sound will resume. Programming is now
complete.
4. Other buttons can be set in the same man-
ner.
If the battery cable is disconnected, or if the fuse
opens, the radio memory will be canceled. In that
case, reset the desired stations.
Radio data system (RDS):
RDS stands for Radio Data System, and is a data
information service transmitted by some radio
stations on the FM band (not AM band) . Cur-
rently, most RDS stations are in large cities, but
many stations are now considering broadcasting
RDS data.
RDS can display:
cStation call sign, such as “WHFR 98.3”.
cStation name, such as “The Groove”.cMusic or programming type such as “Clas-
sical”, “Country”, or “Rock”.
If the station broadcasts RDS information, the
RDS icon is displayed.
Compact disc (CD) changer operation
Place the ignition switch in the ACC or ON
position and insert the compact disc into the slot
with the label side facing up. The compact disc
will be guided automatically into the slot and start
playing. To insert the disc, first press the
button.
If the radio is already operating, it will automati-
cally turn off and the compact disc will play.
If the system has been turned off while the com-
pact disc was playing, pressing the PWR button
will start the compact disc.
Do not use 3.1 in (8 cm) diameter compact discs
in the CD changer.
CD load button:
To insert a CD in the CD changer, press
the
load button for less than 1.5 seconds.
Select the loading slot by pressing the CD insert
select button (1 – 6) , then insert the CD.
To insert 6 CDs to the CD changer, press
the
load button for more than 1.5 seconds.
4-34Monitor, climate, audio, phone and voice recognition systems
ZREVIEW COPYÐ2009 Altima(alt)
Owners Manual(owners)ÐUSA_English(nna)
02/03/09Ðdebbie
X
Page 204 of 373
SEEK/TRACK (tuning)
button:
Press the SEEK/TRACK button
orfor less than 1.5 seconds to tune from high to low
or low to high frequencies and stop at the next
broadcasting station.
“Scan” (tuning) key:
Touch the “Scan” key. SCAN illuminates in the
display window. Scan tuning begins from low to
high frequencies. Scan tuning stops for 5 sec-
onds at each broadcasting station that has suffi-
cient signal strength. Touching the “Scan” key
again during this 5 second period stops scan
tuning and the radio remains tuned to that station.
Station memory operations:
18 stations can be set for the FM, AM or SAT
(Satellite if so equipped) radio to the A, B and C
preset button in any combination of FM, AM or
SAT stations.
1. Press the A·B·C button or the “Preset” key to
select preset channel A, B or C.
2. Press the RADIO button to select the de-
sired FM, AM or SAT station band.
3. Tune to the desired station using manual
tuning, seek tuning or scan tuning. Press
and hold any of the desired station memory(1 – 6) buttons until a beep sound is heard
(the station will now appear in one of the 1 –
6 keys on the screen)
4. The channel indicator will then come on and
the sound will resume. Memorizing is now
complete.
5. Other buttons can be set in the same man-
ner.
If the battery cable is disconnected, or if the fuse
blows, the radio memory will be canceled. In that
case, reset the desired stations.
Radio data system (RDS):
RDS stands for Radio Data System, and is a data
information service transmitted by some radio
stations on the FM band (not AM band) . Cur-
rently, most RDS stations are in large cities, but
many stations are now considering broadcasting
RDS data.
RDS can display:
cStation call sign, such as “WHFR 98.3”.
cStation name, such as “The Groove”.
cMusic or programming type such as “Clas-
sical”, “Country” or “Rock”.
If the station broadcasts RDS information, the
RDS icon is displayed.
Compact disc (CD) changer operation
With the ignition switch in the ACC or ON posi-
tion, press one of the CD changer (1 – 6) but-
tons. Once the CD slot has open insert the
compact disc into the slot with the label side
facing up. The compact disc will be guided auto-
matically into the slot and start playing.
If the radio is already operating, it will automati-
cally turn off and the compact disc will play.
If the system has been turned off while the com-
pact disc was playing, pressing the
ON·OFF/VOL control knob will start the compact
disc.
Loading buttons:
1 Disc Load:
cPress one of the CD changer (1 – 6) select
buttons for less than 1.5 seconds, then in-
sert the CD.
cWhile in CD mode press one of the station
and CD select (1 – 6) buttons on the radio,
then insert the CD.
cWhile in CD mode press one of the CD (1 –
6) keys on the screen, then insert the CD.
All Disc Load:
cPress and hold one of the CD changer (1 –
6) buttons for more than 1.5 seconds.
4-40Monitor, climate, audio, phone and voice recognition systems
ZREVIEW COPYÐ2009 Altima(alt)
Owners Manual(owners)ÐUSA_English(nna)
02/03/09Ðdebbie
X