Page 118 of 313

button or the UNLOCK
button is pushed, or
�The PANIC
button or the
HATCH/TRUNKbutton is pushed on
the keyfob for longer than 0.5 second.
Setting hazard indicator and horn
modeThis vehicle is set in hazard indicator and horn
mode when you first receive the vehicle.
In hazard indicator and horn mode, when the
LOCK
button is pushed, the hazard indi-
cator flashes twice and the horn chirps once.
When the UNLOCK
button is pushed, the
hazard indicator flashes once.
If hazard indicator and horn mode is not neces-
sary, you can switch to hazard indicator only
mode by following the switching procedure.
In hazard indicator only mode, when the LOCK
button is pushed, the hazard indicator
flashes twice. When the UNLOCK
button
is pushed, neither the hazard indicator nor the
horn operates.
(Switching procedure)
Push the LOCK
and UNLOCK
but-
tons on the keyfob simultaneously for more than
2 seconds to switch from one mode to the other.
When pushing the buttons to set hazard indica-
tor only mode, the hazard indicator flashes 3
times.
When pushing the buttons to set hazard indica-
tor and horn mode, the hazard indicator flashes
SPA1260
Pre-driving checks and adjustments
3-7
Page 120 of 313
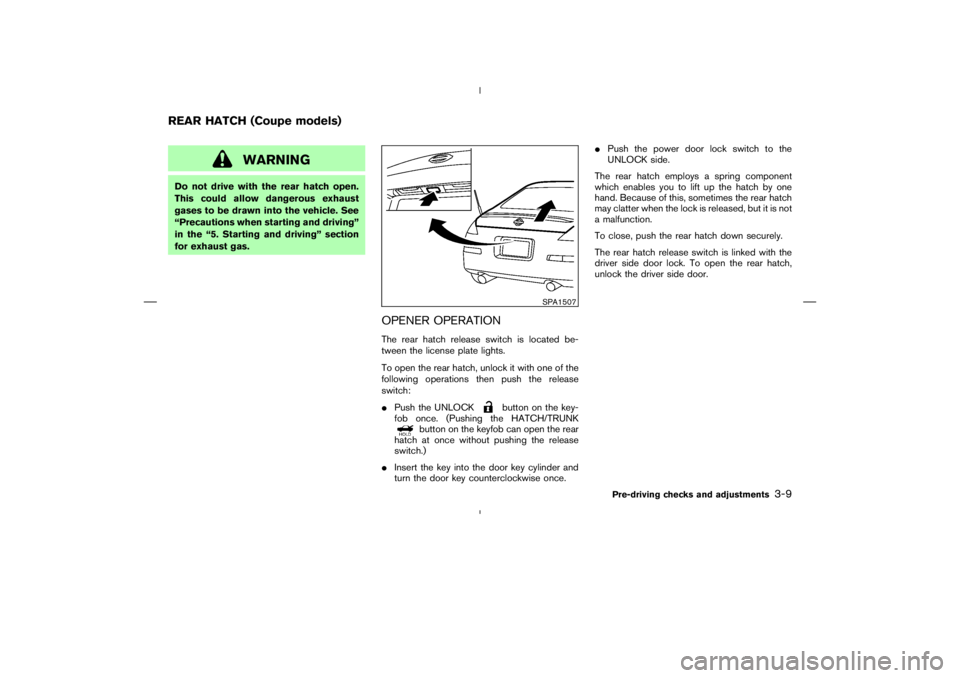
button on the key-
fob once. (Pushing the HATCH/TRUNK
button on the keyfob can open the rear
hatch at once without pushing the release
switch.)
�Insert the key into the door key cylinder and
turn the door key counterclockwise once.�Push the power door lock switch to the
UNLOCK side.
The rear hatch employs a spring component
which enables you to lift up the hatch by one
hand. Because of this, sometimes the rear hatch
may clatter when the lock is released, but it is not
a malfunction.
To close, push the rear hatch down securely.
The rear hatch release switch is linked with the
driver side door lock. To open the rear hatch,
unlock the driver side door.
SPA1507
REAR HATCH (Coupe models)
Pre-driving checks and adjustments
3-9
Page 121 of 313

WARNING
�Do not drive with the trunk lid open.
This could allow dangerous exhaust
gases to be drawn into the vehicle.
See “Precautions when starting and
driving” in the “5. Starting and driv-
ing” section for exhaust gas.
�Closely supervise children when they
are around cars to prevent them from
playing and becoming locked in the
trunk where they could be seriously
injured. Keep the car locked, with the
trunk closed when not in use, and
prevent children’s access to car keys.
OPENER OPERATIONThe trunk lid release switch is located between
the license plate lights.
To open the trunk lid, unlock it with one of the
following operations then push the release
switch:
�Push the UNLOCK
button on the key-
fob once. (Pushing the HATCH/TRUNK
button on the keyfob can open the
trunk lid at once without pushing the release
switch.)
�Insert the key into the door key cylinder and
turn it counterclockwise once.
SPA1556
SPA1685
TRUNK LID (Roadster models)
3-10
Pre-driving checks and adjustments
Page 126 of 313
CAUTION
Keep all parts of the top linkage clear of
obstructions, or the top latch may not be
securely locked.NOTE:
�In case of low battery or low tempera-
ture, the top may temporarily stop mov-
ing during the operation. This functions
to protect the top control mechanism,
and it is not a malfunction.
�If the top is opened and closed repeat-
edly in a short period of time, it may
stop moving to protect the top motor.
Wait for a few minutes before operating
the top again.
Pre-driving checks and adjustments
3-15
Page 162 of 313
satellite
radio provider. After receiving the activation
signal, an available channel list will be auto-
matically updated in the radio. Turn the ignition
switch from the LOCK to ACC position to
update the channel list.
Satellite radio is not available in Alaska and
Hawaii.
Audio main operationFor all operation precautions, see “Audio opera-
tion precautions” earlier in this section.
Head unit:
The auto loudness circuit enhances the low
SAA1299
Display screen, heater, air conditioner and audio systems
4-23
Page 169 of 313
:
Push up or down the tuning switch for less than
1.5 seconds to change the radio frequency.
SEEK tuning (radio):
Push up or down the tuning switch for more than
1.5")
Tuning switch
Memory change (radio):
Push up or down the tuning switch for less than
1.5 seconds to change the radio frequency.
SEEK tuning (radio):
Push up or down the tuning switch for more than
1.5 seconds to seek the next or previous radio
station.
APS (Automatic Program Search) FF,
APS REW (CD or CD changer):
Push up or down the tuning switch for less than
1.5 seconds to return to the beginning of the
present program or skip to the next program.
Push several times to skip back or skip through
programs.
This system searches for the blank intervals
between selections. If there is a blank intervalwithin one program or there is no interval be-
tween programs, the system may not stop in the
desired or expected location.
FOLDER change (CD changer/CD with
MP3 or WMA):
Push up or down the tuning switch for more than
1.5 seconds to change the folders (if there are
any folders).
DISC change (CD changer/CD without
MP3 or WMA):
Push up or down the tuning switch for more than
1.5 seconds to change the playing disc up or
down.
ANTENNAThe antenna is located at the rear of the vehicle.
To remove the antenna, turn it counterclockwise.
To reinstall it, screw it securely into the base.
Page 171 of 313

button
3. PHONE ENDbutton
4. Indicator light
5. Microphone
Your vehicle is equipped with the Bluetooth
Hands-Free Phone System. If you are an owner
of a Bluetooth
enabled cellular phone, you can
set up the wireless connection between your
cellular phone and the in-vehicle phone module.
With Bluetoothwireless technology, you can
make or receive a hands-free telephone call with
your cellular phone in the vehicle.Once your cellular phone is paired to the in-
vehicle phone module, no other phone connect-
ing procedure is required. Your phone is auto-
matically connected with the in-vehicle phone
module when the ignition switch is turned to the
ON position with the paired cellular phone
turned on and carried in the vehicle.
You can register up to 5 different Bluetooth
cellular phones to the in-vehicle phone module.
However, you can talk on only one cellular phone
at a time.
Before using the Bluetooth
Hands-Free Phone
System, refer to the following notes.
�Set up the wireless connection between acellular phone and the in-vehicle phone mod-
ule before using the Bluetooth
Hands-Free
Phone System.
�Some Bluetooth
enabled cellular phones
may not be recognized by the in-vehicle
phone module. Please visit
www.nissanusa.com/bluetooth for a recom-
mended phone list.
�You will not be able to use a hands-free
phone under the following conditions:
— Your vehicle is outside of the telephone
service area.
— Your vehicle is in an area where it is
difficult to receive radio waves; such as in
a tunnel, in an underground parking ga-
rage, near a tall building or in a mountain-
ous area.
— Your cellular phone is locked to prevent it
from being dialed.
When the radio wave condition is not ideal or
ambient sound is too loud, it may be difficult to
hear the other person’s voice during a call.
Do not place the cellular phone in an area
surrounded by metal or far away from the in-
vehicle phone module to prevent tone quality
degradation and wireless connection disruption.
While a cellular phone is connected through the
SAA1699
4-32
Display screen, heater, air conditioner and audio systems
Page 182 of 313

button.
8. The SA mode will be explained. Follow the
instructions provided by the system.
9. When training is finished, the system will tell
you an adequate number of phrases have
been recorded.
10.The system will ask you to say your name.
Follow the instructions to register your name.
11.The system will announce that speaker adap-
tation has been completed and the system is
ready.
The SA mode will stop if:
�The
button is pressed for more than 5
seconds in SA mode.
�The vehicle is driven during SA mode.
�The ignition switch is turned to the OFF or
LOCK position.
Training phrasesDuring the SA mode, the system instructs you to
say the following phrases.
(The system will prompt you for each phrase.)
�phone book new entry
�dial three oh four two nine
�delete call back number
�setup pair phone
�memo pad play
�eight pause nine three two pause seven
�delete all entries
�call seven two four zero nine
�phone book delete entry
�memo pad record
�dial star two one seven oh
�Yes
�No
�select ring tone
�dial eight five six nine two
�Bluetooth on
�setup change priority�call three one nine oh two
�nine seven pause pause three oh eight
�Cancel
�call back number
�call star two zero nine five
�delete phone
�dial eight three zero five one
�Home
�four three pause two nine pause zero
�delete redial number
�phone book list names
�call eight oh five four one
�Correction
�setup change ring tone
�dial seven four oh one eight
�setup main menu
�Delete
�dial nine seven two six six
�memo pad delete
�call seven six three oh one
�go back
Display screen, heater, air conditioner and audio systems
4-43