2009 MITSUBISHI ASX engine
[x] Cancel search: enginePage 105 of 368

Refuel as soon as possible.Type 1
Type 2NOTE
l The
driving range is determined based on the
fuel consumption data. This may vary depend-
ing on the driving conditions and habits.
Treat the distance displayed as just a rough
guideline.
l When you refuel, the driving range display is
updated.
However, if you only add a small amount of
fuel, the correct value will not be displayed.
Fill with a full tank whenever possible.
l On rare occasions, the value displayed for
the driving range may change if you are
parked on an extremely steep incline. This is
due to the movement of fuel in the tank and
does not indicate a malfunction. l
The
display setting can be changed to the pre-
ferred units (km or miles). Refer to “Chang-
ing the function settings (when the ignition
switch or the operation mode is ON)” on
page 3-17.
Average speed display E00521600656
This displays the average speed from the last reset
to the present time.
There are the following 2 mode settings.
For
the method for changing the average speed dis-
play setting, refer to “Changing the function set-
tings (when the ignition switch or the operation
mode is ON)” on page 3-17.
Type 1 Type 2 Manual reset mode
l When
the average speed is being displayed,
if you hold down the multi-information me-
ter switch, the average speed displayed at
that time is reset. l
When
the following operation is performed,
the mode setting is automatically switched
from manual to auto.
[Except for vehicles equipped with keyless
operation system]
Turn the ignition switch from the “ACC” or
“LOCK” position to the “ON” position.
[For vehicles equipped with keyless opera-
tion system]
Change the operation mode from ACC or
OFF to ON.
Switching to auto occurs automatically. If
switching to manual mode is done, however,
the data from the last reset is displayed.
Auto reset mode l When the average speed is being displayed,
if you hold down the multi-information me-
ter switch, the average speed displayed at
that time is reset.
l When the engine switch or the operation
mode is in the following conditions, the aver-
age speed display is automatically reset.
[Except for vehicles equipped with keyless
operation system]
The ignition switch is in the “ACC” or
“LOCK” position for about 4 hours or longer.
[For vehicles equipped with keyless opera-
tion system]
The operation mode is in ACC or OFF for
about 4 hours or longer. Instruments and controls
3-11 3
Page 106 of 368

NOTE
l The
average speed display and the average
fuel consumption display can be reset individ-
ually for the auto reset mode and manual re-
set mode.
l “---” is displayed when the average speed can-
not be measured.
l The initial (default) setting is “Auto reset
mode”.
l The display setting can be changed to the pre-
ferred units (km/h or mph).
Refer to “Changing the function settings
(when the ignition switch or the operation
mode is ON)” on page 3-17.
l The memory of the auto reset mode or man-
ual reset mode for the average speed display
is erased if the battery is disconnected.
Average fuel consumption display E00521700628
This displays the average fuel consumption from
the last reset to the present time.
There are the following 2 mode settings. For information on how to change the average fuel
consumption
display setting, refer to “Changing
the function settings (when the ignition switch or
the operation mode is ON)” on page 3-17.
Type 1 Type 2 The “ ”
mark (A) in the momentary fuel gauge
shows the average fuel consumption. (Type 2)
Manual reset mode
l When the average fuel consumption is being
displayed, if you hold down the multi-infor-
mation meter switch, the average fuel con-
sumption displayed at that time is reset. l
When
the following operation is performed,
the mode setting is automatically switched
from manual to auto.
[Except for vehicles equipped with keyless
operation system]
Turn the ignition switch from the “ACC” or
“LOCK” position to the “ON” position.
[For vehicles equipped with keyless opera-
tion system]
Change the operation mode from ACC or
OFF to ON.
Switching to auto occurs automatically. If
switching to manual mode is done, however,
the data from the last reset is displayed.
Auto reset mode l When the average fuel consumption is being
displayed, if you hold down the multi-infor-
mation meter switch, the average fuel con-
sumption displayed at that time is reset.
l When the engine switch or the operation
mode is in the following conditions, the aver-
age fuel consumption display is automatical-
ly reset.
[Except for vehicles equipped with keyless
operation system]
The ignition switch is in the “ACC” or
“LOCK” position for about 4 hours or longer.
[For vehicles equipped with keyless opera-
tion system]
The operation mode is in ACC or OFF for
about 4 hours or longer. Instruments and controls
3-12
3
Page 113 of 368

l
When the engine switch or the operation
mode is in the following conditions, the aver-
age fuel consumption display and average
speed display are automatically reset.
[Except for vehicles equipped with keyless
operation system]
The ignition switch is in the “ACC” or
“LOCK” position for about 4 hours or longer.
[For vehicles equipped with keyless opera-
tion system]
The operation mode is in ACC or OFF for
about 4 hours or longer.
NOTE l The average fuel consumption display and
average speed display can be reset individual-
ly for the auto reset mode and manual reset
mode.
l The memory of the auto reset mode or man-
ual reset mode for the average fuel consump-
tion display and average speed display is
erased if the battery is disconnected.
l The initial (default) setting is “Auto reset
mode”.
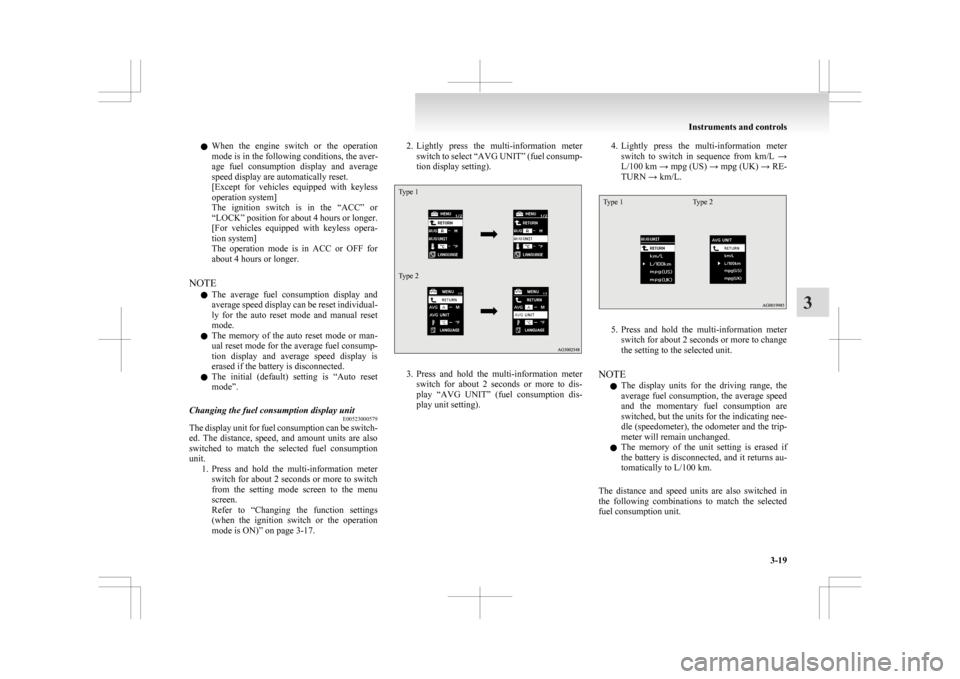
Changing the fuel consumption display unit E00523000579
The display unit for fuel consumption can be switch-
ed.
The distance, speed, and amount units are also
switched to match the selected fuel consumption
unit. 1. Press and hold the multi-information meterswitch for about 2 seconds or more to switch
from the setting mode screen to the menu
screen.
Refer to “Changing the function settings
(when the ignition switch or the operation
mode is ON)” on page 3-17. 2. Lightly
press the multi-information meter
switch to select “AVG UNIT” (fuel consump-
tion display setting).
Type 1
Type 2 3. Press
and hold the multi-information meter
switch for about 2 seconds or more to dis-
play “AVG UNIT” (fuel consumption dis-
play unit setting). 4. Lightly
press the multi-information meter
switch to switch in sequence from km/L →
L/100 km → mpg (US) → mpg (UK) → RE-
TURN → km/L.
Type 1 Type 2 5. Press
and hold the multi-information meter
switch for about 2 seconds or more to change
the setting to the selected unit.
NOTE l The display units for the driving range, the
average fuel consumption, the average speed
and the momentary fuel consumption are
switched, but the units for the indicating nee-
dle (speedometer), the odometer and the trip-
meter will remain unchanged.
l The memory of the unit setting is erased if
the battery is disconnected, and it returns au-
tomatically to L/100 km.
The distance and speed units are also switched in
the following combinations to match the selected
fuel consumption unit. Instruments and controls
3-19 3
Page 119 of 368

Indication lamp, warning lamp, and information screen display list
E00523700013
Indication and warning lamp list E005238006101-
Position lamp indication lamp ® p. 3-40
2- High-beam indication lamp ® p. 3-40
3- Charge warning lamp ® p. 3-42
4- Turn-signal indication lamps/Hazard warning indication lamps ® p. 3-40
5- Front fog lamp indication lamp* ® p. 3-40
6- Rear fog lamp indication lamp ® p. 3-40
7- Anti-lock brake system (ABS) warning lamp ® p. 4-38
8- Brake warning lamp ® p. 3-41
9- Cruise control indication lamp* ® p. 4-43 10-
Seat belt warning lamp ® p. 2-11
11- Supplement Restraint System (SRS) warning lamp ® p. 2-34
12- Check engine warning lamp ® p. 3-41
13- Active Stability Control (ASC) OFF indicator* ® p. 4-41
14- Active Stability Control (ASC) indicator* ® p. 4-41
15- Auto Stop & Go (AS&G) OFF indication lamp* ® p. 4-20
16- Auto Stop & Go (AS&G) indication lamp* ® p. 4-17
17- Diesel preheat indication lamp (diesel-powered vehicles) ® p. 3-40
18- Information screen display list ® p. 3-26 Instruments and controls
3-25 3
Page 123 of 368

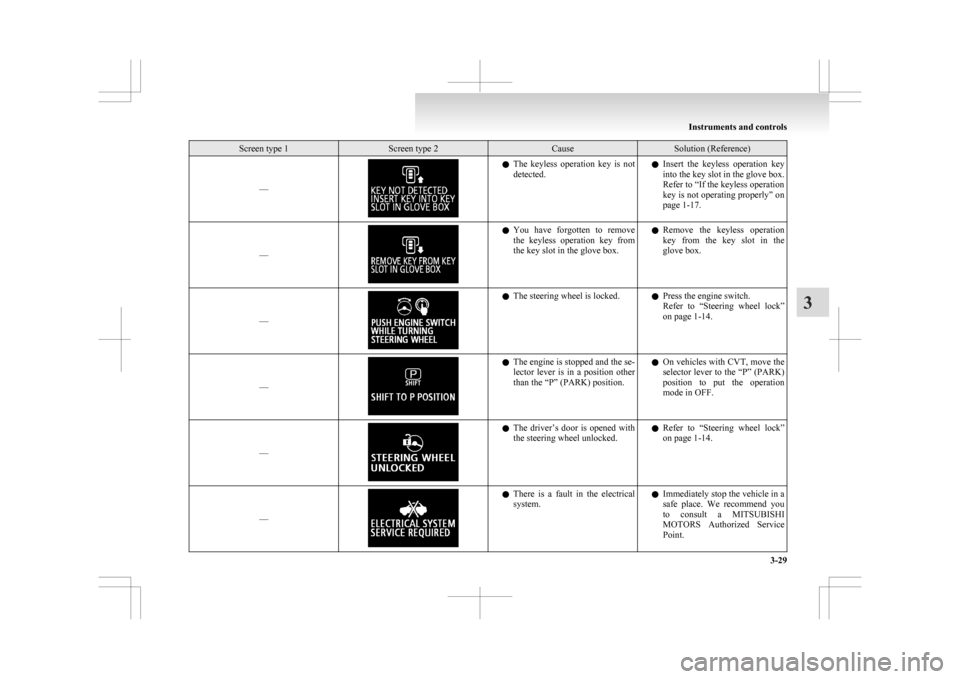
Screen type 1 Screen type 2 Cause Solution (Reference)
–– l
The keyless operation key is not
detected. l
Insert the keyless operation key
into the key slot in the glove box.
Refer to “If the keyless operation
key is not operating properly” on
page 1-17.
–– l
You
have forgotten to remove
the keyless operation key from
the key slot in the glove box. l
Remove the keyless operation
key from the key slot in the
glove box.
–– l
The steering wheel is locked.
lPress the engine switch.
Refer
to “Steering wheel lock”
on page 1-14.
–– l
The engine is stopped and the se-
lector
lever is in a position other
than the “P” (PARK) position. l
On vehicles with CVT, move the
selector lever to the “P” (PARK)
position to put the operation
mode in OFF.
–– l
The
driver’s door is opened with
the steering wheel unlocked. l
Refer to “Steering wheel lock”
on page 1-14.
–– l
There
is a fault in the electrical
system. l
Immediately stop the vehicle in a
safe place. We recommend you
to consult a MITSUBISHI
MOTORS Authorized Service
Point. Instruments and controls
3-29 3
Page 126 of 368

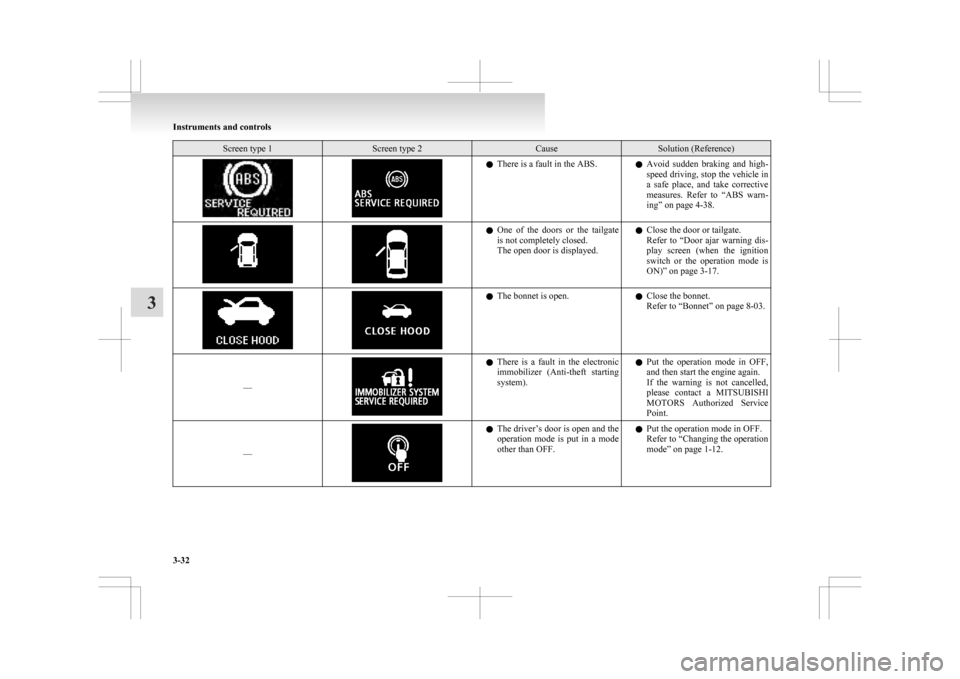
Screen type 1 Screen type 2 Cause Solution (Reference)
l
There is a fault in the ABS.
lAvoid sudden braking and high-
speed driving, stop the vehicle in
a safe place, and take corrective
measures. Refer to “ABS warn-
ing” on page 4-38. l
One
of the doors or the tailgate
is not completely closed.
The open door is displayed. l
Close the door or tailgate.
Refer
to “Door ajar warning dis-
play screen (when the ignition
switch or the operation mode is
ON)” on page 3-17. l
The bonnet is open.
lClose the bonnet.
Refer to “Bonnet” on page
8-03.
–– l
There
is a fault in the electronic
immobilizer (Anti-theft starting
system). l
Put the operation mode in OFF,
and then start the engine again.
If the warning is not cancelled,
please contact a MITSUBISHI
MOTORS Authorized Service
Point.
–– l
The
driver’s door is open and the
operation mode is put in a mode
other than OFF. l
Put the operation mode in OFF.
Refer to
“Changing the operation
mode” on page 1-12. Instruments and controls
3-32
3
Page 127 of 368

Screen type 1 Screen type 2 Cause Solution (Reference)
–– l
There is a fault in the steering
wheel lock. l
Immediately stop the vehicle in a
safe place.
We recommend you to consult a
MITSUBISHI MOTORS Au-
thorized Service Point.
–– l
There
is a fault in the electrical
system. l
Immediately stop the vehicle in a
safe place.
We recommend you to consult a
MITSUBISHI MOTORS Au-
thorized Service Point. l
The engine is overheated.
lStop
the vehicle in a safe place
and take corrective measures.
Refer to “Engine overheating”
on page 6-04. l
The
automatic transmission
(CVT) fluid temperature is too
high. Refer to “Automatic transmission IN-
VECS-III Sports Mode 6CVT (Intelli-
gent & Innovative Vehicle Electronic
Control System III)” on page 4-24. l
You
turned the ignition switch to
the “ON” position or put the op-
eration mode in ON without fas-
tening your seat belt. l
Fasten your seat belt properly. Re-
fer to “Seat belt warning” on
page 2-11. Instruments and controls
3-33 3
Page 128 of 368

Screen type 1 Screen type 2 Cause Solution (Reference)
l
There is a fault in the fuel system.
lWe recommend you to consult a
MITSUBISHI MOTORS Au-
thorized Service Point. l
You
are driving with the parking
brake still applied. l
Release the parking brake. Refer
to “Brake warning display” on
page 3-42. l
There
is a fault in the engine oil
circulation system. l
Immediately stop the vehicle in a
safe place. We recommend you
to have it checked.
Refer to “Oil pressure warning
display” on page 3-44. l
There
is a fault in the charging
system. l
Immediately stop the vehicle in a
safe place. We recommend you
to consult a MITSUBISHI
MOTORS Authorized Service
Point.
Refer to “Charge warning dis-
play” on page 3-43. l
There
is a fault in the SRS airbag
or the pretensioner system. l
We recommend you to have it
checked.
Refer to “Supplemental restraint
System (SRS) warning lamp” on
page 2-34. Instruments and controls
3-34
3