2009 MITSUBISHI ASX transmission
[x] Cancel search: transmissionPage 186 of 368

CAUTION
l
Do not tow 4-wheel drive vehicles with
the front or rear wheels on the ground
(Type A or Type B) as illustrated. This
could result in damage to the drivetrain,
or unstable towing.
If you tow 4-wheel drive vehicles, use
Type C or Type D equipment.
l Even in “2WD” drive mode, the vehicle
cannot be towed with the front or the
rear wheels on the ground.
Jacking up a 4-wheel drive vehicle WARNING
l Do
not crank the engine while the vehicle
is jacked up.
The tyre on the ground may turn and the
vehicle may roll off the jack.
Clutch operation
Quick
or slight clutch engagement made while the
engine is running at high speed will cause damage
to the clutch and transmission because the tractive
force is very great.
Operate the pedal slowly and positively. Braking
E00607001784
All
the parts of the brake system are critical to safe-
ty. We recommend you to have the vehicle
checked at regular intervals according to the serv-
ice booklet. CAUTION
l
Avoid
driving habits that cause heavy
braking and never “ride” the brakes by
resting your foot on the brake pedal
while driving.
It causes brake overheating and fade.
Brake system
The
service brake is divided into two brake cir-
cuits. And your vehicle is equipped with power
brakes. If one brake circuit fails, the other is availa-
ble to stop the vehicle. If you should lose the pow-
er assist for some reason, the brakes will still work.
In these situations, even if the brake pedal moves
down to the very end of its possible stroke or re-
sists being depressed, keep depressing the brake ped-
al down harder and further than usual; stop driving
as soon as possible and have the brake system re-
paired. WARNING
l Do
not turn off the engine while your ve-
hicle is in motion. If you turn off the en-
gine while driving, the power assistance
for the braking system will stop working
and your brakes will not work effectively. WARNING
l If
the power assist is lost or if either
brake hydraulic system stops working
properly, have your vehicle checked im-
mediately.
Warning display
The
brake warning lamp illuminates to indicate a
fault in the braking system. A warning is also dis-
played on the multi-information display. Refer to
“Brake warning lamp” on page 3-41 and “Brake
warning display” on page 3-42.
When brakes are wet
Check the brake system while driving at a low
speed immediately after starting, especially when
the brakes are wet, to confirm they work normally.
A film of water can be formed on the brake discs
and prevent normal braking after driving in heavy
rain or through large puddles, or after the vehicle is
washed. If this occurs, dry the brakes out by driv-
ing slowly while lightly depressing the brake pedal.
When driving downhill
It is important to take advantage of the engine brak-
ing by shifting to a lower shift position while driv-
ing on steep downhill roads in order to prevent the
brakes from overheating. Starting and driving
4-34
4
Page 194 of 368

NOTE
l The
combination of items shown on the dis-
play varies depending on the vehicle model. CAUTION
l
When display/indicator blinks, ASC is
operating,
which means that the road is
slippery or that your vehicle’s wheels are
beginning to slip. If this happens, drive
slower with less accelerator input.
l If the temperature in the braking system
continues to increase due to continuous
brake control on a slippery road surface,
the display/indicator will blink. To pre-
vent
the brake system from overheating,
the brake control of the traction control
function will be temporarily suspended.
The engine control of the traction control
function and normal brake operation will
not be affected. Park your vehicle in a
safe place. When the temperature in the
braking system has come down, the dis-
play/indicator
will be turned off and the
traction control function will start operat-
ing again.
NOTE l The display/indicator may turn on when
you
start the engine. This means that the bat-
tery voltage momentarily dropped when the
engine was started. It does not indicate a mal-
function, provided that the display goes out
immediately. l
When
a compact spare tyre has been put on
your vehicle, the gripping ability of the tyre
will be lower, making it more likely that the display/indicator will blink.
ASC warning display E00619400443
If an abnormal condition occurs in the system, the
following display/indicator will turn on. -
ASC indicator -
ASC OFF display/ASC OFF indica-
tor
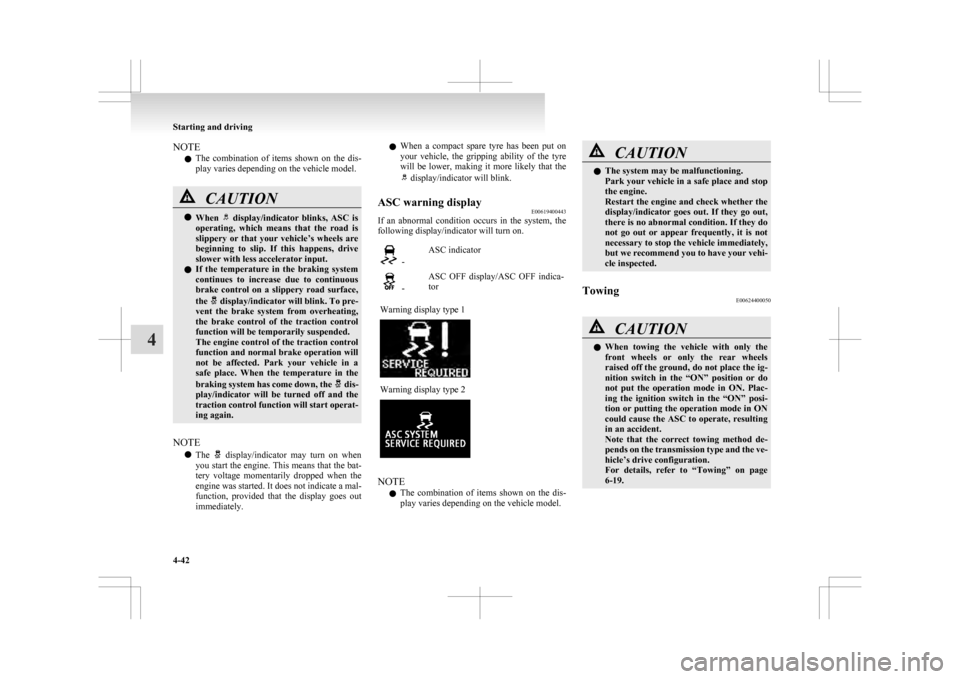
Warning display type 1 Warning display type 2
NOTE
l The
combination of items shown on the dis-
play varies depending on the vehicle model. CAUTION
l
The system may be malfunctioning.
Park
your vehicle in a safe place and stop
the engine.
Restart the engine and check whether the
display/indicator goes out. If they go out,
there is no abnormal condition. If they do
not go out or appear frequently, it is not
necessary to stop the vehicle immediately,
but we recommend you to have your vehi-
cle inspected.
Towing E00624400050 CAUTION
l
When
towing the vehicle with only the
front wheels or only the rear wheels
raised off the ground, do not place the ig-
nition switch in the “ON” position or do
not put the operation mode in ON. Plac-
ing the ignition switch in the “ON” posi-
tion or putting the operation mode in ON
could cause the ASC to operate, resulting
in an accident.
Note that the correct towing method de-
pends on the transmission type and the ve-
hicle’s drive configuration.
For details, refer to “Towing” on page
6-19. Starting and driving
4-42
4
Page 297 of 368

Towing
E00801503187
If your vehicle needs to be towed
If
you need to tow your vehicle, we recommend
that you contact a MITSUBISHI MOTORS Author-
ized Service Point or tow truck company.
In the following cases, transport the vehicle using a
tow truck.
l The engine runs but the vehicle does not
move or abnormal noise is produced.
l Inspection of the vehicle’s underside reveals
that oil or some other fluid is leaking.
If a wheel gets stuck in a ditch, do not try to tow
the vehicle.
Please contact your MITSUBISHI MOTORS Au-
thorized Service Point or a commercial tow truck
service for assistance.
Only when you cannot receive a towing service
from a MITSUBISHI MOTORS Authorized Serv-
ice Point or commercial tow truck service, tow
your vehicle carefully in accordance with the in-
structions given in “Emergency towing” in this part. The regulations concerning towing may differ from
country
to country. It is recommended that you
obey the regulations of the area where you are driv-
ing your vehicle.
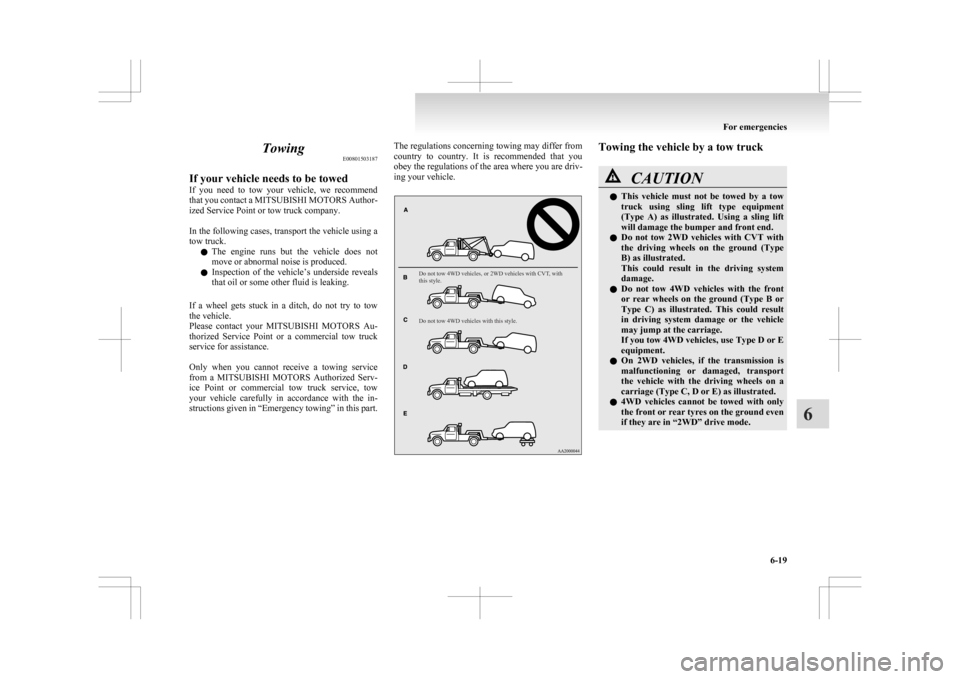
Do not tow 4WD vehicles, or 2WD vehicles with CVT, with
this style.
Do not tow 4WD vehicles with this style. Towing the vehicle by a tow truck
CAUTION
l
This
vehicle must not be towed by a tow
truck using sling lift type equipment
(Type A) as illustrated. Using a sling lift
will damage the bumper and front end.
l Do not tow 2WD vehicles with CVT with
the driving wheels on the ground (Type
B) as illustrated.
This could result in the driving system
damage.
l Do not tow 4WD vehicles with the front
or rear wheels on the ground (Type B or
Type C) as illustrated. This could result
in driving system damage or the vehicle
may jump at the carriage.
If you tow 4WD vehicles, use Type D or E
equipment.
l On 2WD vehicles, if the transmission is
malfunctioning or damaged, transport
the vehicle with the driving wheels on a
carriage (Type C, D or E) as illustrated.
l 4WD vehicles cannot be towed with only
the front or rear tyres on the ground even
if they are in “2WD” drive mode. For emergencies
6-19 6
Page 299 of 368

WARNING
l When the engine is not running, the
brake booster and power steering system
do not operate. This means higher brake
depression force and higher steering ef-
fort are required. Therefore, vehicle oper-
ation is more difficult than usual. CAUTION
l
Do
not leave the ignition switch in the
“LOCK” position or the operation mode
in OFF. The steering wheel will lock, caus-
ing loss of control.
3. Place
the gearshift lever in the “N” (Neutral) position (M/T) or the selector lever in the
“N” (NEUTRAL) position (CVT).
4. Turn on the hazard warning lamps if required by law.
(Follow the local driving laws and regula-
tions.) CAUTION
l
The
person in the vehicle being towed
must pay attention to the brake lamps of
the towing vehicle and make sure the
rope never becomes slack.
l Avoid sudden braking, sudden accelera-
tion and sharp turning; such operation
could cause damage to the towing hooks
or the tow rope.
People in the vicinity could be injured as
a result. CAUTION
l
When
towing or being towed down a long
slope, the brakes may overheat reducing
the effectiveness. In this situation, have
your vehicle transported by a tow truck.
l When the vehicle equipped with CVT is
to be towed by another vehicle with the
all wheels on the ground, make sure that
the towing speed and distance given be-
low are never exceeded, causing damage
to the transmission.
Towing speed: 40 km/h (25 mph)
Towing distance: 40 km (25 miles)
For the towing speed and the towing dis-
tance, follow the local driving laws and
regulations.
If your vehicle tows another vehicle 1. Take
out the towing hook, wheel nut wrench
and jack bar.
Refer to “Tools, jack and tyre repair kit” on
page 6-06. 2. Cover
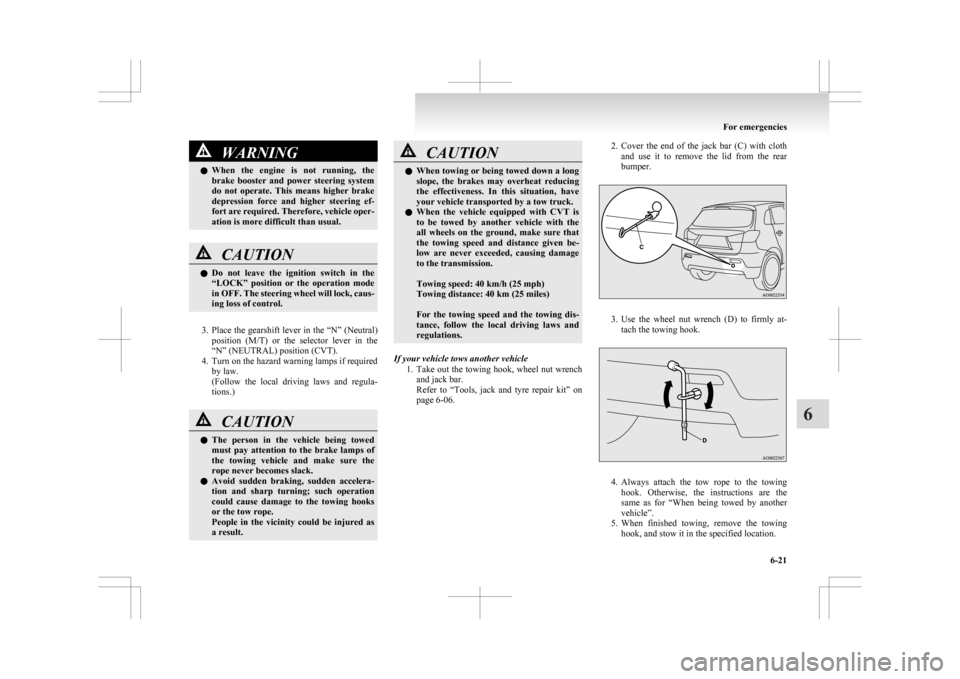
the end of the jack bar (C) with cloth
and use it to remove the lid from the rear
bumper. 3. Use
the wheel nut wrench (D) to firmly at-
tach the towing hook. 4. Always
attach the tow rope to the towing
hook. Otherwise, the instructions are the
same as for “When being towed by another
vehicle”.
5. When finished towing, remove the towing hook, and stow it in the specified location. For emergencies
6-21 6
Page 342 of 368

Vehicle labeling
E01100102785
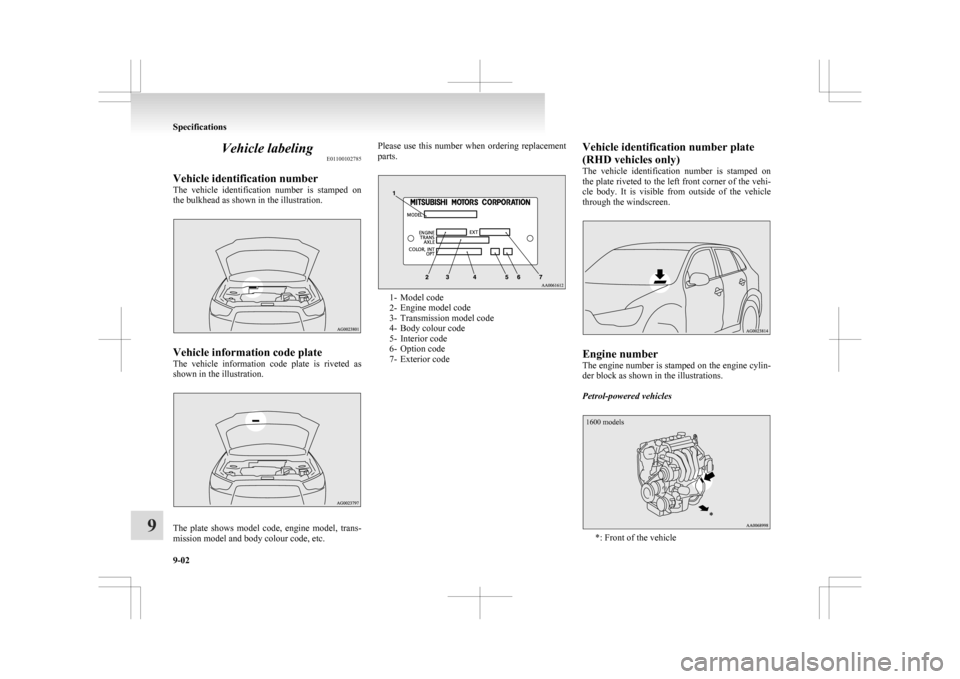
Vehicle identification number
The
vehicle identification number is stamped on
the bulkhead as shown in the illustration. Vehicle information code plate
The
vehicle information code plate is riveted as
shown in the illustration. The plate shows model code, engine model, trans-
mission model and body colour code, etc. Please use this number when ordering replacement
parts.
1- Model code
2-
Engine model code
3- Transmission model code
4- Body colour code
5- Interior code
6- Option code
7- Exterior code Vehicle identification number plate
(RHD vehicles only)
The
vehicle identification number is stamped on
the plate riveted to the left front corner of the vehi-
cle body. It is visible from outside of the vehicle
through the windscreen. Engine number
The
engine number is stamped on the engine cylin-
der block as shown in the illustrations.
Petrol-powered vehicles
1600 models *: Front of the vehicleSpecifications
9-02
9
Page 356 of 368
![MITSUBISHI ASX 2009 1.G Owners Manual No. Item Quantity Lubricants
4 Engine oil Petrol-powered vehicles 1600 models
6.0 litres
[includes 0.65 litre in the reserve tank]
DIA QUEEN SUPER LONG LIFE COOLANT PRE-MIUM or equivalent* 1800 models MITSUBISHI ASX 2009 1.G Owners Manual No. Item Quantity Lubricants
4 Engine oil Petrol-powered vehicles 1600 models
6.0 litres
[includes 0.65 litre in the reserve tank]
DIA QUEEN SUPER LONG LIFE COOLANT PRE-MIUM or equivalent* 1800 models](/manual-img/19/7566/w960_7566-355.png)
No. Item Quantity Lubricants
4 Engine oil Petrol-powered vehicles 1600 models
6.0 litres
[includes 0.65 litre in the reserve tank]
DIA QUEEN SUPER LONG LIFE COOLANT PRE-MIUM or equivalent* 1800 models,
2000 models
7.5 litres
[includes 0.65 litre in the reserve tank] Diesel-powered vehicles
7.5 litres
[includes 0.62 litre in the reserve tank] 5 CVT fluid
7.1 litresDIA QUEEN CVTF-J16 Manual transmission
oil 5 M/T 1600 models
2.0 litres
DIA QUEEN NEW MULTI GEAR OIL API classifica-tion GL-3, SAE 75W-80 2000 models
2.5 litres 6 M/T
2.2 litres7 Transfer oil
0.49 litre Hypoid gear oil API classification GL-5 SAE 808 Rear differential oil
0.5 litreHypoid gear oil API classification GL-5 SAE 809 Refrigerant (air conditioning)
480 - 520 gHFC-134a*: similar high quality ethylene glycol based non-silicate, non-amine, non-nitrate and non-borate coolant with long life hybrid organic acid technologySpecifications
9-16
9
Page 357 of 368

4
4-wheel drive operation 4-31
AAccessory (Installation) 04
Accessory socket 5-61
Active stability control (ASC)
4-40
Additional equipment 8-17
Air conditioning 5-03 Important operation tips for the air condition-
ing 5-09
Air purifier 5-10
Airbag 2-24
Antenna 5-39
Anti-lock brake system (ABS) 4-38 Display 4-38
Warning lamp 4-38
Ashtray 5-60
Assist grips 5-70
Audio 5-10 Error codes 5-35
External audio input function 5-32
Handling of compact discs 5-38
Steering wheel audio remote control
switches 5-33
Auto Stop & Go (AS&G) system 4-17
Automatic transmission Fluid 9-14
Selector lever operation 4-24
Selector lever position 4-25
Sports mode 4-26
BBattery 8-08
Charge warning lamp 3-42 Discharged battery (Emergency starting) 6-02
Disposal information for used batteries
06
Specification 9-11
Bluetooth® 2.0 interface 5-41
Bonnet 8-03
Bottle holder 5-69
Brake assist system 4-36
Brake Anti-lock brake 4-38
Braking 4-34
Fluid 8-07,9-14
Parking brake 4-06
Bulb capacity 8-23
C Capacities 9-14
Card holder 5-59,5-66
Cargo loads 4-52
Catalytic converter
8-02
Cautions on handling of 4-wheel drive vehi-
cles 4-33
Central door locks 1-22
Charge warning lamp 3-42
Chassis number 9-02
Check engine warning lamp 3-41
Child restraint 2-15
Child-protection rear doors 1-25
Cigarette lighter 5-60
Cleaning Exterior of your vehicle 7-03
Interior of your vehicle 7-02
Clock 5-39
Clutch Fluid 8-07
Coat hook 5-70
Combination headlamps and dipper switch 3-44
Coolant (engine) 8-06,9-14
Cruise control 4-43 Cup holder 5-68
D Daytime running lamps
Bulb capacity
8-24
Replacement 8-30
Demister (rear window) 3-57
Diesel particulate filter (DPF) 4-15
Dimensions 9-04
Dipper (High/Low beam change) 3-47
Doors Central door locks 1-22
Child-protection 1-25
Dead Lock System 1-23
Lock and unlock 1-21
Driving, alcohol and drugs 4-02
E Economical driving 4-02
Electric power steering system (EPS)
4-40
Electric window control 1-34
Electrical system 9-11
Electronic immobilizer (Anti-theft starting sys-
tem) 1-03
Electronically controlled 4WD system 4-29
Emergency starting 6-02
Emergency stop signal system 4-37
Engine specifications 9-10
Engine switch 1-11
Engine Coolant 8-06,9-14
Number 9-02
Oil 8-04
Oil and filter 9-14
Overheating 6-04
Specifications 9-10 Alphabetical index
1
Page 358 of 368

Used engine oils safety instructions and disposal
information 05
Exterior and interior lamp operation
8-17
F Fluid capacities and lubricants 9-14
Fluid
Automatic transmission fluid
9-14
Brake fluid 8-07,9-14
Clutch fluid 8-07
CVT fluid 9-14
Engine coolant 8-06,9-14
Power steering fluid 9-14
Twin Clutch SST fluid 9-14
Washer fluid 8-07,9-14
For cold and snowy weather 8-17
Front fog lamps Bulb capacity 8-24
Replacement 8-29
Switch 3-50
Front room lamp Bulb capacity 8-24
Front seat 2-03
Front turn-signal lamps Bulb capacity 8-24
Replacement 8-28
Fuel consumption 9-13
Fuel Filling the fuel tank 03
Fuel selection 02
Modification/alterations to the electrical or fuel
systems 05
Tank capacity 03
Fuses 8-18
Fusible links 8-18 GGeneral maintenance 8-17
General vehicle data
9-04
Genuine parts 05
Glove box lamp Bulb capacity 8-24
H Hazard warning flasher switch 3-50
Hazard warning indication lamps
3-40
Head restraints 2-07
Headlamp levelling switch 3-48
Headlamp washer switch 3-56
Headlamps Bulb capacity 8-23
Headlamp flasher 3-47
Replacement 8-25,8-26
Switch 3-44
Heated mirror 4-10
Heated seats 2-06
Heater 5-03
High-mounted stop lamp Bulb capacity 8-24
Replacement 8-33
Hill start assist 4-35
Hinges and latches lubrication 8-17
Horn switch 3-57
I If the vehicle breaks down 6-02
Ignition switch 4-11
Indication lamps
3-40
Information screen display 3-42
Inside rear-view mirror 4-08
Inside tailgate release 1-27 Inspection and maintenance following rough road
operation 4-33
Instruments 3-02
Interior lamps 5-62
Map lamps 5-63
J Jack 6-06
Storage 6-06
Jump starting (Emergency starting)
6-02
K Key slot 1-17
Keyless entry system 1-04,1-18
Keyless operation system 1-07
Keys 1-02
L Labeling 9-02
Lamp monitor buzzer
3-46
Leakage (Fuel, engine coolant, oil and exhaust
gas) 8-17
Licence plate lamps Bulb capacity 8-24
Replacement 8-33
Link System 5-41
Lubricants 9-14
Luggage hooks 5-70
Luggage room lamp 5-63 Bulb capacity 8-24
M Making a luggage compartment 2-08
Manual transmission 4-21
Map lamps 5-62,5-63Alphabetical index
2