2009 MINI COOPER CONVERTIBLE wheel
[x] Cancel search: wheelPage 110 of 172

Wheels and tires
108
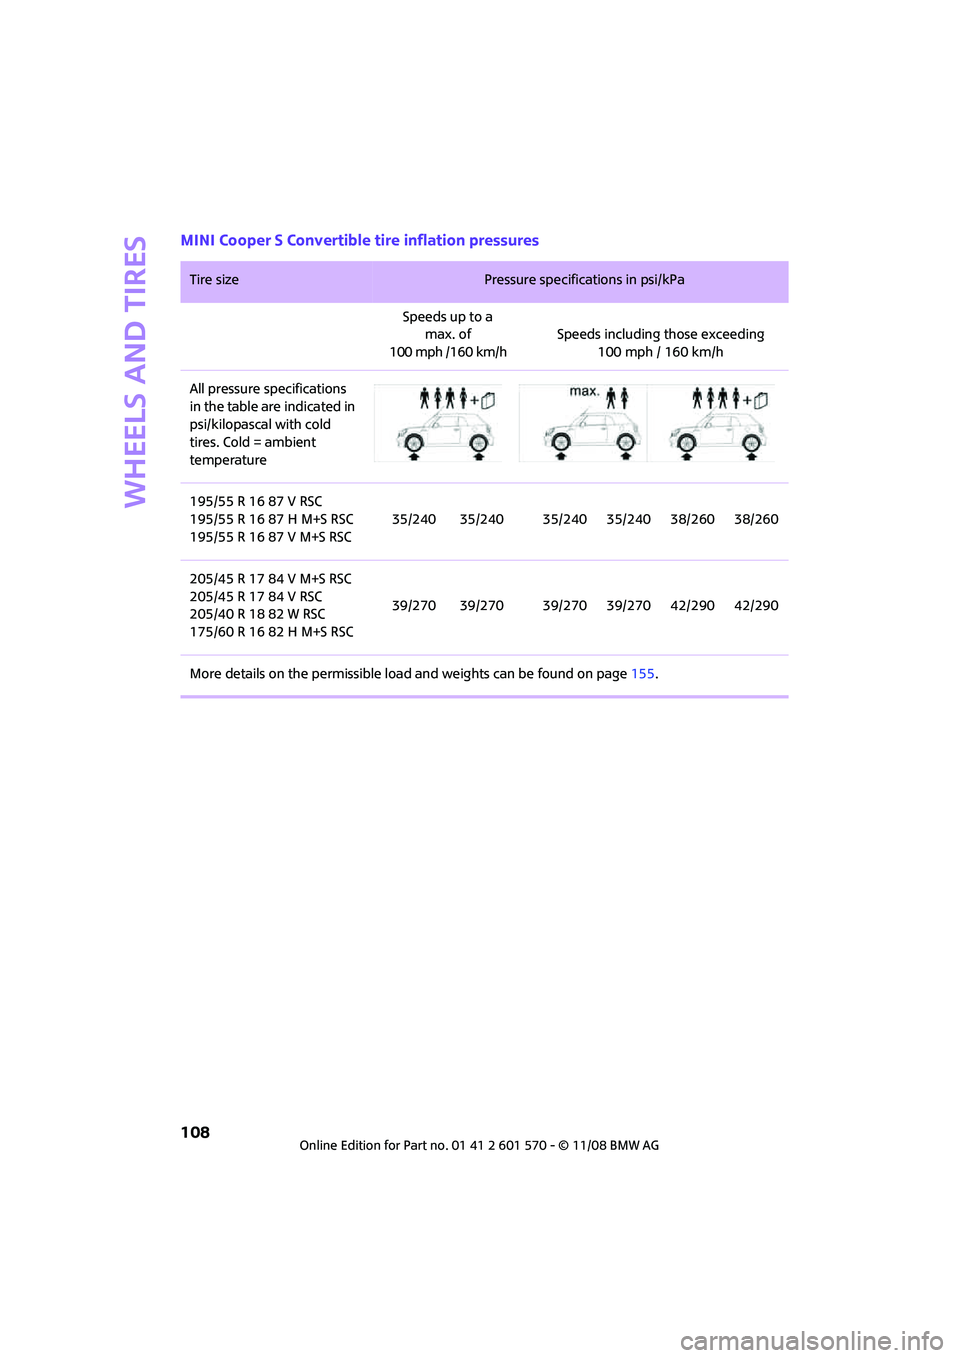
MINI Cooper S Convertible tire inflation pressures
Tire size Pressure specifications in psi/kPa
Speeds up to a
max. of
100 mph /160 km/hSpeeds including those exceeding
100 mph / 160 km/h
All pressure specifications
in the table are indicated in
psi/kilopascal with cold
tires. Cold = ambient
temperature
195/55 R 16 87 V RSC
195/55 R 16 87 H M+S RSC
195/55 R 16 87 V M+S RSC35/240 35/240 35/240 35/240 38/260 38/260
205/45 R 17 84 V M+S RSC
205/45 R 17 84 V RSC
205/40 R 18 82 W RSC
175/60 R 16 82 H M+S RSC39/270 39/270 39/270 39/270 42/290 42/290
More details on the permissible load and weights can be found on page155.
Page 111 of 172

REFERENCEAT A GLANCE CONTROLS DRIVING TIPS MOBILITY
109
Tire coding
Knowledge of the labeling on the side of the tire
makes it easier to identify and choose the right
tires.
Tire size
Speed code letter
Q = up to 100 mph or 160 km/h
T = up to 118 mph or 190 km/h
H = up to 131 mph or 210 km/h
V = up to 150 mph or 240 km/h
W = up to 167 mph or 270 km/h
Y = up to 186 mph or 300 km/h
Tire Identification Number
Tires with DOT codes meet the guidelines of the
US Department of Transportation.
DOT code:
Uniform Tire Quality Grading
Quality grades can be found where applicable
on the tire sidewall between tread shoulder and
maximum section width. For example:
Tread wear 200 Traction AA
Temperature A
DOT Quality Grades
Tread wear
Traction AA A B C
Temperature A B C
All passenger car tires must conform to
Federal Safety Requirements in addition
to these grades.<
Tread wear
The tread wear grade is a comparative rating
based on the wear rate of the tire when tested
under controlled conditions on a specified gov-
ernment test course. For example, a tire graded
150 would wear one and one-half (1γ) times as
well on the government course as a tire graded
100. The relative performance of tires depends
upon the actual conditions of their use, how-
ever, and may depart significantly from the
norm due to variations in driving habits, service
practices and differences in road characteristics
and climate.
Traction
The traction grades, from highest to lowest, are
AA, A, B, and C.
Those grades represent the tire's ability to stop
on wet pavement as measured under controlled
conditions on specified government test sur-
faces of asphalt and concrete. A tire marked C
may have poor traction performance.
The traction grade assigned to this tire is
based on straight-ahead braking traction
tests, and does not include acceleration, corner-
ing, hydroplaning, or peak traction characteris-
tics.<
Temperature
The temperature grades are A, the highest, B,
and C, representing the tire's resistance to the
generation of heat and its ability to dissipate
heat when tested under controlled conditions
on a specified indoor laboratory test wheel. Sus-
tained high temperature can cause the material
of the tire to degenerate and reduce tire life, and
excessive temperature can lead to sudden tire
failure. The grade C corresponds to a level of
performance which all passenger car tires must
e.g.
Nominal width in mm
Aspect ratio in Ξ
Radial belt construction
Rim diameter in inches
Load rating,
not on ZR tires
Speed code letter, in
front of the R on ZR tires225/45 R 17 91 V
e.g.
Manufacturer's
code for tire make
Tire size and
tire design
Tire ageDOT xxxx xxx 5008
Page 112 of 172

Wheels and tires
110
meet under the Federal Motor Vehicle Safety
Standard No. 109. Grades B and A represent
higher levels of performance on the laboratory
test wheel than the minimum required by law.
The temperature grade for this tire is
established for a tire that is properly
inflated and not overloaded. Excessive speed,
underinflation, or excessive loading, either sep-
arately or in combination, can cause heat
buildup and possible tire failure.<
RSC – Run-Flat Tires
You will recognize Run-Flat Tires by a circular
symbol containing the letters RSC on the side of
the tire, page111.
M+S
Winter and all-season tires.
These have better winter properties than sum-
mer tires.
XL
Designation for specially reinforced tires.
Tire condition
Inspect your tires regularly for tread wear, signs
of damage and for foreign objects lodged in the
tread. Check the tread depth.
Tread depth
The tread depth should not drop below 1/8 in/
3 mm, although, for example, European legisla-
tion only specifies a minimum tread depth of
1/16 in/1.6 mm. At tread depths below 1/8 in/
3 mm there is an increased risk of high-speed
hydroplaning, even when only small amounts of
water are present on the road surface.
Winter tires
When winter tires wear down past a tread depth
of 1/6 in/4 mm, they become perceptibly less
suitable for winter conditions. In the interest of
safety, new tires should be installed.
Minimum tread depth
Wear indicators in the base of the tread groove
are distributed around the tire's circumference;
the letters TWI, for Tread Wear Indicator, on the
tire's sidewalls identify tires that incorporate
these wear indicators. When tire tread is worn
down to the level of the wear indicators, the
remaining tread depth is 1/16 in/1.6 mm.
Tire damage
Please note that low-profile tires cause wheels,
tires and suspension parts to be more suscepti-
ble to road hazard and consequential damages.
Unusual vibrations encountered during normal
vehicle operation can indicate tire failure or
some other vehicle defect. This can, for exam-
ple, be caused by driving over curbs. The same
applies to any other abnormal road behavior,
such as pulling severely to the right or left.
In these cases, reduce speed immediately
and have wheels and tires thoroughly
checked. To do so, drive carefully to the nearest
MINI Dealer or tire shop that works according to
MINI repair procedures with correspondingly
trained personnel. If necessary, have the vehicle
towed there.
Otherwise tire damage can be extremely dan-
gerous for vehicle occupants and other road
users.<
Tire age
The manufacturing date of tires is contained in
the tire coding:
DOT ... 5008 means that the tire was manufac-
tured in week 50 of 2008.
Page 113 of 172

REFERENCEAT A GLANCE CONTROLS DRIVING TIPS MOBILITY
111
For various reasons, such as the development of
brittleness, the manufacturer of your MINI rec-
ommends tire replacement after no more than
6 years, regardless of the actual wear of the
tires.
Run-Flat Tires*
The symbol identifying Run-Flat Tires is a circle
with the letters RSC on the sidewall.
Run-Flat Tires comprise a conditionally self-sup-
porting tire and a special rim. The reinforcement
in the sidewalls ensures that the tire can con-
tinue to be used subject to certain restrictions,
even if depressurized.
For information on continuing to drive with a flat
tire, refer to Indication of a flat tire, page66.
New wheels and tires
Have new wheels and tires mounted only
by your MINI Dealer or a specialized tire
shop that has specially trained personnel work-
ing in accordance with the specifications of the
MINI manufacturer. If this work is not carried out
properly, there is a danger of subsequent dam-
age and related safety hazards. Make sure that
the new wheels are balanced.<
Retreaded tires
The manufacturer of your MINI recom-
mends that you avoid using retreaded
tires, as this could impair driving safety. The
causes for this include potentially different tire
casing structures and often wide variations in
tire age, which can result in a limited service
life.<
Correct wheels and tires
The manufacturer of your MINI recom-
mends mounting only wheels and tires
that it has specifically approved for use on your
particular model. Although other wheels and
tires may theoretically have the same dimen-
sions, variations in factors such as manufactur-
ing tolerances can result in contact between tire
and bodywork, ultimately leading to serious
accidents. The manufacturer of your MINI can-
not evaluate non-approved wheels and tires to
determine if they are suited for use, and there-
fore cannot ensure the operating safety of the
vehicle if they are mounted.<
Your MINI Dealer will be glad to inform you
about the correct wheel and tire combination for
your vehicle.
The correct combination of wheels and tires is
also necessary to ensure reliable operation of
various vehicle systems such as ABS and DSC.
To maintain good handling and vehicle
response, use only tires of a single brand and
tread configuration. After a tire has been dam-
aged, mount the previous wheel and tire combi-
nation again as soon as possible.
Wheels with Tire Pressure Monitor TPM
electronics
When mounting new tires or changing over from
summer to winter tires, or vice versa, only use
wheels with TPM electronics; otherwise the Tire
Pressure Monitor may not be able to detect a
puncture, refer to page67. Your MINI Dealer will
be glad to advise you.
Page 114 of 172

Wheels and tires
112
Recommended tire brands
For each tire size, the manufacturer of your MINI
recommends certain tire brands. They are
marked with a clearly visible MINI designation
on the sidewall of the tire.
When properly used, these tires meet the high-
est standards in terms of safety and handling
characteristics.
Run-Flat Tires*
When mounting new tires or changing over from
summer to winter tires and vice versa, mount
Run-Flat Tires for your own safety. Keep in mind
that no space-saver spare tire is available in the
event of a flat. Your MINI Dealer will be glad to
advise you.
Special characteristics of winter tires
The manufacturer of MINI recommends the use
of winter tires on snowy roads or if temperatures
drop below 457/ +76. Although all-season
M+S tires provide better winter traction than
summer tires, they generally fail to provide the
same levels of cold-weather performance as
winter tires.
Pay attention to speed
Always comply with the speed limit for the
winter tires mounted on your car; failure
to do so could result in tire damage and acci-
dents.<
If the car is capable of speeds higher than that
permitted for the winter tires, a label stating the
maximum permitted speed for the mounted
tires must be displayed in your field of view. Spe-
cialist tire dealers and your MINI Dealer can sup-
ply these labels.
Storage
Always store wheels and tires in a cool, dry place
with as little exposure to light as possible.
Always protect tires against all contact with oil,
grease and fuels.
Do not exceed the maximum tire inflation pres-
sure indicated on the sidewall of the tire.
Swapping wheels among the axles
Depending on the individual use, front and rear
tires may exhibit different wear and tear.
In order to maintain an even wear and tear, the
wheels may be rotated between the axles. Your
MINI Dealer will be glad to advise you.
Always check the inflation pressure after the tire
rotation, if necessary change the pressure.
Snow chains*
Only certain types of fine-link snow chains have
been tested by the manufacturer of your MINI,
classified as road-safe and recommended. Con-
tact your MINI Dealer for more details.
Only attach snow chains in pairs to the front
wheels with the following tires.
>175/65 R 15 M+S
>175/60 R 16 M+S
MINI John Cooper Works:
>185/50 R 17 86 H M+S XL RSC
Observe the manufacturer's instructions when
mounting snow chains. Do not exceed a speed
of 30 mph or 50 km/h.
Do not initialize the Flat Tire Monitor if
snow chains are mounted, otherwise the
instrument might issue an incorrect reading.
When driving with snow chains, it can be useful
to briefly deactivate the DSC or activate the DTC,
refer to page64.<
Page 123 of 172

REFERENCEAT A GLANCE CONTROLS DRIVING TIPS MOBILITY
121
In some regions, environmental factors can
affect the vehicle paintwork and damage it. It is
therefore important to adjust the frequency and
extent of vehicle care correspondingly.
Immediately remove aggressive materials such
as spilled fuel, oil, grease, brake fluid, tree sap or
bird droppings to prevent damage to the paint-
work.
Removing paintwork damage
Depending on the severity of the damage,
immediately repair stone damage or
scratches to prevent rusting.<
The manufacturer of the MINI recommends
repairing paint damage professionally according
to factory specifications with original MINI
paints.
Preservation
Preservation is necessary when water no longer
beads on the clean paint surface. To preserve
the paint, only use preservatives that contain
carnauba or synthetic waxes.
Rubber seals
Only treat with water or rubber care products.
Do not use silicon sprays or other silicon-
containing care products on rubber seals,
otherwise noise and damage could occur.<
Chrome parts*
Carefully clean vehicle parts such as the radiator
grill and door handles with copious quantities of
water and, if necessary, a shampoo additive,
especially when contaminated with road salt.
For additional treatment, use chrome polish.
Light-alloy wheels*
The system produces brake dust that collects on
the light alloy wheels. Clean them regularly with
acid-free wheel cleaner.
Do not use aggressive, acid-containing
highly alkaline or abrasive cleansers or
steam jets above 1407/606 as they may
cause damage.<
External sensors
Keep the outside sensors on the vehicle
such as the Park Distance Control clean
and ice-free to ensure that they function prop-
erly.<
Internal care
Upholstery/fabrics
Regularly use a vacuum cleaner to remove sur-
face dirt.
In case of serious spots such as liquid stains, use
a soft sponge or lint-free microfiber cloth and
suitable interior cleaners. Observe the instruc-
tions on the packaging.
Clean upholstery up to the seams. Do not
rub forcefully.<
Velcro fasteners on pants or other items of
clothing can damage seat covers. Make
sure that all Velcro fasteners are closed.<
Leather/leather coverings*
The leather processed by the manufac-
turer of your MINI is a high-quality natural
product. Light variations in the grain is one of
the typical properties of natural leather.<
Dust and road grit in the pores and folds of the
leather have an abrasive effect, leading to
increased wear and causing the leather surface
to become brittle prematurely. Use a cloth or
vacuum cleaner to remove dust on a regular
basis.
Especially when the leather has a light color, it
should be cleaned regularly since it tends to get
heavily soiled.
Treat the leather twice a year using a leather
lotion since dirt and grease will gradually attack
the leather's protective layer.
Carpets/floor mats*
You can use a vacuum cleaner on carpets and
floor mats, or clean them with interior cleaners
when they are very dirty.
Page 127 of 172

REFERENCEAT A GLANCE CONTROLS DRIVING TIPS MOBILITY
125
2.Push on the catch, arrow 1, and unplug the
connector, arrow2.
3.To insert the new bulb and replace the
cover, proceed in reverse order.
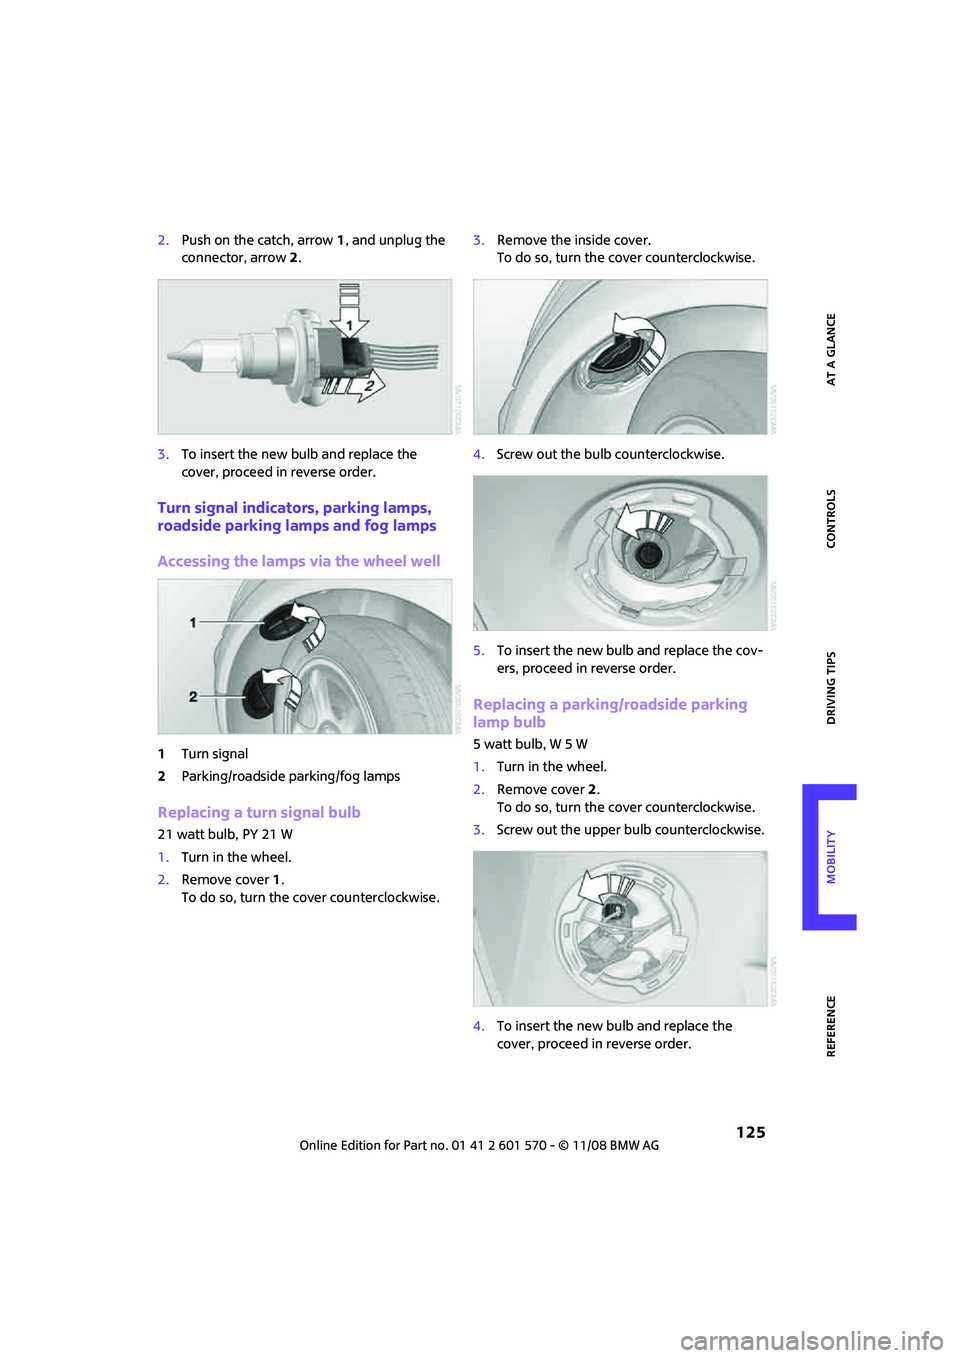
Turn signal indicators, parking lamps,
roadside parking lamps and fog lamps
Accessing the lamps via the wheel well
1Turn signal
2Parking/roadside parking/fog lamps
Replacing a turn signal bulb
21 watt bulb, PY 21 W
1.Turn in the wheel.
2.Remove cover 1.
To do so, turn the cover counterclockwise.3.Remove the inside cover.
To do so, turn the cover counterclockwise.
4.Screw out the bulb counterclockwise.
5.To insert the new bulb and replace the cov-
ers, proceed in reverse order.
Replacing a parking/roadside parking
lamp bulb
5 watt bulb, W 5 W
1.Turn in the wheel.
2.Remove cover 2.
To do so, turn the cover counterclockwise.
3.Screw out the upper bulb counterclockwise.
4.To insert the new bulb and replace the
cover, proceed in reverse order.
Page 128 of 172

Replacing components
126
Replacing a fog lamp bulb
H8 bulb, 35 watts
1.Turn in the wheel.
2.Remove cover 2.
To do so, turn the cover counterclockwise.
3.Screw out the lower bulb counterclockwise.
4.To insert the new bulb and replace the
cover, proceed in reverse order.
Side turn signal indicators
5 watt bulb, W 5 W
1.Push the lamp with the ventilation grate for-
ward and remove.
2.Screw out the bulb holder counterclockwise.
3.Pull out and replace the bulb.
4.To insert the new bulb and replace the
cover, proceed in reverse order.
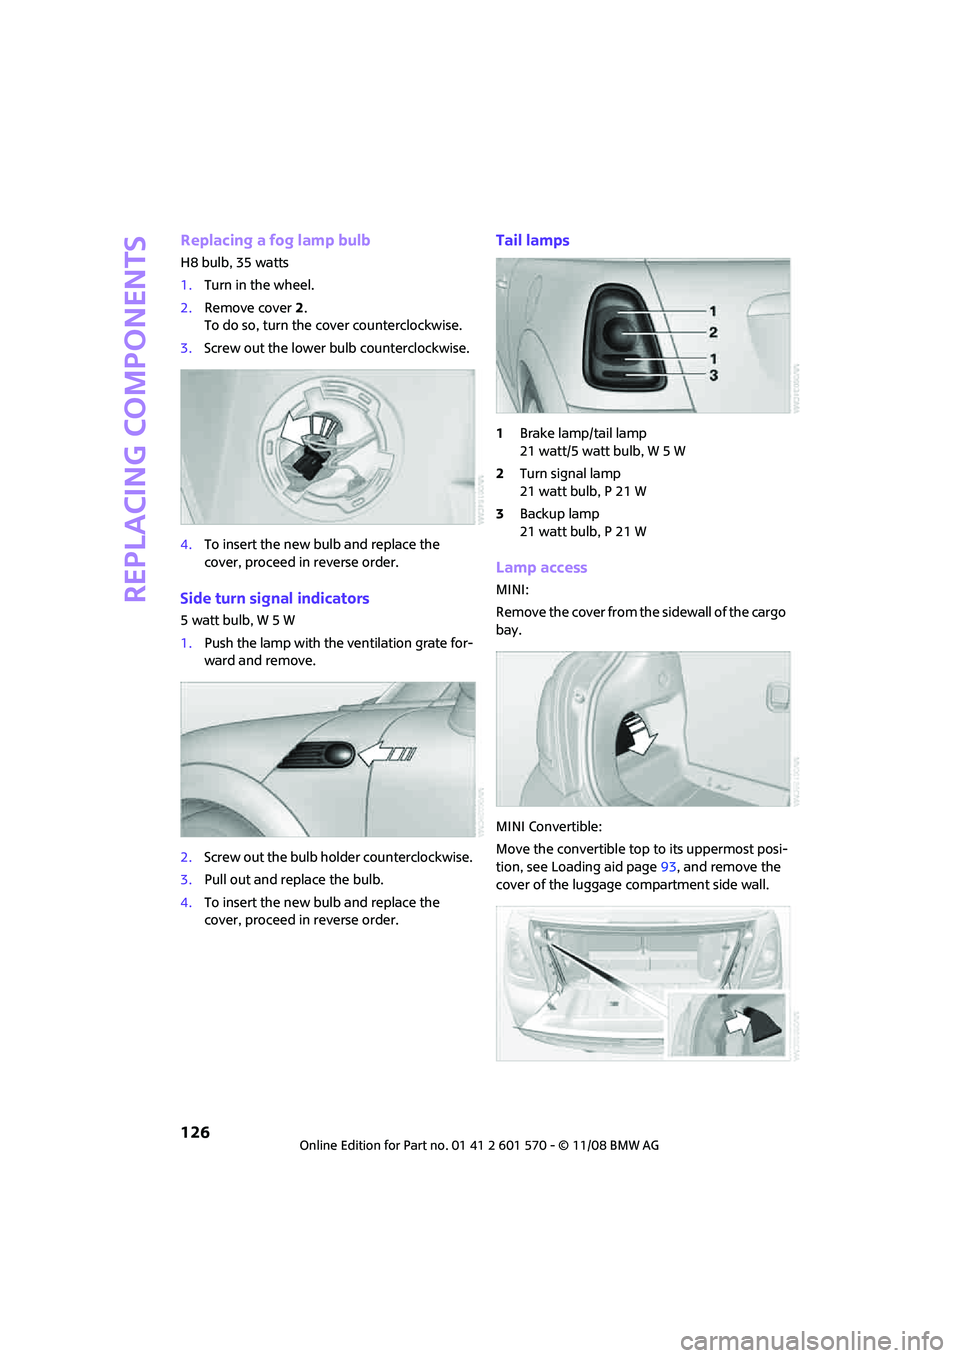
Tail lamps
1Brake lamp/tail lamp
21 watt/5 watt bulb, W 5 W
2Turn signal lamp
21 watt bulb, P 21 W
3Backup lamp
21 watt bulb, P 21 W
Lamp access
MINI:
Remove the cover from the sidewall of the cargo
bay.
MINI Convertible:
Move the convertible top to its uppermost posi-
tion, see Loading aid page93, and remove the
cover of the luggage compartment side wall.