2009 MINI COOPER CONVERTIBLE spare wheel
[x] Cancel search: spare wheelPage 67 of 172

REFERENCEAT A GLANCE CONTROLS DRIVING TIPS MOBILITY
65
Activating the system
Press the SPORT button.
The LED lights up.
SPORT is briefly displayed in the tachometer.
Deactivating the system
>Press the SPORT button again.
>Switch off the engine.
Flat Tire Monitor FTM*
The concept
The Flat Tire Monitor detects pressure loss in a
tire by comparing the rotating speeds of the
individual tires while moving.
If a tire loses pressure, its rolling circumference
changes, and this in turn alters the speed of
rotation. This change is detected and is reported
as a flat tire.
Functional requirement
In order to assure the reliable reporting of a flat
tire, the system must be initialized for the cor-
rect tire inflation pressure.
Each time you correct the pressure in a
tire, or change a wheel or tire, the system
must be reinitialized.<
System limitations
The Flat Tire Monitor is unable to warn the driver
of sudden, severe tire damage caused by exter-
nal factors, nor can it identify the gradual loss of
pressure that will inevitably occur in all four tires
over a lengthy period of time.In the following situations, the system could be
delayed or malfunction:
>System has not been initialized
>Driving on snowy or slippery road surface
>Performance-oriented style of driving: slip in
the drive wheels, high lateral acceleration
>Snow chains are attached
When the vehicle is driven with a space-saver
spare tire
*, page131, the Flat Tire Monitor can-
not function.
Initializing the system
The initialization is completed during driv-
ing, which can be interrupted at any time.
When driving resumes, the initialization is con-
tinued automatically.
Do not initialize the system if you are driving
with snow chains or a space-saver spare tire
*.<
1.Start the engine, but do not start driving.
2.Briefly press the button in the turn indicator
lever repeatedly until "SET/INFO" is dis-
played.
3.Press and hold the button until the display
changes.
4.Briefly press the button repeatedly until the
corresponding symbol and "RESET" are dis-
played.
Page 69 of 172

REFERENCEAT A GLANCE CONTROLS DRIVING TIPS MOBILITY
67
Functional requirement
In order to assure the reliable reporting of a flat
tire, the system must be reset while all tire infla-
tion pressures are correct.
Always use wheels with TPM electronics. Other-
wise, the system may malfunction.
Each time a tire inflation pressure has
been corrected or a wheel or tire has been
changed, reset the system.<
System limitations
TPM cannot warn you in advance of sud-
den severe tire damage caused by outside
influences.<
The system does not work correctly if it has not
been reset; for example, a flat tire may be indi-
cated even though the tire inflation pressures
are correct.
The system is inactive and cannot indicate a flat
tire if a wheel without TPM electronics, such as a
compact spare wheel
*, has been mounted, or if
TPM is temporarily malfunctioning due to other
systems or devices using the same radio fre-
quency.
Resetting the system
Each time a tire inflation pressure has
been corrected or a wheel or tire has been
changed, reset the system.<
Using the button in the turn indicator
lever
1.Start the engine, but do not start driving.
2.Briefly press the button in the turn indicator
lever repeatedly until "SET/INFO" is dis-
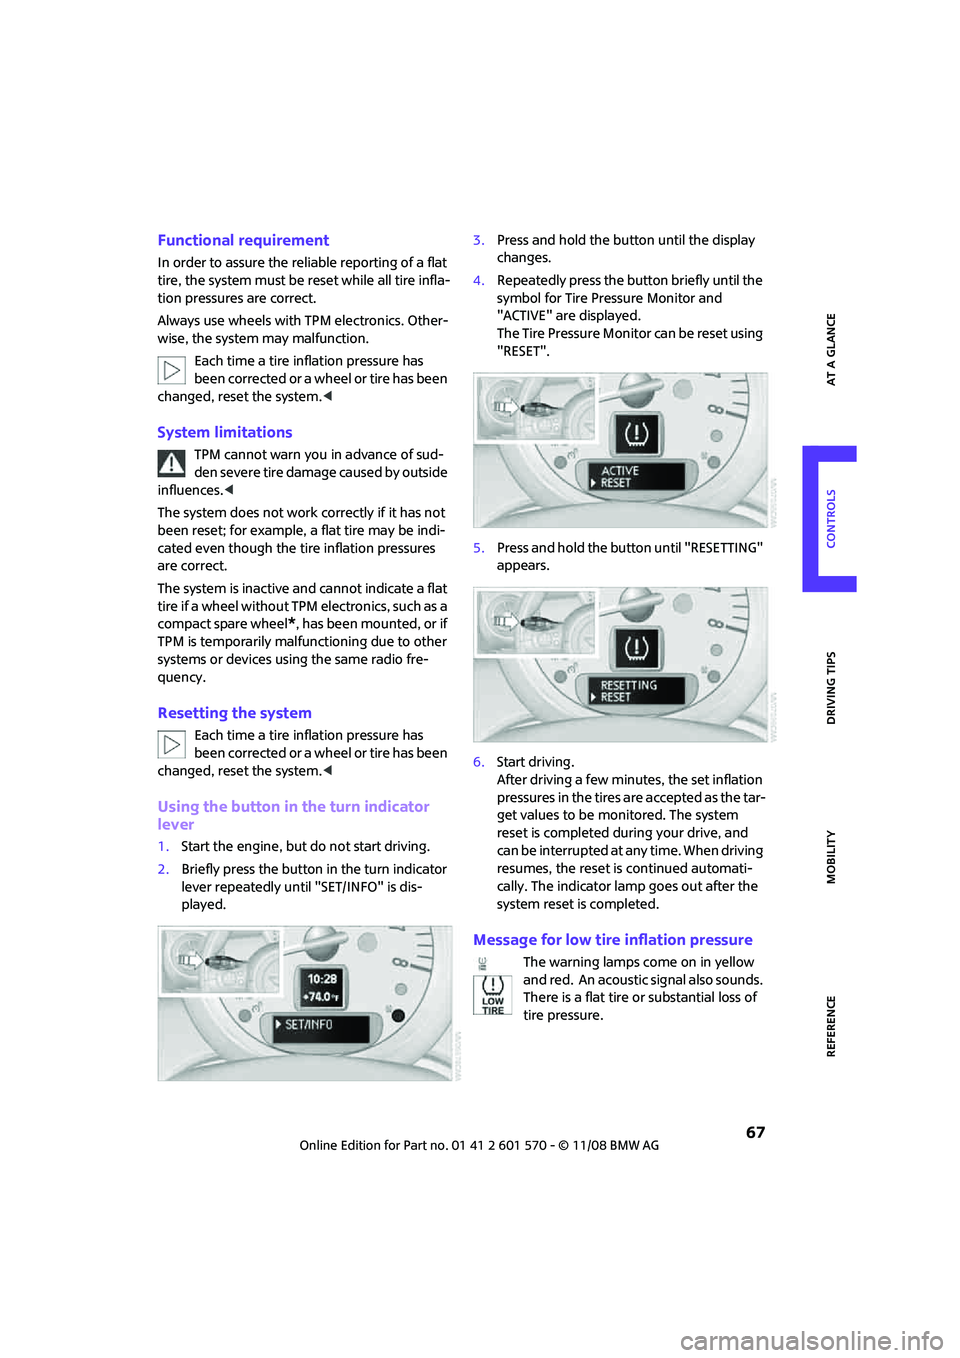
played.3.Press and hold the button until the display
changes.
4.Repeatedly press the button briefly until the
symbol for Tire Pressure Monitor and
"ACTIVE" are displayed.
The Tire Pressure Monitor can be reset using
"RESET".
5.Press and hold the button until "RESETTING"
appears.
6.Start driving.
After driving a few minutes, the set inflation
pressures in the tires are accepted as the tar-
get values to be monitored. The system
reset is completed during your drive, and
can be interrupted at any time. When driving
resumes, the reset is continued automati-
cally. The indicator lamp goes out after the
system reset is completed.
Message for low tire inflation pressure
The warning lamps come on in yellow
and red. An acoustic signal also sounds.
There is a flat tire or substantial loss of
tire pressure.
Page 71 of 172

REFERENCEAT A GLANCE CONTROLS DRIVING TIPS MOBILITY
69
Declaration according to NHTSA/FMVSS
138 Tire Pressure Monitoring Systems
Each tire, including the spare, should be
checked monthly when cold and inflated to the
inflation pressure recommended by the vehicle
manufacturer on the vehicle placard or tire infla-
tion pressure label. If your vehicle has tires of a
different size than the size indicated on the vehi-
cle placard or tire inflation pressure label, you
should determine the proper tire inflation pres-
sure for those tires. As an added safety feature,
your vehicle has been equipped with a tire pres-
sure monitoring system TPMS that illuminates a
low tire pressure telltale when one or more of
your tires are significantly under-inflated.
Accordingly, when the low tire pressure telltale
illuminates, you should stop and check your tires
as soon as possible, and inflate them to the
proper pressure. Driving on a significantly
under-inflated tire causes the tire to overheat
and can lead to tire failure. Underinflation also
reduces fuel efficiency and tire tread life, and
may affect the vehicle's handling and stopping
ability. Please note that the TPMS is not a substi-
tute for proper tire maintenance, and it is the
driver's responsibility to maintain correct tire
pressure, even if underinflation has not reached
the level at which the TPMS low tire pressure tell-
tale illuminates.
The TPMS malfunction indicator is combined
with the low tire pressure telltale. When the sys-
tem detects a malfunction, the telltale will flash
for approximately one minute and then remain
continuously lit. This sequence will continue
upon subsequent vehicle startups as long as the
malfunction exists. When the malfunction indi-
cator is illuminated, the system may not be able
to detect or signal low tire pressure as intended.
TPMS malfunctions may occur for a variety of
reasons, including the installation of replace-
ment or alternate tires or wheels on the vehicle
that prevent the TPMS from functioning prop-
erly. Always check the TPMS malfunction telltale
after replacing one or more tires or wheels on
your vehicle to ensure that the replacement or
alternate tires and wheels allow the TPMS to
continue to function properly.
Page 104 of 172

Wheels and tires
102
Wheels and tires
Tire inflation pressures
Information for your safety
It is not merely the tires' service life, but also driv-
ing comfort and, to a great extent, driving safety
that depend on the condition of the tires and the
maintenance of the specified tire pressure.
Checking pressure
Check the tire inflation pressure regularly
and correct it, if necessary: at least twice a
month and before starting long trips. If you fail to
observe this precaution you may be driving on
tires with incorrect tire pressures, a condition that
can not only compromise your vehicle's driving
stability, but also lead to tire damage and the risk
of an accident. Do not drive with deflated, i.e. flat
tires, except when using Run-Flat Tires. A flat tire
will seriously impair your vehicle's handling and
braking response. Attempts to drive on a flat tire
can lead to loss of control over the vehicle.<
Check the tire inflation pressures only on
cold tires. This means after a maximum of
1.25 miles/2 km driving or when the vehicle has
been parked for at least 2 hours. When tires are
warm, the tire inflation pressure is higher.
After adjusting the tire inflation pressure,
reinitialize the flat tire monitor, page65,
or reset the tire pressure control, page67.<
Checking the tire inflation pressure of
the space-saver spare tire*
A valve extension for checking the inflation pres-
sure is located behind the bumper.
Inflation pressure specifications
The tables below provide all the correct inflation
pressures for the specified tire sizes at ambient
temperature.
The tire inflation pressures apply to the
tire sizes approved and the tire brands
recommended by the manufacturer of your
MINI. Your MINI Dealer will be glad to advise
you.<
For correct identification of the right tire infla-
tion pressures, observe the following:
>Tire sizes for your vehicle
>Load conditions
>Maximum allowable driving speed
Tire inflation pressures for driving up to
100 mph or 160 km/h
For normal driving speeds of up to 100 mph or
160 km/h and to achieve optimum driving com-
fort, adjust pressures to the respective tire infla-
tion pressures listed on the following pages in
the columns for traveling speeds up to a maxi-
mum of 100 mph or 160 km/h.
These tire inflation pressures can also be found
on the driver's-side door post when the driver's
door is open.
The maximum permissible speed for these
tire pressures is 100 mph or 160 km/h. Do
not exceed this speed, otherwise tire damage
and accidents could occur.<
Page 114 of 172

Wheels and tires
112
Recommended tire brands
For each tire size, the manufacturer of your MINI
recommends certain tire brands. They are
marked with a clearly visible MINI designation
on the sidewall of the tire.
When properly used, these tires meet the high-
est standards in terms of safety and handling
characteristics.
Run-Flat Tires*
When mounting new tires or changing over from
summer to winter tires and vice versa, mount
Run-Flat Tires for your own safety. Keep in mind
that no space-saver spare tire is available in the
event of a flat. Your MINI Dealer will be glad to
advise you.
Special characteristics of winter tires
The manufacturer of MINI recommends the use
of winter tires on snowy roads or if temperatures
drop below 457/ +76. Although all-season
M+S tires provide better winter traction than
summer tires, they generally fail to provide the
same levels of cold-weather performance as
winter tires.
Pay attention to speed
Always comply with the speed limit for the
winter tires mounted on your car; failure
to do so could result in tire damage and acci-
dents.<
If the car is capable of speeds higher than that
permitted for the winter tires, a label stating the
maximum permitted speed for the mounted
tires must be displayed in your field of view. Spe-
cialist tire dealers and your MINI Dealer can sup-
ply these labels.
Storage
Always store wheels and tires in a cool, dry place
with as little exposure to light as possible.
Always protect tires against all contact with oil,
grease and fuels.
Do not exceed the maximum tire inflation pres-
sure indicated on the sidewall of the tire.
Swapping wheels among the axles
Depending on the individual use, front and rear
tires may exhibit different wear and tear.
In order to maintain an even wear and tear, the
wheels may be rotated between the axles. Your
MINI Dealer will be glad to advise you.
Always check the inflation pressure after the tire
rotation, if necessary change the pressure.
Snow chains*
Only certain types of fine-link snow chains have
been tested by the manufacturer of your MINI,
classified as road-safe and recommended. Con-
tact your MINI Dealer for more details.
Only attach snow chains in pairs to the front
wheels with the following tires.
>175/65 R 15 M+S
>175/60 R 16 M+S
MINI John Cooper Works:
>185/50 R 17 86 H M+S XL RSC
Observe the manufacturer's instructions when
mounting snow chains. Do not exceed a speed
of 30 mph or 50 km/h.
Do not initialize the Flat Tire Monitor if
snow chains are mounted, otherwise the
instrument might issue an incorrect reading.
When driving with snow chains, it can be useful
to briefly deactivate the DSC or activate the DTC,
refer to page64.<
Page 130 of 172

Replacing components
128
>MINI Mobility System, refer to the following
section
>Run-Flat Tires, page111
>Tire change with space-saver spare tire,
page129
MINI Mobility System with onboard tool
kit and tire change set*
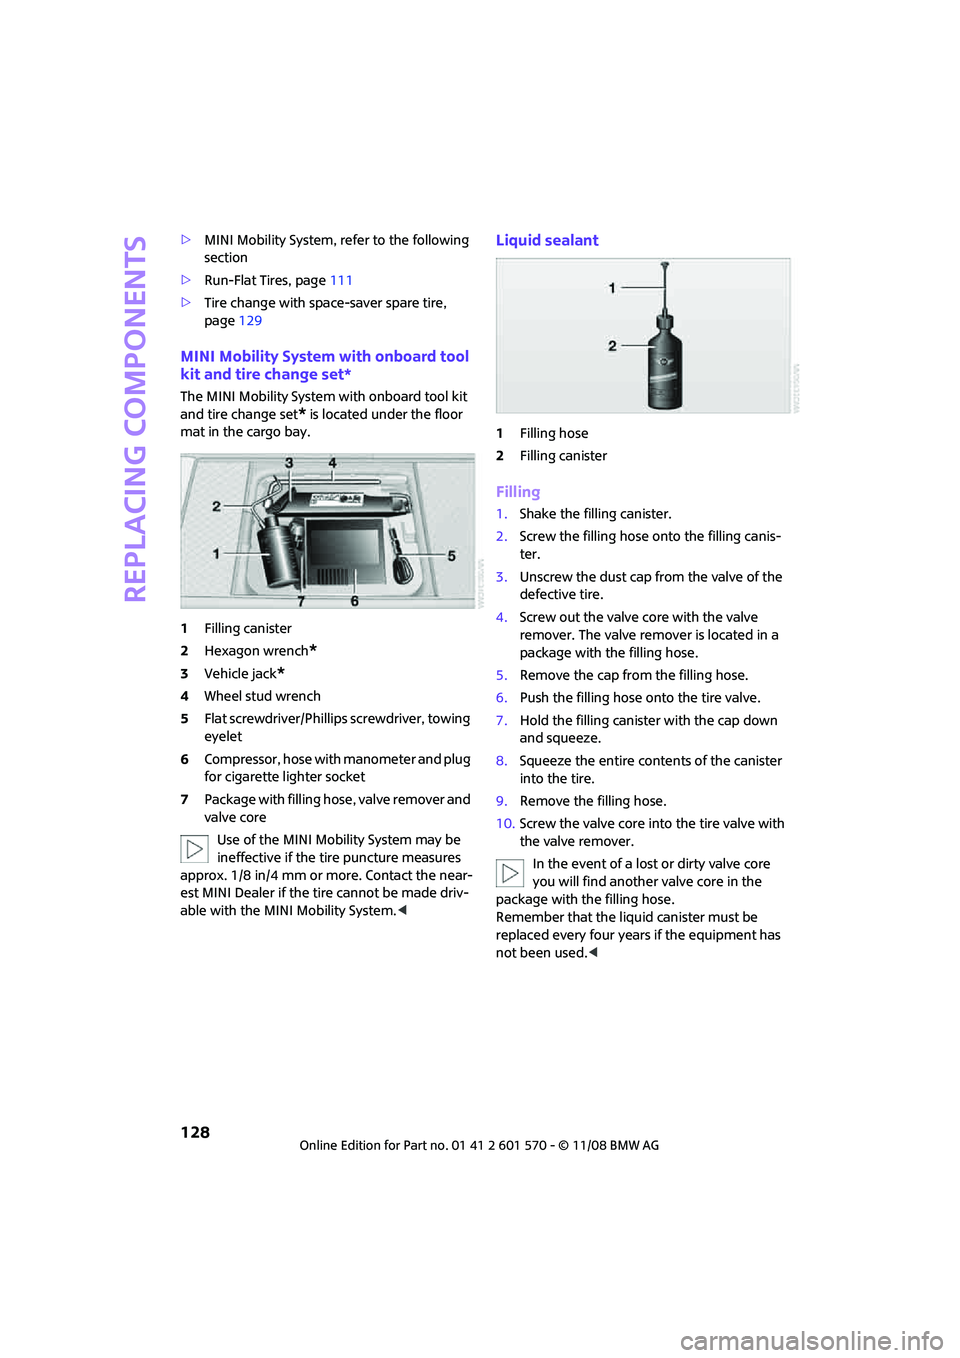
The MINI Mobility System with onboard tool kit
and tire change set
* is located under the floor
mat in the cargo bay.
1Filling canister
2Hexagon wrench
*
3Vehicle jack*
4Wheel stud wrench
5Flat screwdriver/Phillips screwdriver, towing
eyelet
6Compressor, hose with manometer and plug
for cigarette lighter socket
7Package with filling hose, valve remover and
valve core
Use of the MINI Mobility System may be
ineffective if the tire puncture measures
approx. 1/8 in/4 mm or more. Contact the near-
est MINI Dealer if the tire cannot be made driv-
able with the MINI Mobility System.<
Liquid sealant
1Filling hose
2Filling canister
Filling
1.Shake the filling canister.
2.Screw the filling hose onto the filling canis-
ter.
3.Unscrew the dust cap from the valve of the
defective tire.
4.Screw out the valve core with the valve
remover. The valve remover is located in a
package with the filling hose.
5.Remove the cap from the filling hose.
6.Push the filling hose onto the tire valve.
7.Hold the filling canister with the cap down
and squeeze.
8.Squeeze the entire contents of the canister
into the tire.
9.Remove the filling hose.
10.Screw the valve core into the tire valve with
the valve remover.
In the event of a lost or dirty valve core
you will find another valve core in the
package with the filling hose.
Remember that the liquid canister must be
replaced every four years if the equipment has
not been used.<
Page 131 of 172

REFERENCEAT A GLANCE CONTROLS DRIVING TIPS MOBILITY
129
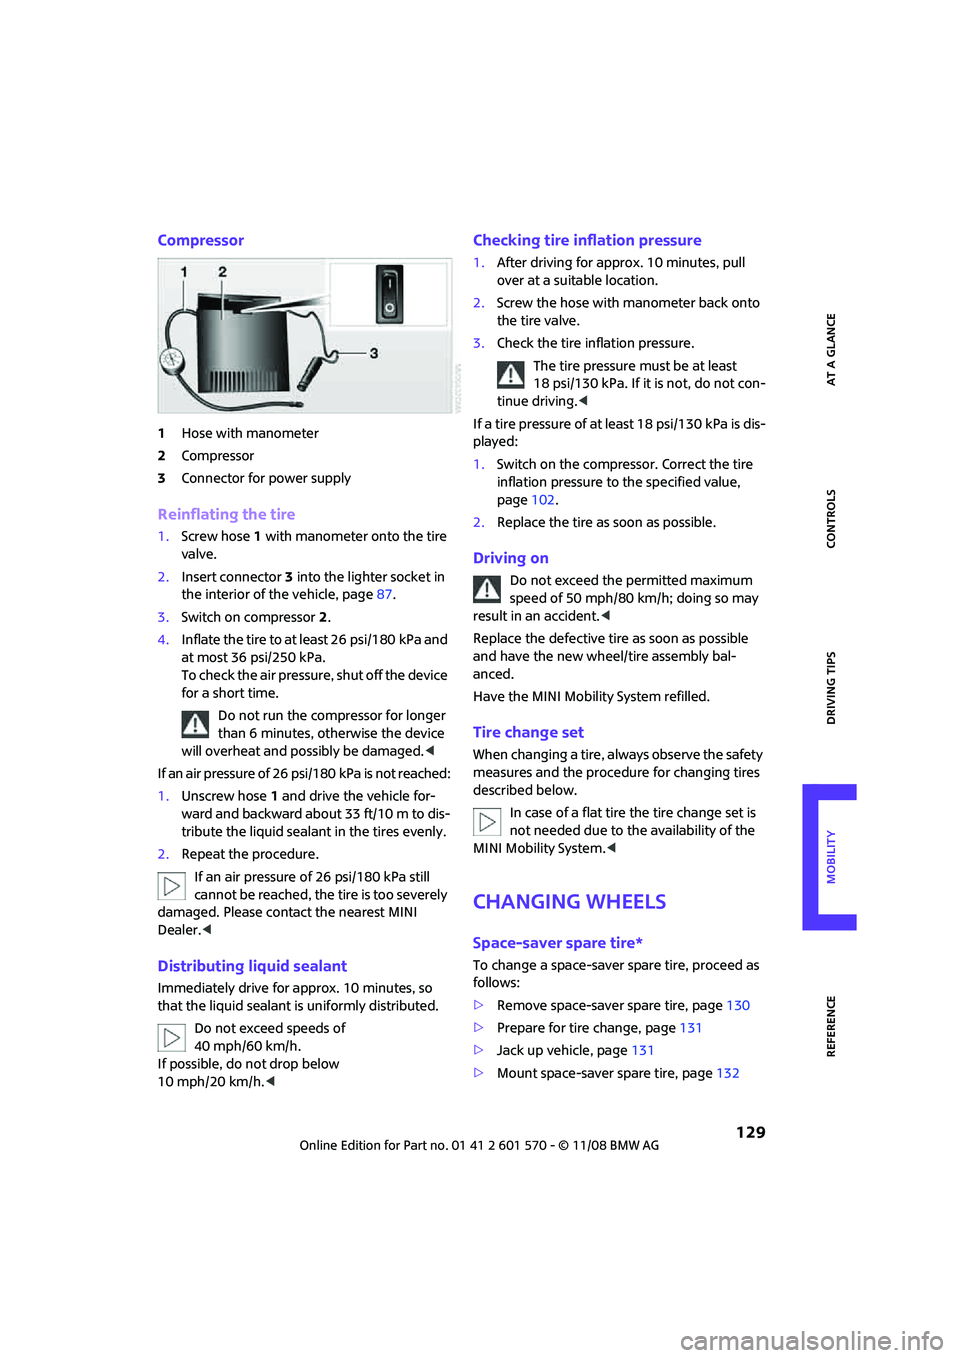
Compressor
1Hose with manometer
2Compressor
3Connector for power supply
Reinflating the tire
1.Screw hose1 with manometer onto the tire
valve.
2.Insert connector 3 into the lighter socket in
the interior of the vehicle, page87.
3.Switch on compressor2.
4.Inflate the tire to at least 26 psi/180 kPa and
at most 36 psi/250 kPa.
To check the air pressure, shut off the device
for a short time.
Do not run the compressor for longer
than 6 minutes, otherwise the device
will overheat and possibly be damaged.<
If an air pressure of 26 psi/180 kPa is not reached:
1.Unscrew hose 1 and drive the vehicle for-
ward and backward about 33 ft/10 m to dis-
tribute the liquid sealant in the tires evenly.
2.Repeat the procedure.
If an air pressure of 26 psi/180 kPa still
cannot be reached, the tire is too severely
damaged. Please contact the nearest MINI
Dealer.<
Distributing liquid sealant
Immediately drive for approx. 10 minutes, so
that the liquid sealant is uniformly distributed.
Do not exceed speeds of
40 mph/60 km/h.
If possible, do not drop below
10 mph/20 km/h.<
Checking tire inflation pressure
1.After driving for approx. 10 minutes, pull
over at a suitable location.
2.Screw the hose with manometer back onto
the tire valve.
3.Check the tire inflation pressure.
The tire pressure must be at least
18 psi/130 kPa. If it is not, do not con-
tinue driving.<
If a tire pressure of at least 18 psi/130 kPa is dis-
played:
1.Switch on the compressor. Correct the tire
inflation pressure to the specified value,
page102.
2.Replace the tire as soon as possible.
Driving on
Do not exceed the permitted maximum
speed of 50 mph/80 km/h; doing so may
result in an accident.<
Replace the defective tire as soon as possible
and have the new wheel/tire assembly bal-
anced.
Have the MINI Mobility System refilled.
Tire change set
When changing a tire, always observe the safety
measures and the procedure for changing tires
described below.
In case of a flat tire the tire change set is
not needed due to the availability of the
MINI Mobility System.<
Changing wheels
Space-saver spare tire*
To change a space-saver spare tire, proceed as
follows:
>Remove space-saver spare tire, page130
>Prepare for tire change, page131
>Jack up vehicle, page131
>Mount space-saver spare tire, page132
Page 132 of 172

Replacing components
130
>Tighten lug bolts, page132
>Drive with space-saver spare tire, page131
Tire change set for a space-saver spare
tire*
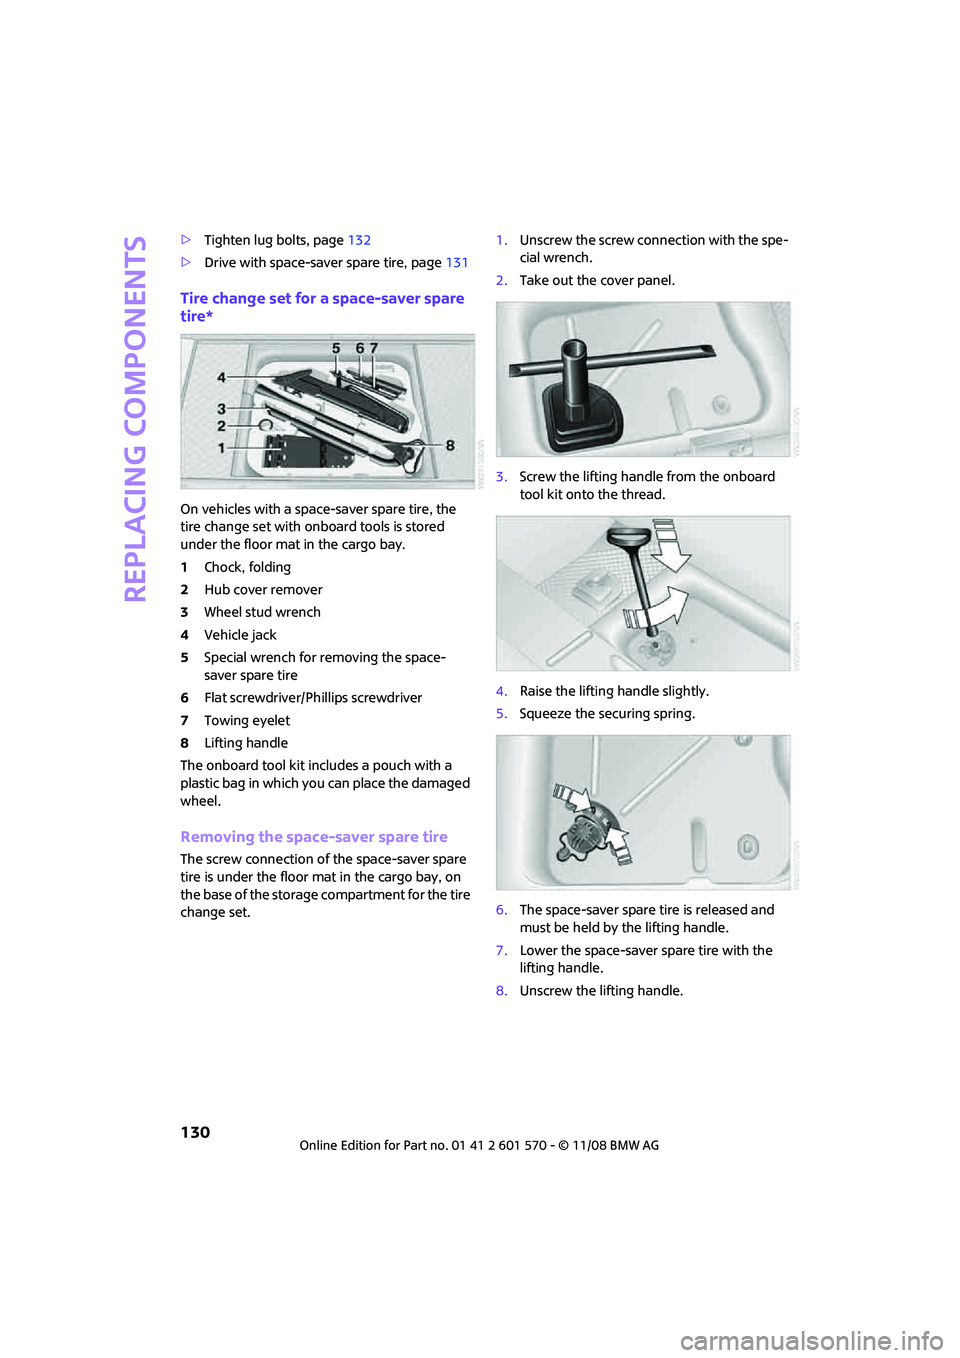
On vehicles with a space-saver spare tire, the
tire change set with onboard tools is stored
under the floor mat in the cargo bay.
1Chock, folding
2Hub cover remover
3Wheel stud wrench
4Vehicle jack
5Special wrench for removing the space-
saver spare tire
6Flat screwdriver/Phillips screwdriver
7Towing eyelet
8Lifting handle
The onboard tool kit includes a pouch with a
plastic bag in which you can place the damaged
wheel.
Removing the space-saver spare tire
The screw connection of the space-saver spare
tire is under the floor mat in the cargo bay, on
the base of the storage compartment for the tire
change set.1.Unscrew the screw connection with the spe-
cial wrench.
2.Take out the cover panel.
3.Screw the lifting handle from the onboard
tool kit onto the thread.
4.Raise the lifting handle slightly.
5.Squeeze the securing spring.
6.The space-saver spare tire is released and
must be held by the lifting handle.
7.Lower the space-saver spare tire with the
lifting handle.
8.Unscrew the lifting handle.