2009 MINI Clubman change time
[x] Cancel search: change timePage 89 of 218

MOBILITYAT A GLANCE CONTROLS DRIVING TIPS ENTERTAINMENT
87
NAVIGATION REFERENCE
Automatic climate
control
Comfortable interior climate
AUTO program6 offers the ideal air distribution
and air flow rate for almost all conditions, refer
to AUTO program below. All you need to do is
select an interior temperature which is comfort-
able for you.
The following sections inform you in detail about
how to adjust the settings.
Most settings are stored for the remote control
currently in use, refer also to Personal Profile set-
tings on page26.
Air flow rate, manual
Press the – button to reduce air flow. Press
the + button to increase it.
You can reactivate the automatic mode
for the air flow rate with the AUTO button.
The air flow rate is lowered or switched off
entirely to save on battery power. The display
remains the same.
Switching the system on/off
Reduce the air flow by pressing the – button
repeatedly until the system is switched off. All
indicators go out.
Press the AUTO button to switch the automatic
climate control back on.
AUTO program
The AUTO program adjusts the air
distribution to the windshield and
side windows, towards the upper body area and
into the footwell for you. The air flow rate and
your temperature specifications will be adapted
to outside influences in accordance with sea-
sonal changes, e.g. sunlight.
The cooling function is automatically switched
on along with the AUTO program.
Recirculated-air mode
Recirculated-air mode: the supply
of outside air is permanently shut off. The system then recirculates the air currently
within the vehicle.
If condensation starts to form on the
inside window surfaces, press the AUTO
button or switch off the recirculated-air mode
and, if necessary, increase the air flow rate.
The recirculated-air mode should not be used
over an extended period of time, otherwise the
air quality inside the car will deteriorate contin-
uously.<
Maximum cooling
At outside temperatures above
327/06 and when the engine is
running, you obtain a maximum
cooling effect as soon as possible.
The automatic climate control goes into recircu-
lated-air mode at the lowest temperature. Air
flows at maximum rate from the vents for the
upper body area. You should therefore open
them for maximum cooling.
Air distribution, manual
The flow of air is directed to the
windows, to the upper body area or
to the footwell as selected.
You can switch the automatic air
distribution back on by pressing the AUTO
button.
Temperature
Set the desired temperature individually.
The automatic climate control achieves
this temperature as quickly as possible
regardless of the season, using maximum
cooling or heating power if necessary, and then
maintains it.
If you switch between different tempera-
ture settings in quick succession, the auto-
matic climate control does not have enough
time to achieve the set temperature.<
Page 111 of 218

MOBILITYAT A GLANCE CONTROLS DRIVING TIPS ENTERTAINMENT
109
NAVIGATION REFERENCE
4.Select "Enter address".
The system also supports you with the following
features:
>If you do not enter a street, the system will
guide you to the downtown area of a town
or city.
>You can skip the entry of country and local-
ity if the current entries should be retained
for your new destination.
Selecting country
1.Select "State / Province" or the displayed
country.
The list of available countries appears on the
display.
2.Select the country of destination.
At least the town/city of the destination or its zip
code must be entered in order to start the desti-
nation guidance.
Entering destination by town/city name
1.Select "Town / City" or the displayed
town/city.
2.Select the first letter.
A list of all towns/cities starting with this let-
ter appears on the Control Display.3.Delete letters if necessary:
>To delete individual letters:
Move the MINI joystick to the right to
highlight and press the MINI joystick.
>To delete all letters:
Move the MINI joystick to the right to
highlight and press the MINI joystick
for an extended period.
4.If necessary, enter more letters.
The list gradually grows smaller each time
you enter a new letter.
>To enter spaces, if necessary:
Select the symbol.
5.If necessary, change to the list of towns and
cities and select a name.
Page 113 of 218

MOBILITYAT A GLANCE CONTROLS DRIVING TIPS ENTERTAINMENT
111
NAVIGATION REFERENCE
5.If necessary, enter more letters.
The list gradually grows smaller each time
you enter a new letter.
6.Change to the list of street names and select
the street name in the corresponding
town/city.
Entering a house number
You can enter all house numbers that are stored
for the street on the navigation DVD.
1.Select "House number".
2.To enter the house number:
Select the digits individually.
3.Move the highlight marker to the third field
from the top. Select the house number.
You can only enter house numbers that are
stored for the street on the navigation DVD.
Starting destination guidance with
manual destination entry
>Select "Start guidance".
Destination guidance starts immediately.
>If you do not want to start destination guid-
ance right away:
Select "Add to destination list".
The destination is stored in the destination
list, page115.
Entering a destination by
voice commands*
You can enter a desired destination via the voice
activation system. During the destination input,
you can switch between voice entry and entry
via the onboard monitor at any time. To do so,
reactivate the voice activation system if neces-
sary.
You can have the possible commands
read aloud via {Options}.<
1.Press the button on the steering wheel.
Selecting country
1.Wait for the system to ask for the country of
destination.
Say the name of the destination country in the
language of the voice activation system.
Entering destination
The destination can be spelled or entered as an
entire word.
Spelling the destination
To enter a destination, spell it in the way it is
commonly spelled in the destination country.
Pronounce the letters smoothly and at normal
volume, avoiding excessive emphases and
pauses.
2.{Enter address}
2.Say the name of the destination country.
1.To spell the name of a town/city:
Say at least the first three letters of the
town/city. The more letters you say, the
more accurately the system will recog-
nize the town/city.
Page 122 of 218

Destination guidance
120
Destination guidance
Starting destination
guidance
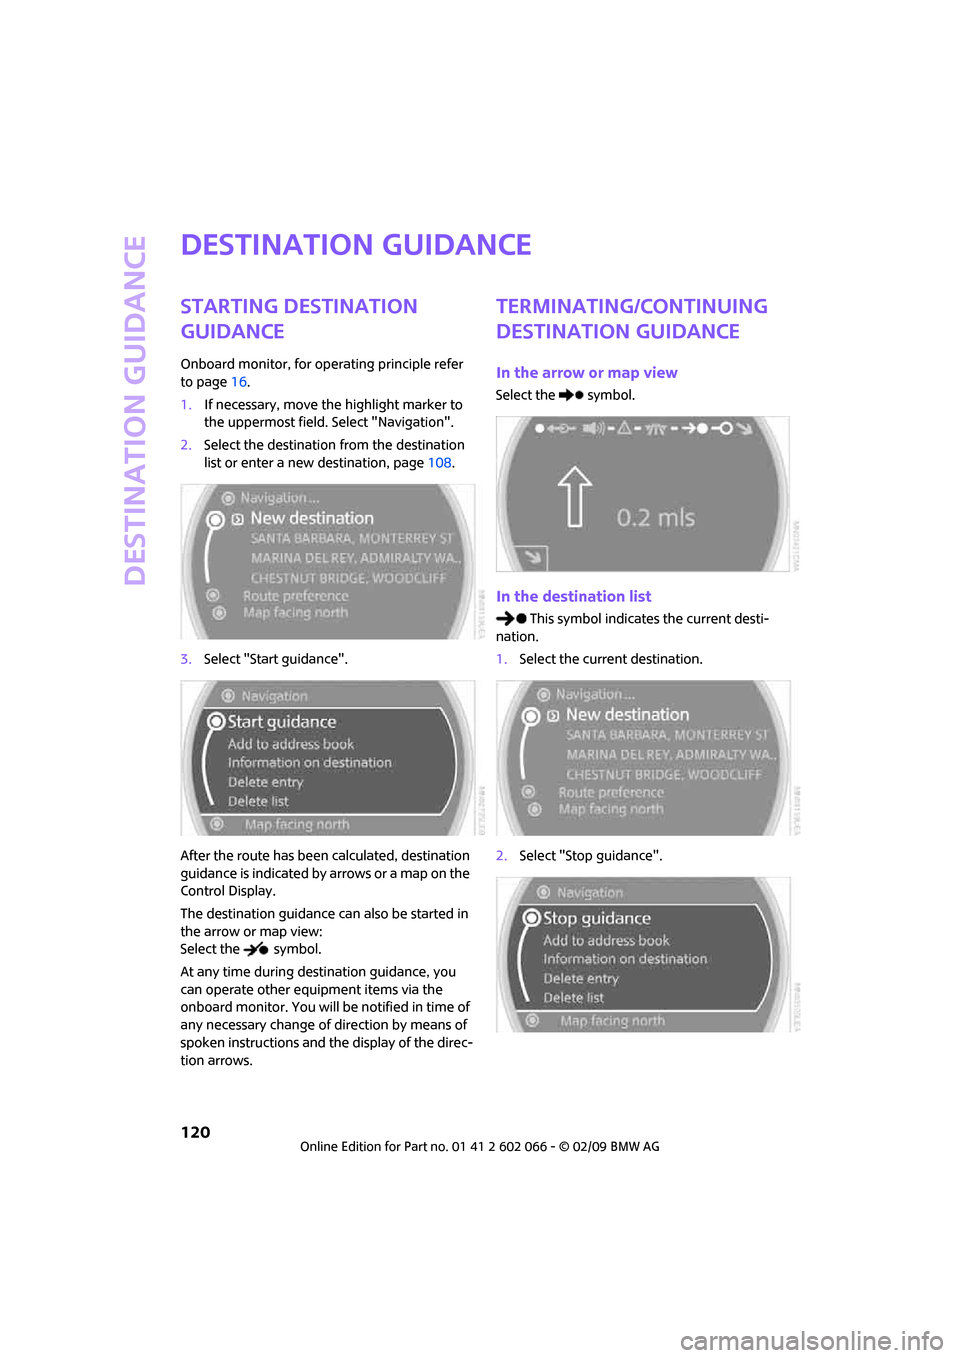
Onboard monitor, for operating principle refer
to page16.
1.If necessary, move the highlight marker to
the uppermost field. Select "Navigation".
2.Select the destination from the destination
list or enter a new destination, page108.
3.Select "Start guidance".
After the route has been calculated, destination
guidance is indicated by arrows or a map on the
Control Display.
The destination guidance can also be started in
the arrow or map view:
Select the symbol.
At any time during destination guidance, you
can operate other equipment items via the
onboard monitor. You will be notified in time of
any necessary change of direction by means of
spoken instructions and the display of the direc-
tion arrows.
Terminating/continuing
destination guidance
In the arrow or map view
Select the symbol.
In the destination list
This symbol indicates the current desti-
nation.
1.Select the current destination.
2.Select "Stop guidance".
Page 123 of 218

MOBILITYAT A GLANCE CONTROLS DRIVING TIPS ENTERTAINMENT
121
NAVIGATION REFERENCE
If you did not reach the destination before the
end of the last journey, the following question
will appear in the display at the start of the next
journey:
"Continue guidance to destination?".
The destination guidance starts automatically
after a short time.
Starting destination guidance
immediately
Select "Yes".
Route display
You have the option of displaying various views
of the route during destination guidance.
Displaying arrow view
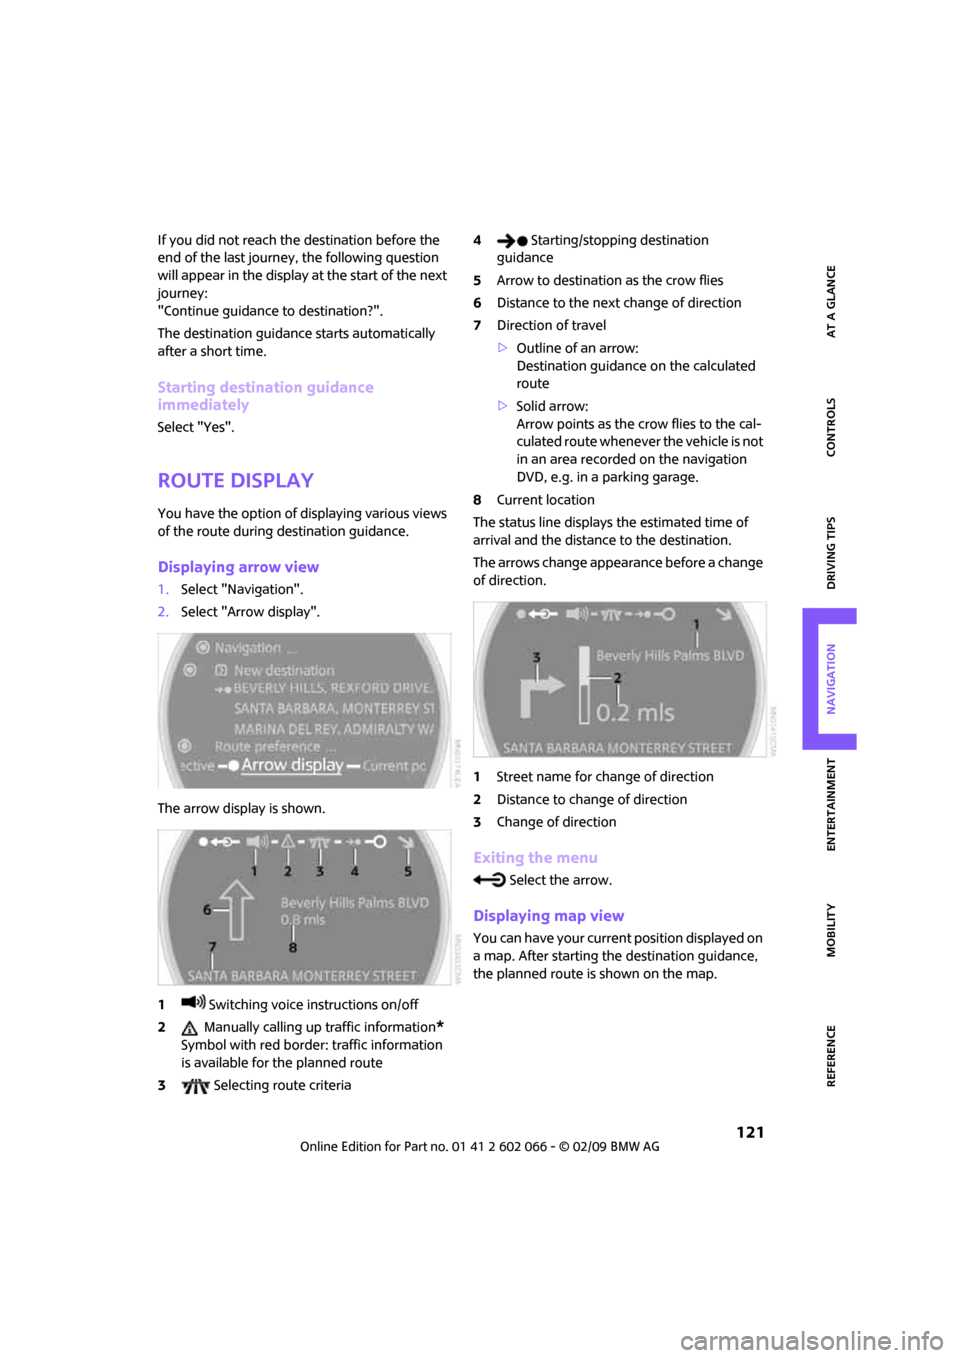
1.Select "Navigation".
2.Select "Arrow display".
The arrow display is shown.
1 Switching voice instructions on/off
2 Manually calling up traffic information
*
Symbol with red border: traffic information
is available for the planned route
3 Selecting route criteria4 Starting/stopping destination
guidance
5Arrow to destination as the crow flies
6Distance to the next change of direction
7Direction of travel
>Outline of an arrow:
Destination guidance on the calculated
route
>Solid arrow:
Arrow points as the crow flies to the cal-
culated route whenever the vehicle is not
in an area recorded on the navigation
DVD, e.g. in a parking garage.
8Current location
The status line displays the estimated time of
arrival and the distance to the destination.
The arrows change appearance before a change
of direction.
1Street name for change of direction
2Distance to change of direction
3Change of direction
Exiting the menu
Select the arrow.
Displaying map view
You can have your current position displayed on
a map. After starting the destination guidance,
the planned route is shown on the map.
Page 124 of 218

Destination guidance
122
1.Select "Navigation".
2.Move the highlight marker to the fourth field
from the top. Select the desired map view:
>"Map facing north"
>"Map direction of travel"
>"Perspective"
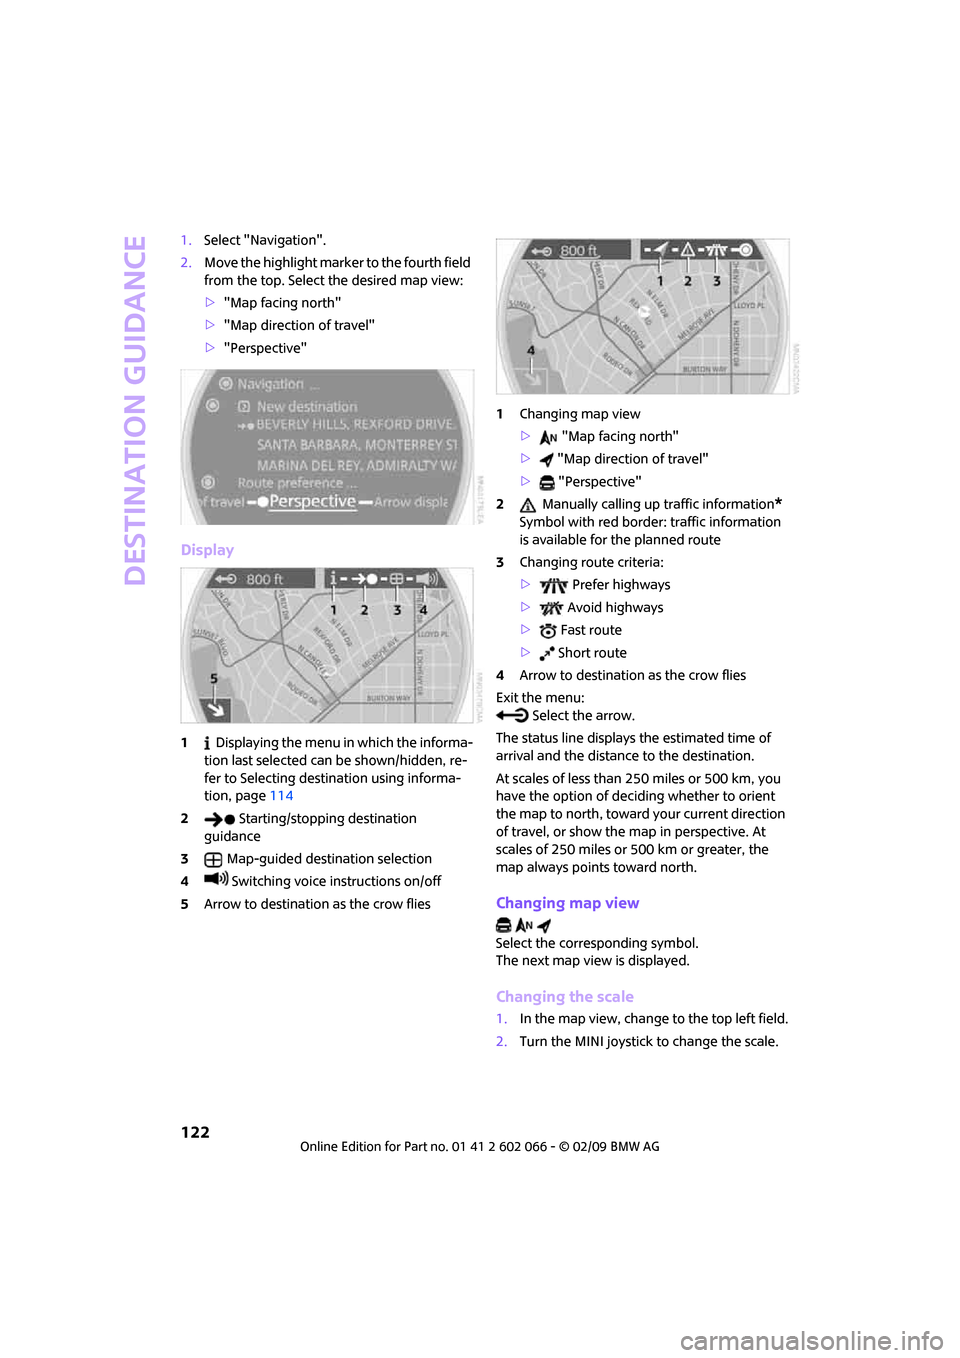
Display
1 Displaying the menu in which the informa-
tion last selected can be shown/hidden, re-
fer to Selecting destination using informa-
tion, page114
2 Starting/stopping destination
guidance
3Map-guided destination selection
4 Switching voice instructions on/off
5Arrow to destination as the crow flies1Changing map view
> "Map facing north"
> "Map direction of travel"
> "Perspective"
2 Manually calling up traffic information
*
Symbol with red border: traffic information
is available for the planned route
3Changing route criteria:
> Prefer highways
> Avoid highways
> Fast route
> Short route
4Arrow to destination as the crow flies
Exit the menu:
Select the arrow.
The status line displays the estimated time of
arrival and the distance to the destination.
At scales of less than 250 miles or 500 km, you
have the option of deciding whether to orient
the map to north, toward your current direction
of travel, or show the map in perspective. At
scales of 250 miles or 500 km or greater, the
map always points toward north.
Changing map view
Select the corresponding symbol.
The next map view is displayed.
Changing the scale
1.In the map view, change to the top left field.
2.Turn the MINI joystick to change the scale.
Page 125 of 218

MOBILITYAT A GLANCE CONTROLS DRIVING TIPS ENTERTAINMENT
123
NAVIGATION REFERENCE
Displaying towns/cities and streets
along the route
You can have the roads and towns along the
route displayed during destination guidance.
The distances remaining to be traveled within
each section of the route are also shown.
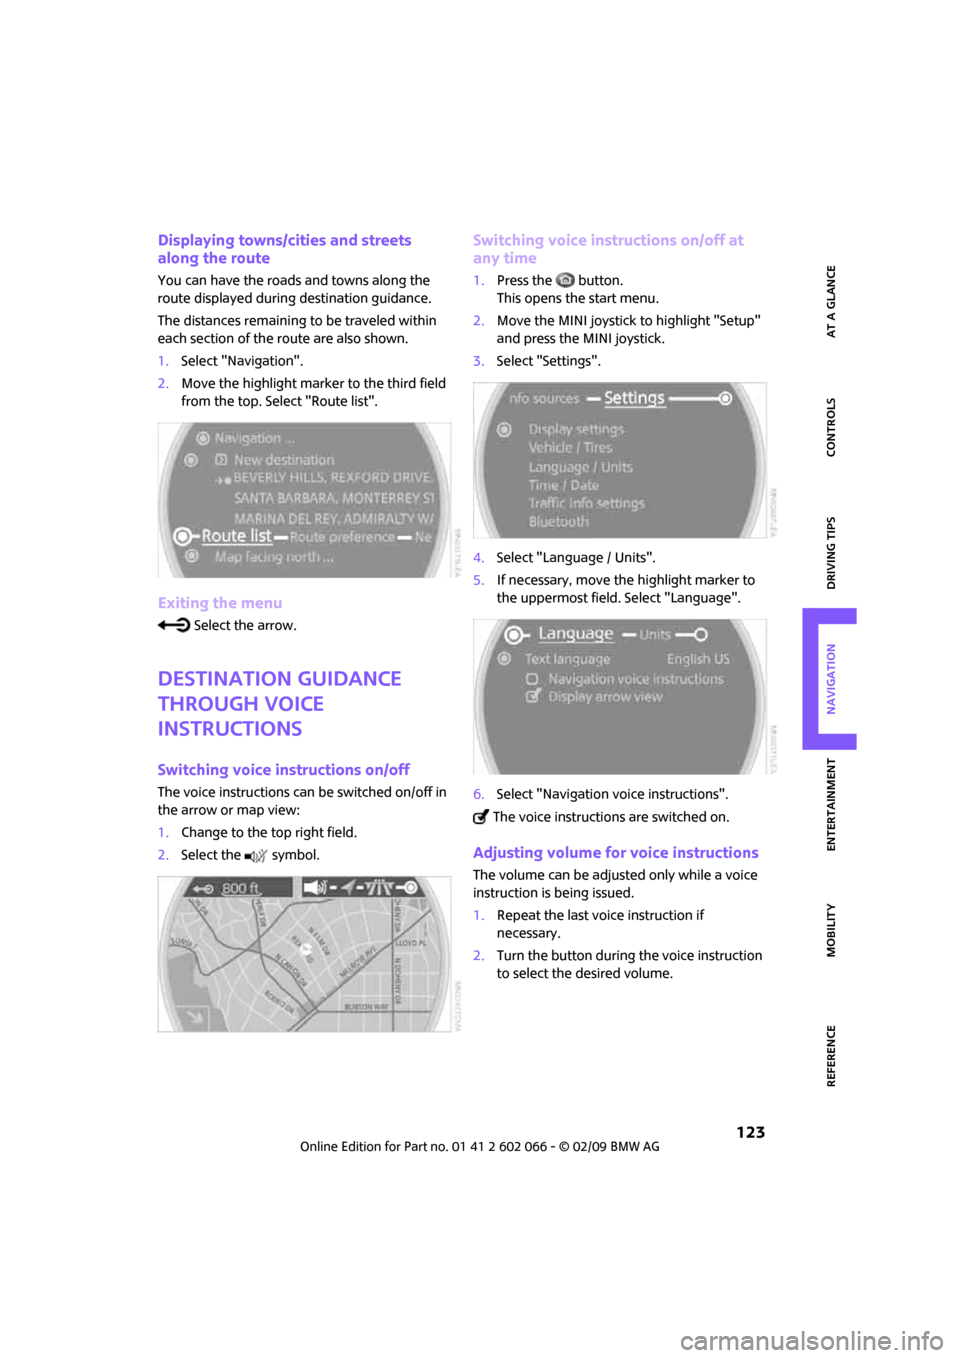
1.Select "Navigation".
2.Move the highlight marker to the third field
from the top. Select "Route list".
Exiting the menu
Select the arrow.
Destination guidance
through voice
instructions
Switching voice instructions on/off
The voice instructions can be switched on/off in
the arrow or map view:
1.Change to the top right field.
2.Select the symbol.
Switching voice instructions on/off at
any time
1.Press the button.
This opens the start menu.
2.Move the MINI joystick to highlight "Setup"
and press the MINI joystick.
3.Select "Settings".
4.Select "Language / Units".
5.If necessary, move the highlight marker to
the uppermost field. Select "Language".
6.Select "Navigation voice instructions".
The voice instructions are switched on.
Adjusting volume for voice instructions
The volume can be adjusted only while a voice
instruction is being issued.
1.Repeat the last voice instruction if
necessary.
2.Turn the button during the voice instruction
to select the desired volume.
Page 140 of 218

Radio
138
Radio Data System RDS
Radio stations in the FM waveband can broad-
cast additional information, e. g. the station
name, using RDS. If the reception conditions are
good, the station names are shown on the Con-
trol Display. Where reception is poor or in the
event of interference, it may take some time
before the station names will appear in the dis-
play.
Switching RDS on/off*
1.Select "FM".
2.Press the MINI joystick.
Other menu items are displayed.
3.Select "RDS".
RDS is activated.
The setting is stored for the remote control in
use, refer to Personal Profile, page26.
HD Radio*
Many stations broadcast both analog and digital
signals. If a digital radio network is available,
these stations can be received digitally and thus
with better sound quality.
Licence conditions
HD Radio
TM technology manufactured under
licence from iBiquity Digital Corp. U.S. and for-
eign patents. HD Radio
TM and the HD and
HD Radio logos are proprietary trademarks of
iBiquity Digital Corp.
Switching digital radio reception on/off
Onboard monitor, for operating principle refer
to page16.1.Press the ... button.
This opens the start menu.
2.Move the MINI joystick to highlight "Setup"
and press the MINI joystick.
3.Select "Settings".
4.Select "Audio".
5.Change to the topmost field. Select
"HD radio".
6.Select "Off".
Digital station reception is now switch-
ed on.
This symbol is displayed in the status line
when a station is received digitally.
Some stations do not transmit the digital and
analog signals simultaneously. If you are in an
area in which digital reception of the selected
station is not possible continuously, reception