2009 MINI Clubman stop start
[x] Cancel search: stop startPage 80 of 218

Technology for driving comfort and safety
78
8.Select "Yes" and press the MINI joystick.
9.Start driving.
The tires are shown in gray and "Resetting
TPM..." is displayed.
After driving a few minutes, the set inflation
pressures in the tires are accepted as the target
values to be monitored. The system reset is
completed during your drive, and can be inter-
rupted at any time. When driving resumes, the
reset is continued automatically. On the
onboard monitor, the tires are shown in green
and "Status: TPM active" is displayed again.
If a flat tire is detected while the system is
being reset and while it is determining the
inflation pressures, all tires on the onboard mon-
itor are displayed in yellow. The message "Tire
low!" is shown.<
Message for low tire inflation pressure
The warning lamps come on in yellow
and red. A message appears on the
onboard monitor. An acoustic signal
also sounds. There is a flat tire or sub-
stantial loss of tire pressure.
1.Reduce speed and stop the vehicle with cau-
tion. Avoid sudden braking and steering ma-
neuvers.
2.Check whether your vehicle is equipped
with normal tires or Run-Flat Tires.
The symbol identifying Run-Flat Tires
is a circle with the letters RSC on the
sidewall, page164.<
Normal tires
1.Determine which tire is damaged.
If this cannot be determined, contact
your MINI Dealer.<
2.Repair the flat tire or change the damaged
tire, refer to page182.
Run-Flat Tires*
1.Cautiously reduce speed to below 50 mph/
80 km/h. Avoid sudden braking and steering
maneuvers. Do not exceed a speed of
50 mph/80 km/h.
Do not continue driving if the vehicle is
not equipped with Run-Flat Tires, oth-
erwise a serious accident could result.<
2.In the event of complete tire pressure loss,
0 psi/0 kPa, you can estimate the possible
distance for continued driving on the basis
of the following guidelines:
>With a light load:
1 to 2 persons without luggage:
approx. 155 miles/250 km
>With a medium load:
2 persons, cargo bay full, or 4 persons
without luggage:
approx. 94 miles/150 km
>With a full load:
4 persons, load compartment full:
approx. 30 miles/50 km
Drive cautiously and do not exceed a
speed of 50 mph/80 km/h, otherwise an
accident may occur. In the event of pressure
loss, vehicle handling changes. This includes
reduced tracking stability in braking, extended
braking distance and altered natural steering
characteristics.
If unusual vibration or loud noises occur during
the journey, this may be an indication that the
damaged tire has finally failed. Reduce the vehi-
cle speed and stop as soon as possible. Other-
wise, sections of the tire may come loose and
cause accidents. Do not continue driving and
contact your MINI Dealer.<
Page 81 of 218

MOBILITYAT A GLANCE CONTROLS DRIVING TIPS ENTERTAINMENT
79
NAVIGATION REFERENCE
Malfunction
The small warning lamp flashes in yel-
low and then lights up continuously; the
larger warning lamp comes on in yel-
low.
On the onboard monitor, the tires are shown in
gray and a message appears. No punctures can
be detected.
This type of message is shown in the following
situations:
>If there is a malfunction.
Have the system checked.
>If a wheel without TPM electronics has been
mounted.
>If TPM is temporarily malfunctioning due to
other systems or devices using the same
radio frequency.
Message for unsuccessful system reset
Both warning lamps come on in yellow.
A message appears on the onboard
monitor. The system is not reset after a
tire has been changed, for example.
Check the tire inflation pressure and reset the
system, page76.
Declaration according to
NHTSA/FMVSS 138 Tire Pressure
Monitoring Systems
Each tire, including the spare, should be
checked monthly when cold and inflated to the
inflation pressure recommended by the vehicle
manufacturer on the vehicle placard or tire infla-
tion pressure label. If your vehicle has tires of a
different size than the size indicated on the vehi-
cle placard or tire inflation pressure label, you
should determine the proper tire inflation pres-
sure for those tires. As an added safety feature,
your vehicle has been equipped with a tire pres-
sure monitoring system TPMS that illuminates a
low tire pressure telltale when one or more of
your tires are significantly under-inflated.
Accordingly, when the low tire pressure telltale
illuminates, you should stop and check your tires
as soon as possible, and inflate them to the
proper pressure. Driving on a significantly
under-inflated tire causes the tire to overheat and can lead to tire failure. Underinflation also
reduces fuel efficiency and tire tread life, and
may affect the vehicle's handling and stopping
ability. Please note that the TPMS is not a substi-
tute for proper tire maintenance, and it is the
driver's responsibility to maintain correct tire
pressure, even if underinflation has not reached
the level at which the TPMS low tire pressure tell-
tale illuminates.
The TPMS malfunction indicator is combined
with the low tire pressure telltale. When the sys-
tem detects a malfunction, the telltale will flash
for approximately one minute and then remain
continuously lit. This sequence will continue
upon subsequent vehicle startups as long as the
malfunction exists. When the malfunction indi-
cator is illuminated, the system may not be able
to detect or signal low tire pressure as intended.
TPMS malfunctions may occur for a variety of
reasons, including the installation of replace-
ment or alternate tires or wheels on the vehicle
that prevent the TPMS from functioning prop-
erly. Always check the TPMS malfunction telltale
after replacing one or more tires or wheels on
your vehicle to ensure that the replacement or
alternate tires and wheels allow the TPMS to
continue to function properly.
Page 86 of 218

Lamps
84
Switching off
Press the lever up or down to the pressure point.
Fog lamps*
1Fog lamps*
2Rear fog lamp*
Press the respective switch to turn the lamps
on/off.
Fog lamps*
The parking lamps or low beams must be
switched on for the fog lamps to operate. The
green indicator lamp comes on when the fog
lamps are switched on.
Depending on your vehicle's equipment, the fog
lamps are switched off when you activate the
headlamp flasher or switch on the high beams.
If the automatic headlamp control is acti-
vated, the low beams will come on auto-
matically when you switch on the fog lamps.<
Rear fog lamp*
The low beams or parking lamps with fog lamps
must be switched on. The yellow indicator lamp
c o m e s o n w h e n t h e r e a r f o g l a m p i s s w i t c h e d o n .
Instrument lighting
You can adjust the brightness of the instrument
lighting only when the parking lamps or the low
beams are on.
Increasing brightness
Press and hold the button until the desired
brightness is reached.
Reducing brightness
Press the button briefly.
The brightness decreases every time the button
is pressed briefly.
Interior lamps
The interior lamps, the footwell lamps* and the
cargo bay lamp are controlled automatically.
To avoid draining the battery, all lamps
inside the car are switched off about
8 minutes after the ignition is switched off, refer
to Start/stop button on page46.<
Switching interior lamps on/off manually
To switch the interior lamps on/off.
Press the switch.
To switch off the interior lamps permanently,
press the button for about 3 seconds.
Page 122 of 218

Destination guidance
120
Destination guidance
Starting destination
guidance
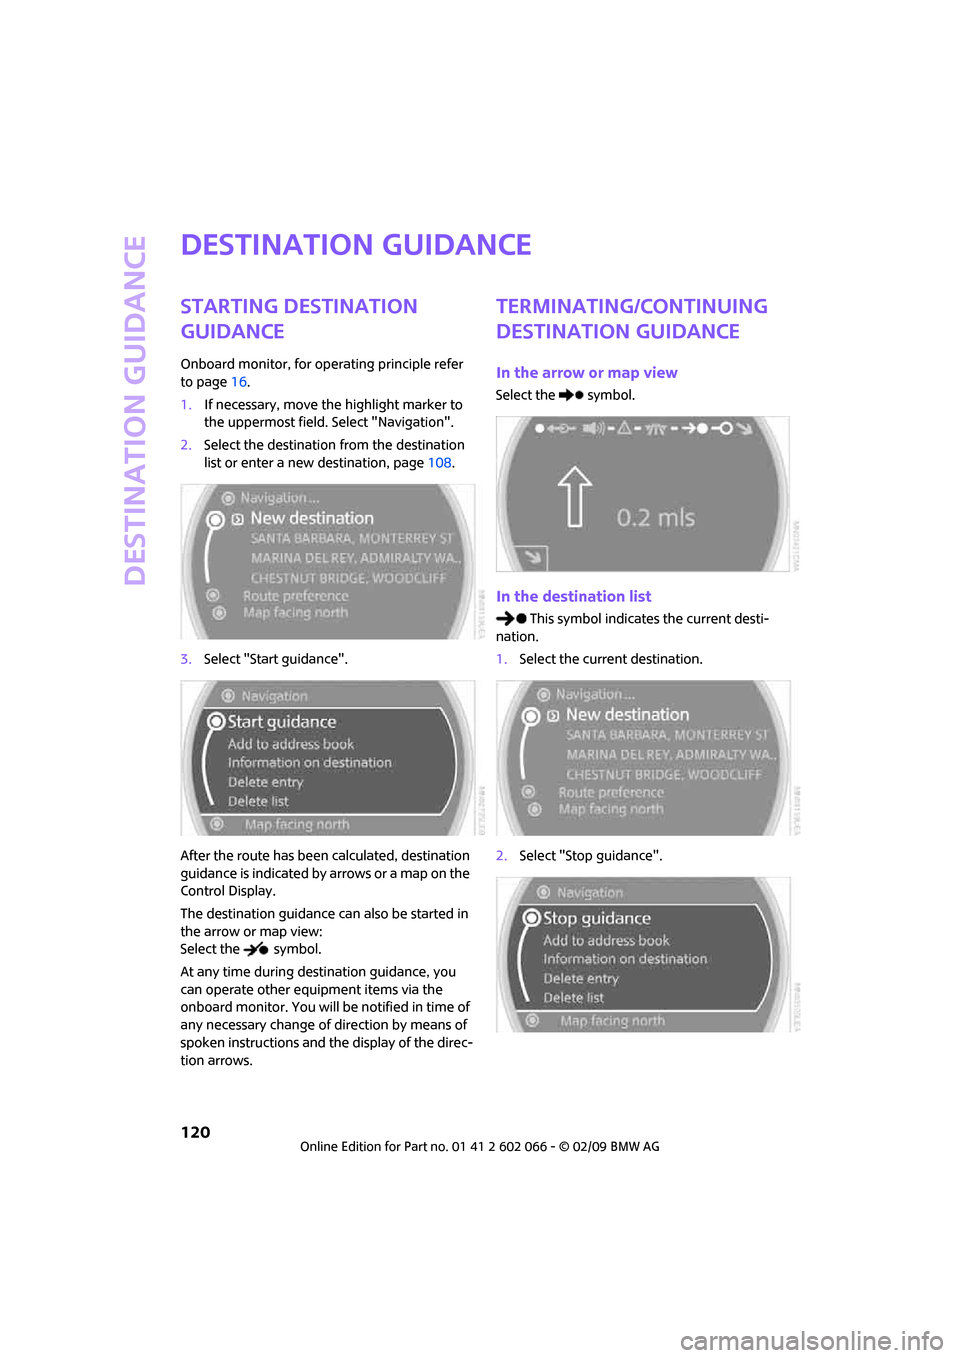
Onboard monitor, for operating principle refer
to page16.
1.If necessary, move the highlight marker to
the uppermost field. Select "Navigation".
2.Select the destination from the destination
list or enter a new destination, page108.
3.Select "Start guidance".
After the route has been calculated, destination
guidance is indicated by arrows or a map on the
Control Display.
The destination guidance can also be started in
the arrow or map view:
Select the symbol.
At any time during destination guidance, you
can operate other equipment items via the
onboard monitor. You will be notified in time of
any necessary change of direction by means of
spoken instructions and the display of the direc-
tion arrows.
Terminating/continuing
destination guidance
In the arrow or map view
Select the symbol.
In the destination list
This symbol indicates the current desti-
nation.
1.Select the current destination.
2.Select "Stop guidance".
Page 123 of 218

MOBILITYAT A GLANCE CONTROLS DRIVING TIPS ENTERTAINMENT
121
NAVIGATION REFERENCE
If you did not reach the destination before the
end of the last journey, the following question
will appear in the display at the start of the next
journey:
"Continue guidance to destination?".
The destination guidance starts automatically
after a short time.
Starting destination guidance
immediately
Select "Yes".
Route display
You have the option of displaying various views
of the route during destination guidance.
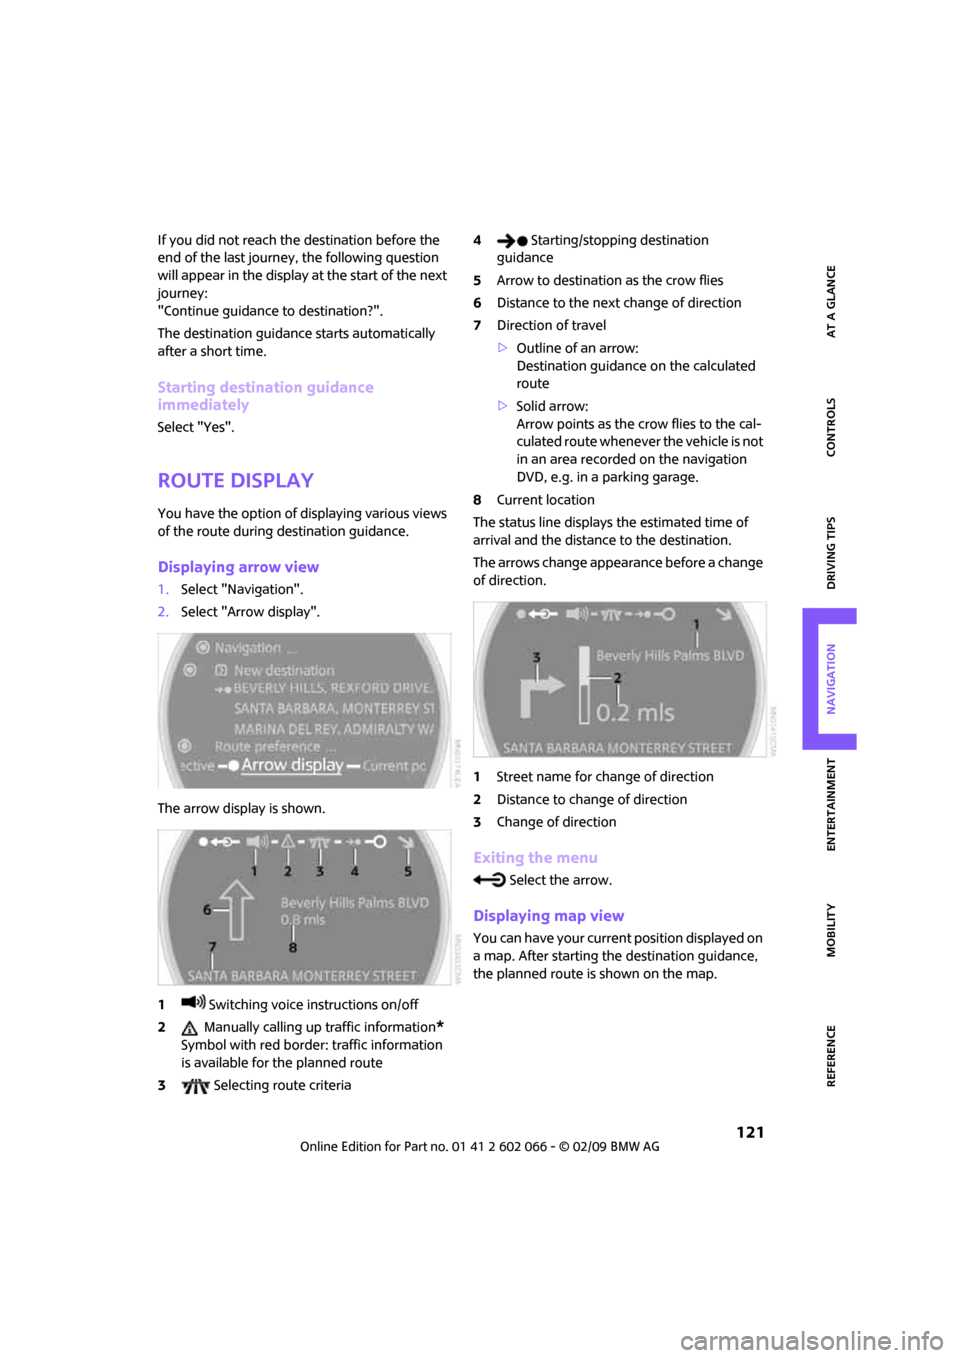
Displaying arrow view
1.Select "Navigation".
2.Select "Arrow display".
The arrow display is shown.
1 Switching voice instructions on/off
2 Manually calling up traffic information
*
Symbol with red border: traffic information
is available for the planned route
3 Selecting route criteria4 Starting/stopping destination
guidance
5Arrow to destination as the crow flies
6Distance to the next change of direction
7Direction of travel
>Outline of an arrow:
Destination guidance on the calculated
route
>Solid arrow:
Arrow points as the crow flies to the cal-
culated route whenever the vehicle is not
in an area recorded on the navigation
DVD, e.g. in a parking garage.
8Current location
The status line displays the estimated time of
arrival and the distance to the destination.
The arrows change appearance before a change
of direction.
1Street name for change of direction
2Distance to change of direction
3Change of direction
Exiting the menu
Select the arrow.
Displaying map view
You can have your current position displayed on
a map. After starting the destination guidance,
the planned route is shown on the map.
Page 124 of 218

Destination guidance
122
1.Select "Navigation".
2.Move the highlight marker to the fourth field
from the top. Select the desired map view:
>"Map facing north"
>"Map direction of travel"
>"Perspective"
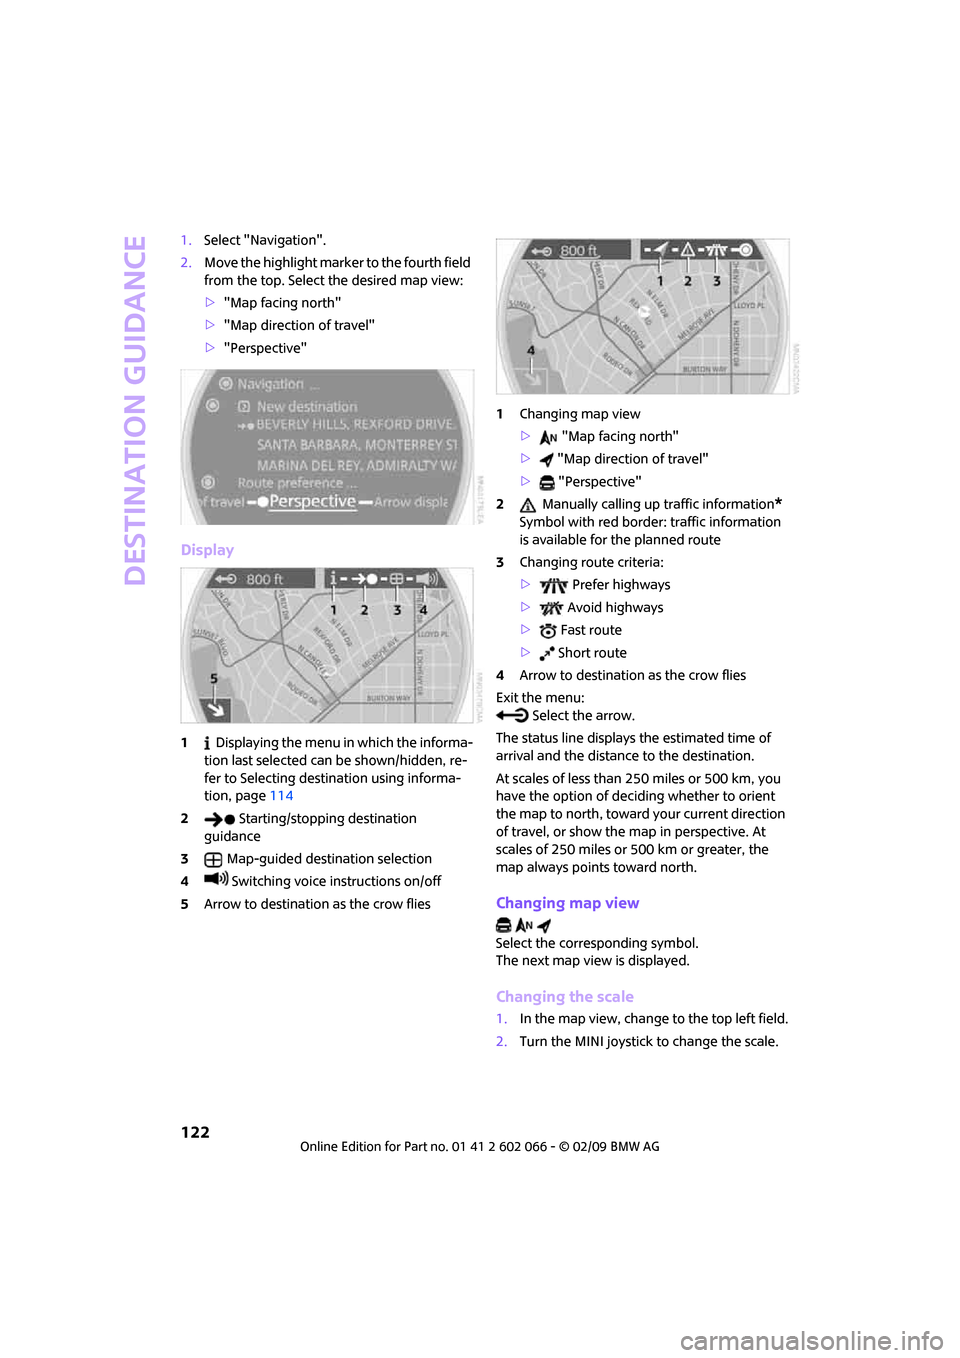
Display
1 Displaying the menu in which the informa-
tion last selected can be shown/hidden, re-
fer to Selecting destination using informa-
tion, page114
2 Starting/stopping destination
guidance
3Map-guided destination selection
4 Switching voice instructions on/off
5Arrow to destination as the crow flies1Changing map view
> "Map facing north"
> "Map direction of travel"
> "Perspective"
2 Manually calling up traffic information
*
Symbol with red border: traffic information
is available for the planned route
3Changing route criteria:
> Prefer highways
> Avoid highways
> Fast route
> Short route
4Arrow to destination as the crow flies
Exit the menu:
Select the arrow.
The status line displays the estimated time of
arrival and the distance to the destination.
At scales of less than 250 miles or 500 km, you
have the option of deciding whether to orient
the map to north, toward your current direction
of travel, or show the map in perspective. At
scales of 250 miles or 500 km or greater, the
map always points toward north.
Changing map view
Select the corresponding symbol.
The next map view is displayed.
Changing the scale
1.In the map view, change to the top left field.
2.Turn the MINI joystick to change the scale.
Page 131 of 218

MOBILITYAT A GLANCE CONTROLS DRIVING TIPS ENTERTAINMENT
129
NAVIGATION REFERENCE
What to do if …
What to do if …
>a navigation DVD is inserted, but an instruc-
tion to insert the DVD appears on the Control
Display?
The navigation DVD may not be the correct
DVD for the navigation system. This infor-
mation is indicated on the DVD label.
>you request the current position of your
vehicle, but do not receive a precise display?
The system is unable to receive enough GPS
signals at your current position due to
obstructions, your current position is not yet
available on your navigation DVD, or the sys-
tem is in the process of calculating your cur-
rent position. As a rule, reception is guaran-
teed when you are in the open.
>the destination guidance does not accept a
destination?
The data of the destination is not stored on
the navigation DVD that is loaded. Choose a
destination as close as possible to the origi-
nal one.
>the destination guidance does not accept an
address without the street name?
On the navigation DVD, no downtown area
can be determined for the city or town
entered. Enter any street, or a destination
such as the railway station in the selected
town, and then start the destination guid-
ance.
>you want to enter a destination for the des-
tination guidance, but it is not possible to
select the letters for your desired entry?
The data of the destination is not stored on
the navigation DVD that is loaded. In this
case, the system will not offer you any letters
to choose from. Choose a destination as
close as possible to the original one.
>the system stops furnishing directions on
which way to turn as you approach inter-
sections?
You are driving in an area that has not yet
been completely recorded on the navigation
DVD. Instead of an arrow indicating a turn, you will see an arrow which indicates the
general direction of your planned route. Or
you have left the recommended route and
the system requires a few seconds to calcu-
late a new recommended route.
>the navigation system does not react to
entries?
If the battery was disconnected, it takes
about 10 minutes before the system is once
again operational.
Page 191 of 218

MOBILITYAT A GLANCE CONTROLS DRIVING TIPS ENTERTAINMENT
189
NAVIGATION REFERENCE
Vehicles with a catalytic converter should only
be tow-started when the engine is cold, vehicles
with an automatic transmission cannot be tow-
started at all.
1.Switch on hazard warning flashers, comply
with local regulations.
2.Switch on the ignition, page46.
3.Shift into 3rd gear.
4.Have the vehicle tow-started with the clutch
completely depressed and then slowly re-
lease the clutch. After the engine starts, im-
mediately depress the clutch completely
again.
5.Stop at a suitable location, remove the tow
bar or rope and switch off the hazard warn-
ing flashers.
6.Have the vehicle checked.