2009 Mercury Milan seat adjustment
[x] Cancel search: seat adjustmentPage 47 of 317

6.Fan speed adjustment:Controls the volume of air circulated in the
vehicle.
Manual heating and air conditioning system operating tips
•To reduce fog build up on the windshield during humid weather, place
the air flow selector in the
position.
•To reduce humidity build up inside the vehicle: do not drive with the
airflow selector in the O (OFF) position or with recirculated air
engaged and A/C off.
•Do not put objects under the front seats that will interfere with the
airflow to the back seats.
•Remove any snow, ice or leaves from the air intake area at the base of
the windshield.
•To improve the A/C cool down, drive with the windows slightly open
for 2–3 minutes after start up or until the vehicle has been “aired out.”
During extreme high ambient temperatures when idling stationary for
extended periods of time in gear, it is recommended to run the A/C in
the MAX A/C mode, reduce blower fan speed from the highest setting
and put the vehicle’s transmission into the PARK gear position
(automatic transmission only) to continue to receive cool air from your
A/C system.
For maximum cooling performance (MAX A/C mode):
•Move the temperature control selector to the coldest setting.
•Set the fan to the highest speed initially, then adjust to maintain
passenger comfort.
In the
andmodes:
•Move the temperature control selector to the coldest setting.
•Select A/C and recirculated air
. Usewith A/C to provide
colder airflow.
•Set the fan to the highest speed initially, then adjust to maintain
passenger comfort.
•To aid in side window defogging/demisting in cold weather:
1. Select
.
2. Select A/C.
3. Set the temperature control to full heat.
2009 Milan(mln)
Owners Guide, 2nd Printing
USA(fus)
Climate Controls
47
Page 120 of 317

To remove the adjustable head restraint, do the following:
1. Pull up the head restraint until it
reaches the highest adjustment
position.
2. Simultaneously press and hold
both the adjust/release button and
the unlock/remove button, then pull
up on the head restraint.
To reinstall the adjustable head restraint, do the following:
1. Insert the two stems into the
guide sleeve collars.
2. Push the head restraint down
until it locks.
Properly adjust the head restraint so that the top of the head restraint is
even with the top of your head and positioned as close as possible to the
back of your head. For occupants of extremely tall stature, adjust the
head restraint to its full up position.
2009 Milan(mln)
Owners Guide, 2nd Printing
USA(fus)
Seating and Safety Restraints
120
Page 133 of 317

All safety restraints in the vehicle are combination lap and shoulder
belts. All of the passenger combination lap and shoulder belts have two
types of locking modes described below:
Vehicle sensitive mode
This is the normal retractor mode, which allows free shoulder belt length
adjustment to your movements and locking in response to vehicle
movement. For example, if the driver brakes suddenly or turns a corner
sharply, or the vehicle receives an impact of approximately 5 mph
(8 km/h) or more, the combination safety belts will lock to help reduce
forward movement of the driver and passengers.
Automatic locking mode
How to use the automatic locking mode
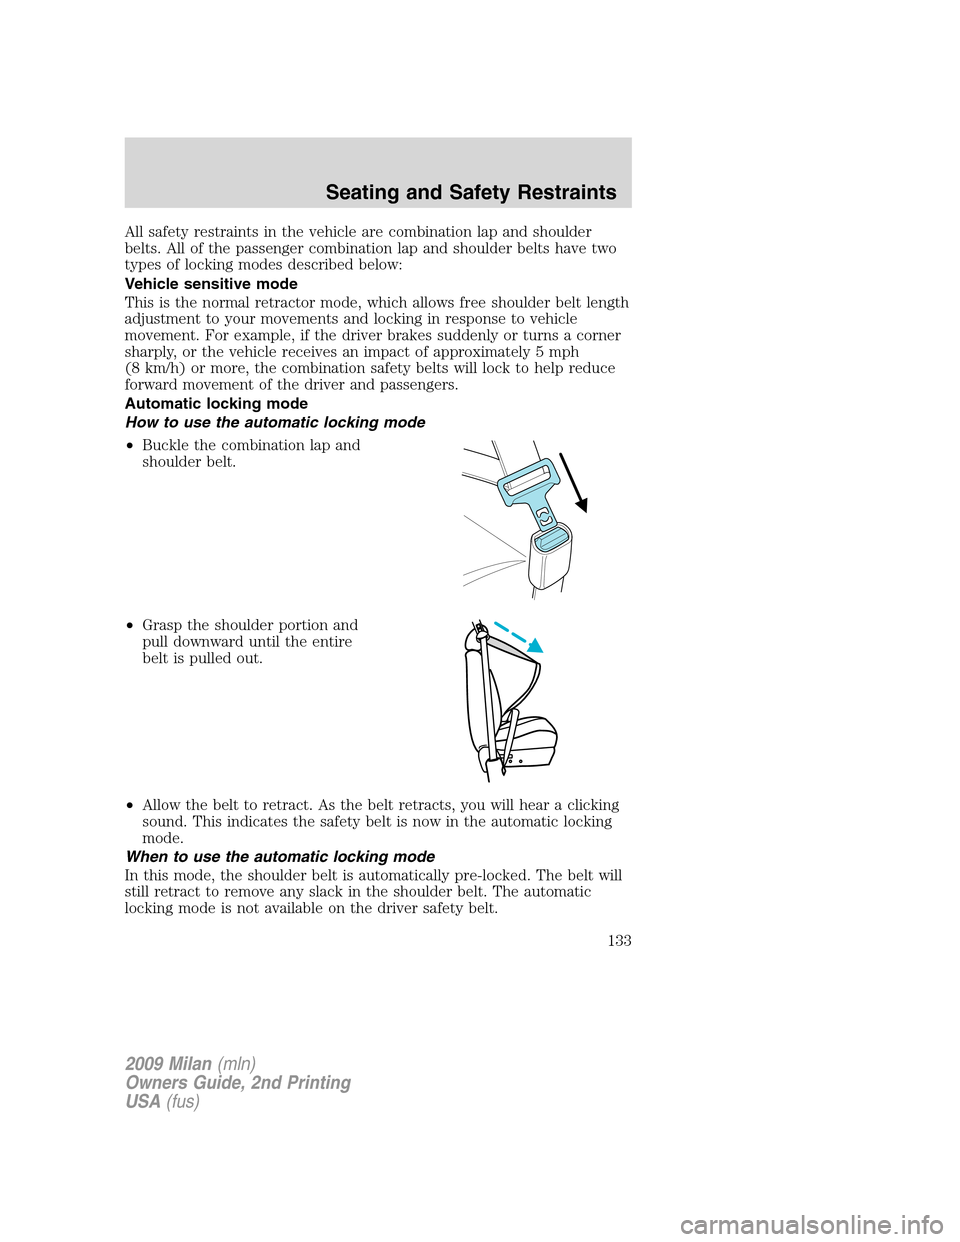
•Buckle the combination lap and
shoulder belt.
•Grasp the shoulder portion and
pull downward until the entire
belt is pulled out.
•Allow the belt to retract. As the belt retracts, you will hear a clicking
sound. This indicates the safety belt is now in the automatic locking
mode.
When to use the automatic locking mode
In this mode, the shoulder belt is automatically pre-locked. The belt will
still retract to remove any slack in the shoulder belt. The automatic
locking mode is not available on the driver safety belt.
2009 Milan(mln)
Owners Guide, 2nd Printing
USA(fus)
Seating and Safety Restraints
133
Page 135 of 317

Safety belt height adjustment
Your vehicle has safety belt height
adjustments at the front outboard
seating positions. Adjust the height
of the shoulder belt so the belt rests
across the middle of your shoulder.
To adjust the shoulder belt height,
pull on the center button and slide
the height adjuster up or down.
Release the button and pull down
on the height adjuster to make sure
it is locked in place.
WARNING:Position the safety belt height adjusters so that the
belt rests across the middle of your shoulder. Failure to adjust
the safety belt properly could reduce the effectiveness of the safety
belt and increase the risk of injury in a collision.
Safety belt extension assembly
If the safety belt is too short when fully extended, there is an 8 inch
(20 cm) safety belt extension assembly that can be added (part number
611C22). This assembly can be obtained from an authorized dealer.
Use only extensions manufactured by the same supplier as the safety
belt. Manufacturer identification is located at the end of the webbing on
the label. Also, use the safety belt extension only if the safety belt is too
short for you when fully extended.
WARNING:Do not use extensions to change the fit of the
shoulder belt across the torso.
Safety belt warning light and indicator chime
The safety belt warning light illuminates in the instrument cluster and a
chime sounds to remind the occupants to fasten their safety belts.
2009 Milan(mln)
Owners Guide, 2nd Printing
USA(fus)
Seating and Safety Restraints
135
Page 313 of 317

in rear seat ..............................161
LATCH .....................................164
recommendations ...................158
Child safety seats - booster
seats ...........................................169
Cleaning your vehicle
engine compartment ..............259
instrument panel ....................261
interior .....................................262
plastic parts ............................260
washing ....................................257
waxing .....................................258
wheels ......................................258
wiper blades ............................261
Climate control (see Air
conditioning or Heating) ......48, 50
Clock ............................................73
Clock adjust
6-CD in dash .............................31
AM/FM/CD .................................24
Clutch
fluid ..........................................295
operation while driving ..........217
recommended shift speeds ....217
Compass, electronic
set zone adjustment .................90
Console ........................................72
overhead ....................................72
Controls
power seat ...............................122
steering column ........................80
Coolant
checking and adding ..............277
refill capacities ................281, 304
specifications ..........................304
Cruise control
(see Speed control) ....................77
Cupholder(s) .............................127Customer Assistance ................227
Ford Extended
Service Plan ............................254
Getting assistance outside the
U.S. and Canada .....................254
Getting roadside assistance ...227
Getting the service
you need .................................250
Ordering additional owner’s
literature .................................255
Utilizing the
Mediation/Arbitration
Program ...................................253
D
Daytime running lamps
(see Lamps) ................................55
Dipstick
automatic transmission
fluid ..................................296–297
engine oil .................................270
Driving under special
conditions ..................216, 222, 224
sand .........................................223
snow and ice ...........................225
through water .................223, 226
E
Electronic message center .........87
Emergencies, roadside
jump-starting ..........................242
Emission control system ..........291
Engine ........................................307
cleaning ...................................259
coolant .....................................277
fail-safe cooling .......................282
idle speed control ...................275
lubrication specifications .......304
refill capacities ........................304
2009 Milan(mln)
Owners Guide, 2nd Printing
USA(fus)
Index
313