Page 140 of 426

140 Controls in detailControl systemFuel consumption since last reset�
Press button ÿ or è repeatedly
until you see the first function of the
trip computer menu.
�
Press button j or k repeatedly
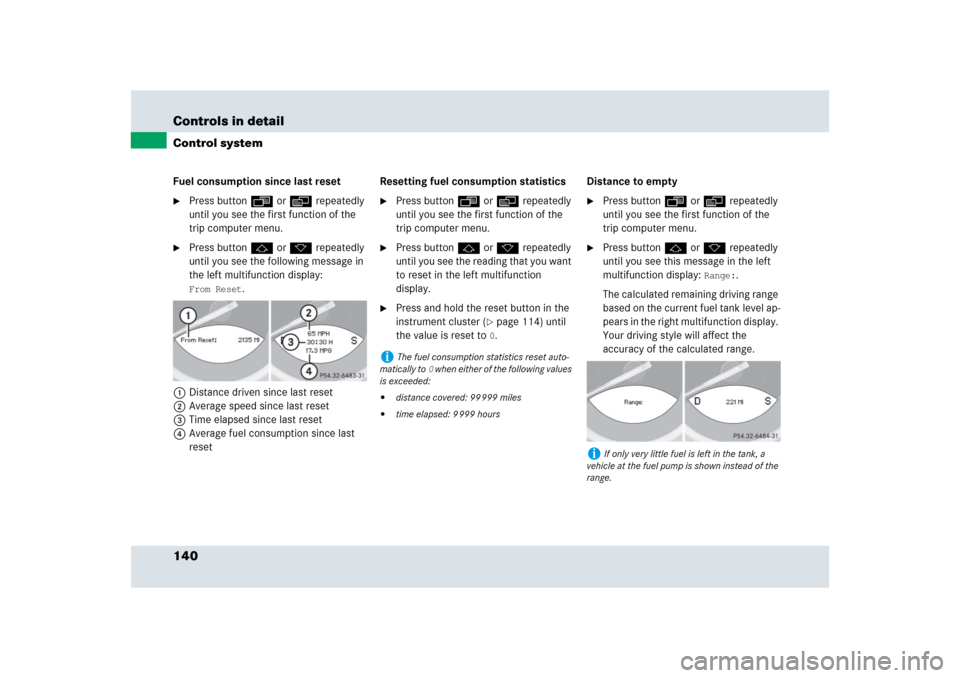
until you see the following message in
the left multifunction display: From Reset
.
1Distance driven since last reset
2Average speed since last reset
3Time elapsed since last reset
4Average fuel consumption since last
resetResetting fuel consumption statistics
�
Press button ÿ or è repeatedly
until you see the first function of the
trip computer menu.
�
Press button j or k repeatedly
until you see the reading that you want
to reset in the left multifunction
display.
�
Press and hold the reset button in the
instrument cluster (
�page 114) until
the value is reset to 0.Distance to empty
�
Press button ÿ or è repeatedly
until you see the first function of the
trip computer menu.
�
Press button j or k repeatedly
until you see this message in the left
multifunction display:
Range:
.
The calculated remaining driving range
based on the current fuel tank level ap-
pears in the right multifunction display.
Your driving style will affect the
accuracy of the calculated range.
i
The fuel consumption statistics reset auto-
matically to
0 when either of the following values
is exceeded:
�
distance covered: 99 999 miles
�
time elapsed: 9 999 hours
i
If only very little fuel is left in the tank, a
vehicle at the fuel pump is shown instead of the
range.
Page 247 of 426

247 Operation
At the gas station
�At the gas station
RefuelingThe fuel filler flap is located on the
right-hand side of the vehicle towards the
rear. Locking/unlocking the vehicle with
the SmartKey automatically locks/unlocks
the fuel filler flap.
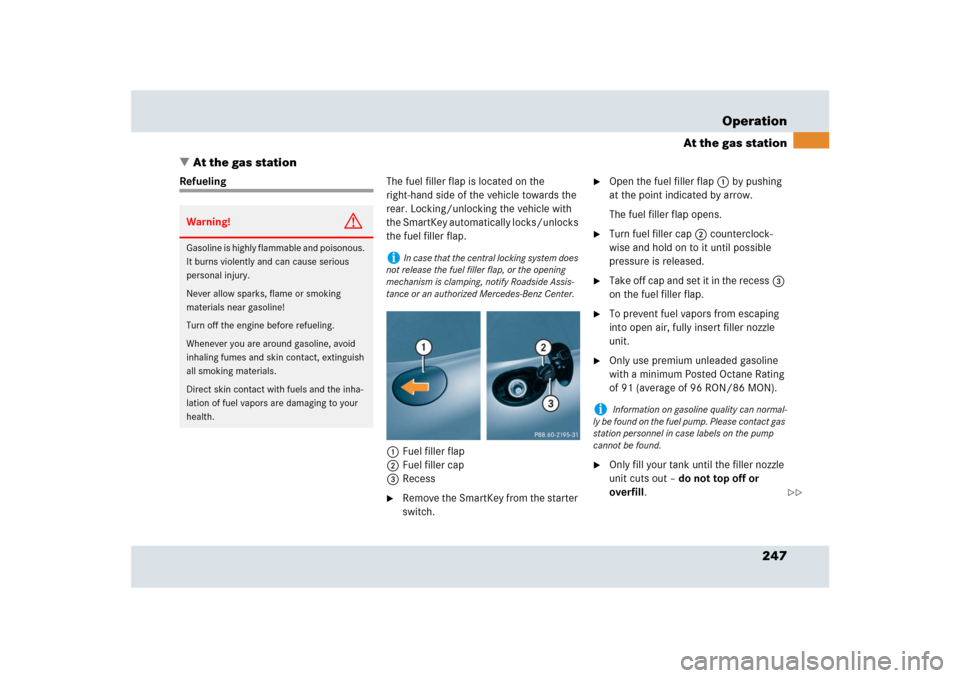
1Fuel filler flap
2Fuel filler cap
3Recess
�
Remove the SmartKey from the starter
switch.
�
Open the fuel filler flap 1 by pushing
at the point indicated by arrow.
The fuel filler flap opens.
�
Turn fuel filler cap2 counterclock-
wise and hold on to it until possible
pressure is released.
�
Take off cap and set it in the recess3
on the fuel filler flap.
�
To prevent fuel vapors from escaping
into open air, fully insert filler nozzle
unit.
�
Only use premium unleaded gasoline
with a minimum Posted Octane Rating
of 91 (average of 96 RON/86 MON).
�
Only fill your tank until the filler nozzle
unit cuts out – do not top off or
overfill.
Warning!
G
Gasoline is highly flammable and poisonous.
It burns violently and can cause serious
personal injury.
Never allow sparks, flame or smoking
materials near gasoline!
Turn off the engine before refueling.
Whenever you are around gasoline, avoid
inhaling fumes and skin contact, extinguish
all smoking materials.
Direct skin contact with fuels and the inha-
lation of fuel vapors are damaging to your
health.
i
In case that the central locking system does
not release the fuel filler flap, or the opening
mechanism is clamping, notify Roadside Assis-
tance or an authorized Mercedes-Benz Center.
i
Information on gasoline quality can normal-
ly be found on the fuel pump. Please contact gas
station personnel in case labels on the pump
cannot be found.
��
Page 248 of 426

248 OperationAt the gas station�
Replace fuel filler cap by turning it
clockwise until it audibly engages.
�
Close the fuel filler flap until you hear
the latch close shut.
Check regularly and before a long trip
1Coolant
2Engine oil
3Brake fluid
Warning!
G
Overfilling of the fuel tank may create
pressure in the system which could cause a
gas discharge. This could cause the gas to
spray back out when removing the fuel
pump nozzle, which could cause personal
injury. i
Make sure to close the fuel filler flap before
locking your vehicle as the flap locking pin pre-
vents closing after you have locked the vehicle.
i
For more information on gasoline, see “Pre-
mium unleaded gasoline” (
�page 396), see “Fu-
el requirements” (
�page 397), or contact an
authorized Mercedes-Benz Center, or visit
www.mbusa.com (USA only).
Leaving the engine running and the fuel filler cap
open can cause theú malfunction indicator
lamp (USA only) or the± malfunction indica-
tor lamp (Canada only) to illuminate.
For more information, see “Practical hints”
(
�page 309).
i
Opening the hood, see (
�page 250).
��
Page 405 of 426

405 Technical terms
Instrument cluster
The displays and indicator/warning
lamps in the driver’s field of vision, in-
cluding the tachometer, speedometer,
engine temperature and fuel gauge.
Kickdown
Depressing the accelerator past the
point of resistance shifts the transmis-
sion down to the lowest possible. This
very quickly accelerates the vehicle
and should not be used for normal
acceleration needs.
Kilopascal (kPa)
(
�page 287)
Maximum load rating
(�page 287)
Maximum loaded vehicle weight
(�page 287)
Maximum tire inflation pressure
(�page 287)MON
(M
otor O
ctane N
umber)
The Motor Octane Number for gasoline
as determined by a standardized
method. It is an indication of a gaso-
line's ability to resist undesired detona-
tion (knocking). The average of both
the MON (Motor Octane Number) and
RON (Research Octane Number) is
posted at the pump, also known as
ANTI-KNOCK INDEX.
Multifunction display
Two display fields in the instrument
cluster used to present information
provided by the control system.
Multifunction steering wheel
Steering wheel with buttons for
operating the control system.
Normal occupant weight
(
�page 287)OCS
(O
ccupant C
lassification S
ystem)
The system automatically turns the
front passenger front air bag on or off
based on the classified occupant size
category determined by weight sensor
readings from the seat.
Overspeed range
Engine speeds within the red marking
on the tachometer dial. Avoid this
engine speed range, as it may result in
serious engine damage that is not
covered by the Mercedes-Benz Limited
Warranty.
Poly-V-belt drive
Drives engine-components (alternator,
AC compressor, etc.) from the engine.