2009 MERCEDES-BENZ GL SUV tyre pressure
[x] Cancel search: tyre pressurePage 187 of 309

board computer refer to those measured at
sea level. At high altitudes, the tyre pres-
sure values indicated by a pressure gauge
are higher than those shown by the on-
board computer. In this case, do not reduce
the tyre pressures.
i After a teach-in period, the tyre pressure
monitor automatically recognises new
wheels or new sensors. As long as a clear
allocation of the tyre pressure values to the
individual wheels is not possible, the dis-
play message Tyre pressure monitor
active is shown instead of the tyre pres-
sure display. The tyre pressures are already
being monitored.
Restarting the tyre pressure monitor When you restart the tyre pressure monitor,
all existing warning messages are deleted and
the warning lamps go out. The monitor uses
the currently set tyre pressures as the speci-
fied values for monitoring.
In most cases, the tyre pressure monitor will
automatically detect the new reference val-
ues, e.g. if you have:
R changed the tyre pressure
R changed the wheels or tyres
R fitted new wheels or tyres
i You will find the menu overview on
(Y page 99).
If you wish to define the new reference values
manually:
X Use the table on the inside of the fuel filler
flap to ensure that the tyre pressure is set
correctly in all four tyres for the current
operating conditions.
Also observe the notes in the section on
tyre pressures (Y page 180).
X Make sure that the key is in position 2in
the ignition lock.
X Press the &or* button to select the
Tyre pressure function or wait until the
following message appears: X
Press the reset button on the instrument
cluster (Y page 25).
The multi-function display shows the mes-
sage:
Restart tyre pressure monitor?
Yes Cancel
X Press the Wbutton.
The multi-function display shows the mes-
sage:
Tyre pressure monitor restarted
The tyre pressure monitor has stored the
pressure of the tyres as a new reference
value.
Cancelling the restart X
Press the Xbutton.
Other messages in the multi-function
display If in multi-function display the following mes-
sage appears:
Please correct tyre pressures
X
Check the tyre pressure on all four wheels
and correct it if necessary.
i If the wheel positions on the vehicle are
interchanged, the tyre pressures may be
displayed for the wrong positions for a
short time. This is rectified after a few
minutes of driving, and the tyre pressures
are displayed for the correct positions. Interchanging the wheels
G
Risk of accident
Interchange the front and rear wheels only if
they have the same dimensions: for example
size, offset, etc.
After a wheel is changed, have the tightening
torque checked at a specialist workshop that
has the necessary specialist knowledge and
tools to carry out the work required.
Mercedes-Benz recommends that you use a 184
Tyres and wheelsOperation
X164_AKB; 2; 3, en-GB
wobuchh,
Version: 2.11.8.1 2009-03-31T14:14:58+02:00 - Seite 184
Dateiname: 6515431202_buchblock.pdf; erzeugt am 01. Apr 2009 00:17:48; WK
Page 188 of 309
Mercedes-Benz Service Centre for this pur-
pose. In particular, work relevant to safety or
on safety-related systems must be carried out
at a qualified specialist workshop.
The wheels could work loose if they are not
tightened to a torque of 150 Nm.
For safety reasons, Mercedes-Benz recom-
mends that you only use wheel bolts of the
correct size which have been approved for
Mercedes-Benz vehicles.
The wear patterns on the front and rear tyres
differ, depending on the operating conditions.
Interchange the wheels before a clear wear
pattern has formed on the tyres. Front tyres
typically wear more on the shoulders and the
rear tyres in the centre.
On vehicles that have the same size front and
rear wheels you can interchange the wheels
every 5,000 km to 10,000 km depending on
the degree of tyre wear. Do not reverse the
direction of tyre rotation.
Clean the contact surfaces of the wheel and
the brake disc thoroughly every time a wheel
is interchanged. Check the tyre pressure and,
if necessary, restart the tyre pressure loss
warning system or the tyre pressure moni-
tor*.
! On vehicles fitted with a tyre pressure
monitor*, electronic components are loca-
ted in the wheel.
Tyre-fitting tools should not be applied in
the area of the valve, as this could damage
the electronic components.
Always have the wheels interchanged/
changed at a qualified specialist workshop,
e.g. a Mercedes-Benz Service Centre.
i Vehicles with a tyre pressure monitor*
If the positions of the wheels on the vehicle
are changed, the tyre pressure may be tem-
porarily displayed in the wrong position.
This is rectified after a few minutes of driv-
ing; the tyre pressures are then displayed
in the correct positions. Winter driving
Points to remember
Have your vehicle winterproofed at a qualified
specialist workshop, e.g. at a Mercedes-Benz
Service Centre, at the onset of winter.
Observe the notes in the "Changing a wheel"
section (Y page 184). Winter tyres
At temperatures below +7 ˚C always use all-
weather tyres or winter tyres and always use
winter tyres in winter road conditions. Only
winter tyres displaying the isnowflake
symbol in addition to the M+S marking pro-
vide optimum grip in wintry road conditions.
Only these tyres will allow the ABS and
ESP ®
driving systems to function optimally in
winter, as these tyres have been designed
specifically for driving in snow.
Use winter tyres of the same make and tread
on all wheels to maintain safe handling char-
acteristics. G
Risk of accident
Winter tyres with a tread depth of less than
4 mm must be replaced immediately. They are
no longer suitable for winter use and can no
longer provide sufficient grip. This could
cause you to lose control of your vehicle and
cause an accident.
Always observe the maximum permissible
speed specified for the winter tyres you have
fitted. If you fit winter tyres which have a
lower maximum permissible speed than that
of the vehicle, affix an appropriate warning
sign in the driver's field of vision. This can be
obtained at a qualified specialist workshop,
e.g. from a Mercedes-Benz Service Centre.
Under these circumstances, you should also
restrict the maximum speed of the vehicle
using permanent Speedtronic 27
to the maxi-
27 Only available for certain countries. Winter driving
185Operation
* optional
X164_AKB; 2; 3, en-GB
wobuchh,
Version: 2.11.8.1 2009-03-31T14:14:58+02:00 - Seite 185 Z
Dateiname: 6515431202_buchblock.pdf; erzeugt am 01. Apr 2009 00:17:48; WK
Page 189 of 309
mum permissible speed for the winter tyres
(Y page 128).
Once you have fitted the winter tyres:
X Check the tyre pressures (Y page 180).
X Restart the tyre pressure moni-
tor* (Y page 183). G
Risk of accident
If you fit the spare wheel* when driving with
winter tyres, bear in mind that driving stability
will be impaired owing to unstable cornering
characteristics caused by the different tyres.
You should therefore adapt your driving style
and drive carefully.
Have the spare wheel* replaced at the near-
est qualified specialist workshop which has
the necessary specialist knowledge and tools
to carry out the work required. Mercedes-
Benz recommends that you use a Mercedes-
Benz Service Centre for this purpose. In par-
ticular, work relevant to safety or on safety-
related systems must be carried out at a quali-
fied specialist workshop. Snow chains
For safety reasons, Mercedes-Benz recom-
mends that you only use snow chains which
have been specially approved for your vehicle
by Mercedes-Benz, or are of a corresponding
standard of quality.
! Do not drive in ADS SPORTmode when
driving with snow chains fitted.
If you intend to fit snow chains, please bear
the following points in mind:
R you may not attach snow chains to all
wheel-tyre combinations; see the "Tyres and wheels" section in the "Technical data"
chapter.
R snow chains must not be fitted to emer-
gency spare wheels, e.g. a "Minispare"
emergency spare wheel.
R Fit snow chains only in pairs and only to the
rear wheels. Comply with the manufactur-
er's installation instructions.
Do not exceed the maximum permissible
speed of 50 km/h.
i You may wish to deactivate ESP ®
when
pulling away with snow chains fitted
(Y page 51). This way, you can allow the
wheels to spin in a controlled manner, ach-
ieving an increased driving force (cutting
action). Winter driving
G
Risk of accident
Do not shift down for additional engine brak-
ing on a slippery road surface. This could
cause the drive wheels to lose their grip and
the vehicle could skid.
You should drive particularly carefully on slip-
pery road surfaces. Avoid sudden accelera-
tion, steering and braking manoeuvres.
If the vehicle threatens to skid or cannot be
stopped when moving at low speed:
X Shift the selector lever to N.
X Try to bring the vehicle under control by
using corrective steering. Driving tips
Rolling with the engine switched off
G
Risk of accident
Never switch the engine off while the vehicle
is in motion.
There is no power assistance for the steering
and the service brake when the engine is not
running. 186
Driving tipsOperation
* optional
X164_AKB; 2; 3, en-GB
wobuchh,
Version: 2.11.8.1 2009-03-31T14:14:58+02:00 - Seite 186
Dateiname: 6515431202_buchblock.pdf; erzeugt am 01. Apr 2009 00:17:48; WK
Page 191 of 309
New brake pads/linings
For safety reasons, Mercedes-Benz recom-
mends that you only have brake pads/linings
fitted to your vehicle which have been
approved for Mercedes-Benz vehicles or
which correspond to an equivalent quality
standard. Brake pads/linings which have not
been approved for Mercedes-Benz vehicles or
which are not of an equivalent quality could
affect your vehicle's operating safety. G
Risk of accident
New brake pads/linings only reach their opti-
mum braking effect after several hundred kil-
ometres of driving. Before this optimum brak-
ing effect is reached, you should compensate
for the reduced braking effect by applying
greater pressure when braking. This also
applies after the brake discs or the brake
pads/linings have been replaced. Tyre grip
G
Risk of accident
While the vehicle can be fully controlled at a
certain speed on dry roads, you must reduce
your speed on wet or icy roads to achieve the
same road safety. Otherwise, you could cause
an accident.
Pay particular attention to the road conditions
at temperatures around freezing point.
If ice has formed on the road surface (e.g.
from fog), a thin film of water rapidly forms on
the ice when you brake, considerably reduc-
ing tyre grip. Drive with particular care in such
weather conditions. Driving on wet roads
If water has accumulated to a certain depth
on the road surface, there is a danger of aqua-
planing occurring, even if:
R you drive at low speeds
R the tyres have adequate tread depth For this reason, do not drive in tyre ruts, and
brake carefully. Driving on flooded roads
If you have to drive on stretches of road on
which water has collected, please bear in
mind that:
R the maximum permitted still water depth
depends on the vehicle equipment
(Y page 192).
R you should drive no faster than at walking
pace.
! Bear in mind that vehicles travelling in
front or in the opposite direction create
waves. This may cause the maximum per-
missible water depth to be exceeded.
Failure to observe these notes may result
in damage to the engine, electrical systems
and transmission. Off-road driving
Points to remember
G
Risk of accident
Drive slowly in rough terrain with which you
are unfamiliar. This will allow you to detect
unexpected obstacles more easily and, there-
fore, to reduce the risk of an accident.
Do not make U-turns on mountain roads. Oth-
erwise, the vehicle could tip over. If a slope is
too steep for the vehicle, drive back in reverse
gear.
Do not drive at an angle up steep inclines.
Otherwise, the vehicle could tip over. If you
drive up a steep incline at an angle and the
vehicle threatens to overturn, steer into the
line of fall immediately.
Never allow the vehicle to roll backwards. The
braking effect of the engine cannot be utilised
in neutral. If you only use the service brake,
you could lose control of the vehicle. 188
Off-road drivingOperation
X164_AKB; 2; 3, en-GB
wobuchh
,V ersion: 2.11.8.1
2009-03-31T14:14:58+02:00 - Seite 188
Dateiname: 6515431202_buchblock.pdf; erzeugt am 01. Apr 2009 00:17:49; WK
Page 193 of 309
X
Wheels and tyres: check the tyre tread
depth and tyre pressure.
X Check for damage and remove foreign
objects, e.g. small stones, from the
wheels/tyres.
X Replace any missing valve caps.
X Replace dented or damaged wheels.
Checklist after driving off-road Driving over rough terrain places greater
demands on your vehicle than driving on nor-
mal roads. After driving off-road, check the
vehicle. This allows you to detect damage
promptly and reduce the risk of an accident
to yourself and other road users.
X Deactivate the LOW RANGE off-road gear
(Y page 114).
X Deactivate DSR (Y page 113).
X Set the differential lock setting to AUTO on
the selector wheel (Y page 116).
X Lower the vehicle level again to a level suit-
able to the road conditions, e.g. to the high-
way/high-speed level.
X Clean the headlamps and rear lights and
check for damage.
X Clean the front and rear licence plates.
X Clean the wheels/tyres with a water jet and
remove any foreign objects.
X Clean the wheels, wheel arches and the
vehicle underside with a water jet; check
for foreign objects and damage.
X Check whether twigs or other parts of
plants have become trapped. These
increase the risk of fire and can damage
fuel pipes, brake hoses or the rubber bel-
lows of the axle joints and propeller shafts.
X After the trip, examine without fail the
entire undercarriage, wheels, tyres, brakes,
bodywork structure, steering, chassis and
exhaust system for damage.
X After driving for extended periods across
sand, mud, gravel, water or in similarly dirty
conditions, have the brake discs, wheels, brake pads/l
inings and axle joints checked
and cleaned.
X If you detect strong vibrations after off-road
travel, check for foreign objects in the
wheels and drive train and remove them if
necessary. Foreign objects can disturb the
balance and cause vibrations. Travelling uphill
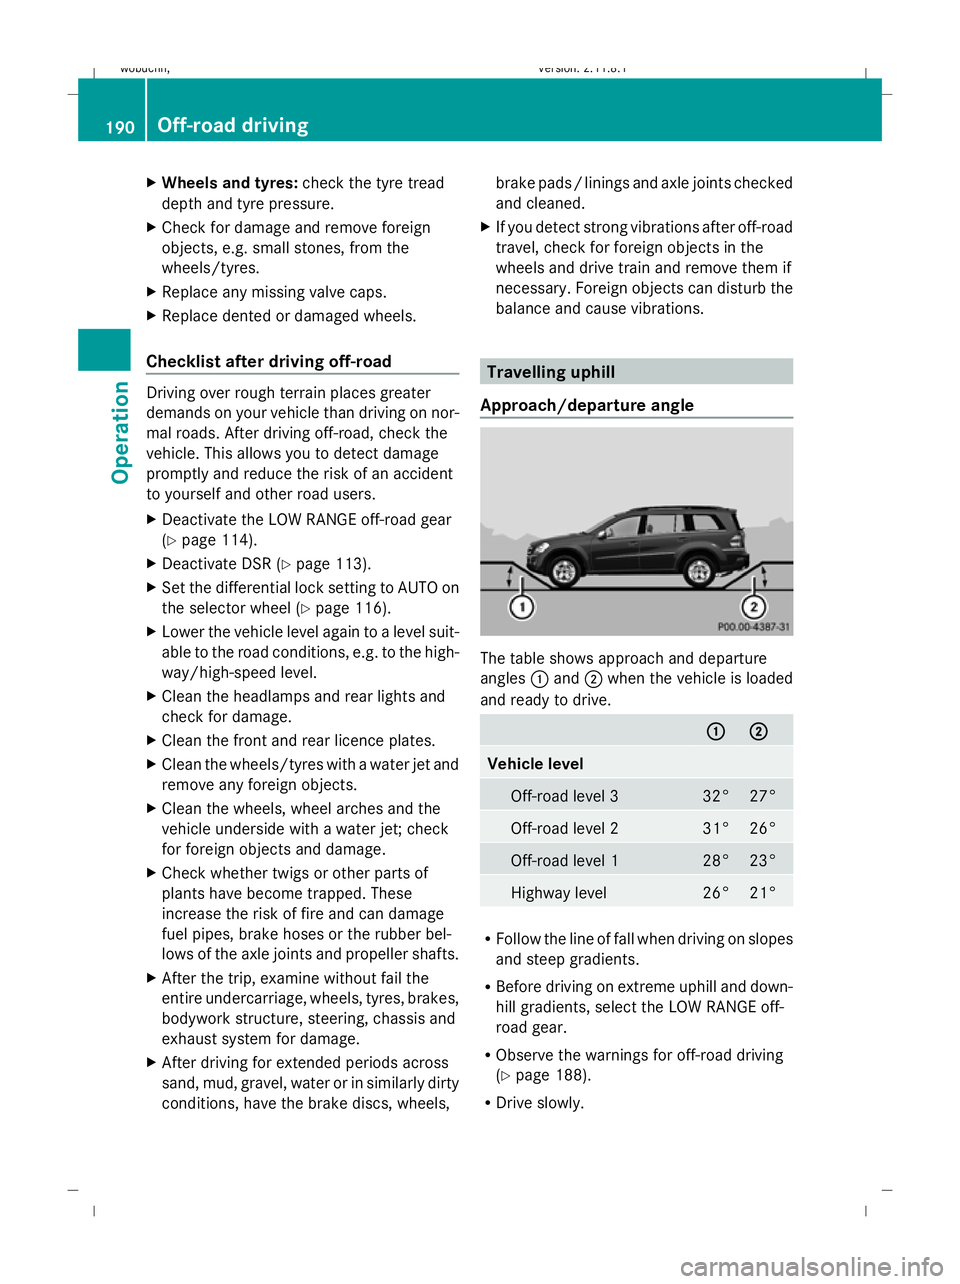
Approach/departure angle The table shows approach and departure
angles
:and ;when the vehicle is loaded
and ready to drive. :
: ;
; Vehicle level
Off-road level 3 32° 27°
Off-road level 2 31° 26°
Off-road level 1 28° 23°
Highway level 26° 21°
R
Follow the line of fall when driving on slopes
and steep gradients.
R Before driving on extreme uphill and down-
hill gradients, select the LOW RANGE off-
road gear.
R Observe the warnings for off-road driving
(Y page 188).
R Drive slowly. 190
Off-road drivingOperation
X164_AKB; 2; 3, en-GB
wobuchh,
Version: 2.11.8.1 2009-03-31T14:14:58+02:00 - Seite 190
Dateiname: 6515431202_buchblock.pdf; erzeugt am 01. Apr 2009 00:17:49; WK
Page 200 of 309

You will find the values approved by the man-
ufacturer on the vehicle identification plates
and those for the towing vehicle in the "Tech-
nical data" section.
You will find installation dimensions and loads
in the "Technical data" section
(Y page 297).
The maximum drawbar load of the trailer
drawbar on the ball coupling is 140 kg. How-
ever, the actual noseweight must not exceed
the value given on the trailer coupling or
trailer identification plates. The lowest weight
applies.
! Use a noseweight as close as possible to
the maximum permissible noseweight. Do
not use a noseweight of less than 50 kg,
otherwise the trailer may come loose.
Bear in mind that the payload and the rear
axle load are reduced by the actual nose-
weight.
When towing a trailer, where possible set the
tyre pressures for the permissible gross
weight which you find in the table on the
inside of your vehicle's fuel filler flap (higher
values).
Driving tips i
Observe the notes on ESP ®
trailer stabi-
lisation (Y page 51).
In Germany, the maximum permissible speed
for vehicle/trailer combinations depends on
the type of trailer and is either 80 km/h or
100 km/h. Before beginning the journey,
check the trailer's documents to see what the
maximum permitted speed is. G
Risk of accident
Always observe the maximum speed permit-
ted in Germany for vehicle/trailer combina-
tions, even in countries where higher speeds
are permitted. This lowers the risk of an acci-
dent. When towing a trailer, your vehicle's handling
characteristics will be different in comparison
to when driving without a trailer.
The vehicle/trailer combination:
R is heavier
R is restricted in its acceleration and gradi-
ent-climbing capability
R has an increased braking distance
R is affected more by strong crosswinds
R demands more sensitive steering
R consumes more fuel
On long and steep downhill gradients, you
must select shift range 1,2or 3in good time.
i This also applies if you have activated
cruise control, Distronic* or Speedtronic.
This will use the braking effect of the engine,
so less braking will be required to maintain
the speed. This relieves the load on the brake
system and prevents the brakes from over-
heating and wearing too quickly. If you need
additional braking, depress the brake pedal
repeatedly rather than continuously. G
Risk of accident
Never depress the brake pedal continuously
while the vehicle is in motion, e.g. never cause
the brakes to rub by applying constant slight
pedal pressure. This causes the brake system
to overheat, increases the braking distance
and can lead to the brakes failing completely.
Driving tips
R Maintain a greater distance from the vehi-
cle in front than when driving without a
trailer.
R Avoid braking abruptly. If possible, brake
gently at first to allow the trailer to run on.
Then, increase the braking force rapidly.
R The values given for gradient-climbing
capabilities from a standstill refer to sea
level. When driving in mountainous areas,
note that the power output of the engine,
and consequently the vehicle's gradient- Trailer towing*
197Operation
* optional
X164_AKB; 2; 3, en-GB
wobuchh
,V ersion: 2.11.8.1
2009-03-31T14:14:58+02:00 - Seite 197 Z
Dateiname: 6515431202_buchblock.pdf; erzeugt am 01. Apr 2009 00:17:52; WK
Page 205 of 309
High-pressure cleaners
G
Risk of accident
Do not use high-pressure cleaners with circu-
lar-jet nozzles (dirt grinders) to clean your
vehicle, in particular the tyres. You could oth-
erwise damage the tyres and cause an acci-
dent.
! Observe the instructions issued by the
equipment manufacturer concerning the
distance to be maintained between the
nozzle of the high-pressure cleaner and the
vehicle (at least 30 cm).
Move the high-pressure cleaner nozzle
around when cleaning your vehicle.
Do not aim directly at any of the following:
R tyres
R door joint
R electrical components
R battery
R connectors
R lights
R seals
R trim elements
R ventilation slots
Damaged seals or electrical components
can lead to failures or leaks.
Cleaning the paintwork Scratches, corrosive deposits, areas affected
by corrosion and damage caused by inade-
quate care cannot always be completely
repaired. In such cases, visit a qualified spe-
cialist workshop immediately, e.g. a
Mercedes-Benz Service Centre.
X Remove the following types of dirt immedi-
ately, whilst avoiding rubbing too hard.
Soak:
R insect remains with insect remover
R bird droppings with water and rinse off the treated surface after-
wards.
Remove:
R
tree resin, oils, fuels and greases by rub-
bing gently with a cloth soaked in petro-
leum ether or lighter fluid.
R tar stain with tar remover
R wax with silicone remover
! Do not affix:
R stickers
R films
R magnetic plates or similar items
to painted surfaces. Otherwise, you could
damage the paintwork.
Cleaning the wheels !
Do not use acidic wheel cleaners to
remove brake dust. This could damage
wheel bolts and brake components.
Cleaning the windows X
Clean the inside and outside of the win-
dows with a damp cloth and a cleaning
product approved and recommended by
Mercedes-Benz.
! Clean the water drainage channels of the
windscreen and the rear window at regular
intervals. Under certain circumstances,
deposits such as leaves, petals and pollen
may prevent water from draining away
leading to corrosion damage.
Cleaning the wiper blades G
Risk of injury
Before cleaning the windscreen or wiper
blades, turn the key to position 0in the igni-
tion lock or press the Start/Stop button* until
all indicator lamps have gone out in the instru-
ment cluster. The windscreen wipers could
otherwise move and cause injury. 202
CareOperation
* optional
X164_AKB; 2; 3, en-GB
wobuchh,
Version: 2.11.8.1 2009-03-31T14:14:58+02:00 - Seite 202
Dateiname: 6515431202_buchblock.pdf; erzeugt am 01. Apr 2009 00:17:53; WK
Page 220 of 309

Display messages
Possible causes/consequences and
X
X Solutions P To start
the
engine,
shift to
either P
or N You have attempted to start the engine with the transmission
in position
Ror D.
X Shift the automatic transmission to Por N. Depress
brake to
shift out
of position P
X
Depress the brake pedal. PRE-SAFE inopera‐
tive See
Owner's
Manual
G
Risk of injury
Important functions of PRE-SAFE ®
have failed. All other occu-
pant safety systems, e.g. airbags, remain available.
X Visit a qualified specialist workshop. Tyre pres‐
sure moni‐
tor inopera‐
tive
The tyre pressure monitor* is malfunctioning.
X
Have the tyre pressure monitor* and wheels checked at a
qualified specialist workshop. Tyre pres‐
sure moni‐
tor inopera‐
tive No
wheel sen‐
sors The fitted wheels do not have suitable tyre pressure sensors.
The tyre pressure monitor* is deactivated.
X
Fit wheels with suitable tyre pressure sensors.
The tyre pressure monitor* is activated automatically after
driving for a few minutes. Tyre pres‐
sure moni‐
tor Wheel sen‐
sor miss‐
ing
The tyre pressure monitor* is not receiving signals from one
or more wheels because:
R
a wheel without a suitable tyre pressure sensor has been
fitted, e.g. the emergency wheel*.
R the battery on one of the wheel electronics unit is dis-
charged.
R a wheel electronics unit has malfunctioned.
A line is displayed in the multi-function display for the affected
tyre instead of the tyre pressure value.
X Have the tyre pressure monitor* and wheels checked at a
qualified specialist workshop.
If wheels with suitable tyre pressure sensors are fitted, the
tyre pressures appear in the multi-function display after
driving for a few minutes. Display
messages
217Practical advice
* optional
X164_AKB; 2; 3, en-GB
wobuchh
,V ersion: 2.11.8.1
2009-03-31T14:14:58+02:00 - Seite 217 Z
Dateiname: 6515431202_buchblock.pdf; erzeugt am 01. Apr 2009 00:17:59; WK