2009 MERCEDES-BENZ GL SUV automatic transmission
[x] Cancel search: automatic transmissionPage 118 of 309
do not switch the automatic transmission to
another gear.
If you do not wait for the gear change process
to complete, it may not be correctly imple-
mented. The transfer case may then be in
neutral and the connection between the
engine and the drive axles may be disen-
gaged. The vehicle could then move freely,
even if a gear is engaged, and could inadver-
tently start moving, particularly if it is on a
slope.
Observe the messages in the multi-function
display.
From HIGH RANGE to LOW RANGE
! Only carry out the gear change process if:
R the engine is running
R the automatic transmission is in N
R you are not driving above 40 km/h
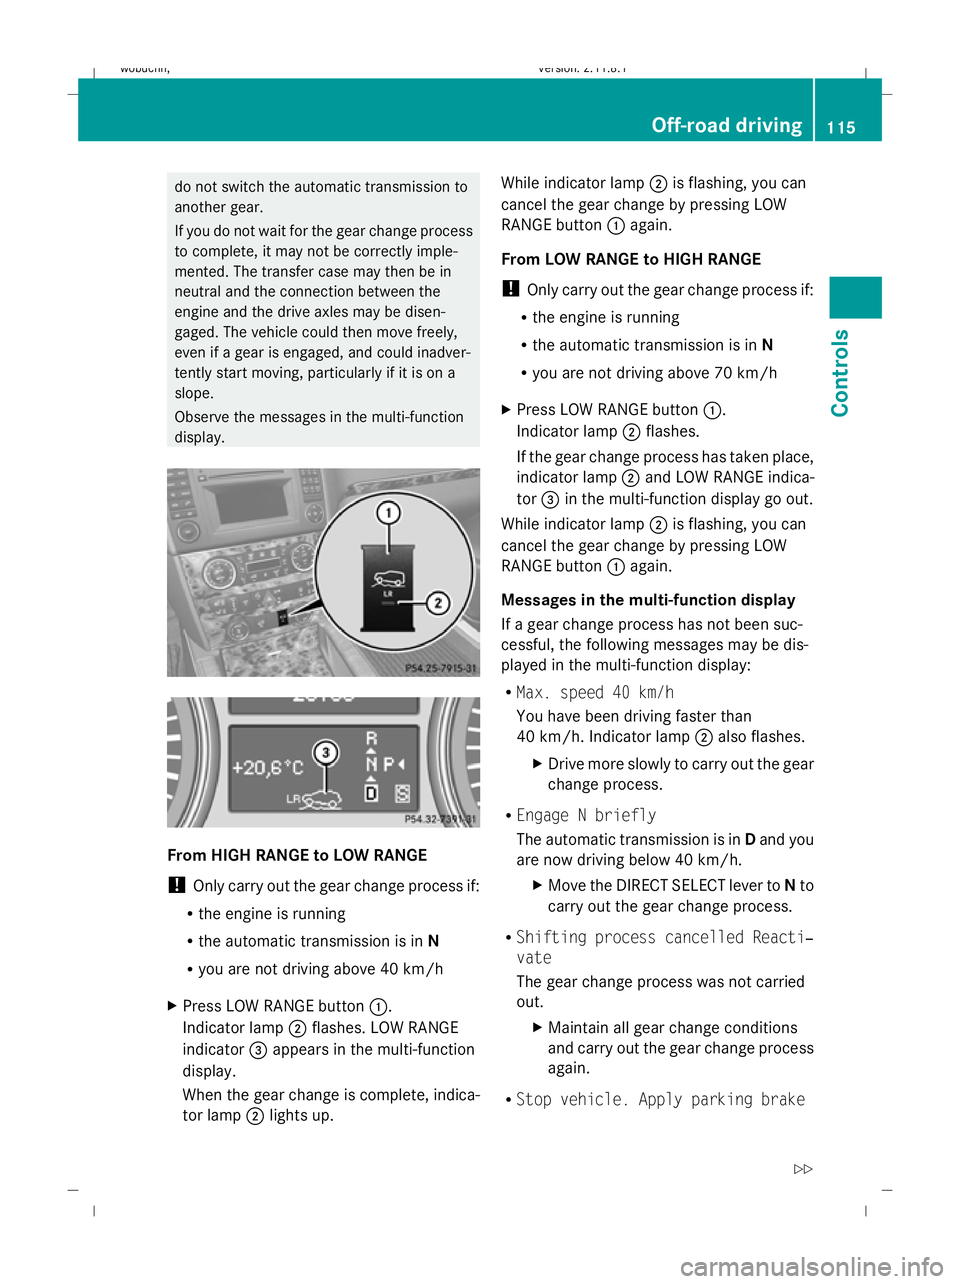
X Press LOW RANGE button :.
Indicator lamp ;flashes. LOW RANGE
indicator =appears in the multi-function
display.
When the gear change is complete, indica-
tor lamp ;lights up. While indicator lamp
;is flashing, you can
cancel the gear change by pressing LOW
RANGE button :again.
From LOW RANGE to HIGH RANGE
! Only carry out the gear change process if:
R the engine is running
R the automatic transmission is in N
R you are not driving above 70 km/h
X Press LOW RANGE button :.
Indicator lamp ;flashes.
If the gear change process has taken place,
indicator lamp ;and LOW RANGE indica-
tor =in the multi-function display go out.
While indicator lamp ;is flashing, you can
cancel the gear change by pressing LOW
RANGE button :again.
Messages in the multi-function display
If a gear change process has not been suc-
cessful, the following messages may be dis-
played in the multi-function display:
R Max. speed 40 km/h
You have been driving faster than
40 km/h. Indicator lamp ;also flashes.
X Drive more slowly to carry out the gear
change process.
R Engage N briefly
The automatic transmission is in Dand you
are now driving below 40 km/h.
XMove the DIRECT SELECT lever to Nto
carry out the gear change process.
R Shifting process cancelled Reacti‐
vate
The gear change process was not carried
out.
XMaintain all gear change conditions
and carry out the gear change process
again.
R Stop vehicle. Apply parking brake Off-road driving
115Controls
X164_AKB; 2; 3, en-GB
wobuchh, Version: 2.11.8.1 2009-03-31T14:14:58+02:00 - Seite 115 Z
Dateiname: 6515431202_buchblock.pdf; erzeugt am 01. Apr 2009 00:17:19; WK
Page 122 of 309
Storing the current speed or calling up
the last stored speed
G
Risk of accident
Only select a stored speed if you know what
that speed is and whether it is suitable for the
current situation. Otherwise, sudden acceler-
ation or braking could endanger you or others.
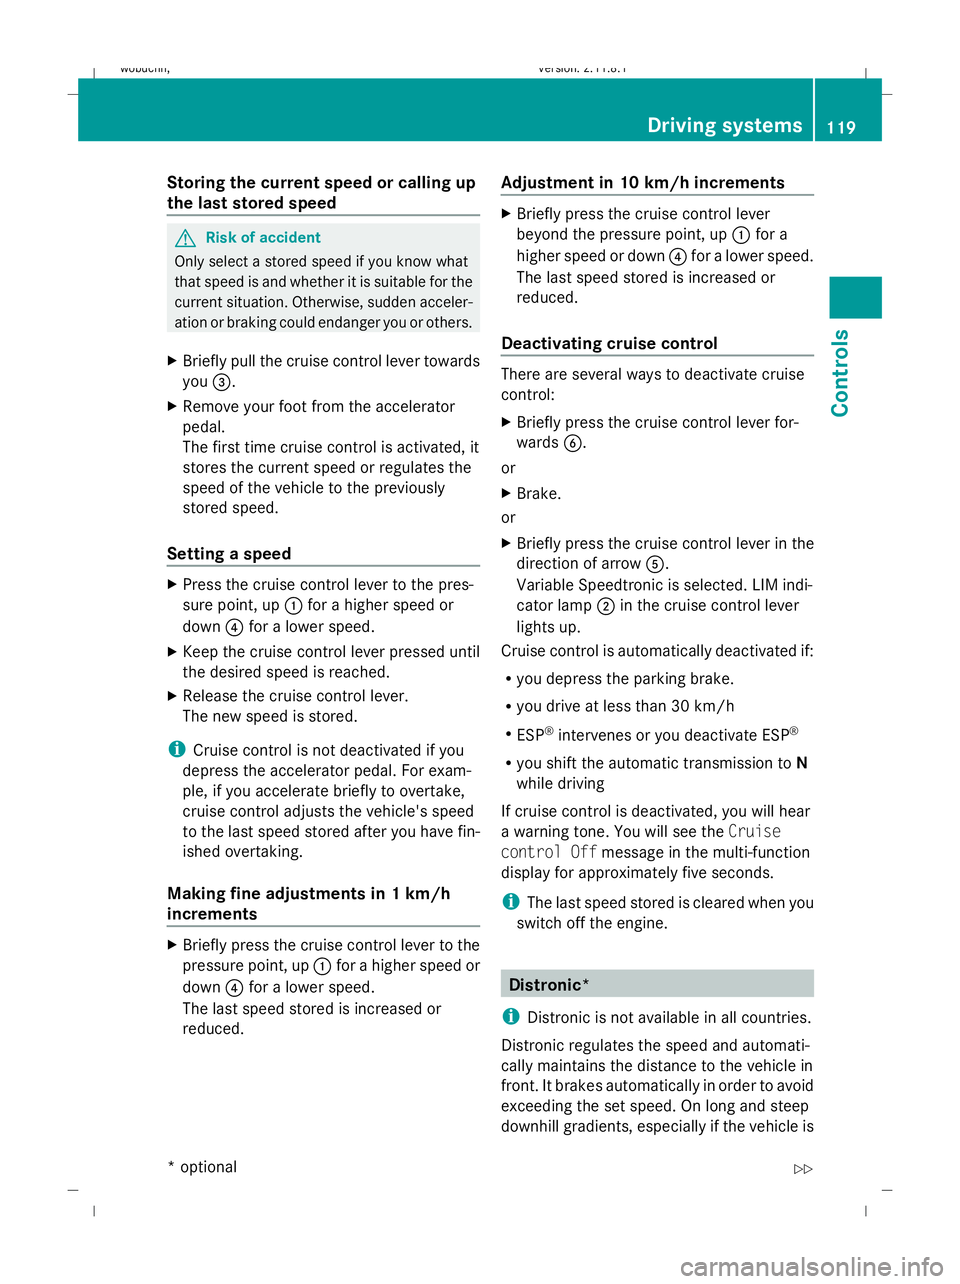
X Briefly pull the cruise control lever towards
you =.
X Remove your foot from the accelerator
pedal.
The first time cruise control is activated, it
stores the current speed or regulates the
speed of the vehicle to the previously
stored speed.
Setting a speed X
Press the cruise control lever to the pres-
sure point, up :for a higher speed or
down ?for a lower speed.
X Keep the cruise control lever pressed until
the desired speed is reached.
X Release the cruise control lever.
The new speed is stored.
i Cruise control is not deactivated if you
depress the accelerator pedal. For exam-
ple, if you accelerate briefly to overtake,
cruise control adjusts the vehicle's speed
to the last speed stored after you have fin-
ished overtaking.
Making fine adjustments in 1 km/h
increments X
Briefly press the cruise control lever to the
pressure point, up :for a higher speed or
down ?for a lower speed.
The last speed stored is increased or
reduced. Adjustment in 10 km/h increments X
Briefly press the cruise control lever
beyond the pressure point, up :for a
higher speed or down ?for a lower speed.
The last speed stored is increased or
reduced.
Deactivating cruise control There are several ways to deactivate cruise
control:
X
Briefly press the cruise control lever for-
wards B.
or
X Brake.
or
X Briefly press the cruise control lever in the
direction of arrow A.
Variable Speedtronic is selected. LIM indi-
cator lamp ;in the cruise control lever
lights up.
Cruise control is automatically deactivated if:
R you depress the parking brake.
R you drive at less than 30 km/h
R ESP ®
intervenes or you deactivate ESP ®
R you shift the automatic transmission to N
while driving
If cruise control is deactivated, you will hear
a warning tone. You will see the Cruise
control Off message in the multi-function
display for approximately five seconds.
i The last speed stored is cleared when you
switch off the engine. Distronic*
i Distronic is not available in all countries.
Distronic regulates the speed and automati-
cally maintains the distance to the vehicle in
front. It brakes automatically in order to avoid
exceeding the set speed. On long and steep
downhill gradients, especially if the vehicle is Driving systems
119Controls
* optional
X164_AKB; 2; 3, en-GB
wobuchh,
Version: 2.11.8.1 2009-03-31T14:14:58+02:00 - Seite 119 Z
Dateiname: 6515431202_buchblock.pdf; erzeugt am 01. Apr 2009 00:17:21; WK
Page 124 of 309

G
Risk of accident
Distronic brakes your vehicle at a maximum
of 4m /s2
, depending on its speed. This cor-
responds to approximately 40% of your vehi-
cle's maximum brake force. You must also
apply the brakes yourself if this braking power
is not sufficient.
If Distronic detects a risk of collision with a
vehicle in front, an intermittent warning tone
sounds. In addition, the ·distance warn-
ing lamp in the instrument cluster lights up.
Brake to avoid a collision.
Cruise control lever You can operate Distronic and variable
Speedtronic with the cruise control lever.
The LIM indicator lamp on the cruise control
lever indicates which system you have selec-
ted:
R LIM indicator lamp off:
Distronic is selected.
R LIM indicator lamp lit:
Variable Speedtronic is selected. :
To store the current speed or a higher
speed
; To adjust the specified distance
= LIM indicator lamp
? To store the current speed or call up the
last stored speed
A To store the current speed or a lower
speed B
To switch between Distronic and variable
Speedtronic
C To deactivate Distronic
Selecting Distronic X
Check whether LIM indicator lamp =is off.
If it is off, Distronic is already selected.
If it is not, press the cruise control lever in
the direction of arrow B.
LIM indicator lamp =in the cruise control
lever goes off. Distronic is selected.
Switching on Distronic, storing and
maintaining the current speed G
Risk of accident
The vehicle can be braked when Distronic is
activated. For this reason, deactivate Dis-
tronic if the vehicle is to be set in motion by
other means (e.g. in a car wash or by towing).
You can activate Distronic in the following
circumstances:
R for about two minutes after the engine is
started
R when the engine is running
R if you do not brake during the journey
R when the parking brake is not applied
R if ESP ®
is activated
R if the automatic transmission is in position
D
R if the bonnet is closed
Activating while driving
When driving at speeds below 30 km/h, you
can only activate Distronic if the vehicle in
front has been detected and is shown in the
multi-function display. If the vehicle in front is
not shown in the multi-function display and is
no longer being detected, because it has
changed lanes, for example, Distronic is
deactivated and you hear a warning tone. Driving systems
121Controls
X164_AKB; 2; 3, en-GB
wobuchh,V ersion: 2.11.8.1
2009-03-31T14:14:58+02:00 - Seite 121 Z
Dateiname: 6515431202_buchblock.pdf; erzeugt am 01. Apr 2009 00:17:21; WK
Page 128 of 309
i
Distronic is not deactivated if you depress
the accelerator pedal. If you accelerate
briefly to overtake, Distronic adjusts the
vehicle's speed to the last speed stored
after you have finished overtaking.
Distronic is automatically deactivated if:
R you depress the parking brake
R you are driving slower than 25 km/h and
there is no vehicle in front, or the vehicle in
front is no longer detected
R ESP ®
intervenes or you deactivate ESP ®
R you shift the automatic transmission to N,
P or R
If Distronic is deactivated, you will hear a
warning tone. You will see the DISTRONIC
Off message in the multi-function display for
approximately five seconds.
Tips for driving with Distronic The following contains descriptions of certain
road and traffic conditions in which you must
be particularly attentive. In such situations,
brake if necessary. Distronic is then deacti-
vated.
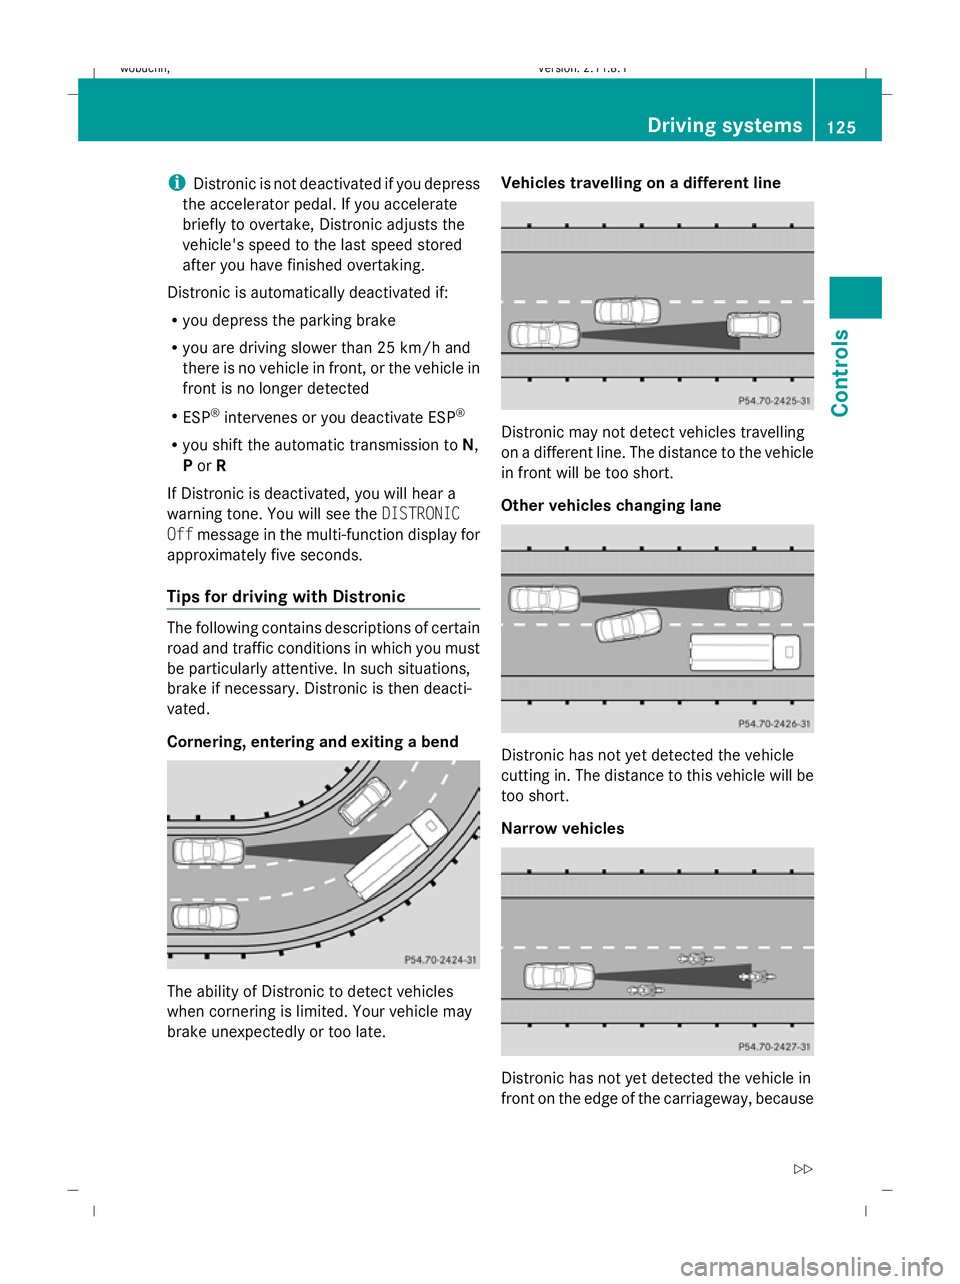
Cornering, entering and exiting a bend
The ability of Distronic to detect vehicles
when cornering is limited. Your vehicle may
brake unexpectedly or too late. Vehicles travelling on a different line
Distronic may not detect vehicles travelling
on a different line. The distance to the vehicle
in front will be too short.
Other vehicles changing lane
Distronic has not yet detected the vehicle
cutting in. The distance to this vehicle will be
too short.
Narrow vehicles Distronic has not yet detected the vehicle in
front on the edge of the carriageway, because Driving systems
125Controls
X164_AKB; 2; 3, en-GB
wobuchh, Version: 2.11.8.1 2009-03-31T14:14:58+02:00 - Seite 125 Z
Dateiname: 6515431202_buchblock.pdf; erzeugt am 01. Apr 2009 00:17:23; WK
Page 136 of 309

If one or more indicator lamps
=are on:
X Turn the selector wheel anti-clockwise ;
until all indicator lamps =that are lit start
to flash.
The vehicle is lowered to highway level. As
soon as the next lowest level is reached,
the indicator lamp stops flashing and goes
out.
While the adjustment is taking place, a mes-
sage appears in the multi-function display,
e.g.: If you press the
WorX button on the
multi-function steering wheel, the messages
will disappear.
Once highway level has been reached, all indi-
cator lamps =go out. You will see a message
in the multi-function display, for example: If you have not previously selected the off-
road menu (Y
page 102) in the on-board com-
puter, the message disappears after about
five seconds.
The vehicle automatically selects highway
level if you are driving at a speed above
115 km/h or if you drive at between
100 km/h and 115 km/h for around 20 sec-
onds. Depending on the ADS basic setting
(Y page 129), the vehicle is lowered to high-
speed level at high speeds. PARKTRONIC*
G
Risk of accident
PARKTRONIC is only an aid and may not
detect all obstacles. It is not a substitute for
attentive driving.
You are always responsible for safety and
must continue to pay attention to your imme-
diate surroundings when parking and
manoeuvring. You could otherwise endanger
yourself and others. G
Risk of injury
Make sure that no persons or animals are in
the manoeuvring range. Otherwise, they
could be injured.
PARKTRONIC is an electronic parking aid
using ultrasound. It indicates visually and
audibly the distance between your vehicle
and an object.
PARKTRONIC is activated automatically when
you:
R switch on the ignition
R release the parking brake
R shift the automatic transmission to D,Ror
N
PARKTRONIC is deactivated at speeds above
18 km/h. It is reactivated at lower speeds.
PARKTRONIC monitors the area around your
vehicle using six sensors in the front bumper
and four sensors in the rear bumper. :
Example: sensors in the front bumper,
left-hand side Driving systems
133Controls
* optional
X164_AKB; 2; 3, en-GB
wobuchh,
Version: 2.11.8.1 2009-03-31T14:14:58+02:00 - Seite 133 Z
Dateiname: 6515431202_buchblock.pdf; erzeugt am 01. Apr 2009 00:17:26; WK
Page 138 of 309
The automatic transmission position deter-
mines which warning display is active when
the engine is running:
Automatic trans-
mission position Warning display
D
Front area activated
R
or N Rear and front areas
activated
P
No areas activated
One or more segments light up as the vehicle
approaches an obstacle, depending on the
vehicle's distance to the obstacle.
From the:
R sixth segment onwards, you will hear an
intermittent warning tone for approx-
imately two seconds.
R seventh segment onwards, you will hear a
warning tone for approximately two sec-
onds. You have reached the minimum dis-
tance.
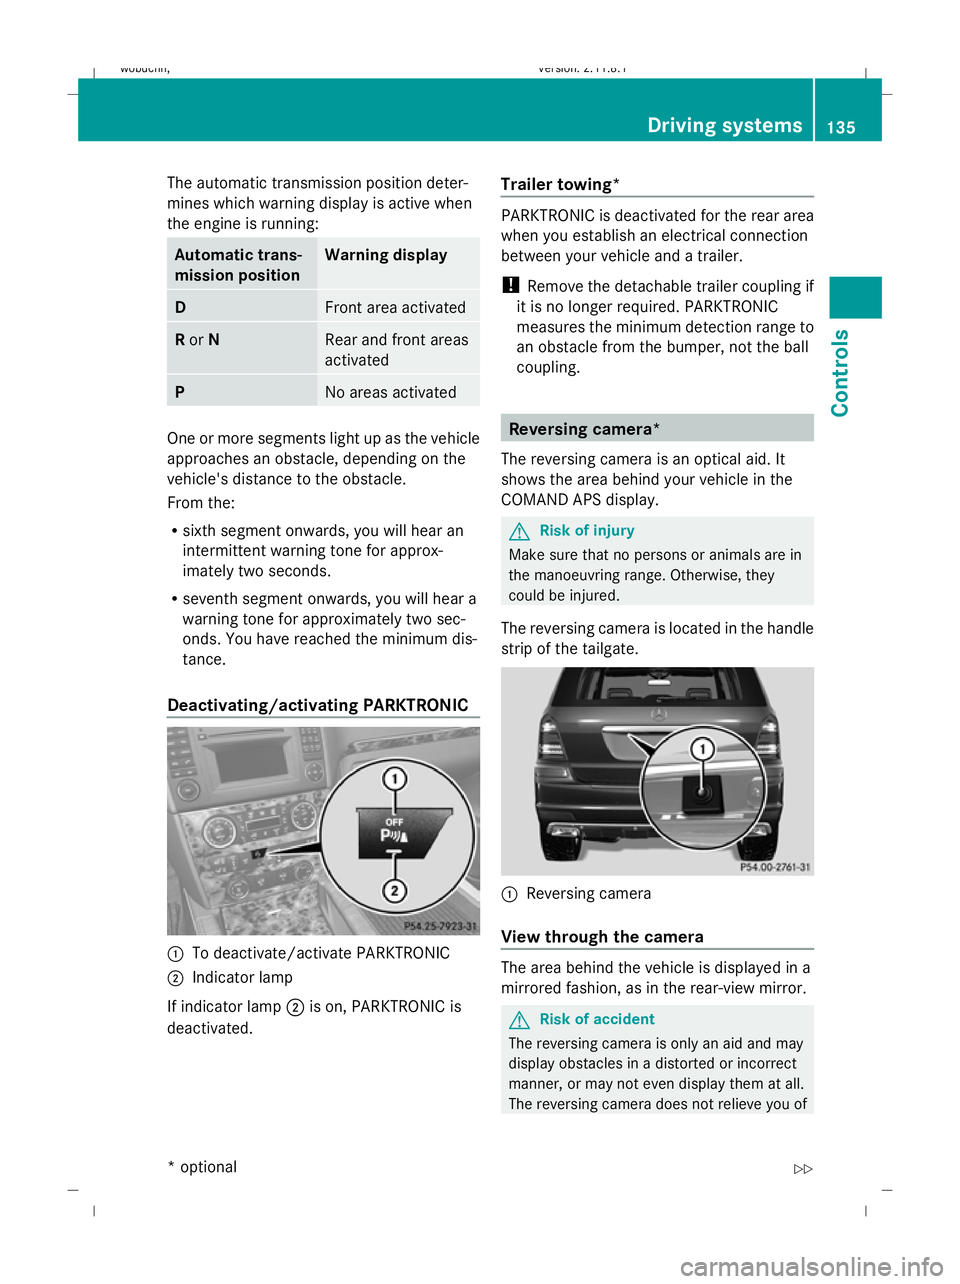
Deactivating/activating PARKTRONIC :
To deactivate/activate PARKTRONIC
; Indicator lamp
If indicator lamp ;is on, PARKTRONIC is
deactivated. Trailer towing* PARKTRONIC is deactivated for the rear area
when you establish an electrical connection
between your vehicle and a trailer.
!
Remove the detachable trailer coupling if
it is no longer required. PARKTRONIC
measures the minimum detection range to
an obstacle from the bumper, not the ball
coupling. Reversing camera*
The reversing camera is an optical aid. It
shows the area behind your vehicle in the
COMAND APS display. G
Risk of injury
Make sure that no persons or animals are in
the manoeuvring range. Otherwise, they
could be injured.
The reversing camera is located in the handle
strip of the tailgate. :
Reversing camera
View through the camera The area behind the vehicle is displayed in a
mirrored fashion, as in the rear-view mirror.
G
Risk of accident
The reversing camera is only an aid and may
display obstacles in a distorted or incorrect
manner, or may not even display them at all.
The reversing camera does not relieve you of Driving systems
135Controls
* optional
X164_AKB; 2; 3, en-GB
wobuchh,
Version: 2.11.8.1 2009-03-31T14:14:58+02:00 - Seite 135 Z
Dateiname: 6515431202_buchblock.pdf; erzeugt am 01. Apr 2009 00:17:27; WK
Page 194 of 309
R
Accelerate gently and make sure that the
wheels are gripping.
R Avoid high engine speeds, except when
driving on sandy and muddy routes with
high driving resistance.
R Select a shift range appropriate to the gra-
dient.
R Before tackling steep downhill gradients,
select shift range 1.
i The vehicle will not roll backwards when
stopping on an uphill gradient if:
R the automatic transmission is in position
D.
R you have selected the LOW RANGE off-
road gear.
Depress the brake pedal when stopping on
steep uphill gradients. Hill start assist will
aid you when you pull away again
(Y page 90).
Maximum gradient-climbing capability On good road surfaces and with the LOW
RANGE off-road gear selected, the full gradi-
ent-climbing capability is available.
i
If the load on the front axle is reduced
when pulling away on a steep uphill slope,
the front wheels have a tendency to spin.
4ETS recognises this and brakes the
wheels accordingly. The rear wheel torque
is increased and it is easier to pull away.
Brow of hill When driving up an uphill gradient, slightly
reduce pressure on the accelerator immedi-
ately before reaching the brow of the hill.
Make use of the vehicle’s own impetus to
travel over the brow.
This style of driving prevents: R
the vehicle from lifting off the ground on the
brow of a hill
R loss of traction
R the vehicle from travelling too quickly down
the other side
Driving downhill R
Drive slowly.
R Do not drive at an angle down steep
inclines. Steer into the line of fall and drive
with the front wheels aligned straight. Oth-
erwise, the vehicle could slip sideways, tip
and overturn.
R Before tackling steep downhill gradients,
select shift range 1.
R Activate DSR. If this is not sufficient, brake
gently. When doing so, make sure that the
vehicle is facing in the direction of the line
of fall.
R Check that the brakes are working normally
after a long downhill stretch.
i Off-road ABS is activated when the
LOW RANGE off-road gear is selected.
At speeds below 30 km/h, the front wheels
lock cyclically during braking. The digging-
in effect achieved in the process reduces
the stopping distance when driving off-
road. The steerability of the vehicle is con-
siderably reduced when the wheels lock. Driving over obstacles
Observe the following rules when driving over
tree stumps, large stones and other obsta-
cles:
R Select the LOW RANGE off-road gear
(Y page 114).
R Avoid high engine speeds.
R Select shift range 1. Off-road driving
191Operation
X164_AKB; 2; 3, en-GB
wobuchh,V ersion: 2.11.8.1
2009-03-31T14:14:58+02:00 - Seite 191 Z
Dateiname: 6515431202_buchblock.pdf; erzeugt am 01. Apr 2009 00:17:49; WK
Page 204 of 309
Care
Care and cleaning products
Regular care of your vehicle is a condition for
retaining the quality in the long term.
Use only care products and cleaning agents
recommended and approved by Mercedes-
Benz.
! For cleaning your vehicle, do not use any
of the following:
R dry, rough or hard cloths
R abrasive cleaning agents
R solvents
R cleaning agents containing solvents
and do not scrub.
Do not touch the surfaces and protective
films with hard objects, e.g. rings or ice
scrapers. You could otherwise scratch or
damage the surfaces and protective film. H
Environmental note
Dispose of empty packaging, cleaning cloths
and polishing wads in an environmentally
responsible manner.
! Do not park the vehicle for a long period
of time directly after cleaning, especially if
the wheels have just been cleaned with a
wheel cleaner. Wheel cleaners could cause
rapid corrosion of the brake discs and
brake pads/linings. After cleaning, park
the vehicle when it is at normal operating
temperature. Exterior care
Automatic car wash G
Risk of accident
The efficiency of the brakes is reduced after
using an automatic car wash. This could cause
an accident. For this reason, following a car
wash, drive with particular care until the
brakes are dry. You can wash the vehicle in an automatic car
wash from the beginning.
!
Do not wash vehicles with an exterior
spare wheel bracket* in an automatic car
wash.
If the vehicle is very dirty, pre-wash it before
cleaning it in an automatic car wash.
! Make sure that the automatic car wash is
suitable for the size of the vehicle. Fold in
the exterior mirrors before the vehicle is
washed. There is otherwise a risk of dam-
age to the exterior mirrors.
! When washing your vehicle in a tow-
through car wash, make sure that the auto-
matic transmission is in position N, other-
wise the vehicle could be damaged.
R Vehicles with a key:
Do not remove the key from the ignition
lock. Do not open the driver's or front-
passenger door when the engine is
switched off, as this automatically shifts
the automatic transmission to park posi-
tion Pand locks the wheels, unless you
have previously shifted the automatic
transmission to N.
R Vehicles with KEYLESS GO*:
Do not open the driver's or front-
passenger door when the engine is
switched off, as this shifts the automatic
transmission to park position Pand locks
the wheels.
! Make sure that the side windows are com-
pletely closed, that the ventilation/heater
blower is fully turned off and that the wind-
screen wiper switch is set to 0. Otherwise,
the rain/light sensor may be activated, trig-
gering unintended wiper movements. This
could cause damage to the vehicle.
After using an automatic car wash, wipe off
wax and drying agents from the windscreen
and the wiper blades. This will prevent smears
and reduce wiping noises caused by residue
on the windscreen. Care
201Operation
* optional
X164_AKB; 2; 3, en-GB
wobuchh,
Version: 2.11.8.1 2009-03-31T14:14:58+02:00 - Seite 201 Z
Dateiname: 6515431202_buchblock.pdf; erzeugt am 01. Apr 2009 00:17:53; WK