2009 MERCEDES-BENZ GL SUV AUX
[x] Cancel search: AUXPage 150 of 309
Convenience opening/closing
G
Risk of injury
Make sure that nobody can become trapped
between the side window and the door frame
as the side windows are opened and closed.
Do not place objects or lean against the side
windows when they are being opened or
closed. You or the objects could be drawn in
or become trapped between the side window
and the door frame as the window moves. If
there is a risk of entrapment, press the
d button again. Press the button for stop-
ping, opening or closing the side windows in
the opposite direction as appropriate.
Make sure that nobody can become trapped
when you are opening or closing the sliding/
tilting sunroof*. If there is a risk of entrap-
ment, press the dbutton again. Press the
button to stop, open or close the panorama
sliding/tilting sunroof* in the opposite direc-
tion as appropriate.
X Convenience closing: press and hold
the d button until the side windows and
the sliding/tilting sunroof* are closed.
The indicator lamp in the dbutton lights
up. Air-recirculation mode is activated.
X Convenience opening: press and hold the
d button until the side windows and the
sliding/tilting sunroof* have reached their
original position.
The indicator lamp in the dbutton goes
out. Air-recirculation mode is deactivated.
i If you open the side windows or the slid-
ing/tilting sunroof* manually after closing
with the convenience closing feature, they
will remain in this position when opened
using the convenience opening feature. Switching the residual heat on/off
It is possible to make use of the residual heat
of the engine to continue heating the station-
ary vehicle for up to 30 minutes after the engine has been switched off. The heating
time depends on the temperature that has
been set.
i
The blower will run at a low speed regard-
less of the airflow setting.
i If you activate the "residual heat" function
at high temperatures, only the ventilation
will be activated. The blower runs at
medium speed.
X Turn the key to position 0in the ignition
lock or remove it.
X To activate: press theÁbutton.
The indicator lamp in the Ábutton
comes on.
X To switch off: press theÁbutton.
The indicator lamp in the Ábutton goes
out.
i The residual heat automatically switches
off after around 30 minutes or if:
R the ignition is switched on
R the battery voltage drops Auxiliary heating/ventilation*
Notes on the auxiliary heating/ventila-
tion system G
Risk of poisoning
Exhaust fumes are produced when the auxili-
ary heating is in operation. Inhaling these
exhaust fumes can be poisonous. You should
therefore switch off the auxiliary heating in
confined spaces without an extraction sys-
tem, e.g. a garage. G
Risk of fire
When operating the auxiliary heating, parts of
the vehicle may become very hot, and highly
inflammable material such as fuels could be
ignited. Operating the auxiliary heating is thus
prohibited at filling stations or when your vehi-
cle is being refuelled. You must therefore Air conditioning
147Controls
* optional
X164_AKB; 2; 3, en-GB
wobuchh,
Version: 2.11.8.1 2009-03-31T14:14:58+02:00 - Seite 147 Z
Dateiname: 6515431202_buchblock.pdf; erzeugt am 01. Apr 2009 00:17:31; WK
Page 151 of 309
switch off the auxiliary heating at filling sta-
tions.
i Switch the auxiliary heating on regularly
once a month for about ten minutes.
The auxiliary heating heats the air in the vehi-
cle interior to the set temperature without
using the heat of the running engine. The aux-
iliary heating is operated using the vehicle's
fuel. For this reason, the tank content must
be at least at reserve fuel level to ensure that
the auxiliary heating functions.
The auxiliary heating/ventilation automati-
cally adjusts to changes in temperature and
weather conditions. For this reason, the aux-
iliary heating could switch from ventilation
mode to heating mode or from heating mode
to ventilation mode.
You cannot use the auxiliary ventilation to
cool the vehicle interior to a temperature
lower than the outside temperature.
Before activating X
Turn the key to position 2in the ignition
lock.
X Set the temperature.
The auxiliary heating/ventilation can be acti-
vated even when the air conditioning is being
controlled manually. Optimum comfort can
be attained when the system is set to auto-
matic mode. Set the temperature to 22 †.
The auxiliary heating/ventilation can be acti-
vated or deactivated using the remote control
or the button on the centre console.
The on-board computer can be used to spec-
ify up to three departure times, one of which
may be preselected (Y page 107). Switching the auxiliary heating/venti-
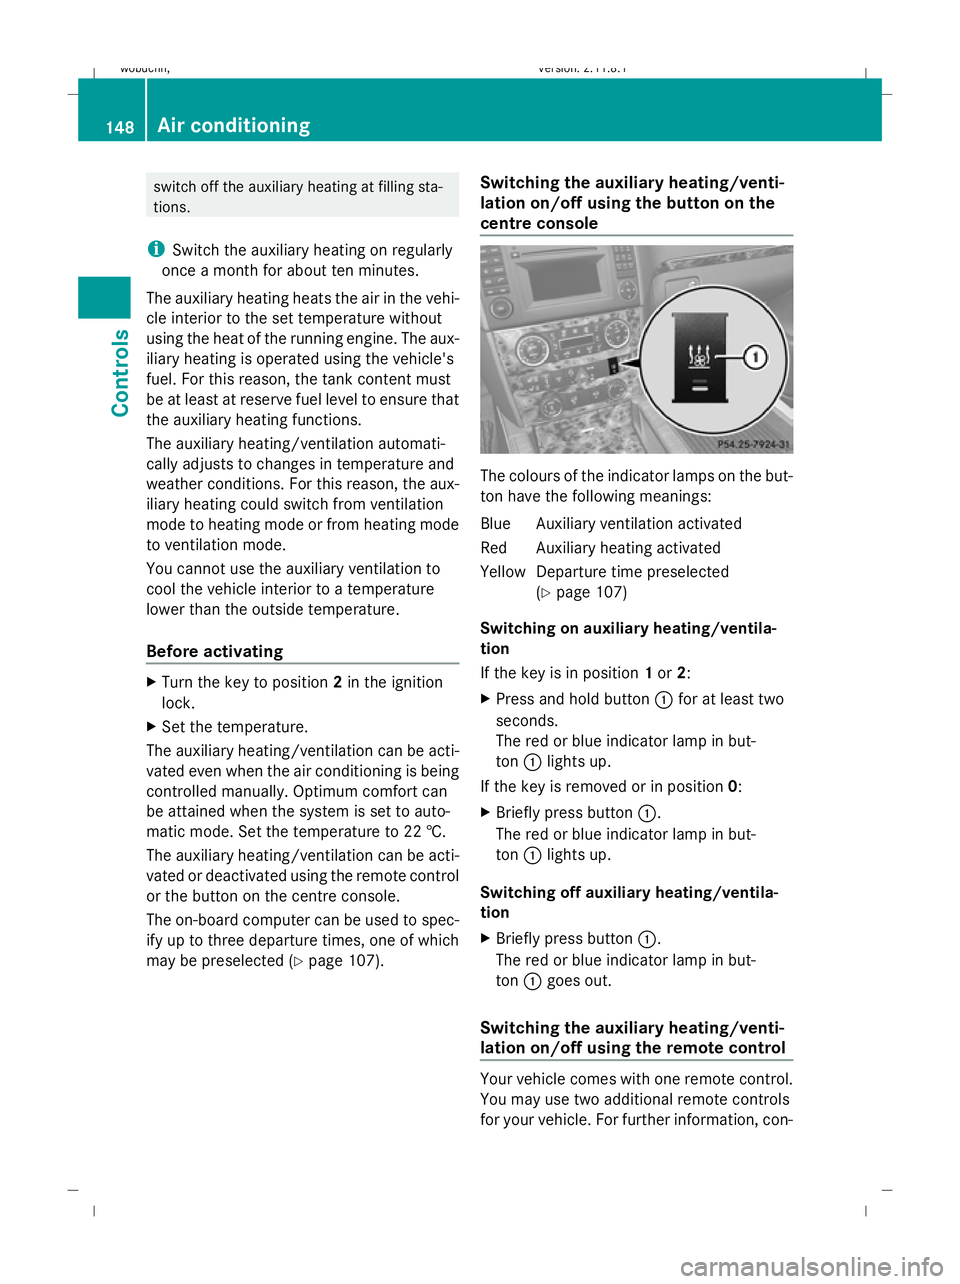
lation on/off using the button on the
centre console The colours of the indicator lamps on the but-
ton have the following meanings:
Blue Auxiliary ventilation activated
Red Auxiliary heating activated
YellowD eparture time preselected
(Y page 107)
Switching on auxiliary heating/ventila-
tion
If the key is in position 1or 2:
X Press and hold button :for at least two
seconds.
The red or blue indicator lamp in but-
ton :lights up.
If the key is removed or in position 0:
X Briefly press button :.
The red or blue indicator lamp in but-
ton :lights up.
Switching off auxiliary heating/ventila-
tion
X Briefly press button :.
The red or blue indicator lamp in but-
ton :goes out.
Switching the auxiliary heating/venti-
lation on/off using the remote control Your vehicle comes with one remote control.
You may use two additional remote controls
for your vehicle. For further information, con-148
Air conditioningControls
X164_AKB; 2; 3, en-GB
wobuchh,
Version: 2.11.8.1 2009-03-31T14:14:58+02:00 - Seite 148
Dateiname: 6515431202_buchblock.pdf; erzeugt am 01. Apr 2009 00:17:32; WK
Page 152 of 309
sult a qualified specialist workshop, e.g. a
Mercedes-Benz Service Centre.
The remote control has a maximum range of
approximately 300 metres. This range is
reduced by:
R sources of radio interference
R solid objects between the remote control
and the vehicle
R the remote control being in an unfavoura-
ble position in relation to the vehicle
R transmitting from an enclosed space
i The optimum range can be achieved if you
hold the remote control vertically, pointing
upwards when you press one of the but-
tons.
i A battery symbol appears in the display
when the batteries in the remote control
are low. Replace the remote control bat-
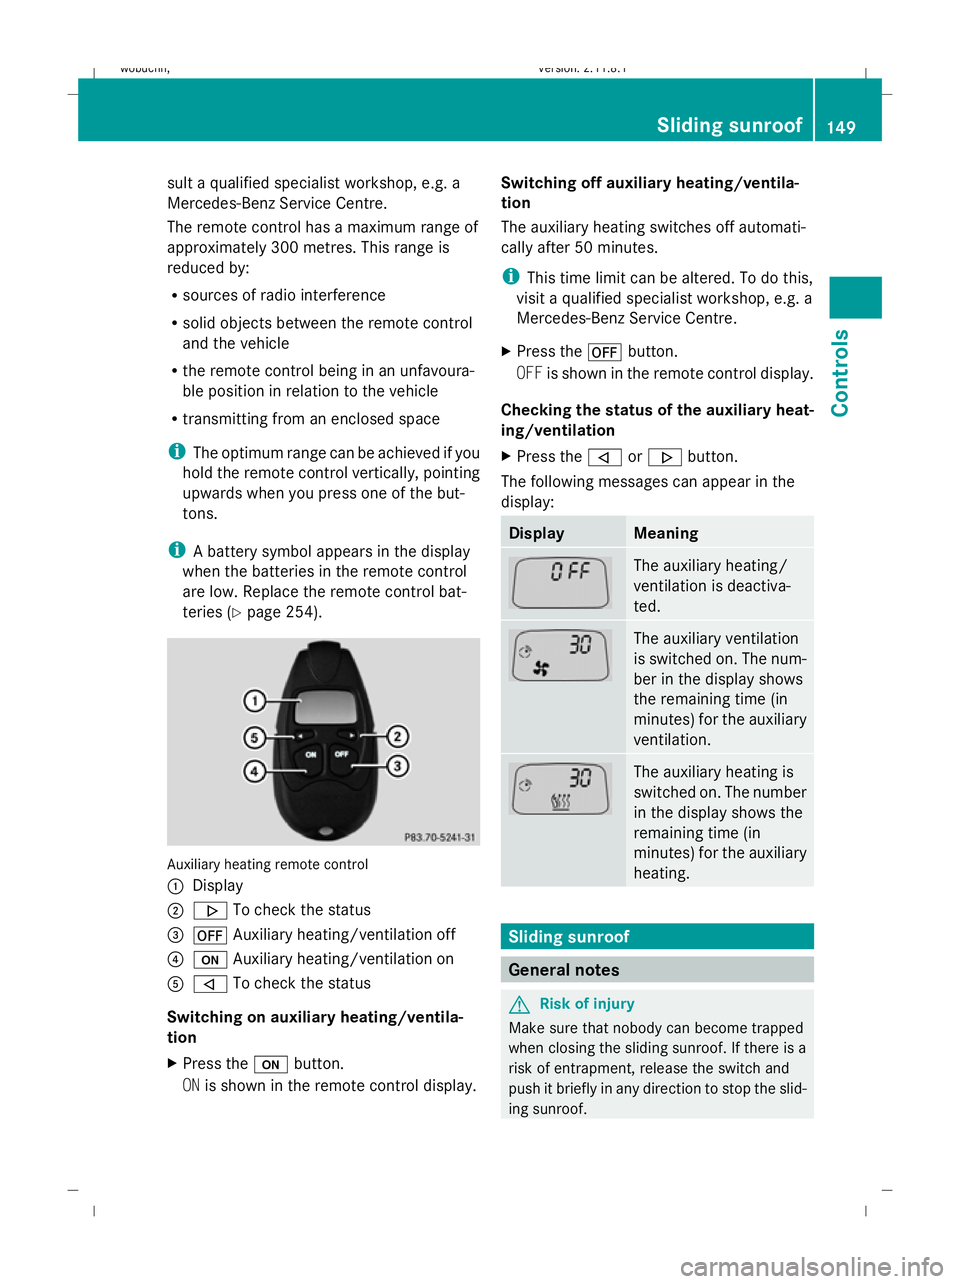
teries (Y page 254). Auxiliary heating remote control
: Display
; . To check the status
= ^ Auxiliary heating/ventilation off
? u Auxiliary heating/ventilation on
A , To check the status
Switching on auxiliary heating/ventila-
tion
X Press the ubutton.
ON is shown in the remote control display. Switching off auxiliary heating/ventila-
tion
The auxiliary heating switches off automati-
cally after 50 minutes.
i
This time limit can be altered. To do this,
visit a qualified specialist workshop, e.g. a
Mercedes-Benz Service Centre.
X Press the ^button.
OFF is shown in the remote control display.
Checking the status of the auxiliary heat-
ing/ventilation
X Press the ,or. button.
The following messages can appear in the
display: Display Meaning
The auxiliary heating/
ventilation is deactiva-
ted.
The auxiliary ventilation
is switched on. The num-
ber in the display shows
the remaining time (in
minutes) for the auxiliary
ventilation.
The auxiliary heating is
switched on. The number
in the display shows the
remaining time (in
minutes) for the auxiliary
heating.
Sliding sunroof
General notes
G
Risk of injury
Make sure that nobody can become trapped
when closing the sliding sunroof. If there is a
risk of entrapment, release the switch and
push it briefly in any direction to stop the slid-
ing sunroof. Sliding sunroof
149Controls
X164_AKB; 2; 3, en-GB
wobuchh, Version: 2.11.8.1 2009-03-31T14:14:58+02:00 - Seite 149 Z
Dateiname: 6515431202_buchblock.pdf; erzeugt am 01. Apr 2009 00:17:32; WK
Page 155 of 309
seat backrests are securely locked into
place.
R always place the load behind unoccupied
seats if possible.
R secure the load with sufficiently strong and
wear-resistant load restraints. Pad sharp
edges for protection.
i Load restraints are available at any quali-
fied specialist workshop, e.g. a Mercedes-
Benz Service Centre. Stowage compartments
G
Risk of injury
The stowage compartments must be closed
when items are stored in them. Luggage nets
are not designed to secure heavy items of
luggage.
You or other vehicle occupants could be
injured by objects being thrown around if you:
R brake sharply
R change direction suddenly
R are involved in an accident
Sharp-edged and fragile objects must not be
placed in the luggage net.
Glove compartment i
Depending on the vehicle's equipment,
there is an AUX-IN connection installed in
the glove compartment, or a Media Inter-
face*, which is a universal interface for
portable audio equipment, e.g. for an iPod
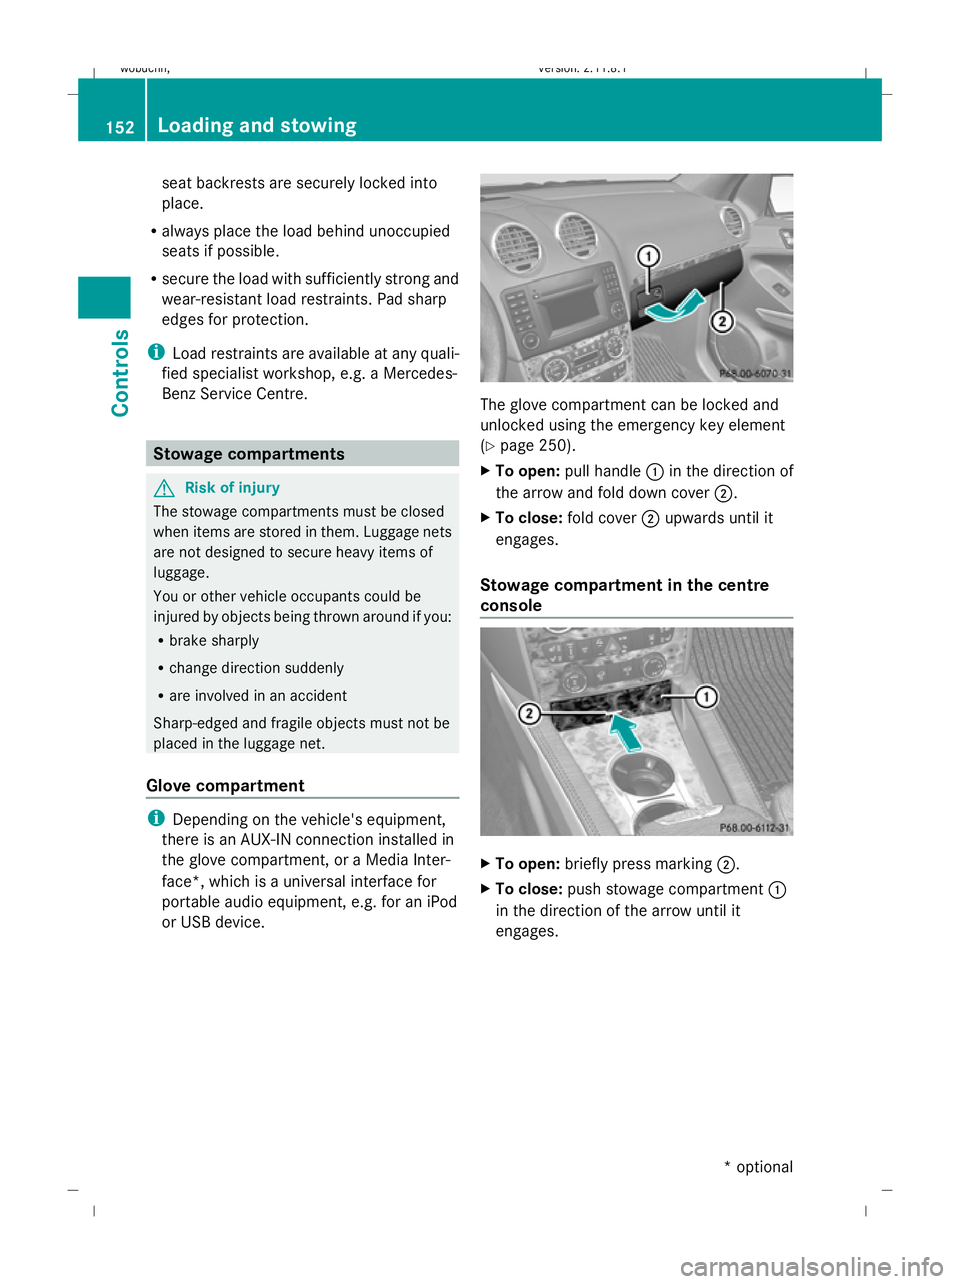
or USB device. The glove compartment can be locked and
unlocked using the emergency key element
(Y
page 250).
X To open: pull handle :in the direction of
the arrow and fold down cover ;.
X To close: fold cover ;upwards until it
engages.
Stowage compartment in the centre
console X
To open: briefly press marking ;.
X To close: push stowage compartment :
in the direction of the arrow until it
engages. 152
Loading and stowingControls
* optional
X164_AKB; 2; 3, en-GB
wobuchh,
Version: 2.11.8.1 2009-03-31T14:14:58+02:00 - Seite 152
Dateiname: 6515431202_buchblock.pdf; erzeugt am 01. Apr 2009 00:17:33; WK
Page 175 of 309
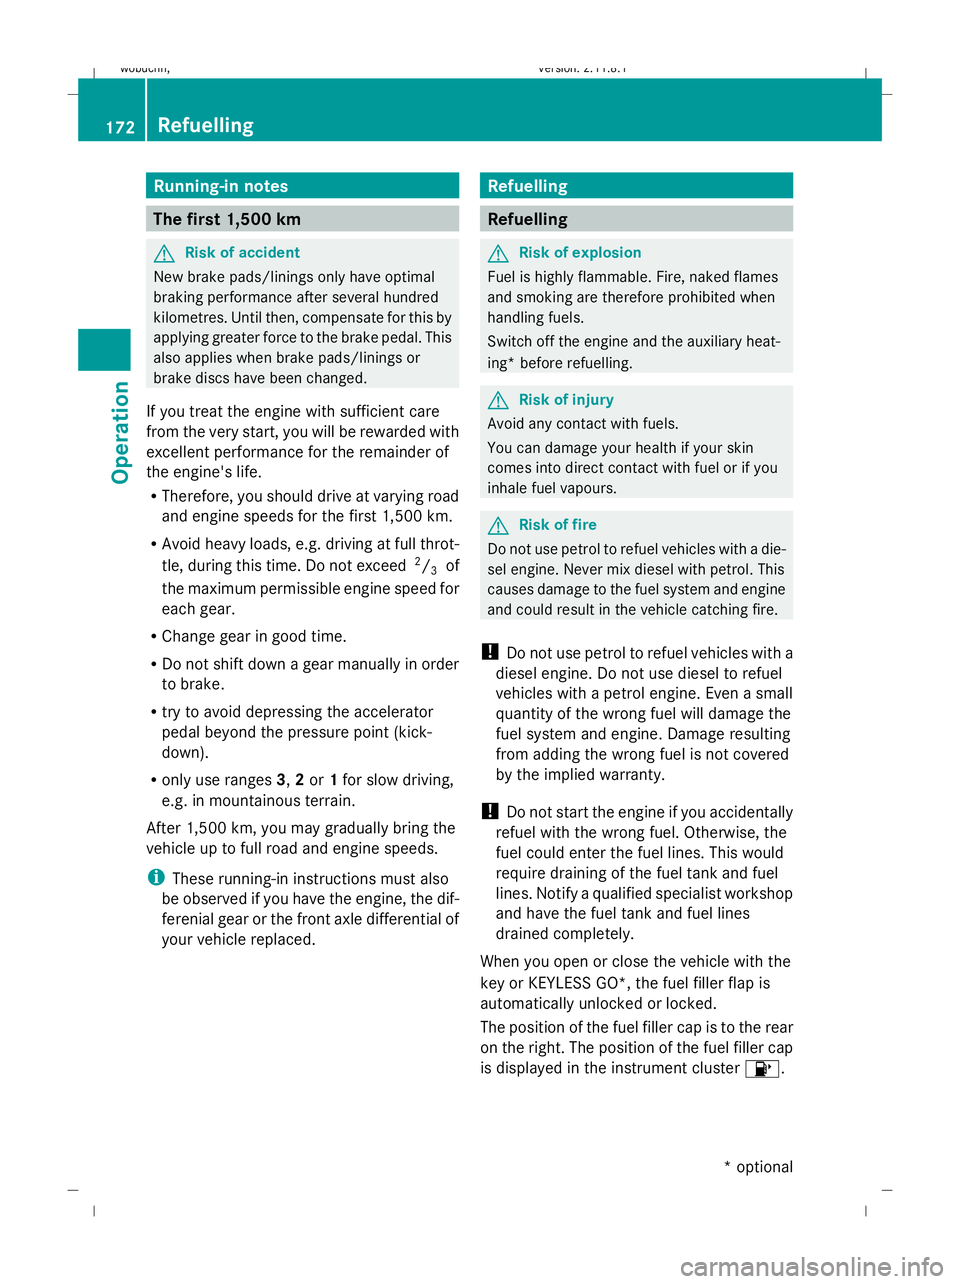
Running-in notes
The first 1,500 km
G
Risk of accident
New brake pads/linings only have optimal
braking performance after several hundred
kilometres. Until then, compensate for this by
applying greater force to the brake pedal. This
also applies when brake pads/linings or
brake discs have been changed.
If you treat the engine with sufficient care
from the very start, you will be rewarded with
excellent performance for the remainder of
the engine's life.
R Therefore, you should drive at varying road
and engine speeds for the first 1,500 km.
R Avoid heavy loads, e.g. driving at full throt-
tle, during this time. Do not exceed 2
/ 3 of
the maximum permissible engine speed for
each gear.
R Change gear in good time.
R Do not shift down a gear manually in order
to brake.
R try to avoid depressing the accelerator
pedal beyond the pressure point (kick-
down).
R only use ranges 3,2or 1for slow driving,
e.g. in mountainous terrain.
After 1,500 km, you may gradually bring the
vehicle up to full road and engine speeds.
i These running-in instructions must also
be observed if you have the engine, the dif-
ferenial gear or the front axle differential of
your vehicle replaced. Refuelling
Refuelling
G
Risk of explosion
Fuel is highly flammable. Fire, naked flames
and smoking are therefore prohibited when
handling fuels.
Switch off the engine and the auxiliary heat-
ing* before refuelling. G
Risk of injury
Avoid any contact with fuels.
You can damage your health if your skin
comes into direct contact with fuel or if you
inhale fuel vapours. G
Risk of fire
Do not use petrol to refuel vehicles with a die-
sel engine. Never mix diesel with petrol. This
causes damage to the fuel system and engine
and could result in the vehicle catching fire.
! Do not use petrol to refuel vehicles with a
diesel engine. Do not use diesel to refuel
vehicles with a petrol engine. Even a small
quantity of the wrong fuel will damage the
fuel system and engine. Damage resulting
from adding the wrong fuel is not covered
by the implied warranty.
! Do not start the engine if you accidentally
refuel with the wrong fuel. Otherwise, the
fuel could enter the fuel lines. This would
require draining of the fuel tank and fuel
lines. Notify a qualified specialist workshop
and have the fuel tank and fuel lines
drained completely.
When you open or close the vehicle with the
key or KEYLESS GO*, the fuel filler flap is
automatically unlocked or locked.
The position of the fuel filler cap is to the rear
on the right. The position of the fuel filler cap
is displayed in the instrument cluster 8.172
RefuellingOperation
* optional
X164_AKB; 2; 3, en-GB
wobuchh,
Version: 2.11.8.1 2009-03-31T14:14:58+02:00 - Seite 172
Dateiname: 6515431202_buchblock.pdf; erzeugt am 01. Apr 2009 00:17:45; WK
Page 216 of 309
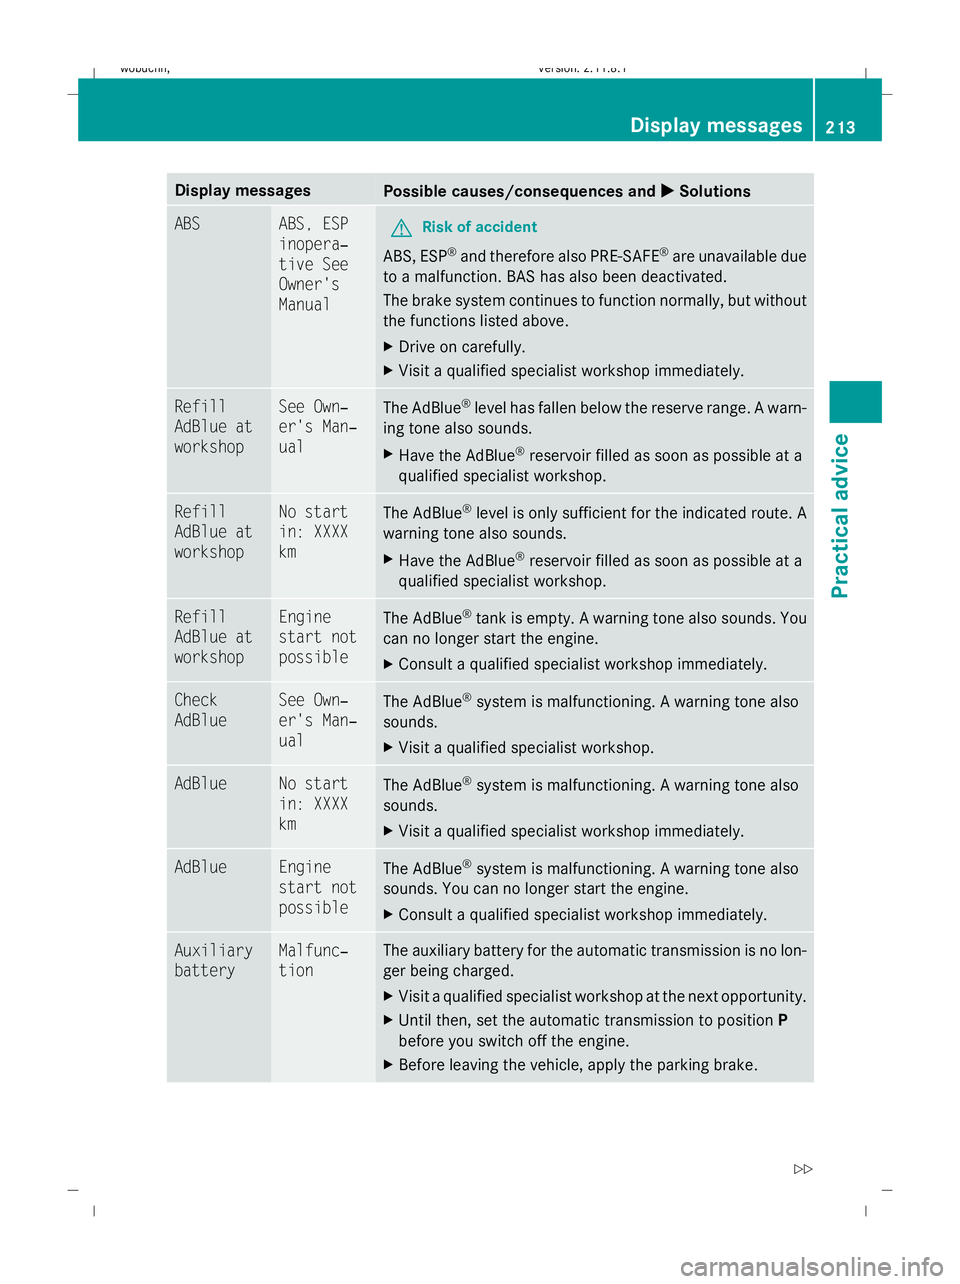
Display messages
Possible causes/consequences and
X
X Solutions ABS ABS, ESP
inopera‐
tive See
Owner's
Manual
G
Risk of accident
ABS, ESP ®
and therefore also PRE-SAFE ®
are unavailable due
to a malfunction. BAS has also been deactivated.
The brake system continues to function normally, but without
the functions listed above.
X Drive on carefully.
X Visit a qualified specialist workshop immediately. Refill
AdBlue at
workshop See Own‐
er's Man‐
ual
The AdBlue
®
level has fallen below the reserve range. A warn-
ing tone also sounds.
X Have the AdBlue ®
reservoir filled as soon as possible at a
qualified specialist workshop. Refill
AdBlue at
workshop No start
in: XXXX
km
The AdBlue
®
level is only sufficient for the indicated route. A
warning tone also sounds.
X Have the AdBlue ®
reservoir filled as soon as possible at a
qualified specialist workshop. Refill
AdBlue at
workshop Engine
start not
possible
The AdBlue
®
tank is empty. A warning tone also sounds. You
can no longer start the engine.
X Consult a qualified specialist workshop immediately. Check
AdBlue See Own‐
er's Man‐
ual
The AdBlue
®
system is malfunctioning. A warning tone also
sounds.
X Visit a qualified specialist workshop. AdBlue No start
in: XXXX
km
The AdBlue
®
system is malfunctioning. A warning tone also
sounds.
X Visit a qualified specialist workshop immediately. AdBlue Engine
start not
possible
The AdBlue
®
system is malfunctioning. A warning tone also
sounds. You can no longer start the engine.
X Consult a qualified specialist workshop immediately. Auxiliary
battery Malfunc‐
tion The auxiliary battery for the automatic transmission is no lon-
ger being charged.
X
Visit a qualified specialist workshop at the next opportunity.
X Until then, set the automatic transmission to position P
before you switch off the engine.
X Before leaving the vehicle, apply the parking brake. Display
messages
213Practical advice
X164_AKB; 2; 3, en-GB
wobuchh,V ersion: 2.11.8.1
2009-03-31T14:14:58+02:00 - Seite 213 Z
Dateiname: 6515431202_buchblock.pdf; erzeugt am 01. Apr 2009 00:17:58; WK
Page 234 of 309
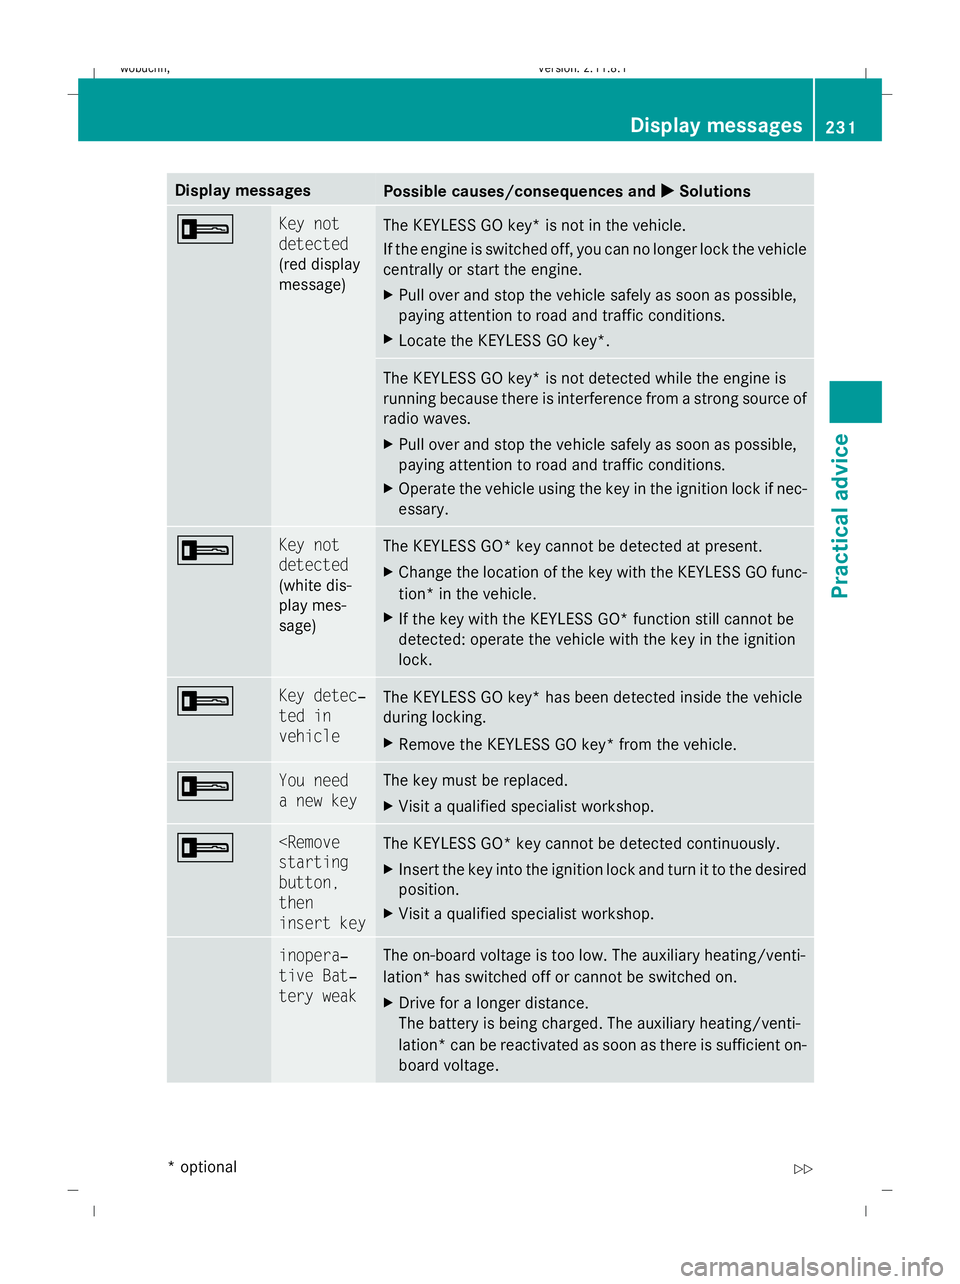
Display messages
Possible causes/consequences and
X
X Solutions + Key not
detected
(red display
message)
The KEYLESS GO key* is not in the vehicle.
If the engine is switched off, you can no longer lock the vehicle
centrally or start the engine.
X
Pull over and stop the vehicle safely as soon as possible,
paying attention to road and traffic conditions.
X Locate the KEYLESS GO key*. The KEYLESS GO key* is not detected while the engine is
running because there is interference from a strong source of
radio waves.
X Pull over and stop the vehicle safely as soon as possible,
paying attention to road and traffic conditions.
X Operate the vehicle using the key in the ignition lock if nec-
essary. + Key not
detected
(white dis-
play mes-
sage)
The KEYLESS GO* key cannot be detected at present.
X
Change the location of the key with the KEYLESS GO func-
tion* in the vehicle.
X If the key with the KEYLESS GO* function still cannot be
detected: operate the vehicle with the key in the ignition
lock. + Key detec‐
ted in
vehicle
The KEYLESS GO key* has been detected inside the vehicle
during locking.
X
Remove the KEYLESS GO key* from the vehicle. + You need
a new key The key must be replaced.
X
Visit a qualified specialist workshop. +
button,
then
insert key
The KEYLESS GO* key cannot be detected continuously.
X
Insert the key into the ignition lock and turn it to the desired
position.
X Visit a qualified specialist workshop. & inopera‐
tive Bat‐
tery weak The on-board voltage is too low. The auxiliary heating/venti-
lation* has switched off or cannot be switched on.
X
Drive for a longer distance.
The battery is being charged. The auxiliary heating/venti-
lation *can be reactivated as soon as there is sufficient on-
board voltage. Display messages
231Practical advice
* optional
X164_AKB; 2; 3, en-GB
wobuchh,
Version: 2.11.8.1 2009-03-31T14:14:58+02:00 - Seite 231 Z
Dateiname: 6515431202_buchblock.pdf; erzeugt am 01. Apr 2009 00:18:01; WK
Page 235 of 309
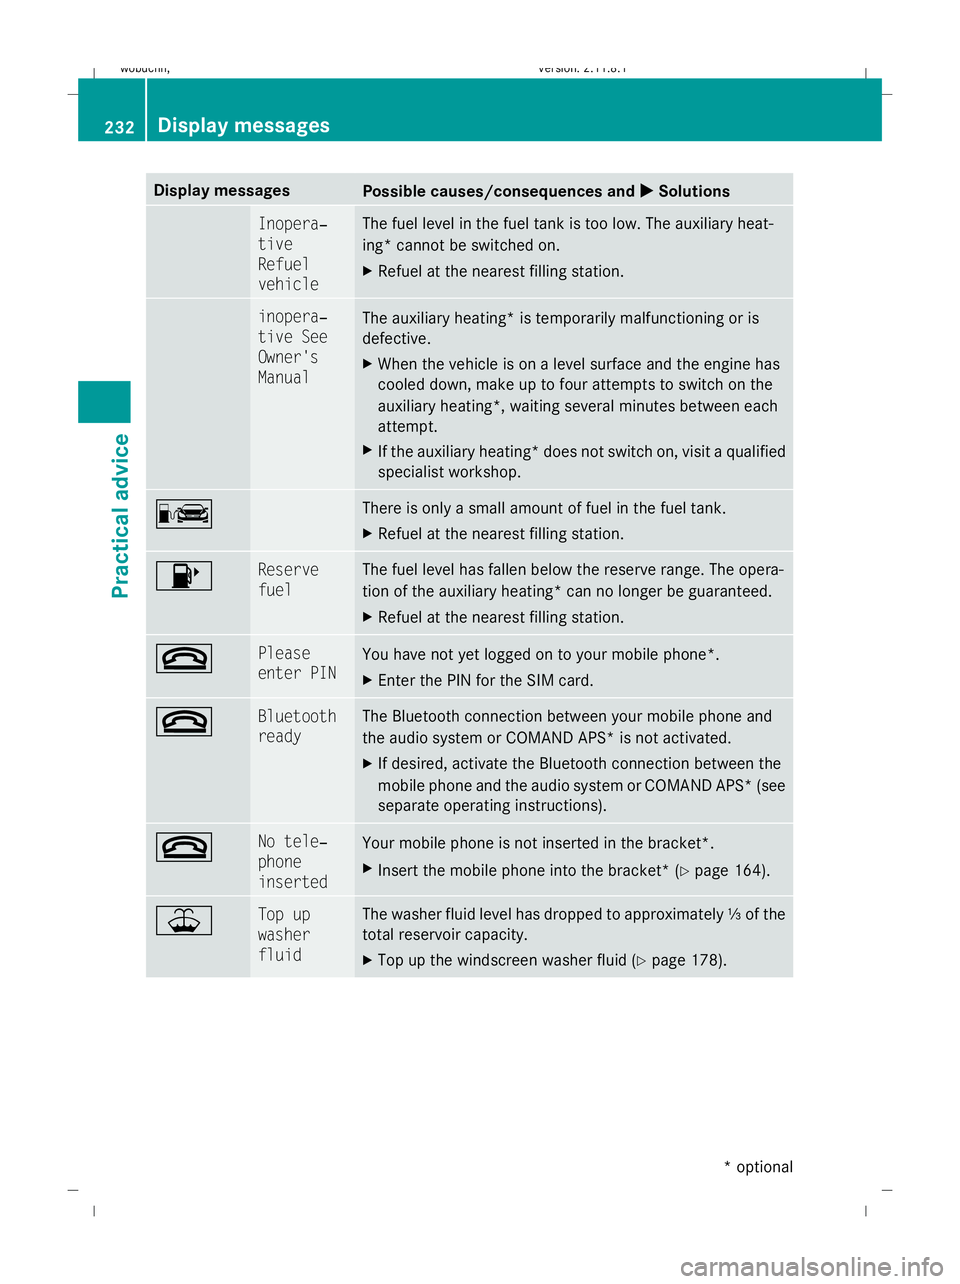
Display messages
Possible causes/consequences and
X
X Solutions & Inopera‐
tive
Refuel
vehicle The fuel level in the fuel tank is too low. The auxiliary heat-
ing* cannot be switched on.
X
Refuel at the nearest filling station. & inopera‐
tive See
Owner's
Manual
The auxiliary heating* is temporarily malfunctioning or is
defective.
X
When the vehicle is on a level surface and the engine has
cooled down, make up to four attempts to switch on the
auxiliary heating*, waiting several minutes between each
attempt.
X If the auxiliary heating* does not switch on, visit a qualified
specialist workshop. C There is only a small amount of fuel in the fuel tank.
X
Refuel at the nearest filling station. 8 Reserve
fuel The fuel level has fallen below the reserve range. The opera-
tion of the auxiliary heating* can no longer be guaranteed.
X
Refuel at the nearest filling station. ~ Please
enter PIN
You have not yet logged on to your mobile phone
*.
X Enter the PIN for the SIM card. ~ Bluetooth
ready The Bluetooth connection between your mobile phone and
the audio system or COMAND APS* is not activated.
X
If desired, activate the Bluetooth connection between the
mobile phone and the audio system or COMAND APS* (see
separate operating instructions). ~ No tele‐
phone
inserted
Your mobile phone is not inserted in the bracket*.
X
Insert the mobile phone into the bracket* ( Ypage 164). ¥ Top up
washer
fluid The washer fluid level has dropped to approximately
⅓of the
total reservoir capacity.
X Top up the windscreen washer fluid (Y page 178).232
Display messagesPractical advice
* optional
X164_AKB; 2; 3, en-GB
wobuchh,
Version: 2.11.8.1 2009-03-31T14:14:58+02:00 - Seite 232
Dateiname: 6515431202_buchblock.pdf; erzeugt am 01. Apr 2009 00:18:01; WK