2009 MERCEDES-BENZ E-CLASS SALOON radio
[x] Cancel search: radioPage 300 of 373

Problem
Possible causes/consequences and
X
X Solutions You have lost a key.
X
Have the key cancelled at a Mercedes-Benz Service Centre.
X Report the loss immediately to the vehicle insurers.
X If necessary, have the manual locks changed too. You have lost the emer-
gency key element.
X
Report the loss immediately to the vehicle insurers.
X If necessary, have the manual locks changed too. The engine cannot be
started using the key. The on-board voltage is too low.
X Switch off non-essential consumers, e.g. seat heating* or inte-
rior lighting, and try to start the engine again.
If this does not work:
X Check the starter battery and charge it if necessary
(Y page 319).
or
X Jump-start the vehicle (Y page 323).
or
X Consult a qualified specialist workshop. The engine cannot be
started using the key.
The steering lock is mechanically blocked.
44
X Remove the key and reinsert it into the ignition lock. While doing
this, turn the steering wheel in both directions. The engine cannot be
started using KEYLESS
GO*. The key is in the
vehicle. A door is open. Therefore, the key cannot be detected as easily.
X
Close the door and try to start the vehicle again. There is interference from a powerful source of radio waves.
X
Start your vehicle using the key in the ignition lock. 44
Not vehicles with DIRECT SELECT selector lever. Troubleshooting
297Practical advice
* optional
212_AKB; 2; 4, en-GB
mkalafa,
Version: 2.11.8.1 2009-05-05T14:17:16+02:00 - Seite 297 Z
Dateiname: 6515346702_buchblock.pdf; erzeugt am 07. May 2009 14:17:14; WK
Page 325 of 373

X
Firmly depress the parking brake and on
vehicles with automatic transmission*,
shift the transmission to position P.
X Switch off all electrical consumers (e.g.
radio, blower, etc.).
X Turn the key to 0(Y page 75) in the ignition
lock and remove it or make sure that no
ignition position has been selected with
KEYLESS GO*. In the instrument cluster, all
of the indicator lamps must be out.
X Vehicles with the battery in the engine
compartment: open the bonnet.
X Vehicles with the battery in the boot:
open the boot. X
Vehicles with a battery in the engine
compartment: release and remove
clamps ;on filter box :.
X Remove the negative terminal clamp from
the battery.
X Remove the cover from the positive termi-
nal clamp.
X Remove the positive terminal clamp from
the battery.
X Disconnect the breather hose. Removing the battery
X Disconnect the battery ( Ypage 321).
X Loosen the bolt which holds the battery in
place.
X Remove the battery. Charging and fitting the battery
G
Risk of injury
Battery acid is caustic. Avoid contact with the
skin, eyes or clothing.
Charging the battery G
Risk of injury
Only charge the battery in a well-ventilated
area. As the battery is being charged, gases
can escape and generate minor explosions.
This could injure you and other persons or
cause damage to the paintwork or acid cor-
rosion on the vehicle.
You can obtain information about battery
chargers which allow the battery to be
charged while still installed from a qualified
specialist workshop, e.g. a Mercedes-Benz
Service Centre. G
Risk of injury
There is a risk of acid burns during the charg-
ing process due to the gases which escape
from the battery. Do not lean over the battery
during the charging process.
! Only charge the installed battery with a
battery charger which has been tested and
approved by Mercedes-Benz. These battery
chargers allow the battery to be charged
while still installed.
! Only use battery chargers with a maxi-
mum charging voltage of 14.8 V.
! Only charge the battery using the jump-
start connection point.
X Vehicles with the battery in the engine
compartment: open the bonnet.
X Vehicles with the battery in the boot:
open the boot.
X Connect the battery charger by its positive
terminal and earth point in the same order
as when connecting the donor battery in 322
BatteryPractical advice
* optional
212_AKB; 2; 4, en-GB
mkalafa
,V ersion: 2.11.8.1
2009-05-05T14:17:16+02:00 - Seite 322
Dateiname: 6515346702_buchblock.pdf; erzeugt am 07. May 2009 14:17:26; WK
Page 326 of 373

the jump-starting procedure
(Y
page 323).
Fitting the battery X
Install the battery. To do this, follow the
steps described in "Removing the battery"
(Y page 322) in reverse order.
X Reconnect the battery (Y page 323).Reconnecting the battery
! Always connect the battery in the order
described below. Never swap the terminal
clamps. Otherwise, you may damage the
vehicle electronics.
X Switch off all electrical consumers (e.g.
radio, blower, etc.).
X Connect the positive terminal clamp and
secure the cover.
X Connect the negative terminal clamp.
X Connect the breather hose.
X On vehicles with the battery in the
engine compartment: put the filter box
back in place, then clip in and close the
retaining clamps.
Close the bonnet.
X Vehicles with the battery in the boot:
close the boot.
i If the battery power supply has been inter-
rupted (e.g. if it has been reconnected), you
must carry out the following tasks:
R set the time ( Ypage 132)
R reset the function for folding the exterior
mirrors in/out automatically* by folding
the mirrors out once ( Ypage 87) Jump-starting
If your vehicle's battery is discharged, the
engine can be jump-started from another
vehicle or from an external battery using jump
leads. Observe the following points:
R
you may only jump-start when the engine
and catalytic converter are cold.
R do not start the engine if the battery is fro-
zen. Let the battery thaw first.
R jump-starting may only be performed from
batteries with a nominal voltage of 12 V.
R only use jump leads which have a sufficient
cross-section and insulated terminal
clamps.
i Jump leads and further information about
jump-starting can be obtained from any
Mercedes-Benz Service Centre.
! Avoid repeated and lengthy starting
attempts.
Do not use a rapid-charging device to start
the engine. G
Risk of injury
There is a risk of acid burns when jump-start-
ing a vehicle due to the gases which escape
from the battery. Do not lean over the battery
while the engine is being jump-started. G
Risk of explosion
Gases escaping from the battery during jump-
starting may cause minor explosions. Avoid
creating sparks. Keep naked flames away
from the battery, and do not smoke.
Comply with safety precautions and take pro-
tective measures when handling batteries.
You will find these under "Battery" in the
index.
X Make sure that the two vehicles do not
touch.
X Depress the parking brake firmly.
X Manual transmission: engage neutral.
X Automatic transmission*: shift the trans-
mission to position P.
X Switch off all electrical consumers (e.g.
radio, blower, etc.).
X Open the bonnet (Y page 219). Jump-starting
323Practical advice
* optional
212_AKB; 2; 4, en-GB
mkalafa
,V ersion: 2.11.8.1
2009-05-05T14:17:16+02:00 - Seite 323 Z
Dateiname: 6515346702_buchblock.pdf; erzeugt am 07. May 2009 14:17:26; WK
Page 334 of 373

Retrofitting two-way radios and
mobile phones (RF transmitters)
Use the Technical Specification
ISO/TS 21609 46
implementation regulation
when retrofitting RF (radio frequency) trans-
mitters.
If your vehicle has fittings for two-way radio
equipment (e.g. taxis, hire cars or official vehi-
cles), use the power supply or aerial connec-
tions intended for use with the basic wiring.
Be sure to observe the manufacturer's addi-
tional instructions when installing the fittings.
! Damage resulting from installation work
that has not been carried out correctly is
not covered by the Mercedes-Benz implied
warranty.
To ensure correct installation, Mercedes-
Benz recommends having this work done
at a Mercedes-Benz Service Centre or at a
qualified specialist workshop.
Transmission output Transmission output at the aerial base must
not exceed the maximum values below. Waveband Maximum trans-
mission output
(PEAK)
Short wave
(f < 54 MHz) 100 W
4 m waveband 30 W
2 m waveband 50 W
Trunked radio/Tetra 35 W
70 cm waveband 35 W
GSM 900/AMPS 10 W
GSM 1800 10 W
UMTS 10 W Aerial positions
The following aerial positions may be used if
RF transmitters have been properly installed:
Aerial positions, Saloon
:
Front roof area (vehicles with sliding/tilt-
ing sunroof*: observe the roof's sweep)
(vehicles with panorama sliding roof*: this
area is not authorised for use)
; Rear roof area (vehicles with panorama
sliding sunroof*: this area is not author-
ised for use)
= Rear mudguard (recommended installa-
tion position: on the side which faces the
centre of the road)
? Boot lid
46 ISO/TS 21609 – Technical Specification for Road Vehicles -- (EMC) guidelines for installation of aftermarket
radio frequency transmitting equipment. Vehicle electronics
331Technical data
* optional
212_AKB; 2; 4, en-GB
mkalafa
,V ersion: 2.11.8.1
2009-05-05T14:17:16+02:00 - Seite 331 Z
Dateiname: 6515346702_buchblock.pdf; erzeugt am 07. May 2009 14:17:31; WK
Page 335 of 373

Aerial positions, Estate
:
Front roof area (vehicles with sliding/tilt-
ing sunroof*: observe the roof's sweep)
(vehicles with panorama sliding roof*: this
area is not authorised for use)
; Rear roof area
= Rear mudguard (recommended installa-
tion position: on the side which faces the
centre of the road) G
Risk of accident
Incorrect retrofitting of RF transmitters can
cause the vehicle electronics to malfunction,
impair the vehicle's operating safety and,
thus, also impair your own safety.
To ensure correct installation, Mercedes-
Benz recommends having this work done at a
Mercedes-Benz Service Centre or at a quali-
fied specialist workshop. G
Risk of injury
Improper installation of RF transmitters can
lead to increased electromagnetic radiation in
the vehicle interior. Using an exterior aerial
takes into account current scientific discus-
sions relating to the possible health hazards
that may result from electromagnetic fields.
To ensure correct installation, Mercedes-
Benz recommends having this work done at a
Mercedes-Benz Service Centre or at a quali-
fied specialist workshop.
Deviations with respect to aerial locations,
output and frequencies must be approved by
Mercedes-Benz. Other aerial positions
There is no restriction for aerial positions in
the outer area of the vehicle for these wave-
bands: trunked radio/Tetra, 70 cm wave-
band, GSM 900/AMPS, GSM 1800 and
UMTS.
Legal provisions for fittings must be
observed.
RF transmitters with a maximum transmis-
sion output of 100 mW (PEAK) may be used
in the vehicle without restrictions.
!
The operating permit may be invalidated
if the instructions for installation and use of
RF transmitters are not observed, e.g.
approved wavebands, maximum output
and aerial positions on the vehicle. Vehicle identification plates
Vehicle identification plate with vehi-
cle identification number (VIN) and
paint code number
The vehicle identification plate is located on
the side of the door frame on the right-hand
side. X
Open the front right-hand door.
You will see vehicle identification plate :.332
Vehicle identification platesTechnical data
* optional
212_AKB; 2; 4, en-GB
mkalafa
,V ersion: 2.11.8.1
2009-05-05T14:17:16+02:00 - Seite 332
Dateiname: 6515346702_buchblock.pdf; erzeugt am 07. May 2009 14:17:31; WK
Page 362 of 373

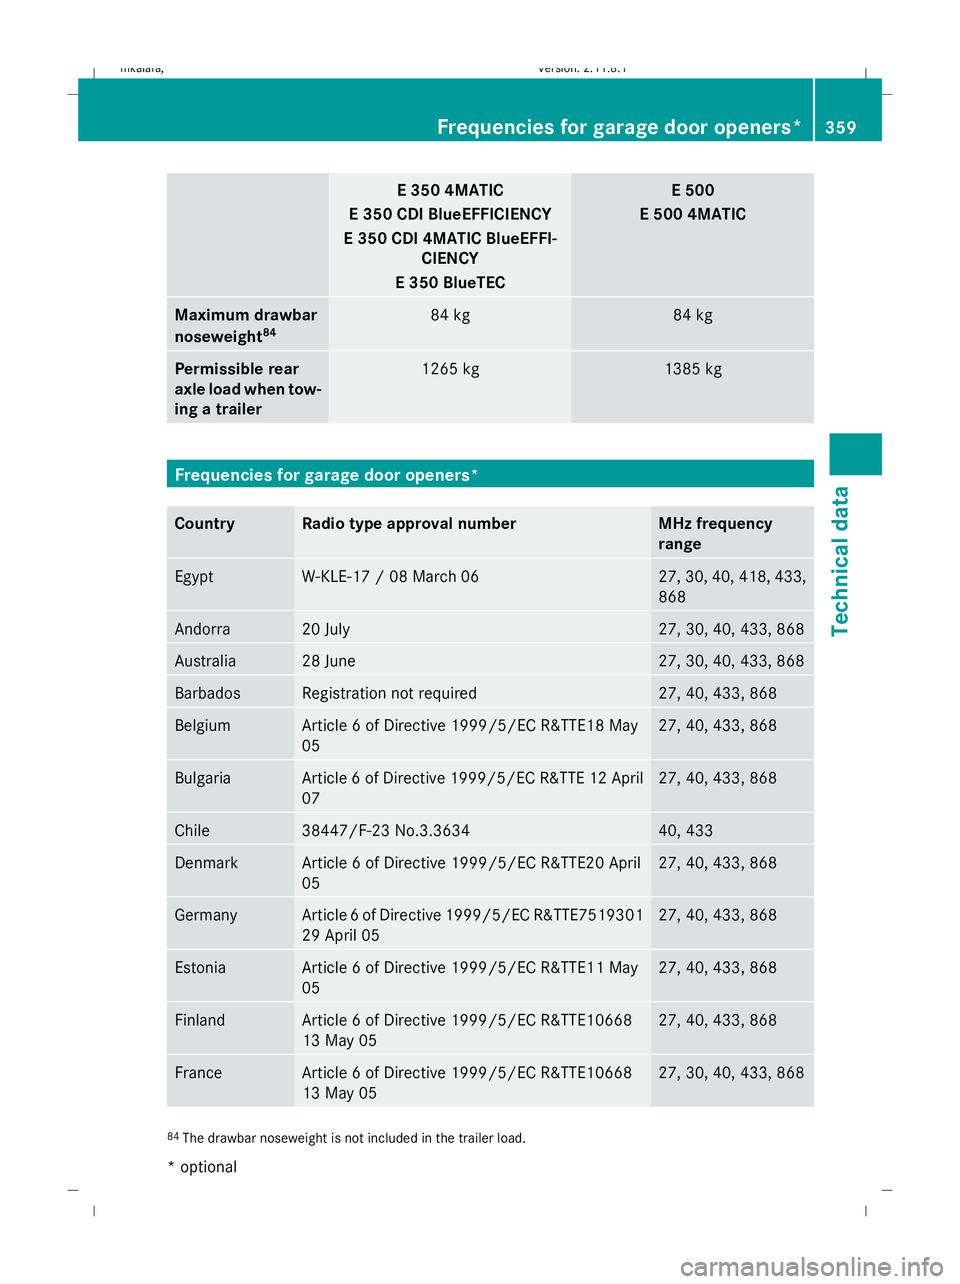
E 350 4MATIC
E 350 CDI BlueEFFICIENCY
E 350 CDI 4MATIC BlueEFFI- CIENCY
E 350 BlueTEC E 500
E 500 4MATIC Maximum drawbar
noseweight
84 84 kg 84 kg
Permissible rear
axle load when tow-
ing a trailer
1265 kg 1385 kg
Frequencies for garage door openers*
Country Radio type approval number MHz frequency
range
Egypt W-KLE-17 / 08 March 06 27, 30, 40, 418, 433,
868
Andorra 20 July 27, 30, 40, 433, 868
Australia 28 June 27, 30, 40, 433, 868
Barbados Registration not required 27, 40, 433, 868
Belgium Article 6 of Directive 1999/5/EC R&TTE18 May
05 27, 40, 433, 868
Bulgaria Article 6 of Directive 1999/5/EC R&TTE 12 April
07 27, 40, 433, 868
Chile 38447/F-23 No.3.3634 40, 433
Denmark Article 6 of Directive 1999/5/EC R&TTE20 April
05 27, 40, 433, 868
Germany Article 6 of Directive 1999/5/EC R&TTE7519301
29 April 05 27, 40, 433, 868
Estonia Article 6 of Directive 1999/5/EC R&TTE11 May
05 27, 40, 433, 868
Finland Article 6 of Directive 1999/5/EC R&TTE10668
13 May 05 27, 40, 433, 868
France Article 6 of Directive 1999/5/EC R&TTE10668
13 May 05 27, 30, 40, 433, 868
84
The drawbar noseweight is not included in the trailer load. Frequencies for garage door openers*
359Technical data
* optional
212_AKB; 2; 4, en-GB
mkalafa,
Version: 2.11.8.1 2009-05-05T14:17:16+02:00 - Seite 359 Z
Dateiname: 6515346702_buchblock.pdf; erzeugt am 07. May 2009 14:17:37; WK
Page 363 of 373

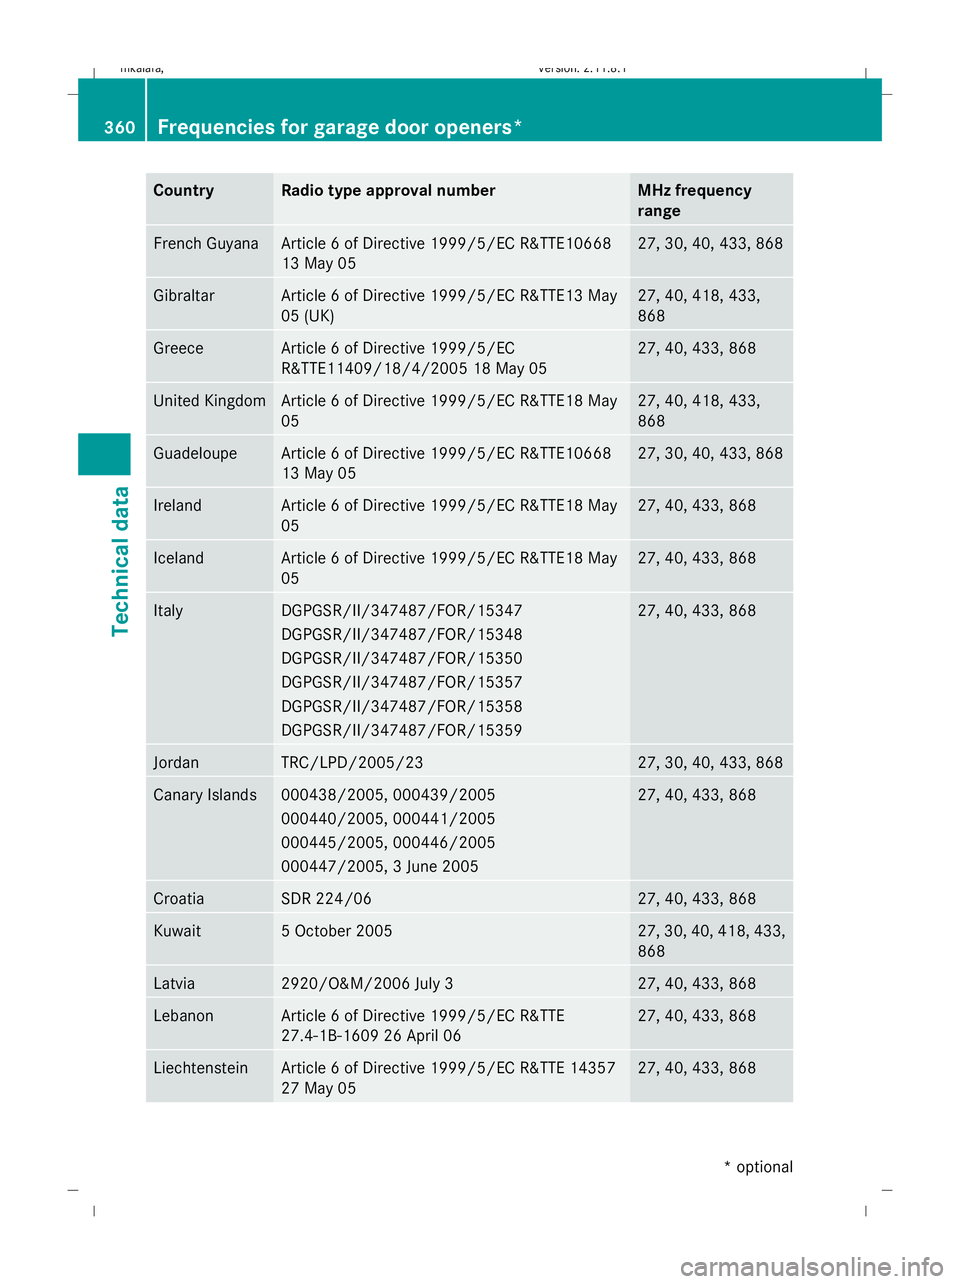
Country Radio type approval number MHz frequency
range
French Guyana Article 6 of Directive 1999/5/EC R&TTE10668
13 May 05 27, 30, 40, 433, 868
Gibraltar Article 6 of Directive 1999/5/EC R&TTE13 May
05 (UK) 27, 40, 418, 433,
868
Greece Article 6 of Directive 1999/5/EC
R&TTE11409/18/4/2005 18 May 05 27, 40, 433, 868
United Kingdom Article 6 of Directive 1999/5/EC R&TTE18 May
05 27, 40, 418, 433,
868
Guadeloupe Article 6 of Directive 1999/5/EC R&TTE10668
13 May 05 27, 30, 40, 433, 868
Ireland Article 6 of Directive 1999/5/EC R&TTE18 May
05 27, 40, 433, 868
Iceland Article 6 of Directive 1999/5/EC R&TTE18 May
05 27, 40, 433, 868
Italy DGPGSR/II/347487/FOR/15347
DGPGSR/II/347487/FOR/15348
DGPGSR/II/347487/FOR/15350
DGPGSR/II/347487/FOR/15357
DGPGSR/II/347487/FOR/15358
DGPGSR/II/347487/FOR/15359 27, 40, 433, 868
Jordan TRC/LPD/2005/23 27, 30, 40, 433, 868
Canary Islands 000438/2005, 000439/2005
000440/2005, 000441/2005
000445/2005, 000446/2005
000447/2005, 3 June 2005 27, 40, 433, 868
Croatia SDR 224/06 27, 40, 433, 868
Kuwait 5 October 2005 27, 30, 40, 418, 433,
868
Latvia 2920/O&M/2006 July 3 27, 40, 433, 868
Lebanon Article 6 of Directive 1999/5/EC R&TTE
27.4-1B-1609 26 April 06 27, 40, 433, 868
Liechtenstein Article 6 of Directive 1999/5/EC R&TTE 14357
27 May 05 27, 40, 433, 868360
Frequencies for garage door openers*Technical data
* optional
212_AKB; 2; 4, en-GB
mkalafa,
Version: 2.11.8.1 2009-05-05T14:17:16+02:00 - Seite 360
Dateiname: 6515346702_buchblock.pdf; erzeugt am 07. May 2009 14:17:37; WK
Page 364 of 373

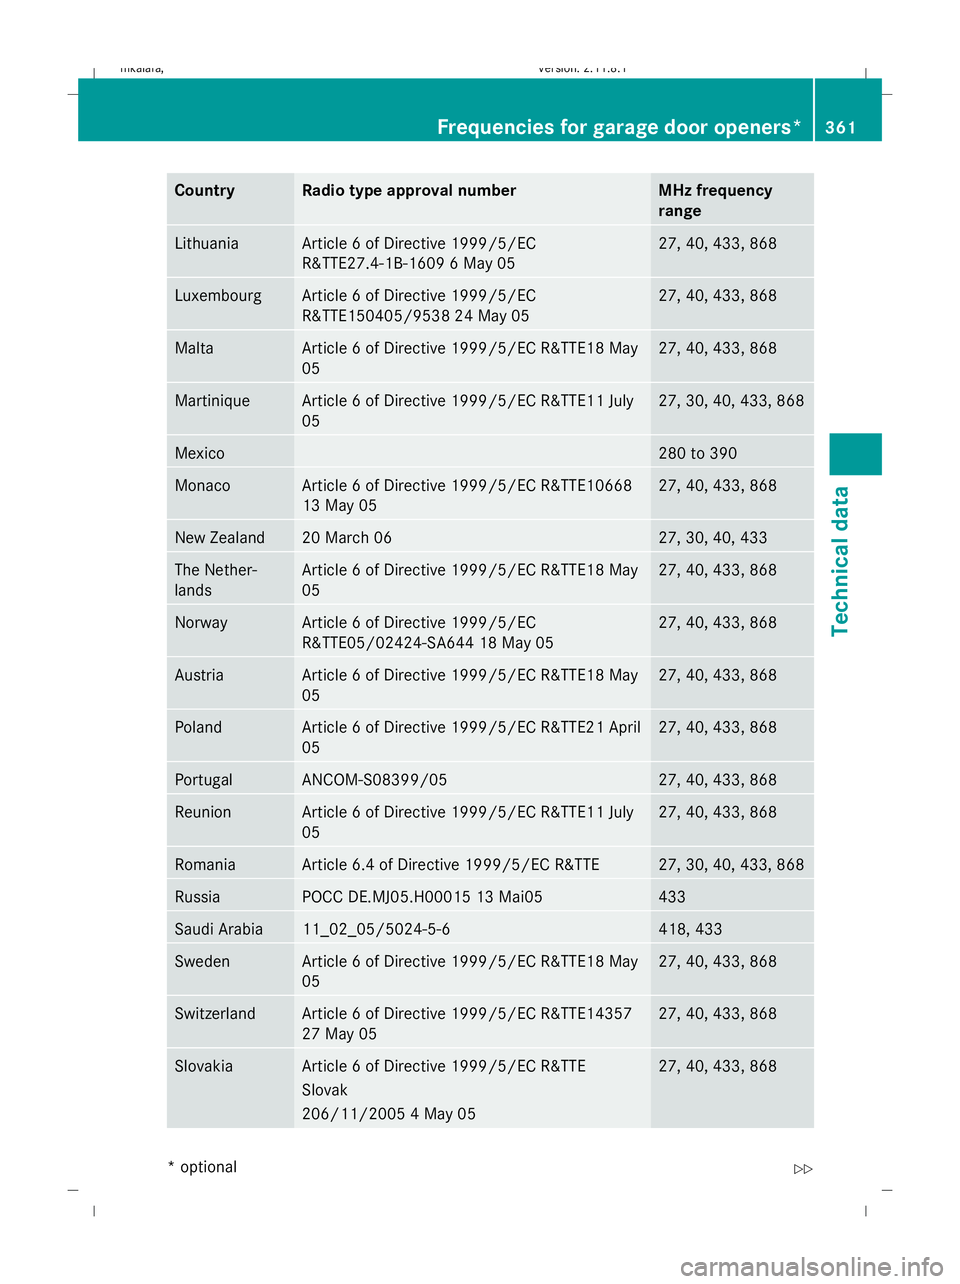
Country Radio type approval number MHz frequency
range
Lithuania Article 6 of Directive 1999/5/EC
R&TTE27.4-1B-1609 6 May 05 27, 40, 433, 868
Luxembourg Article 6 of Directive 1999/5/EC
R&TTE150405/9538 24 May 05 27, 40, 433, 868
Malta Article 6 of Directive 1999/5/EC R&TTE18 May
05 27, 40, 433, 868
Martinique Article 6 of Directive 1999/5/EC R&TTE11 July
05 27, 30, 40, 433, 868
Mexico 280 to 390
Monaco Article 6 of Directive 1999/5/EC R&TTE10668
13 May 05 27, 40, 433, 868
New Zealand 20 March 06 27, 30, 40, 433
The Nether-
lands Article 6 of Directive 1999/5/EC R&TTE18 May
05 27, 40, 433, 868
Norway Article 6 of Directive 1999/5/EC
R&TTE05/02424-SA644 18 May 05 27, 40, 433, 868
Austria Article 6 of Directive 1999/5/EC R&TTE18 May
05 27, 40, 433, 868
Poland Article 6 of Directive 1999/5/EC R&TTE21 April
05 27, 40, 433, 868
Portugal ANCOM-S08399/05 27, 40, 433, 868
Reunion Article 6 of Directive 1999/5/EC R&TTE11 July
05 27, 40, 433, 868
Romania Article 6.4 of Directive 1999/5/EC R&TTE 27, 30, 40, 433, 868
Russia POCC DE.MJ05.H00015 13 Mai05 433
Saudi Arabia 11_02_05/5024-5-6 418, 433
Sweden Article 6 of Directive 1999/5/EC R&TTE18 May
05 27, 40, 433, 868
Switzerland Article 6 of Directive 1999/5/EC R&TTE14357
27 May 05 27, 40, 433, 868
Slovakia Article 6 of Directive 1999/5/EC R&TTE
Slovak
206/11/2005 4 May 05 27, 40, 433, 868Frequencies for garage door openers*
361Technical data
* optional
212_AKB; 2; 4, en-GB
mkalafa,
Version: 2.11.8.1 2009-05-05T14:17:16+02:00 - Seite 361 Z
Dateiname: 6515346702_buchblock.pdf; erzeugt am 07. May 2009 14:17:38; WK