2009 MERCEDES-BENZ E-CLASS SALOON display
[x] Cancel search: displayPage 182 of 373
Demisting the windscreen
i You should only select the "demisting"
function until the windscreen is clear again.
X Turn the key to position 2in the ignition
lock.
X To activate: press the¬button.
The indicator lamp above the ¬button
lights up.
The system automatically switches to the
following functions:
R cooling with air dehumidification on
R high airflow 37
R high temperature 37
R air distribution to the windscreen and
front side windows
R air-recirculation mode off
X To switch off: press the¬button.
The indicator lamp above the ¬button
goes out. The previously selected settings
come into effect again. The cooling with air
dehumidification function remains on. Air-
recirculation mode remains deactivated.
or
X Press the Ãbutton.
The indicator lamp above the ¬button
goes out. Airflow and air distribution are set
to automatic mode.
or
X Thermatic 2-zone automatic climate
control: press button EorH up or down
(Y page 172).
Thermotronic luxury 3-zone automatic
climate control*: press buttonForJ
up or down ( Ypage 173).
or
X Thermatic 2-zone automatic climate
control: press button Gup or down
(Y page 172). Thermotronic luxury 3-zone automatic
climate control*:
press buttonHup or
down (Y page 173). Demisting the windows
Windows misted up on the inside X
Activate the "cooling function with air dehu-
midification" function.
X Activate automatic mode.
X If the windows continue to mist up, activate
the demisting function.
i You should only select this setting until
the windscreen is clear again.
Windows misted up on the outside X
Activate the windscreen wipers.
X Thermatic 2-zone automatic climate
control: press button Fup or down
(Y page 172) until the PorO symbol
appears in the display.
X Thermotronic luxury 3-zone automatic
climate control*: press buttonIup or
down (Y page 173), until PorO
appears in the display.
i You should only select this setting until
the windscreen is clear again. Switching the rear window heating
on/off
G
Risk of accident
Make sure that all windows are clear of ice
and snow before starting a journey. This may
otherwise obstruct your view of the traffic
conditions, thereby causing an accident.
i The rear window heating has a high cur-
rent draw. You should therefore switch it
off as soon as the window is clear, as it only
37 Depending on the outside temperature. Air conditioning
179Controls
* optional
212_AKB; 2; 4, en-GB
mkalafa
,V ersion: 2.11.8.1
2009-05-05T14:17:16+02:00 - Seite 179 Z
Dateiname: 6515346702_buchblock.pdf; erzeugt am 07. May 2009 14:16:31; WK
Page 185 of 373

mode to heating mode or from heating mode
to ventilation mode.
You cannot use the auxiliary ventilation to
cool the vehicle interior to a temperature
lower than the outside temperature.
Before activating X
Turn the key to position 2in the ignition
lock.
X Set the temperature.
The auxiliary heating/ventilation can be acti-
vated even when the air conditioning is being
controlled manually. Optimum comfort can
be attained when the system is set to auto-
matic mode. Set the temperature to 22 †.
The auxiliary heating/ventilation can be acti-
vated or deactivated using the remote control
or the button on the centre console.
The on-board computer can be used to spec-
ify up to three departure times, one of which
may be preselected (Y page 135).
Switching the auxiliary heating/venti-
lation on/off using the button on the
centre console The colours of the indicator lamps on the but-
ton have the following meanings:
Blue Auxiliary ventilation activated
Red Auxiliary heating activated
Yellow Departure time preselected (Ypage 135) X
Press button :.
The red or blue indicator lamp in but-
ton :comes on or goes out.
Switching the auxiliary heating/venti-
lation on/off using the remote control Your vehicle comes with one remote control.
You may use two additional remote controls
for your vehicle. For further information, con-
sult a qualified specialist workshop, e.g. a
Mercedes-Benz Service Centre.
The remote control has a maximum range of
approximately 300 metres. This range is
reduced by:
R
sources of radio interference
R solid objects between the remote control
and the vehicle
R the remote control being in an unfavoura-
ble position in relation to the vehicle
R transmitting from an enclosed space
i The optimum range can be achieved if you
hold the remote control vertically, pointing
upwards when you press one of the but-
tons.
i A battery symbol appears in the display
when the batteries in the remote control
are low. Replace the remote control bat-
teries (Y page 304). 182
Air conditioningControls
212_AKB; 2; 4, en-GB
mkalafa,
Version: 2.11.8.1 2009-05-05T14:17:16+02:00 - Seite 182
Dateiname: 6515346702_buchblock.pdf; erzeugt am 07. May 2009 14:16:31; WK
Page 186 of 373
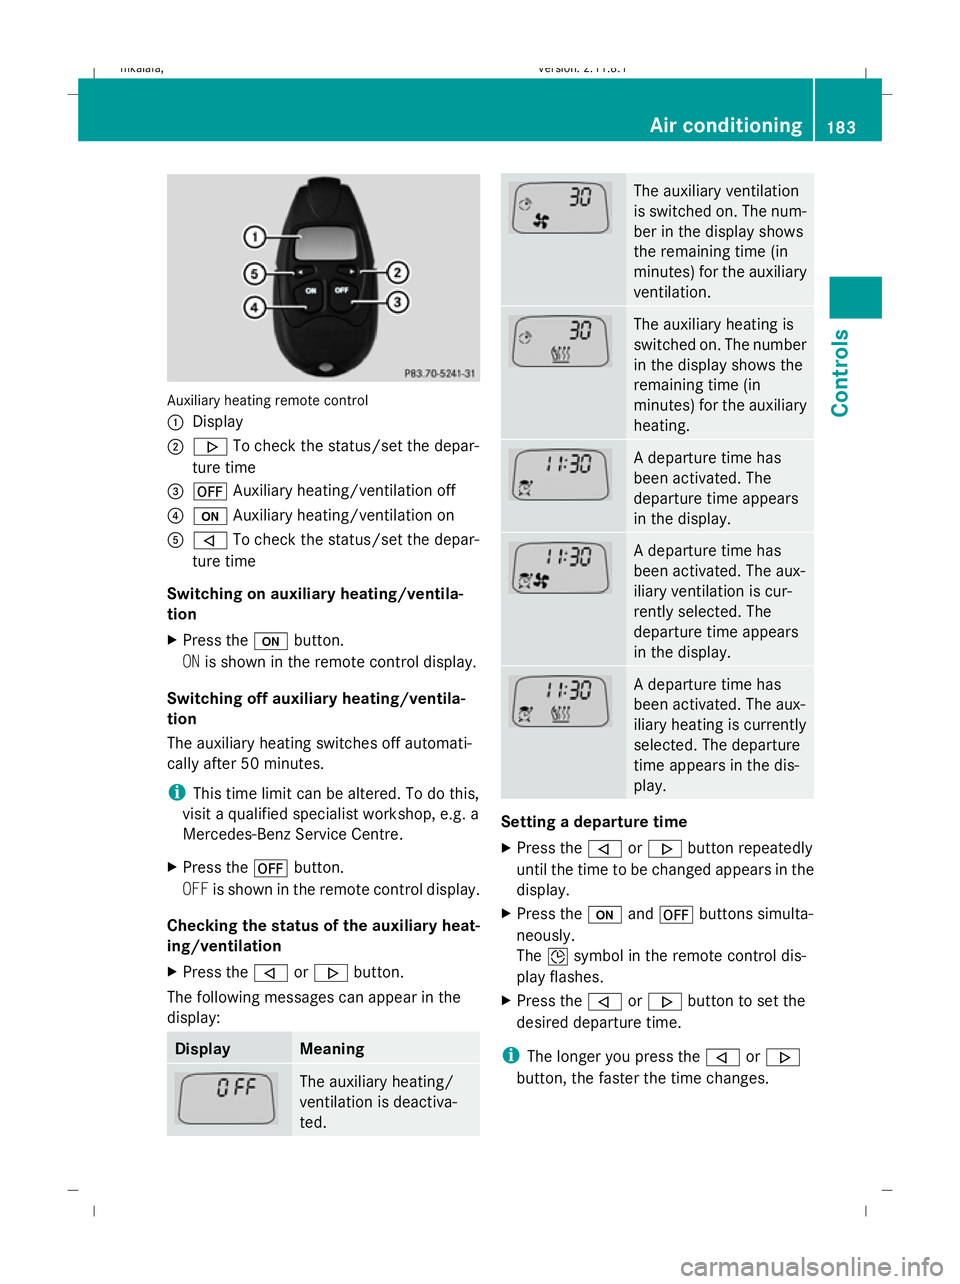
Auxiliary heating remote control
:
Display
; . To check the status/set the depar-
ture time
= ^ Auxiliary heating/ventilation off
? u Auxiliary heating/ventilation on
A , To check the status/set the depar-
ture time
Switching on auxiliary heating/ventila-
tion
X Press the ubutton.
ON is shown in the remote control display.
Switching off auxiliary heating/ventila-
tion
The auxiliary heating switches off automati-
cally after 50 minutes.
i This time limit can be altered. To do this,
visit a qualified specialist workshop, e.g. a
Mercedes-Benz Service Centre.
X Press the ^button.
OFF is shown in the remote control display.
Checking the status of the auxiliary heat-
ing/ventilation
X Press the ,or. button.
The following messages can appear in the
display: Display Meaning
The auxiliary heating/
ventilation is deactiva-
ted. The auxiliary ventilation
is switched on. The num-
ber in the display shows
the remaining time (in
minutes) for the auxiliary
ventilation.
The auxiliary heating is
switched on. The number
in the display shows the
remaining time (in
minutes) for the auxiliary
heating.
A departure time has
been activated. The
departure time appears
in the display.
A departure time has
been activated. The aux-
iliary ventilation is cur-
rently selected. The
departure time appears
in the display.
A departure time has
been activated. The aux-
iliary heating is currently
selected. The departure
time appears in the dis-
play.
Setting a departure time
X
Press the ,or. button repeatedly
until the time to be changed appears in the
display.
X Press the uand^ buttons simulta-
neously.
The Îsymbol in the remote control dis-
play flashes.
X Press the ,or. button to set the
desired departure time.
i The longer you press the ,or.
button, the faster the time changes. Air conditioning
183Controls
212_AKB; 2; 4, en-GB
mkalafa,V ersion: 2.11.8.1
2009-05-05T14:17:16+02:00 - Seite 183 Z
Dateiname: 6515346702_buchblock.pdf; erzeugt am 07. May 2009 14:16:32; WK
Page 187 of 373
X
Press the uand^ buttons simulta-
neously.
The new departure time is stored.
Activating a set departure time
X Press the ,or. button repeatedly
until the desired departure time appears in
the display.
X Press the ubutton.
The Ísymbol and the departure time
appear in the display.
Deactivating a set departure time
X Press the ,or. button.
The status of the auxiliary heating is shown
in the display.
X Press the .button.
The first departure time stored appears in
the display.
X Press the ^button.
The display message OFFappears in the
display. Sliding sunroof
General notes
G
Risk of injury
Make sure that nobody can become trapped
when closing the sliding sunroof. If there is a
risk of entrapment, release the switch and
push it briefly in any direction to stop the slid-
ing sunroof. G
Risk of injury
Children could injure themselves if they oper-
ate the sliding sunroof.
Never leave children unsupervised in the vehi-
cle. Always take the key with you when leaving
the vehicle, even if you are only leaving it for
a short time. G
Risk of injury
The glass in the panorama sunroof could
break in an accident. If you are not wearing a seat belt, there is a risk that you could be
thrown through the opening in the event of the
vehicle overturning. Therefore, always wear a
seat belt to reduce the risk of injuries.
! Only open the panorama sliding sunroof
if it is free of snow and ice. Otherwise, mal-
functions may occur.
Do not allow anything to protrude from the
sliding sunroof. The seals could otherwise
be damaged.
i When the sliding sunroof is open, apart
from the normal airflow noises resonance
noises may also occur. They are caused by
minor pressure fluctuations in the vehicle
interior. Change the position of the sliding
sunroof or open a side window slightly to
reduce or eliminate these noises.
i Related topics:
R convenience opening from the out-
side (Y page 102) or from the inside
(Y page 180)
R convenience closing from the out-
side (Y page 102) or from the inside
(Y page 180)
R automatic closing of the sliding sunroof
(PRE-SAFE) (Y page 42) 184
Sliding sunroofControls
212_AKB; 2; 4, en-GB
mkalafa,
Version: 2.11.8.1 2009-05-05T14:17:16+02:00 - Seite 184
Dateiname: 6515346702_buchblock.pdf; erzeugt am 07. May 2009 14:16:32; WK
Page 199 of 373
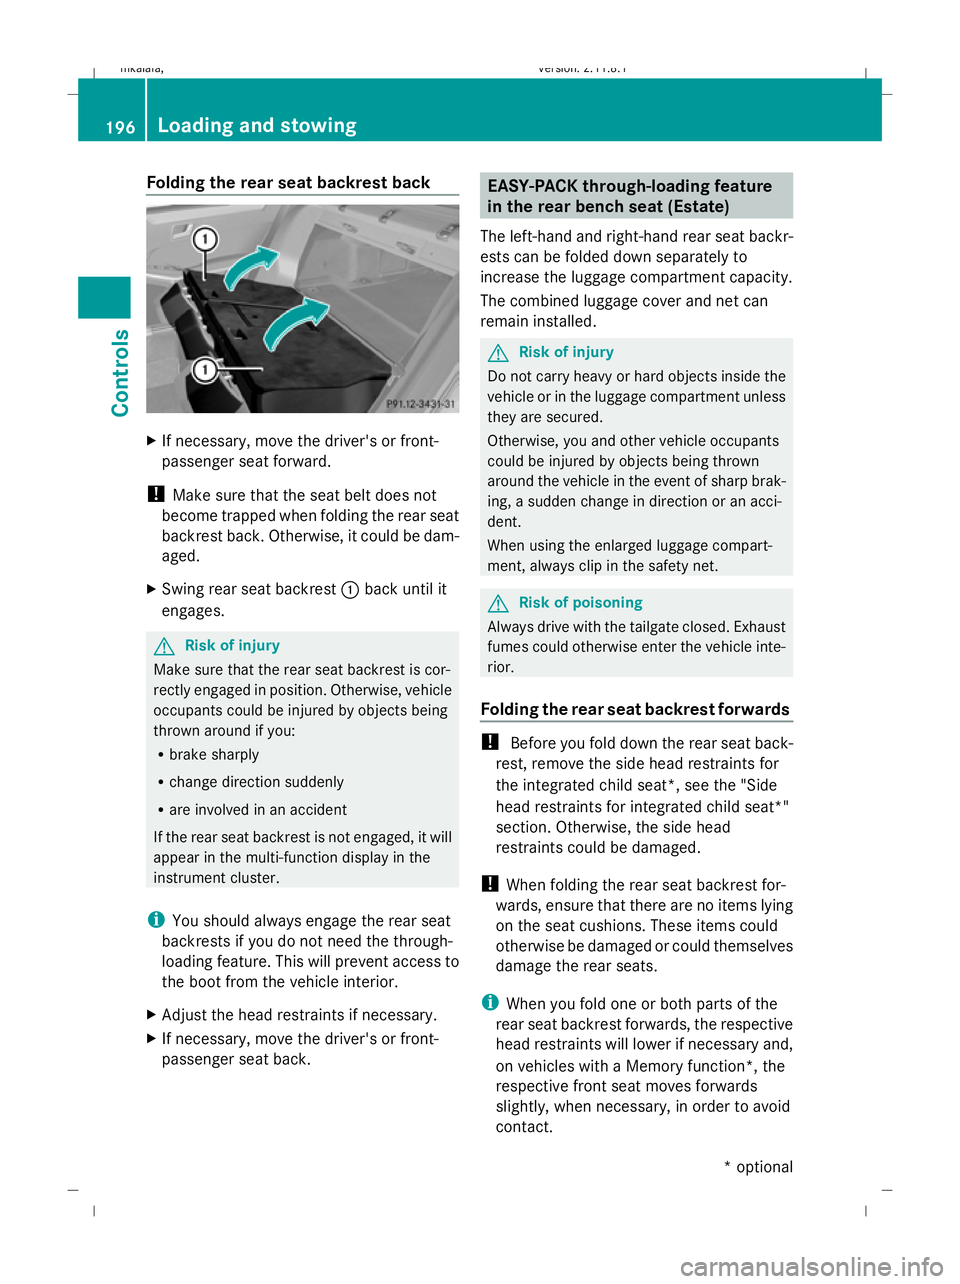
Folding the rear seat backrest back
X
If necessary, move the driver's or front-
passenger seat forward.
! Make sure that the seat belt does not
become trapped when folding the rear seat
backrest back. Otherwise, it could be dam-
aged.
X Swing rear seat backrest :back until it
engages. G
Risk of injury
Make sure that the rear seat backrest is cor-
rectly engaged in position. Otherwise, vehicle
occupants could be injured by objects being
thrown around if you:
R brake sharply
R change direction suddenly
R are involved in an accident
If the rear seat backrest is not engaged, it will
appear in the multi-function display in the
instrument cluster.
i You should always engage the rear seat
backrests if you do not need the through-
loading feature. This will prevent access to
the boot from the vehicle interior.
X Adjust the head restraints if necessary.
X If necessary, move the driver's or front-
passenger seat back. EASY-PACK through-loading feature
in the rear bench seat (Estate)
The left-hand and right-hand rear seat backr-
ests can be folded down separately to
increase the luggage compartment capacity.
The combined luggage cover and net can
remain installed. G
Risk of injury
Do not carry heavy or hard objects inside the
vehicle or in the luggage compartment unless
they are secured.
Otherwise, you and other vehicle occupants
could be injured by objects being thrown
around the vehicle in the event of sharp brak-
ing, a sudden change in direction or an acci-
dent.
When using the enlarged luggage compart-
ment, always clip in the safety net. G
Risk of poisoning
Always drive with the tailgate closed. Exhaust
fumes could otherwise enter the vehicle inte-
rior.
Folding the rear seat backrest forwards !
Before you fold down the rear seat back-
rest, remove the side head restraints for
the integrated child seat*, see the "Side
head restraints for integrated child seat*"
section. Otherwise, the side head
restraints could be damaged.
! When folding the rear seat backrest for-
wards, ensure that there are no items lying
on the seat cushions. These items could
otherwise be damaged or could themselves
damage the rear seats.
i When you fold one or both parts of the
rear seat backrest forwards, the respective
head restraints will lower if necessary and,
on vehicles with a Memory function*, the
respective front seat moves forwards
slightly, when necessary, in order to avoid
contact. 196
Loading and stowingCont
rols
* optional
212_AKB; 2; 4, en-GB
mkalafa
,V ersion: 2.11.8.1
2009-05-05T14:17:16+02:00 - Seite 196
Dateiname: 6515346702_buchblock.pdf; erzeugt am 07. May 2009 14:16:40; WK
Page 200 of 373
X
Vehicles without Memory function*: if nec-
essary, move the driver's or front-
passenger seat forwards.
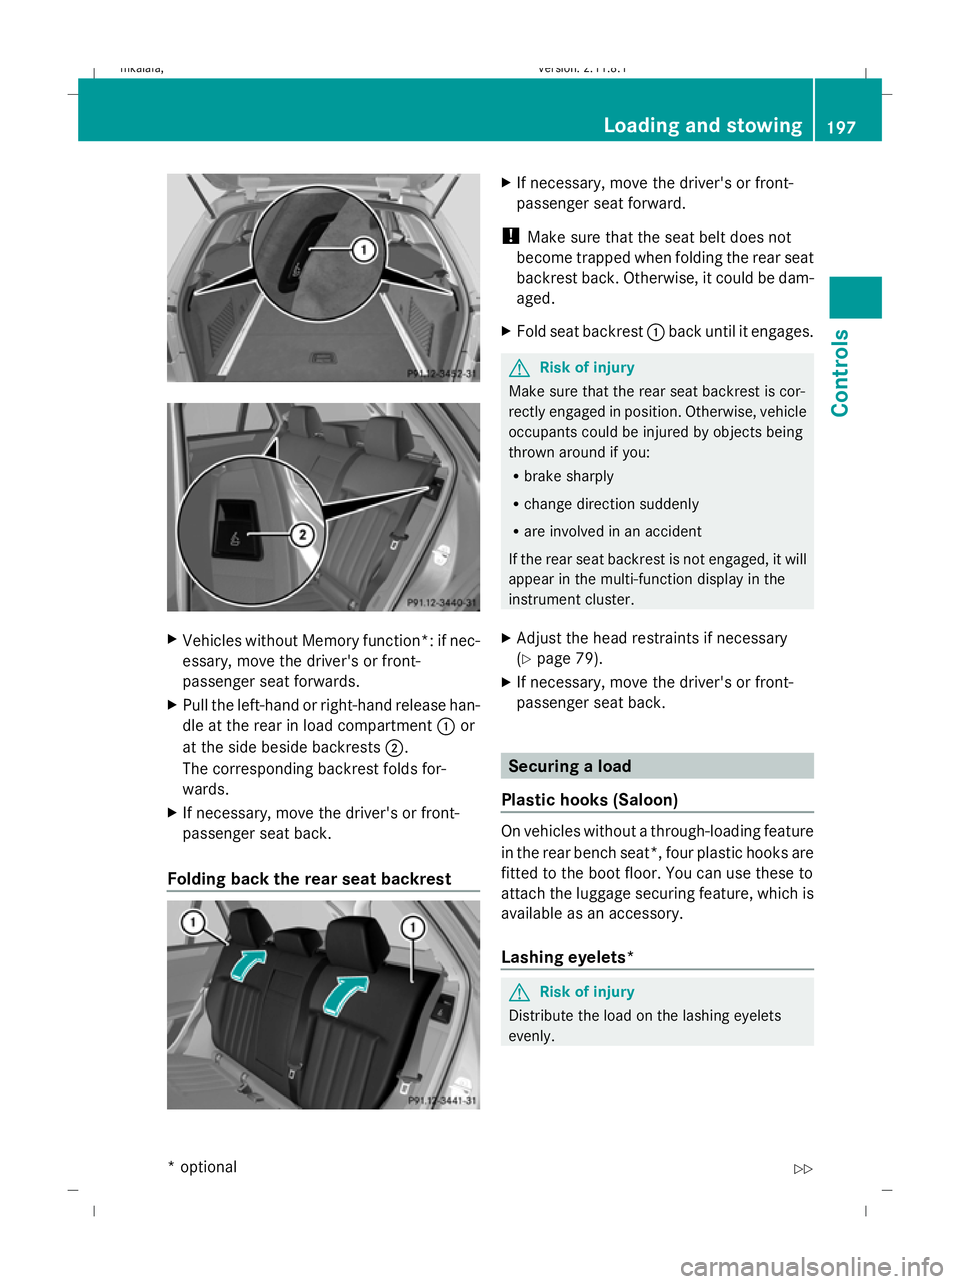
X Pull the left-hand or right-hand release han-
dle at the rear in load compartment :or
at the side beside backrests ;.
The corresponding backrest folds for-
wards.
X If necessary, move the driver's or front-
passenger seat back.
Folding back the rear seat backrest X
If necessary, move the driver's or front-
passenger seat forward.
! Make sure that the seat belt does not
become trapped when folding the rear seat
backrest back. Otherwise, it could be dam-
aged.
X Fold seat backrest :back until it engages. G
Risk of injury
Make sure that the rear seat backrest is cor-
rectly engaged in position. Otherwise, vehicle
occupants could be injured by objects being
thrown around if you:
R brake sharply
R change direction suddenly
R are involved in an accident
If the rear seat backrest is not engaged, it will
appear in the multi-function display in the
instrument cluster.
X Adjust the head restraints if necessary
(Y page 79).
X If necessary, move the driver's or front-
passenger seat back. Securing a load
Plastic hooks (Saloon) On vehicles without a through-loading feature
in the rear bench seat*, four plastic hooks are
fitted to the boot floor. You can use these to
attach the luggage securing feature, which is
available as an accessory.
Lashing eyelets*
G
Risk of injury
Distribute the load on the lashing eyelets
evenly. Loading and stowing
197Controls
* optional
212_AKB; 2; 4, en-GB
mkalafa,
Version: 2.11.8.1 2009-05-05T14:17:16+02:00 - Seite 197 Z
Dateiname: 6515346702_buchblock.pdf; erzeugt am 07. May 2009 14:16:41; WK
Page 220 of 373

require draining of the fuel tank and fuel
lines. Notify a qualified specialist workshop
and have the fuel tank and fuel lines
drained completely.
When you open or close the vehicle with the
key or KEYLESS GO*, the fuel filler flap is
automatically unlocked or locked.
The position of the fuel filler cap is to the rear
on the right. The position of the fuel filler cap
is displayed in the instrument cluster 8.
The arrow next to the filling pump indicates
the side of the vehicle. Saloon (example)
:
To open the fuel filler flap
; To insert the fuel filler cap
= Tyre pressure table
? Fuel type
X To open: press the fuel filler flap in the
direction of arrow :.
The fuel filler flap opens slightly.
X Open the fuel filler flap.
X Turn the fuel filler cap anti-clockwise and
remove it.
X Insert the fuel filler cap into the holder
bracket on the inside of filler flap ;.
X Only fill the tank until the pump nozzle
switches off.
! Overfilling the fuel tank could damage the
fuel system. X
To close: replace the fuel filler cap and turn
it clockwise. The fuel filler cap audibly
engages.
X Press the fuel filler flap closed until it
engages audibly. Petrol (EN 228)
! Refuel using only unleaded, sulphur-free
premium grade petrol with a minimum
octane number of 95 RON/85 MON con-
forming to European standard EN 228.
Otherwise, you could impair engine output
or damage the engine.
i As a temporary measure, only when the
recommended fuel is not available, you
may also use regular unleaded petrol,
91 RON/82.5 MON. This may reduce
engine performance and increase fuel con-
sumption. Avoid driving at full throttle.
In some countries, the fuel grade available
may not be adequate and could cause cok-
ing around the inlet valve. In such cases,
and in consultation with a Mercedes-Benz
Service Centre, the petrol may be mixed
with the additive recommended by
Mercedes-Benz (part no.
A000989254510). You must observe the
notes and mixing ratios specified on the
container.
Further information on "Fuel" (Y page 334).
E 350 CGI BlueEFFICIENCY !
Refuel using only unleaded, sulphur-free
premium grade petrol with a minimum
octane number of 95 RON/85 MON con-
forming to European standard EN 228.
Otherwise, you could impair engine output
or damage the engine.
i In some countries, the available petrol
may not be sufficiently low in sulphur. This
fuel can temporarily produce unpleasant
odours, especially on short journeys. As Refuelling
217Operation
* optional
212_AKB; 2; 4, en-GB
mkalafa,
Version: 2.11.8.1 2009-05-05T14:17:16+02:00 - Seite 217 Z
Dateiname: 6515346702_buchblock.pdf; erzeugt am 07. May 2009 14:16:54; WK
Page 224 of 373

E 300 (example)
X
Pull oil dipstick :out of the oil dipstick
tube.
X Wipe off oil dipstick :.
X Insert oil dipstick :into the oil dipstick
tube to the stop, and take it out again.
The oil level is correct if the level is between
the minimum mark =and maximum
mark ;.
X Top up the oil if necessary.
Topping up the engine oil H
Environmental note
When topping up the oil, take care not to spill
any. Oil must not be allowed to escape into
the soil or waterways. You would otherwise be
damaging the environment. Cap (example)
X
Turn cap :anti-clockwise and remove.
X Top up with the amount of oil required
(Y page 336). i
The difference in quantity between the
minimum mark and maximum mark is
approximately 2 litres.
i On vehicles with a 4-cylinder petrol
engine and vehicles with an 8-cylinder pet-
rol engine, the difference between the MIN
mark and the MAX mark is approximately
1.5 litres.
! Do not add too much oil. If too much oil
is added and the oil level is above the max-
imum mark on the dipstick, the engine or
catalytic converter could be damaged.
Have excess oil siphoned off.
X Replace cap :on the filler neck and
tighten clockwise.
Ensure that the cap locks into place
securely.
For further information on engine oil, see
(Y page 336). Coolant
Only check the coolant level when the vehicle
is on a level surface and the engine has cooled
down.
X Turn the key to position 2(Y page 75) in
the ignition lock.
X Check the coolant temperature gauge in
the instrument cluster. G
Risk of injury
The cooling system is pressurised. Therefore,
only unscrew the cap once the engine has
cooled down. The coolant temperature gauge
must display less than 70 †. Otherwise, you
could be scalded if hot coolant escapes. Engine compartment
221Operation
212_AKB; 2; 4, en-GB
mkalafa, Version: 2.11.8.1 2009-05-05T14:17:16+02:00 - Seite 221 Z
Dateiname: 6515346702_buchblock.pdf; erzeugt am 07. May 2009 14:16:56; WK