2009 MERCEDES-BENZ E-CLASS ESTATE engine
[x] Cancel search: enginePage 119 of 373
the left-hand steering wheel gearshift pad-
dle until the transmission shifts to the opti-
mal gear for the current speed.
X To deactivate: press program selector
button :repeatedly until Cor Sappears
in the display.
Kickdown
i On vehicles with AMG engines, it is not
possible to use kickdown in manual drive
program M.
You can also use kickdown for maximum
acceleration in manual drive program M.
X Depress the accelerator pedal beyond the
pressure point.
The transmission shifts to a lower gear
depending on the engine speed.
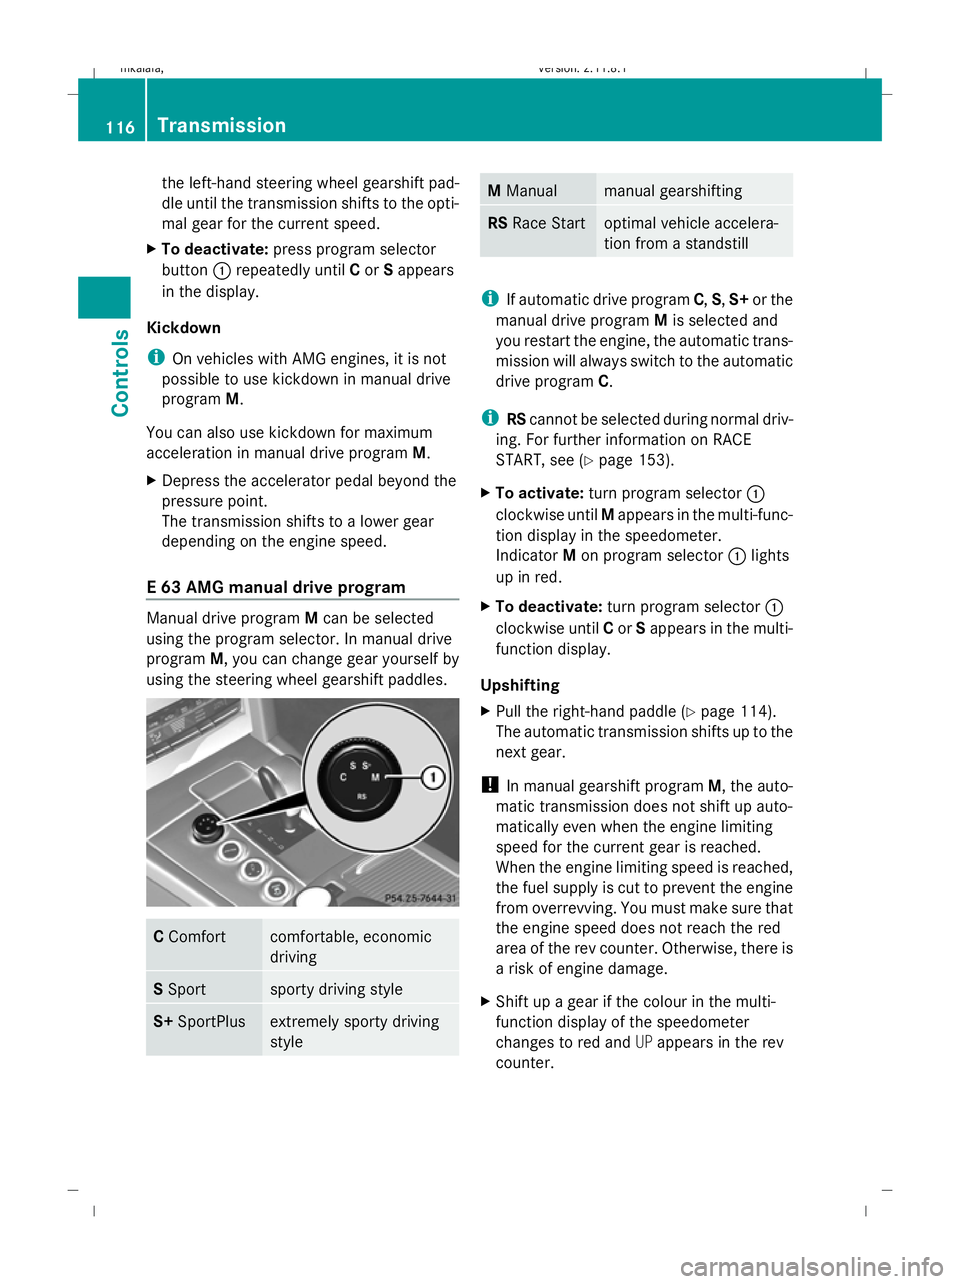
E 63 AMG manual drive program Manual drive program
Mcan be selected
using the program selector. In manual drive
program M, you can change gear yourself by
using the steering wheel gearshift paddles. C
Comfort comfortable, economic
driving
S
Sport sporty driving style
S+
SportPlus extremely sporty driving
style M
Manual manual gearshifting
RS
Race Start optimal vehicle accelera-
tion from a standstill
i
If automatic drive program C,S,S+ or the
manual drive program Mis selected and
you restart the engine, the automatic trans-
mission will always switch to the automatic
drive program C.
i RScannot be selected during normal driv-
ing. For further information on RACE
START, see (Y page 153).
X To activate: turn program selector :
clockwise until Mappears in the multi-func-
tion display in the speedometer.
Indicator Mon program selector :lights
up in red.
X To deactivate: turn program selector :
clockwise until Cor Sappears in the multi-
function display.
Upshifting
X Pull the right-hand paddle (Y page 114).
The automatic transmission shifts up to the
next gear.
! In manual gearshift program M, the auto-
matic transmission does not shift up auto-
matically even when the engine limiting
speed for the current gear is reached.
When the engine limiting speed is reached,
the fuel supply is cut to prevent the engine
from overrevving. You must make sure that
the engine speed does not reach the red
area of the rev counter. Otherwise, there is
a risk of engine damage.
X Shift up a gear if the colour in the multi-
function display of the speedometer
changes to red and UPappears in the rev
counter. 116
TransmissionControls
212_AKB; 2; 4, en-GB
mkalafa
,V ersion: 2.11.8.1
2009-05-05T14:17:16+02:00 - Seite 116
Dateiname: 6515346702_buchblock.pdf; erzeugt am 07. May 2009 14:16:09; WK
Page 120 of 373
Downshifting
G
Risk of accident
Do not shift down to brake on a slippery road
surface. This could cause the drive wheels to
lose their grip, and the vehicle could skid.
X Pull the left-hand paddle ( Ypage 114).
The automatic transmission shifts down to
the next gear.
i For maximum acceleration, pull the left-
hand steering wheel gearshift paddle until
the transmission selects the optimum gear
for the current speed.
Kickdown
i On vehicles with AMG engines, it is not
possible to use kickdown in manual drive
program M. Instrument cluster
Points to remember
You will find an illustration of the instrument
cluster in the "At a glance" section
(Y page 27). G
Risk of accident
If the instrument cluster or the multi-function
display fails, then no display messages can be
shown.
You will not then be able to see information
about the vehicle status, such as speed and
outside temperature, warning and indicator
lamps, display messages or the failure of sys-
tems. The vehicle’s handling characteristics
may be affected. Adapt your driving style and
speed accordingly.
Immediately consult a qualified specialist
workshop which has the necessary specialist
knowledge and tools to carry out the work
required. Mercedes-Benz recommends that
you use a Mercedes-Benz Service Centre for
this purpose. In particular, work relevant to
safety or on safety-related systems must be
carried out at a qualified specialist workshop. Coolant temperature display
The coolant temperature gauge is in the
instrument cluster on the right-hand side.
Under normal operating conditions and with
the specified coolant level, the coolant tem-
perature may rise to 120 †. The coolant tem-
perature may rise to the top end of the scale
at high outside temperatures and on long
uphill stretches. Speedometer with segments
The segments in the speedometer indicate
which speed range is available.
Cruise control mode:
The segments light up from the stored speed
to the maximum speed.
Variable Speedtronic mode:
The segments light up from the start of the
scale to the selected limit speed.
Distronic Plus* mode:
One or two segments around the stored
speed light up. Rev counter
The red band in the rev counter indicates the
engine's overrevving range. The fuel supply is
interrupted to protect the engine when the
red band is reached.
! Do not drive in the overrevving range.
Doing so will damage the engine. Outside temperature display
G
Risk of accident
At temperatures just above freezing point, the
road could be icy, particularly in wooded areas
or on bridges. The vehicle could start skidding
if you fail to adapt your driving style. You
should therefore always adapt your driving
style and speed to suit the weather condi-
tions. Inst
rument cluster
117Controls
* optional
212_AKB; 2; 4, en-GB
mkalafa
,V ersion: 2.11.8.1
2009-05-05T14:17:16+02:00 - Seite 117 Z
Dateiname: 6515346702_buchblock.pdf; erzeugt am 07. May 2009 14:16:09; WK
Page 126 of 373
=
Upshift instruction
? Engine oil temperature
A Coolant temperature
Shift UPinstruction =indicates that the
engine has reached the overrevving range.
Shift UPinstruction =blocks other mes-
sages in the multi-function display until you
have shifted up.
When the engine oil temperature is below
80 †, the oil temperature gauge flashes.
Avoid driving at full engine output during this
time.
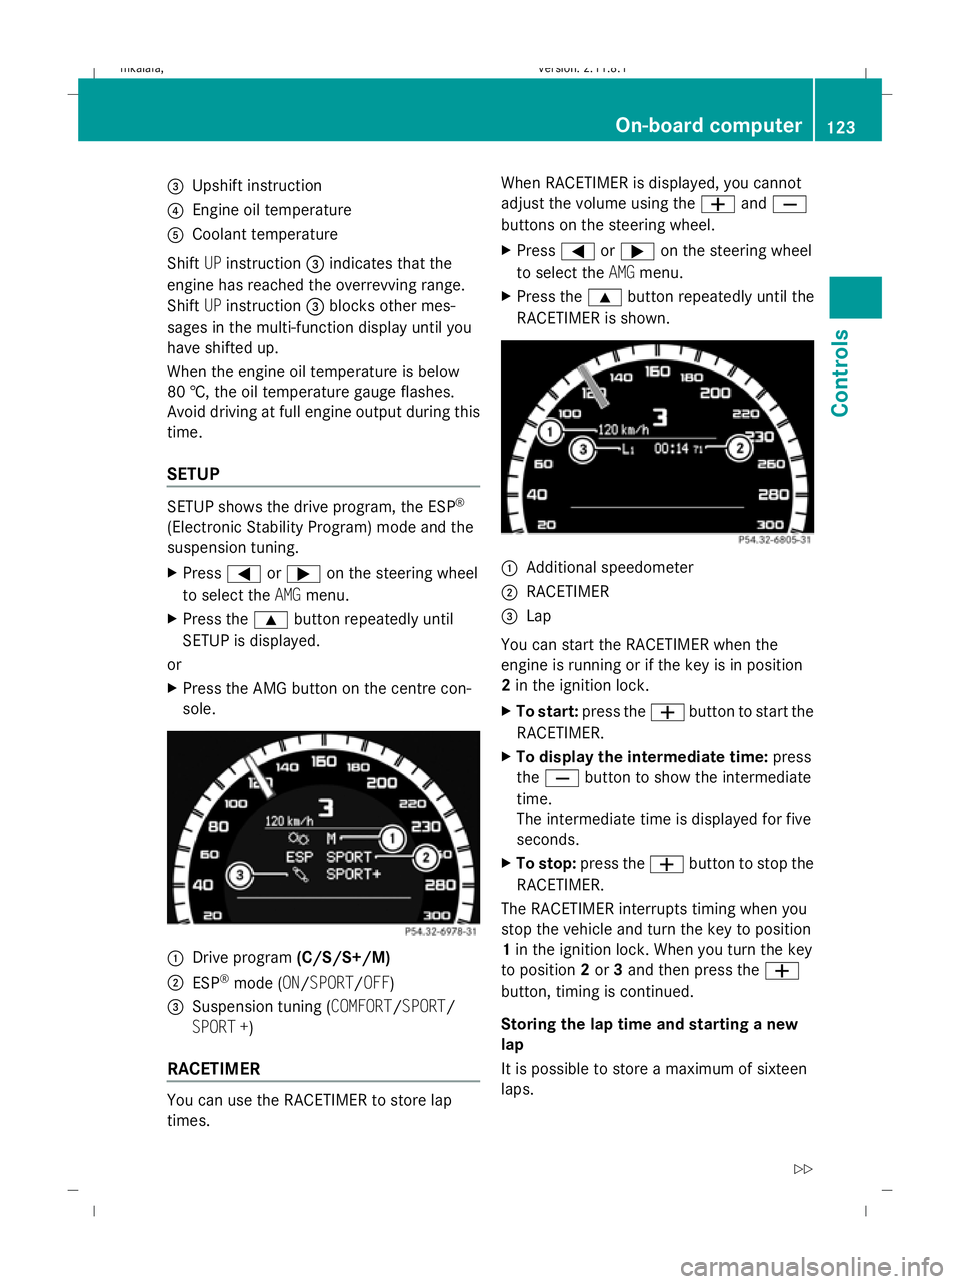
SETUP SETUP shows the drive program, the ESP
®
(Electronic Stability Program) mode and the
suspension tuning.
X Press =or; on the steering wheel
to select the AMGmenu.
X Press the 9button repeatedly until
SETUP is displayed.
or
X Press the AMG button on the centre con-
sole. :
Drive program (C/S/S+/M)
; ESP ®
mode (ON/SPORT/OFF)
3 Suspension tuning (COMFORT/SPORT/
SPORT +)
RACETIMER You can use the RACETIMER to store lap
times. When RACETIMER is displayed, you cannot
adjust the volume using the
WandX
buttons on the steering wheel.
X Press =or; on the steering wheel
to select the AMGmenu.
X Press the 9button repeatedly until the
RACETIMER is shown. :
Additional speedometer
; RACETIMER
= Lap
You can start the RACETIMER when the
engine is running or if the key is in position
2 in the ignition lock.
X To start: press the Wbutton to start the
RACETIMER.
X To display the intermediate time: press
the X button to show the intermediate
time.
The intermediate time is displayed for five
seconds.
X To stop: press the Wbutton to stop the
RACETIMER.
The RACETIMER interrupts timing when you
stop the vehicle and turn the key to position
1 in the ignition lock. When you turn the key
to position 2or 3and then press the W
button, timing is continued.
Storing the lap time and starting a new
lap
It is possible to store a maximum of sixteen
laps. On-board computer
123Controls
212_AKB; 2; 4, en-GB
mkalafa, Version: 2.11.8.1 2009-05-05T14:17:16+02:00 - Seite 123 Z
Dateiname: 6515346702_buchblock.pdf; erzeugt am 07. May 2009 14:16:12; WK
Page 135 of 373
i
Vehicles for the United Kingdom: this
function is not available.
The Permanent display: function allows
you to choose whether the multi-function dis-
play always shows the outside temperature
or the speed in mph.
X Press the =or; button on the steer-
ing wheel to select the Settingsmenu.
X Press the :or9 button to select the
Inst. cluster submenu.
X Press the abutton to confirm.
X Press the :or9 button to select the
Permanent display: function.
You will see the selected setting: outside
temperature orDig. speedo [mph].
X Press the abutton to save the setting.
Time/date This submenu is only available on vehicles
with Audio 20.
Your vehicle may be equipped with one of the
following audio systems:
A: Audio 20
B: Audio 50 APS*
C: COMAND APS*
X You can see which audio system is fitted in
your vehicle by referring to the separate
operating instructions.
Depending on the audio system fitted, time
and date are received from GPS satellites and
therefore cannot be set using the on-board
computer. Refer to the following table. A B C
Setting using the on-board com-
puter X
Automatic GPS satellite recep-
tion X X
Set the time zone once – see
separate operating instructions X X In the
Time/date submenu, you can set the
time and date.
Setting the time
X Press the =or; button on the steer-
ing wheel to select the Settingsmenu.
X Press the :or9 button to select the
Time/date submenu.
X Press the abutton to confirm.
X Press the :or9 button to select the
Time: function.
You will see the time currently set.
X Press the abutton to change it.
X Press the =or; button to select the
display to be changed: hours, minutes.
X Press the :or9 button to set the
selected display.
X Press the abutton to store the entry.
Setting the date
X Press the =or; button on the steer-
ing wheel to select the Settingsmenu.
X Press the :or9 button to select the
Time/date submenu.
X Press the abutton to confirm.
X Press the :or9 button to select the
Date: function.
You will see the date currently set.
X Press the abutton to change it.
X Press the =or; button to select the
display to be changed: day, month, year.
X Press the :or9 button to set the
selected display.
X Press the abutton to store the entry.
Lights Switching the daytime driving lights on/
off
If you have activated the
Daytime driving
lamps: function and the light switch is in the
c position the daytime driving lights are
switched on automatically when the engine is 132
On-board computerControls
* optional
212_AKB; 2; 4, en-GB
mkalafa,
Version: 2.11.8.1 2009-05-05T14:17:16+02:00 - Seite 132
Dateiname: 6515346702_buchblock.pdf; erzeugt am 07. May 2009 14:16:16; WK
Page 137 of 373
X
Press the :or9 button to set the
brightness.
or
X Press the :button to switch off the
ambient lighting.
X Press the aor% button to save the
setting.
Activating or deactivating the surround
lighting and exterior lighting delayed
switch-off
The Surround lighting: function allows
you to set whether the exterior lighting should
come on when it is dark:
R for 40 seconds after unlocking the vehicle
with the key.
The exterior lighting switches off when you
open the driver’s door.
R for 15 seconds after switching off the
engine and closing the doors.
If the engine is switched off and then none
of the doors are opened, or if an open door
is not closed, the exterior lighting goes out
after 60 seconds.
If you activate the Surround lighting:
function, the following light up:
R the side lamps
R the dipped-beam headlamps 34
R the front foglamps*
R the licence plate lighting
X Press the =or; button on the steer-
ing wheel to select the Settingsmenu.
X Press the :or9 button to select the
Light submenu.
X Press the abutton to confirm.
X Press the :or9 button to select the
Surround lighting: function.
You will see the selected setting: onor
off.
X Press the abutton to save the setting. Deactivating the delayed switch-off tempora-
rily:
X
Before leaving the vehicle, turn the key to
position 0in the ignition lock.
X Turn the key to position 2in the ignition
lock and back to position 0.
The delayed switch-off is deactivated.
Delayed switch-off is reactivated the next
time you start the engine.
Activating/deactivating the interior light-
ing delayed switch-off
When you activate the Interior lighting
delay sw. off: function and remove the
key from the ignition lock, the interior lighting
remains on for around 20 seconds if it is dark.
X Press the =or; button on the steer-
ing wheel to select the Settingsmenu.
X Press the :or9 button to select the
Light submenu.
X Press the abutton to confirm.
X Press the :or9 button to select the
Interior lighting delay sw. off:
function.
You will see the selected setting: onor
off.
X Press the abutton to save the setting.
Vehicle Set permanent Speedtronic with
Limit
speed (winter tyres): (Ypage 150).
Activating/deactivating automatic door
locking
If you select the Automatic door locks:
function, the vehicle is centrally locked above
a speed of around 15 km/h.
For more information on the automatic door
locking feature, see (Y page 72).
X Press the =or; button on the steer-
ing wheel to select the Settingsmenu.
X Press the :or9 button to select the
Vehicle submenu.
34 Only for vehicles without front foglamps*. 134
On-board computerControls
* optional
212_AKB; 2; 4, en-GB
mkalafa,
Version: 2.11.8.1 2009-05-05T14:17:16+02:00 - Seite 134
Dateiname: 6515346702_buchblock.pdf; erzeugt am 07. May 2009 14:16:16; WK
Page 141 of 373
Brake* are described in the "Driving safety
systems" section (Y page 58). Cruise control
Cruise control maintains a constant road
speed for you. It brakes automatically in order
to avoid exceeding the set speed. On long and
steep downhill gradients, especially if the
vehicle is laden or towing a trailer, you must
shift to a lower gear in good time or select
shift range 1,2or 3on vehicles with auto-
matic transmission*. By doing so, you will
make use of the braking effect of the engine,
which relieves the load on the brake system
and prevents the brakes from overheating
and wearing too quickly. G
Risk of accident
Do not change down for additional engine
braking on a slippery road surface. This could
cause the drive wheels to lose their grip and
the vehicle could skid.
Use cruise control only if road and traffic con-
ditions make it appropriate to maintain a
steady speed for a prolonged period. You can
store any road speed above 30 km/h. G
Risk of accident
Cruise control cannot take account of road
and traffic conditions.
Always pay attention to traffic conditions
even when cruise control is activated.
Cruise control is only an aid designed to assist
driving. You are responsible for the vehicle's
speed and for braking in good time. G
Risk of accident
Do not use cruise control:
R in road and traffic conditions which do not
allow you to maintain a constant speed (e.g. heavy traffic or winding roads). You could
otherwise cause an accident.
R on slippery roads. Braking or accelerating
could cause the drive wheels to lose trac-
tion and the vehicle could then skid.
R when there is poor visibility, e.g. due to fog,
heavy rain or snow
Cruise control lever You can operate cruise control and variable
Speedtronic with the cruise control lever.
The LIM indicator lamp on the cruise control
lever indicates which system you have selec-
ted:
R LIM indicator lamp off:
Cruise control is selected.
R LIM indicator lamp lit:
Variable Speedtronic is selected. :
To store the current speed or a higher
speed
; LIM indicator lamp
= To store the current speed or to call up
the last stored speed
? To store the current speed or a lower
speed
A To switch between cruise control and var-
iable Speedtronic
B To deactivate cruise control
When cruise control is activated, the stored
speed is displayed in the multi-function dis-
play for five seconds. In the multi-function 138
Driving systemsControls
* optional
212_AKB; 2; 4, en-GB
mkalafa
,V ersion: 2.11.8.1
2009-05-05T14:17:16+02:00 - Seite 138
Dateiname: 6515346702_buchblock.pdf; erzeugt am 07. May 2009 14:16:17; WK
Page 142 of 373
display, the segments between the stored
speed and the maximum speed light up.
Selecting cruise control
X
Check whether LIM indicator lamp ;is off.
If it is off, cruise control is already selected.
If it is not, press the cruise control lever in
the direction of arrow A.
LIM indicator lamp ;in the cruise control
lever goes off. Cruise control is selected.
Storing and maintaining the current
speed You can store the current speed if you are
driving faster than 30 km/
hand ESP ®
is acti-
vated (Y page 60).
X Accelerate the vehicle to the desired
speed.
X Briefly press the cruise control lever
up : or down ?to the pressure point.
X Remove your foot from the accelerator
pedal.
Cruise control is activated. The vehicle
automatically maintains the stored speed.
i Cruise control may be unable to maintain
the stored speed on uphill gradients. The
stored speed is resumed when the gradient
evens out. Cruise control maintains the
stored speed on downhill gradients by
automatically applying the brakes.
Vehicles with manual transmission:
R always drive at adequate, but not exces-
sive, engine speeds.
R change gear in good time.
R if possible, do not change down several
gears at a time. Storing the current speed or calling up
the last stored speed G
Risk of accident
Only select a stored speed if you know what
that speed is and whether it is suitable for the
current situation. Otherwise, sudden acceler-
ation or braking could endanger you or others.
X Briefly pull the cruise control lever towards
you =.
X Remove your foot from the accelerator
pedal.
The first time cruise control is activated, it
stores the current speed or regulates the
speed of the vehicle to the previously
stored speed.
Setting a speed X
Press the cruise control lever to the pres-
sure point, up :for a higher speed or
down ?for a lower speed.
X Keep the cruise control lever pressed until
the desired speed is reached.
X Release the cruise control lever.
The new speed is stored.
i Cruise control is not deactivated if you
depress the accelerator pedal. For exam-
ple, if you accelerate briefly to overtake,
cruise control adjusts the vehicle's speed
to the last speed stored after you have fin-
ished overtaking.
Making fine adjustments in 1 km/h
increments X
Briefly press the cruise control lever to the
pressure point, up :for a higher speed or
down ?for a lower speed.
The last speed stored is increased or
reduced. Driving systems
139Controls
212_AKB; 2; 4, en-GB
mkalafa, Version: 2.11.8.1 2009-05-05T14:17:16+02:00 - Seite 139 Z
Dateiname: 6515346702_buchblock.pdf; erzeugt am 07. May 2009 14:16:17; WK
Page 143 of 373
Adjustment in 10 km/h increments
X
Briefly press the cruise control lever
beyond the pressure point, up :for a
higher speed or down ?for a lower speed.
The last speed stored is increased or
reduced.
Deactivating cruise control There are several ways to deactivate cruise
control:
X
Briefly press the cruise control lever for-
wards B.
or
X Brake.
or
X Briefly press the cruise control lever in the
direction of arrow A.
Variable Speedtronic is selected. LIM indi-
cator lamp ;in the cruise control lever
lights up.
Cruise control is automatically deactivated if:
R you depress the parking brake.
R you drive at less than 30 km/h
R ESP ®
intervenes or you deactivate ESP ®
R you change into neutral in a vehicle with
manual transmission while driving or if the
clutch is depressed for longer than 6 sec-
onds
R on vehicles with manual transmission, you
shift to a higher gear and as a result the
engine speed is too low
R you move the selector lever to Non vehi-
cles with automatic transmission* while
driving
If cruise control is deactivated, you will hear
a warning tone. You see the Cruise con‐
trol off message in the multi-function dis-
play for approximately five seconds.
i The last speed stored is cleared when you
switch off the engine. Distronic Plus*
i Distronic Plus is not available in all coun-
tries.
Distronic Plus regulates the speed and auto-
matically maintains the distance to the vehi-
cle in front. It brakes automatically in order
to avoid exceeding the set speed. On long and
steep downhill gradients, especially if the
vehicle is laden or towing a trailer, you must
select shift range 1,2or 3in good time. By
doing so, you will make use of the braking
effect of the engine, which relieves the load
on the brake system and prevents the brakes
from overheating and wearing too quickly. G
Risk of accident
Do not change down for additional engine
braking on a slippery road surface. This could
cause the drive wheels to lose their grip and
the vehicle could skid. G
Risk of accident
Distronic Plus is only an aid designed to assist
driving. The driver is fully responsible for the
vehicle's distance from other vehicles, the
vehicle's speed and for braking in good time.
Distronic Plus does not react to:
R pedestrians
R stationary obstacles on the road, e.g. stop-
ped or parked vehicles
R oncoming and crossing traffic
Distronic Plus may not detect narrow vehicles
driving in front, e.g. motorcycles, or vehicles
driving on a different line. Therefore, always
pay attention to traffic conditions even when
Distronic Plus is activated. Otherwise, you
may fail to recognise dangers in time, cause
an accident and injure yourself and others.
If a slower-moving vehicle is detected in front,
Distronic Plus causes your vehicle to brake
and maintain a preset distance to the vehicle
in front. 140
Driving systemsCont
rols
* optional
212_AKB; 2; 4, en-GB
mkalafa
,V ersion: 2.11.8.1
2009-05-05T14:17:16+02:00 - Seite 140
Dateiname: 6515346702_buchblock.pdf; erzeugt am 07. May 2009 14:16:17; WK