2009 MERCEDES-BENZ E-CLASS ESTATE child lock
[x] Cancel search: child lockPage 74 of 373
Individual settings
You can change the setting of the locking
system in such a way that only the driver's
door and the fuel filler flap are unlocked. This
could be useful if you frequently travel on your
own.
X To change the setting: press the%
and & buttons simultaneously for
approximately six seconds until the battery
check lamp flashes twice.
The key now functions as follows:
X To unlock the driver's door: press the
% button once.
X To unlock centrally: press the%but-
ton twice.
X To lock centrally: press the&button.
The KEYLESS GO* function is changed as fol-
lows:
X To unlock the driver's door: touch the
inner surface of the door handle on the
driver's door.
X To unlock centrally: touch the inner sur-
face of the door handle on the front-
passenger door or the rear door.
X To lock centrally: touch sensor sur-
face :on one of the door handles.
Restoring the factory settings X
Press the %and& buttons simulta-
neously for approximately six seconds until
the battery check lamp flashes twice.
Additional information R
Convenience opening (Y page 102)
R Convenience closing (Y page 102)
R Opening and closing in an emergency
(Y page 299) Opening the doors from the inside
You can open a door from the inside even if it
has been locked, unless the child-proof locks
have been activated ( Ypage 57). X
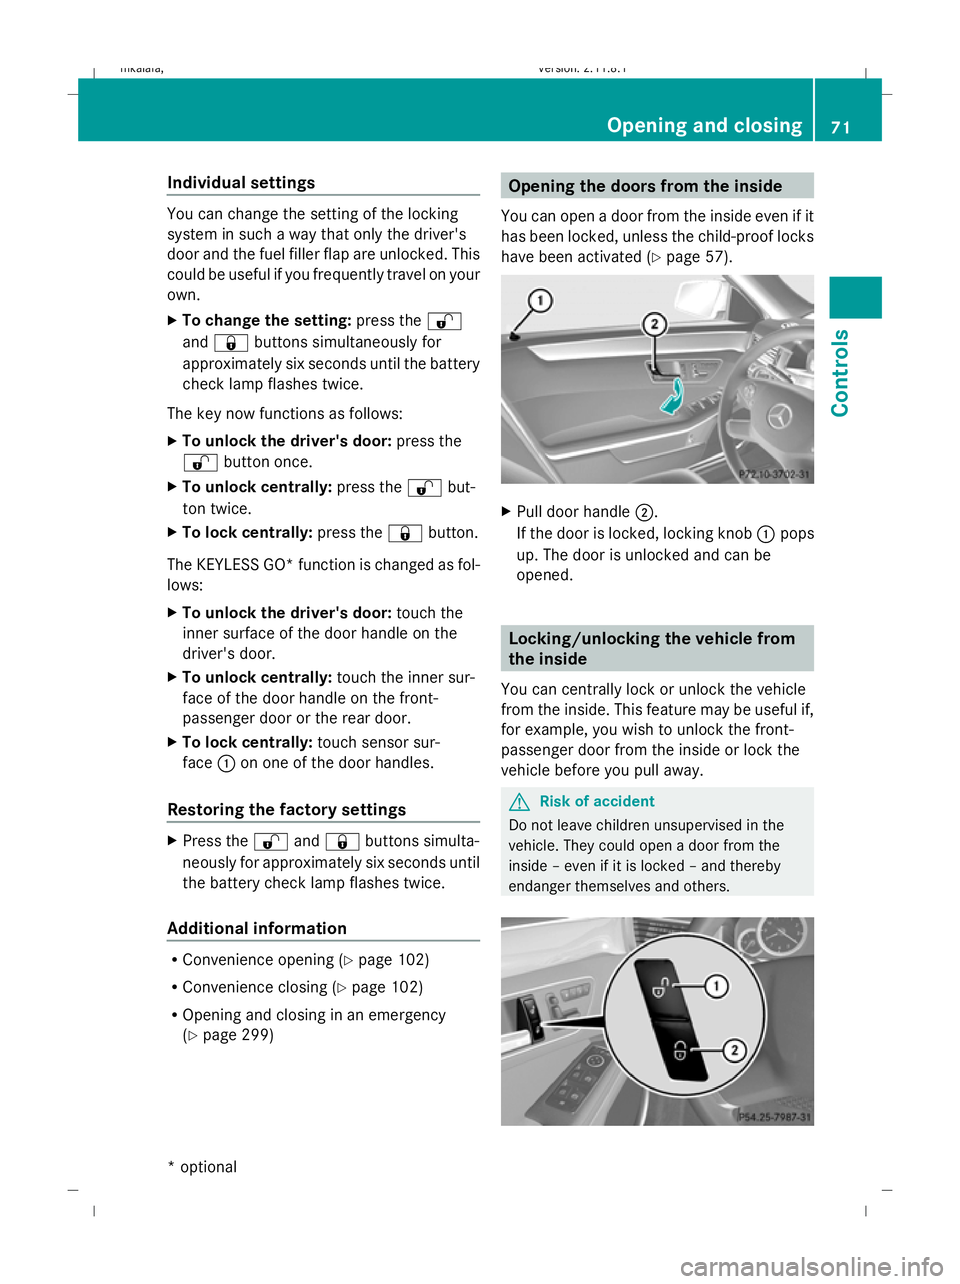
Pull door handle ;.
If the door is locked, locking knob :pops
up. The door is unlocked and can be
opened. Locking/unlocking the vehicle from
the inside
You can centrally lock or unlock the vehicle
from the inside. This feature may be useful if,
for example, you wish to unlock the front-
passenger door from the inside or lock the
vehicle before you pull away. G
Risk of accident
Do not leave children unsupervised in the
vehicle. They could open a door from the
inside – even if it is locked – and thereby
endanger themselves and others. Opening and closing
71Controls
* optional
212_AKB; 2; 4, en-GB
mkalafa
,V ersion: 2.11.8.1
2009-05-05T14:17:16+02:00 - Seite 71 Z
Dateiname: 6515346702_buchblock.pdf; erzeugt am 07. May 2009 14:15:46; WK
Page 79 of 373
Seats
Points to remember
You will find information about folding the
rear bench seat forwards in the "Through-
loading feature in the rear bench seat"
(Saloon) (Y page 195) and "EASY-PACK load-
ing-aid feature rear bench seat (Estate)"
(Y page 196) sections.
Depending on the vehicle's equipment, the
seats can adjusted either manually/electri-
cally or electrically*. G
Risk of injury
The seats can still be adjusted when there is
no key in the ignition lock. For this reason,
children should never be left unsupervised in
the vehicle. They could become trapped when
adjusting a seat. G
Risk of accident
Only adjust the driver's seat when the vehicle
is stationary. You will otherwise be distracted
from the road and traffic conditions and you
could lose control of the vehicle as a result of
the seat moving. This could cause an acci-
dent. G
Risk of injury
Make sure that nobody can become trapped
when you adjust the seat.
Observe the notes concerning the airbag sys-
tem.
Secure children as recommended; see "Chil-
dren in the vehicle" section. G
Risk of injury
Make sure that the central area of the head
restraint supports the back of your head at
about eye level. You could seriously injure
your neck if your head is not correctly sup-
ported by the head restraint in the event of an
accident. Never travel without a correctly
adjusted and engaged head restraint.
! When you move the seats, make sure that
there are no objects in the footwell or behind the seats. Otherwise, you could
damage the seats and the objects.
i The head restraints in the front seats are
fitted with the NECK-PRO system
(Y page 43). For this reason, it is not pos-
sible to remove the head restraints from
the front seats.
The head restraints cannot be removed
from the rear compartment seats on vehi-
cles without the through-loading feature*.
Please contact a Mercedes-Benz Service
Centre for more information. Adjusting the seats manually and
electrically Seat fore-and-aft adjustment
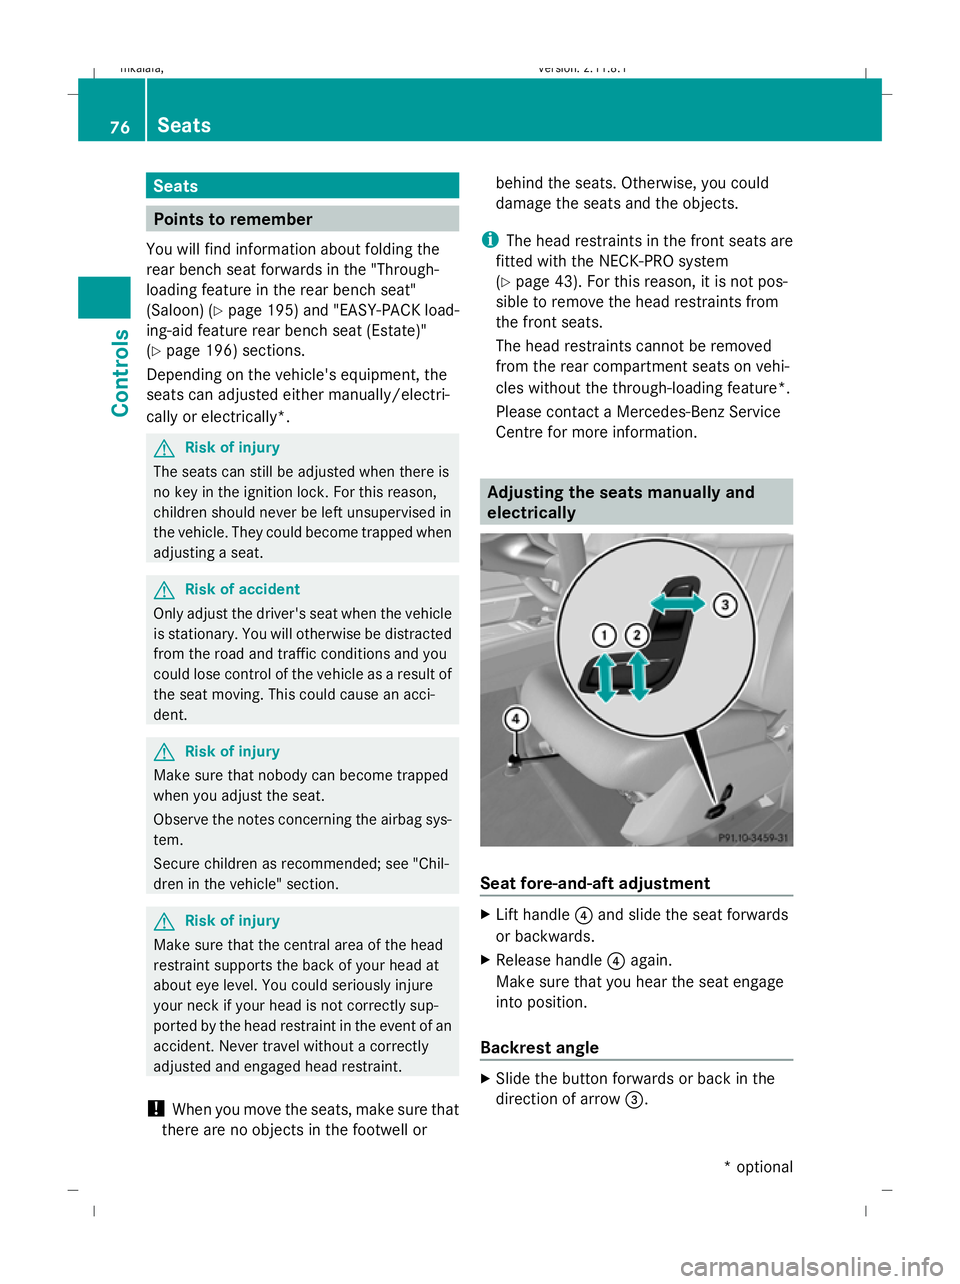
X
Lift handle ?and slide the seat forwards
or backwards.
X Release handle ?again.
Make sure that you hear the seat engage
into position.
Backrest angle X
Slide the button forwards or back in the
direction of arrow =.76
SeatsControls
* optional
212_AKB; 2; 4, en-GB
mkalafa,
Version: 2.11.8.1 2009-05-05T14:17:16+02:00 - Seite 76
Dateiname: 6515346702_buchblock.pdf; erzeugt am 07. May 2009 14:15:49; WK
Page 85 of 373
Rear-compartment seats
i
The system automatically switches down
from level 3to level 2after about eight
minutes (driver's seat and front-passenger
seat) or five minutes (rear seats).
The system automatically switches down
from level 2to level 1after approximately
ten minutes.
The system automatically switches off
approximately 20 minutes after it is set to
level 1.
X Make sure that the key is in position 1or
2 in the ignition lock.
X To switch on: press button:repeatedly
until the desired heating level is set.
X To switch off: press button:repeatedly
until all indicator lamps go out.
i If the battery voltage is too low, the seat
heating may switch off. Folding bench seat* in the luggage
compartment (Estate)
The folding bench seat in the luggage com-
partment is only suitable for persons no more
than 1.40 m tall and weighing a maximum of
50 kg.
The maximum permissible weight may be
reduced by extensive optional extras, vehicle
load and trailer towing. Observe the maxi-
mum gross vehicle weight and the permissi-
ble axle load, which can be found on the vehi-
cle identification plate (Y page 332).The combined luggage cover and net must be
fitted if you are using the folding bench seat. G
Risk of injury
The rear seat backrests must be locked in the
upright position if you are using the folding
bench seat in the luggage compartment.
Only drive when the head restraints in the
folding bench seat are adjusted to the correct
position. Make sure that the centre of the
head restraint supports the seat occupant's
head at about eye level. This can reduce the
risk of injury to a child in the event of an acci-
dent.
Ensure that the seat belt sits correctly on the
body and that it is engaged in the seat belt
buckle.
Never leave children unsupervised in the vehi-
cle. This applies even if they are secured in a
child restraint system.
Secure children as recommended; see "Chil-
dren in the vehicle" section. G
Risk of injury
Only replace damaged covers with genuine
covers.
Make sure that items of luggage and other
objects are sufficiently secured in the luggage
compartment.
Otherwise, the load could injure someone in
the event of sharp braking, a sudden change
in direction or an accident.
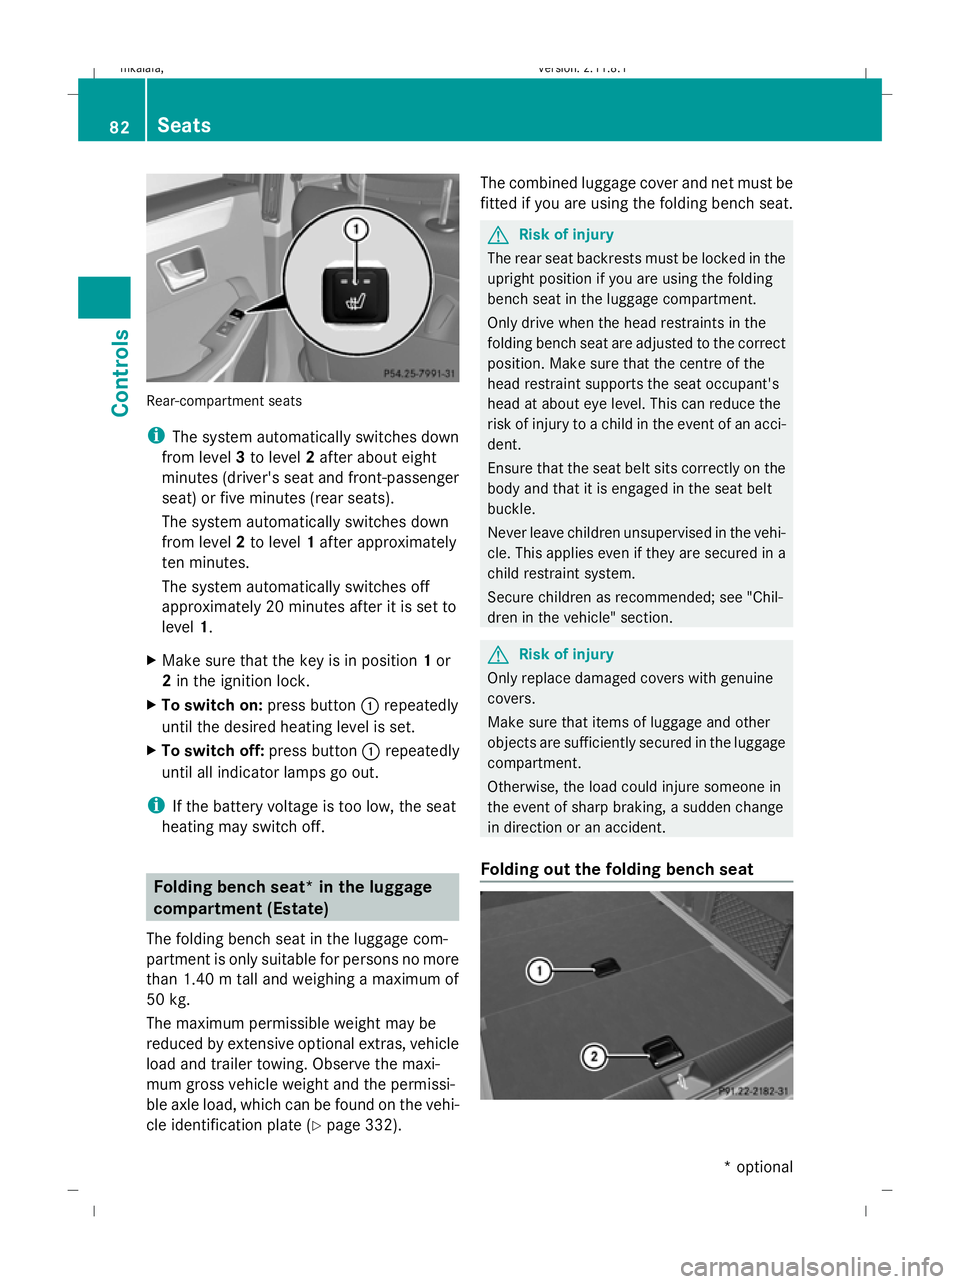
Folding out the folding bench seat 82
SeatsCont
rols
* optional
212_AKB; 2; 4, en-GB
mkalafa
,V ersion: 2.11.8.1
2009-05-05T14:17:16+02:00 - Seite 82
Dateiname: 6515346702_buchblock.pdf; erzeugt am 07. May 2009 14:15:53; WK
Page 87 of 373
!
To prevent damage, you must insert the
head restraints fully into their guides and
engage the belt buckles in their guides. X
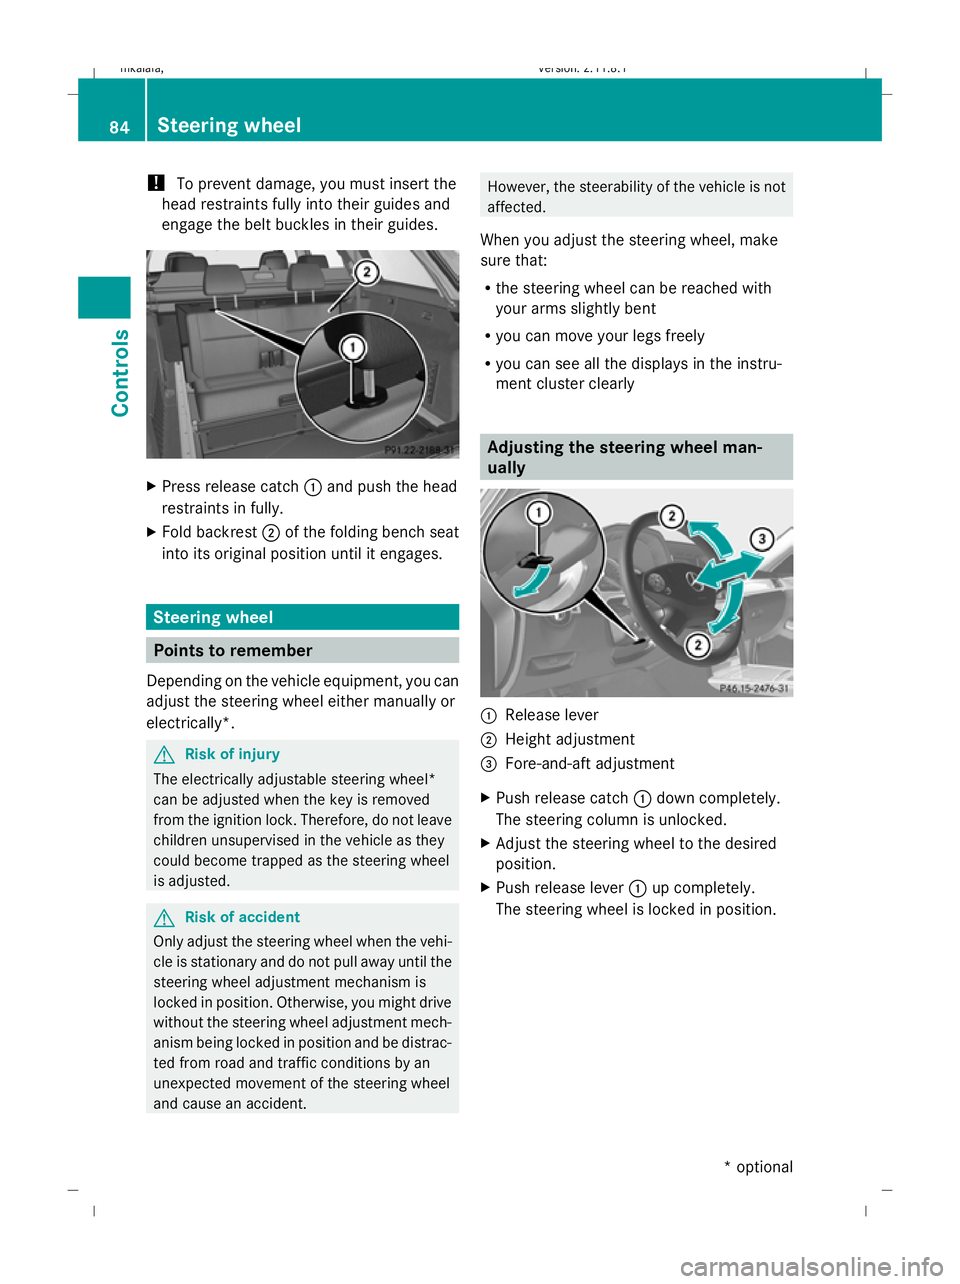
Press release catch :and push the head
restraints in fully.
X Fold backrest ;of the folding bench seat
into its original position until it engages. Steering wheel
Points to remember
Depending on the vehicle equipment, you can
adjust the steering wheel either manually or
electrically*. G
Risk of injury
The electrically adjustable steering wheel*
can be adjusted when the key is removed
from the ignition lock. Therefore, do not leave
children unsupervised in the vehicle as they
could become trapped as the steering wheel
is adjusted. G
Risk of accident
Only adjust the steering wheel when the vehi-
cle is stationary and do not pull away until the
steering wheel adjustment mechanism is
locked in position. Otherwise, you might drive
without the steering wheel adjustment mech-
anism being locked in position and be distrac-
ted from road and traffic conditions by an
unexpected movement of the steering wheel
and cause an accident. However, the steerability of the vehicle is not
affected.
When you adjust the steering wheel, make
sure that:
R the steering wheel can be reached with
your arms slightly bent
R you can move your legs freely
R you can see all the displays in the instru-
ment cluster clearly Adjusting the steering wheel man-
ually
:
Release lever
; Height adjustment
= Fore-and-aft adjustment
X Push release catch :down completely.
The steering column is unlocked.
X Adjust the steering wheel to the desired
position.
X Push release lever :up completely.
The steering wheel is locked in position. 84
Steering wheelControls
* optional
212_AKB; 2; 4, en-GB
mkalafa,
Version: 2.11.8.1 2009-05-05T14:17:16+02:00 - Seite 84
Dateiname: 6515346702_buchblock.pdf; erzeugt am 07. May 2009 14:15:55; WK
Page 88 of 373
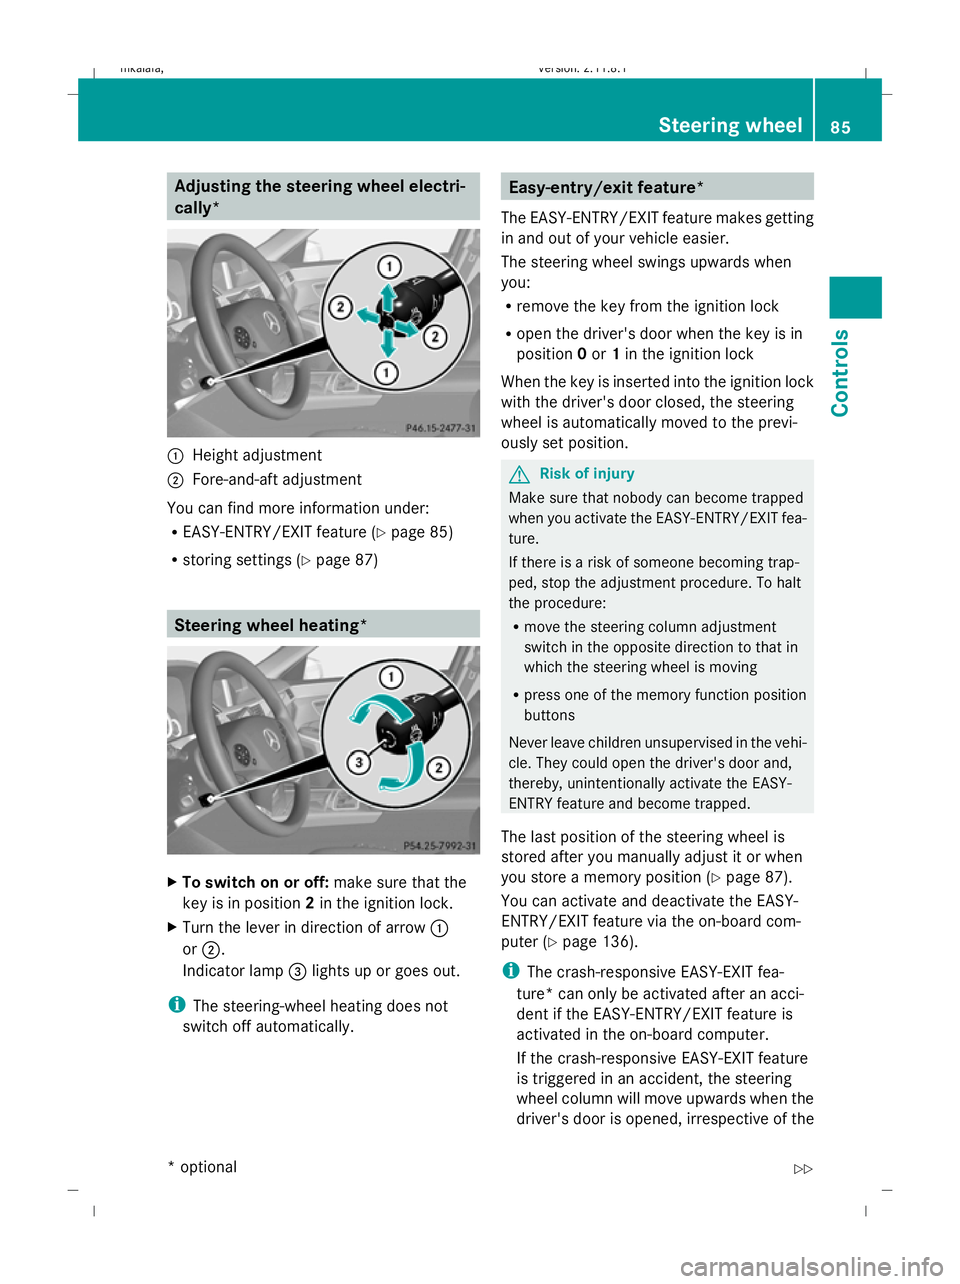
Adjusting the steering wheel electri-
cally*
:
Height adjustment
; Fore-and-aft adjustment
You can find more information under:
R EASY-ENTRY/EXIT feature (Y page 85)
R storing settings (Y page 87) Steering wheel heating*
X
To switch on or off: make sure that the
key is in position 2in the ignition lock.
X Turn the lever in direction of arrow :
or ;.
Indicator lamp =lights up or goes out.
i The steering-wheel heating does not
switch off automatically. Easy-entry/exit feature*
The EASY-ENTRY/EXIT feature makes getting
in and out of your vehicle easier.
The steering wheel swings upwards when
you:
R remove the key from the ignition lock
R open the driver's door when the key is in
position 0or 1in the ignition lock
When the key is inserted into the ignition lock
with the driver's door closed, the steering
wheel is automatically moved to the previ-
ously set position. G
Risk of injury
Make sure that nobody can become trapped
when you activate the EASY-ENTRY/EXIT fea-
ture.
If there is a risk of someone becoming trap-
ped, stop the adjustment procedure. To halt
the procedure:
R move the steering column adjustment
switch in the opposite direction to that in
which the steering wheel is moving
R press one of the memory function position
buttons
Never leave children unsupervised in the vehi-
cle. They could open the driver's door and,
thereby, unintentionally activate the EASY-
ENTRY feature and become trapped.
The last position of the steering wheel is
stored after you manually adjust it or when
you store a memory position (Y page 87).
You can activate and deactivate the EASY-
ENTRY/EXIT feature via the on-board com-
puter (Y page 136).
i The crash-responsive EASY-EXIT fea-
ture* can only be activated after an acci-
dent if the EASY-ENTRY/EXIT feature is
activated in the on-board computer.
If the crash-responsive EASY-EXIT feature
is triggered in an accident, the steering
wheel column will move upwards when the
driver's door is opened, irrespective of the Steering wheel
85Controls
* optional
212_AKB; 2; 4, en-GB
mkalafa
,V ersion: 2.11.8.1
2009-05-05T14:17:16+02:00 - Seite 85 Z
Dateiname: 6515346702_buchblock.pdf; erzeugt am 07. May 2009 14:15:55; WK
Page 90 of 373
i
Make sure that the exterior mirrors are
always folded out fully while the vehicle is
in motion; otherwise, they may vibrate.
Resetting the exterior mirrors If the battery has been disconnected or has
become discharged, the exterior mirrors
must be reset. Otherwise, the exterior mirrors
will not fold in when you select the "Fold in
mirrors when locking" function in the on-
board computer (Y page 136).
X Make sure that the key is in position 1in
the ignition lock.
X Briefly press button :.
Automatically folding exterior mirrors
in or out* If the "Fold in mirrors when locking" function
is activated in the on-board computer
(Y
page 136):
R the exterior mirrors fold in automatically as
soon as you lock the vehicle from the out-
side.
R the exterior mirrors fold out again automat-
ically as soon as you unlock the vehicle and
then open the driver's or front-passenger
door.
i If you have activated this function and fold
in the exterior mirrors using button :, they
will not be folded out automatically. You
can only fold out the exterior mirrors again
using button :. Automatic anti-dazzle mirrors*
The rear-view mirror and the exterior mirror
on the driver's side automatically go into anti-
dazzle mode if the ignition is switched on and
incident light from headlamps strikes the sen-
sor in the rear-view mirror.
The mirrors do not go into anti-dazzle mode if
reverse gear is engaged or the interior lighting
is switched on. G
Risk of accident
If the incident light from headlamps cannot
strike the sensor in the rear-view mirror, for
instance, when the rear window blind* is
extended, the mirror's automatic anti-dazzle
function will not operate.
Incident light could then dazzle you. This may
distract you from the traffic conditions, and
you may, thereby, cause an accident. In this
case, adjust the rear-view mirror manually. Memory functions*
Storing settings
Using the memory button you can store up to
three different settings, e. g. for three differ-
ent people.
The following settings are stored as a single
memory preset:
R position of the seat, backrest and head
restraint
R active multicontour seat*: dynamic func-
tion level
R driver's side: steering wheel position
R driver's side: position of the exterior mir-
rors on the driver's and front-passenger
sides G
Risk of injury
The memory function can still be used when
the key has been removed. For this reason,
children should never be left unsupervised in
the vehicle. Otherwise, they could become
trapped when moving the seat or the steering
wheel. G
Risk of accident
Only use the memory function on the driver’s
side when the vehicle is stationary. Other-
wise, you could be distracted from the traffic
conditions by the steering wheel and seat
moving of their own accord, and as a result
cause an accident. Memory functions*
87Controls
* optional
212_AKB; 2; 4, en-GB
mkalafa,
Version: 2.11.8.1 2009-05-05T14:17:16+02:00 - Seite 87 Z
Dateiname: 6515346702_buchblock.pdf; erzeugt am 07. May 2009 14:15:56; WK
Page 92 of 373
Calling up the parking position
X
When the key is in position 2in the ignition
lock and the exterior mirror on the front-
passenger side is activated, engage
reverse gear.
The exterior mirror on the front-passenger
side moves to the stored parking position.
The exterior mirror on the front-passenger
side moves back to its original position:
R as soon as you exceed a speed of
10 km/h
R about ten seconds after you have disen-
gaged reverse gear
R if you press button :for the exterior mir-
ror on the driver's side Seat belts
Wearing seat belts
Seat belts are the most effective means of
restraining the movement of vehicle occu-
pants in the event of an accident. This
reduces the risk of vehicle occupants coming
into contact with the vehicle interior. G
Risk of injury
A seat belt which is not worn correctly, or
which has not been engaged in the seat belt
buckle correctly, cannot perform its intended
protective function. Under certain circum-
stances, this could result in severe or even
fatal injuries.
Make sure that all occupants – in particular,
pregnant women – wear their seat belt cor-
rectly at all times.
R The seat belt must pass closely over your
body and must not be twisted. Therefore,
you should avoid wearing bulky clothing
(e.g. a winter coat). The shoulder belt sec-
tion must be routed across the middle of
your shoulder – on no account across your
neck or under your arm – and pulled tight
against your upper body. The lap belt must
always pass across your lap as low down as possible, i.e. over your hip joints – not
across your abdomen. If necessary, push
down the belt strap slightly and then
retighten it in the roll-up direction.
R Do not route the belt strap across sharp or
fragile objects, especially if these are loca-
ted on or in your clothing, e.g. spectacles,
pens, keys, etc. The seat belt strap could
be damaged and tear in an accident, and
you or other vehicle occupants could be
injured.
R Only one person should use each seat belt
at any one time. Children must never travel
sitting on the lap of other occupants. It
would not be possible to restrain the child
in the event of a sudden change in direc-
tion, braking or an accident. This could
result in severe or even fatal injuries to the
child and other occupants.
R Persons less than 1.50 m tall cannot wear
the seat belts correctly. For this reason,
secure persons less than 1.50 m tall in spe-
cially designed, suitable restraint systems.
R Children less than 1.50 m tall or under
12 years of age cannot wear the seat belts
properly. Therefore, they always should be
secured in a suitable child restraint system
on a suitable vehicle seat. You can find
more information under "Children in the
vehicle" in the "Safety" section of the Own-
er's Manual. Follow the manufacturer's
installation instructions when fitting the
child restraint system.
R Do not secure any objects with a seat belt
if the seat belt is also being used by one of
the vehicle's occupants. G
Risk of injury
If the backrest is not almost vertical, the seat
belt does not offer the intended level of pro-
tection. Under certain circumstances, this
could cause severe or even fatal injuries.
Before starting a journey, make sure that the
seat is properly adjusted and that the back-
rest is almost vertical. Seat belts
89Controls
212_AKB; 2; 4, en-GB
mkalafa,V ersion: 2.11.8.1
2009-05-05T14:17:16+02:00 - Seite 89 Z
Dateiname: 6515346702_buchblock.pdf; erzeugt am 07. May 2009 14:15:57; WK
Page 103 of 373

4
° Continuous wipe, slow
5 ¯ Continuous wipe, fast
B í Single wipe/ îTo wipe the
windscreen using washer fluid
! With intermittent wiping with rain sensor:
Due to optical influences and the wind-
screen becoming dirty in dry weather con-
ditions, the windscreen wipers may be acti-
vated inadvertently. This could then dam-
age the windscreen wiper blades or scratch
the windscreen.
For this reason, you should always switch
off the windscreen wipers in dry weather.
X Turn the key to position 1or 2in the ignition
lock.
X Turn the combination switch to the corre-
sponding position.
In the ÄorÅ position, the appropriate
wiping frequency is set automatically accord-
ing to the intensity of the rain. In the Å
position, the rain sensor is more sensitive
than in the Äposition and therefore the
windscreen wiper will wipe more frequently. Rear window wiper (Estate)
Combination switch
:
è Switch
2 ô To wipe with washer fluid
3 ITo switch on intermittent wiping
4 0To switch off intermittent wiping
5 ô To wipe with washer fluid X
Turn the key to position 1or 2in the ignition
lock.
X Turn switch :on the combination switch
to the corresponding position.
When the rear window wiper is switched on
the icon appears in the instrument cluster. Side windows
Opening and closing the side win-
dows
G
Risk of injury
When opening the side windows, make sure
that nobody can become trapped between the
side window and the door frame. Keep clear
of the side window during the opening proce-
dure. Otherwise, you could be drawn in or
trapped between the side window and the
door frame by the downwards movement of
the window. If there is a risk of becoming
trapped, release the switch or pull it upwards
to close the side window again. G
Risk of injury
Make sure that nobody can become trapped
as you close the side windows. If there is a
risk of entrapment, release the button or
press the button again to open the side win-
dow. G
Risk of injury
Children may injure themselves if they oper-
ate the side windows.
Never leave children unsupervised in the vehi-
cle. Always take the key with you when leaving
the vehicle, even if you are only leaving it for
a short time. 100
Side windowsCont
rols
212_AKB; 2; 4, en-GB
mkalafa,V ersion: 2.11.8.1
2009-05-05T14:17:16+02:00 - Seite 100
Dateiname: 6515346702_buchblock.pdf; erzeugt am 07. May 2009 14:16:02; WK