2009 MERCEDES-BENZ E-CLASS ESTATE air condition
[x] Cancel search: air conditionPage 184 of 373
X
Convenience opening: press and hold the
g button for a second until the side win-
dows and the sliding/tilting sunroof*/pan-
orama sliding sunroof* have reached their
original position.
The indicator lamp above the gbutton
goes out. Air-recirculation mode is deacti-
vated.
i If you open the side windows or the slid-
ing/tilting sunroof* or panorama sliding
sunroof* manually after closing with the
convenience closing feature, they will
remain in this position when opened using
the convenience opening feature. Switching the residual heat on/off
The "residual heat" function is only available
with Thermotronic luxury 3-zone automatic
climate control*.
It is possible to make use of the residual heat
of the engine to continue heating the station-
ary vehicle for up to 30 minutes after the
engine has been switched off. The heating
time depends on the temperature that has
been set.
i The blower will run at a low speed regard-
less of the airflow setting.
i If you activate the "residual heat" function
at high temperatures, only the ventilation
will be activated. The blower runs at
medium speed.
i It is possible that the "residual heat" func-
tion may be activated automatically an hour
after the key is removed. The vehicle is then
ventilated for 30 minutes to dry the air con-
ditioning system.
X Turn the key to position 0in the ignition
lock or remove it.
X To switch on: press theÌbutton.
The indicator lamp above the Ìbutton
lights up. X
To deactivate: press theÌbutton.
The indicator lamp above the Ìbutton
goes out.
i The residual heat automatically switches
off after around 30 minutes or if:
R the ignition is switched on
R the battery voltage drops Switching the auxiliary heating/ven-
tilation* on/off
Notes on the auxiliary heating/ventila-
tion system G
Risk of poisoning
Exhaust fumes are produced when the auxili-
ary heating is in operation. Inhaling these
exhaust fumes can be poisonous. You should
therefore switch off the auxiliary heating in
confined spaces without an extraction sys-
tem, e.g. a garage. G
Risk of fire
When operating the auxiliary heating, parts of
the vehicle may become very hot, and highly
inflammable material such as fuels could be
ignited. Operating the auxiliary heating is thus
prohibited at filling stations or when your vehi-
cle is being refuelled. You must therefore
switch off the auxiliary heating at filling sta-
tions.
i Switch the auxiliary heating on regularly
once a month for about ten minutes.
The auxiliary heating heats the air in the vehi-
cle interior to the set temperature without
using the heat of the running engine. The aux-
iliary heating is operated using the vehicle's
fuel. For this reason, the tank content must
be at least at reserve fuel level to ensure that
the auxiliary heating functions.
The auxiliary heating/ventilation automati-
cally adjusts to changes in temperature and
weather conditions. For this reason, the aux-
iliary heating could switch from ventilation Air conditioning
181Controls
* optional
212_AKB; 2; 4, en-GB
mkalafa,
Version: 2.11.8.1 2009-05-05T14:17:16+02:00 - Seite 181 Z
Dateiname: 6515346702_buchblock.pdf; erzeugt am 07. May 2009 14:16:31; WK
Page 185 of 373
mode to heating mode or from heating mode
to ventilation mode.
You cannot use the auxiliary ventilation to
cool the vehicle interior to a temperature
lower than the outside temperature.
Before activating X
Turn the key to position 2in the ignition
lock.
X Set the temperature.
The auxiliary heating/ventilation can be acti-
vated even when the air conditioning is being
controlled manually. Optimum comfort can
be attained when the system is set to auto-
matic mode. Set the temperature to 22 †.
The auxiliary heating/ventilation can be acti-
vated or deactivated using the remote control
or the button on the centre console.
The on-board computer can be used to spec-
ify up to three departure times, one of which
may be preselected (Y page 135).
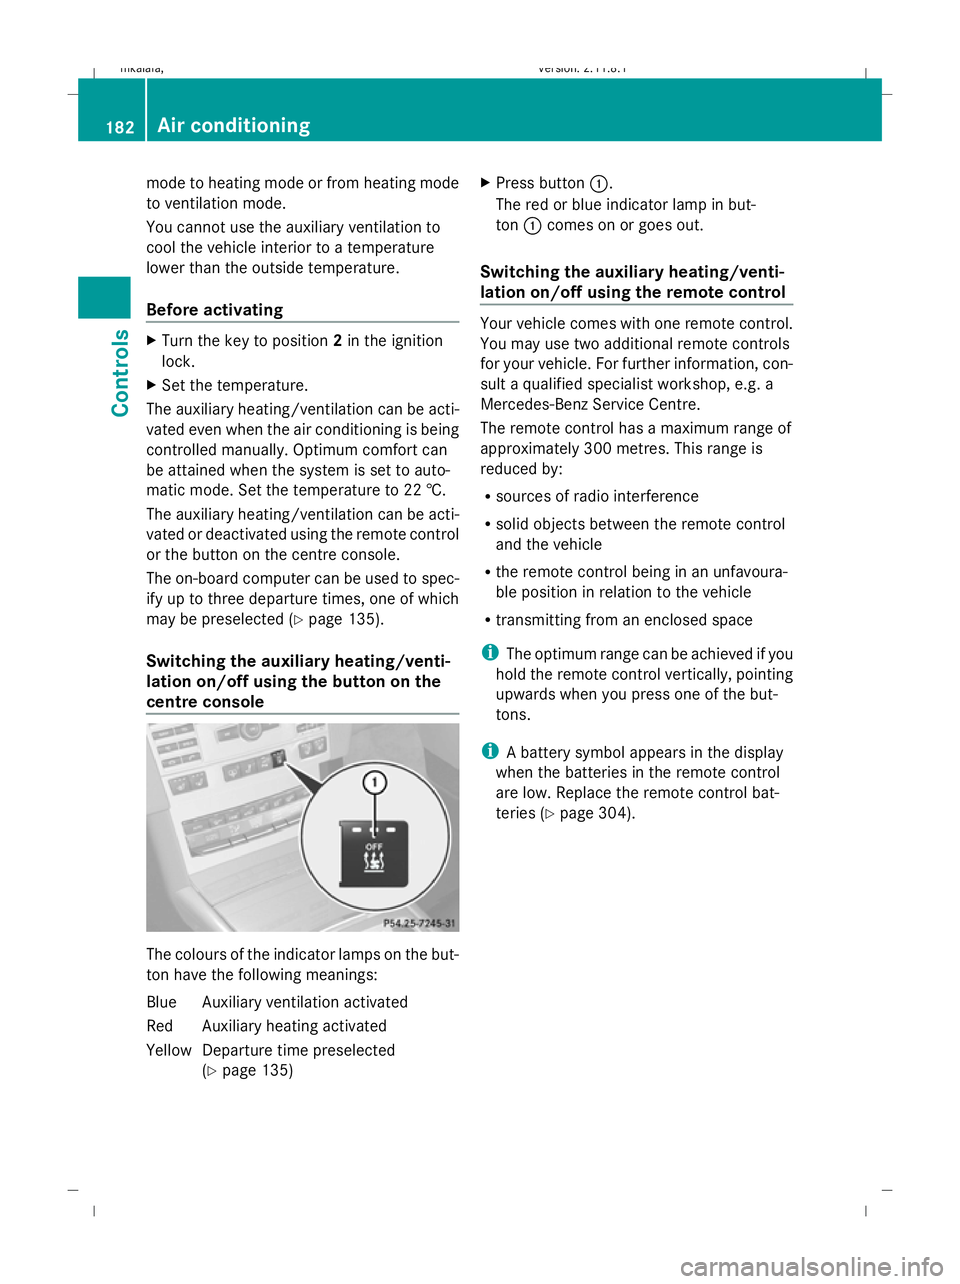
Switching the auxiliary heating/venti-
lation on/off using the button on the
centre console The colours of the indicator lamps on the but-
ton have the following meanings:
Blue Auxiliary ventilation activated
Red Auxiliary heating activated
Yellow Departure time preselected (Ypage 135) X
Press button :.
The red or blue indicator lamp in but-
ton :comes on or goes out.
Switching the auxiliary heating/venti-
lation on/off using the remote control Your vehicle comes with one remote control.
You may use two additional remote controls
for your vehicle. For further information, con-
sult a qualified specialist workshop, e.g. a
Mercedes-Benz Service Centre.
The remote control has a maximum range of
approximately 300 metres. This range is
reduced by:
R
sources of radio interference
R solid objects between the remote control
and the vehicle
R the remote control being in an unfavoura-
ble position in relation to the vehicle
R transmitting from an enclosed space
i The optimum range can be achieved if you
hold the remote control vertically, pointing
upwards when you press one of the but-
tons.
i A battery symbol appears in the display
when the batteries in the remote control
are low. Replace the remote control bat-
teries (Y page 304). 182
Air conditioningControls
212_AKB; 2; 4, en-GB
mkalafa,
Version: 2.11.8.1 2009-05-05T14:17:16+02:00 - Seite 182
Dateiname: 6515346702_buchblock.pdf; erzeugt am 07. May 2009 14:16:31; WK
Page 186 of 373
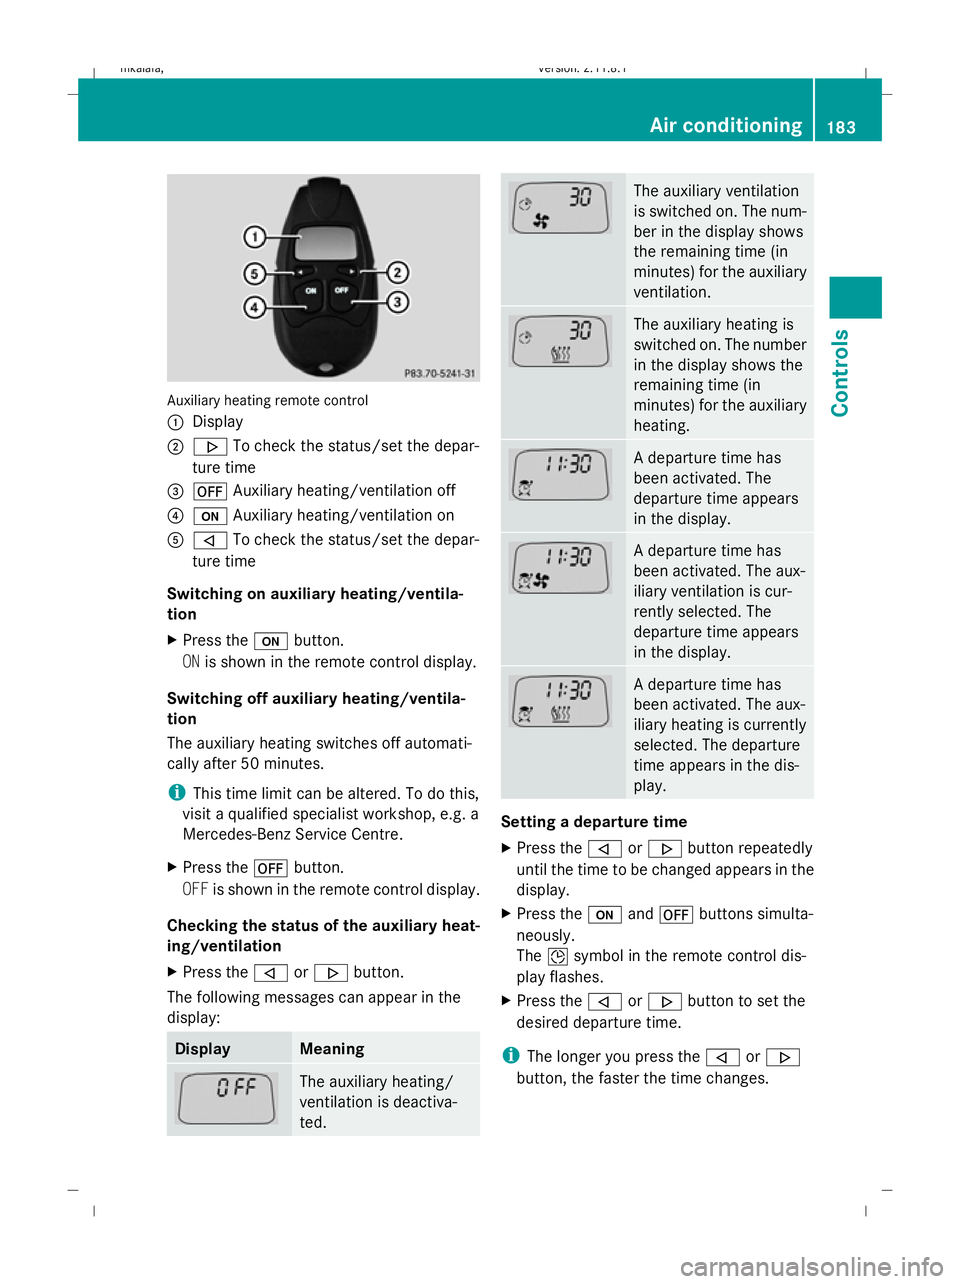
Auxiliary heating remote control
:
Display
; . To check the status/set the depar-
ture time
= ^ Auxiliary heating/ventilation off
? u Auxiliary heating/ventilation on
A , To check the status/set the depar-
ture time
Switching on auxiliary heating/ventila-
tion
X Press the ubutton.
ON is shown in the remote control display.
Switching off auxiliary heating/ventila-
tion
The auxiliary heating switches off automati-
cally after 50 minutes.
i This time limit can be altered. To do this,
visit a qualified specialist workshop, e.g. a
Mercedes-Benz Service Centre.
X Press the ^button.
OFF is shown in the remote control display.
Checking the status of the auxiliary heat-
ing/ventilation
X Press the ,or. button.
The following messages can appear in the
display: Display Meaning
The auxiliary heating/
ventilation is deactiva-
ted. The auxiliary ventilation
is switched on. The num-
ber in the display shows
the remaining time (in
minutes) for the auxiliary
ventilation.
The auxiliary heating is
switched on. The number
in the display shows the
remaining time (in
minutes) for the auxiliary
heating.
A departure time has
been activated. The
departure time appears
in the display.
A departure time has
been activated. The aux-
iliary ventilation is cur-
rently selected. The
departure time appears
in the display.
A departure time has
been activated. The aux-
iliary heating is currently
selected. The departure
time appears in the dis-
play.
Setting a departure time
X
Press the ,or. button repeatedly
until the time to be changed appears in the
display.
X Press the uand^ buttons simulta-
neously.
The Îsymbol in the remote control dis-
play flashes.
X Press the ,or. button to set the
desired departure time.
i The longer you press the ,or.
button, the faster the time changes. Air conditioning
183Controls
212_AKB; 2; 4, en-GB
mkalafa,V ersion: 2.11.8.1
2009-05-05T14:17:16+02:00 - Seite 183 Z
Dateiname: 6515346702_buchblock.pdf; erzeugt am 07. May 2009 14:16:32; WK
Page 210 of 373
Features
Sun visors
G
Risk of accident
Keep the mirrors in the sun visors covered
while driving. Otherwise, you could be daz-
zled, impairing your view of traffic conditions.
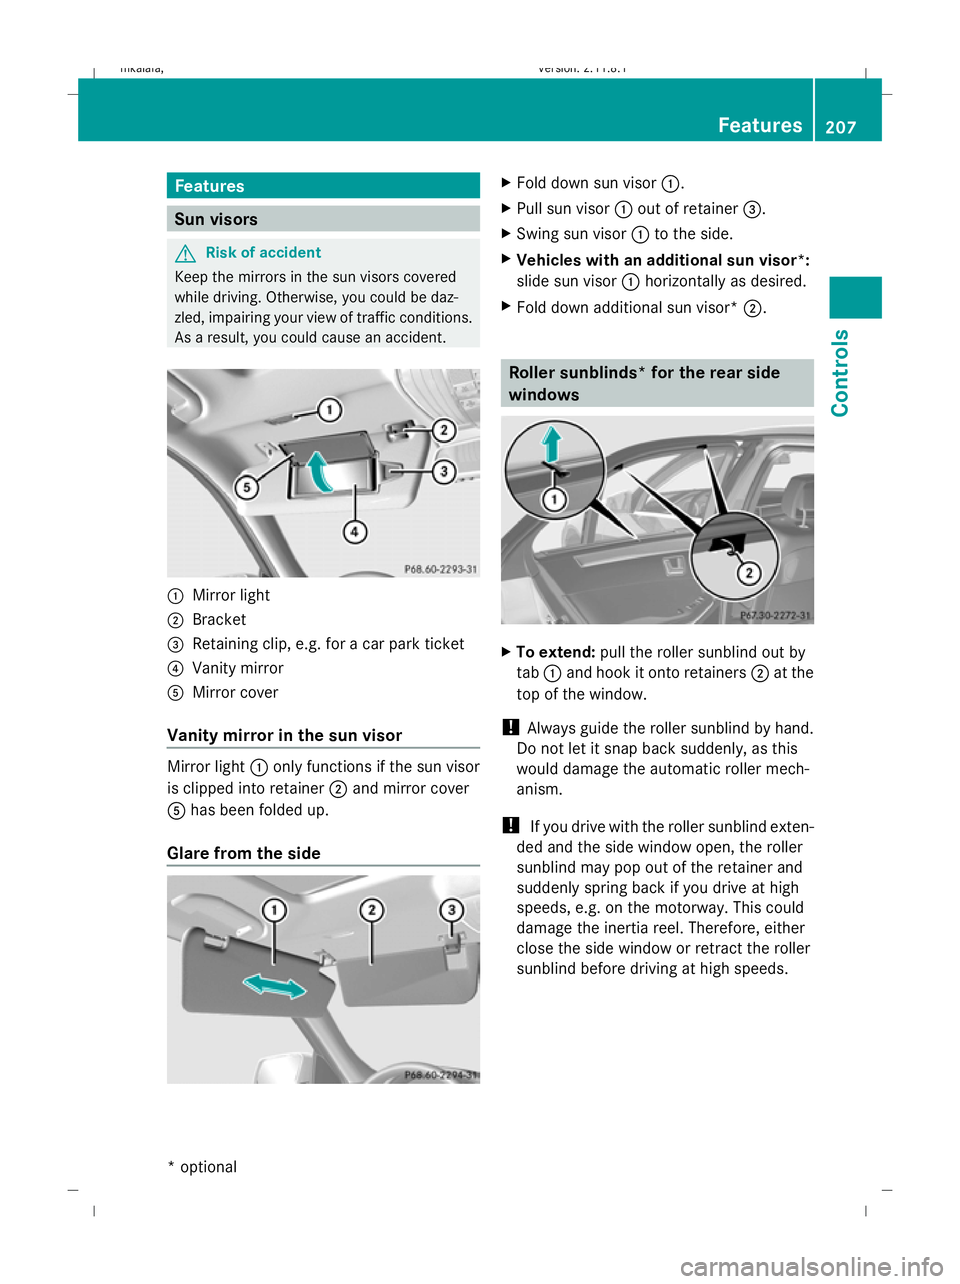
As a result, you could cause an accident. :
Mirror light
; Bracket
= Retaining clip, e.g. for a car park ticket
? Vanity mirror
A Mirror cover
Vanity mirror in the sun visor Mirror light
:only functions if the sun visor
is clipped into retainer ;and mirror cover
A has been folded up.
Glare from the side X
Fold down sun visor :.
X Pull sun visor :out of retainer =.
X Swing sun visor :to the side.
X Vehicles with an additional sun visor *:
sl ide sun visor :horizontally as desired.
X Fold down additional sun visor* ;. Roller sunblinds* for the rear side
windows
X
To extend: pull the roller sunblind out by
tab :and hook it onto retainers ;at the
top of the window.
! Always guide the roller sunblind by hand.
Do not let it snap back suddenly, as this
would damage the automatic roller mech-
anism.
! If you drive with the roller sunblind exten-
ded and the side window open, the roller
sunblind may pop out of the retainer and
suddenly spring back if you drive at high
speeds, e.g. on the motorway. This could
damage the inertia reel. Therefore, either
close the side window or retract the roller
sunblind before driving at high speeds. Features
207Controls
* optional
212_AKB; 2; 4, en-GB
mkalafa,
Version: 2.11.8.1 2009-05-05T14:17:16+02:00 - Seite 207 Z
Dateiname: 6515346702_buchblock.pdf; erzeugt am 07. May 2009 14:16:49; WK
Page 227 of 373
res, tears, bulges on tyres and deformation,
cracks or severe corrosion on wheels), at
least every 14 days, as well as after driving
off-road or on rough roads. Damaged
wheels can cause a loss of tyre pressure.
R Regularly check the tyre tread depth and
the condition of the tread across the whole
width of the tyre (Y page 224). If neces-
sary, turn the front wheels to full lock in
order to inspect the inner side of the tyre
surface.
R All wheels must have a valve cap to protect
the valve against dirt and moisture. Do not
fit anything onto the valve (such as tyre
pressure monitoring systems) other than
the standard valve cap or other valve caps
approved by Mercedes-Benz for your vehi-
cle.
R Regularly check the pressure of all the tyres
including the spare tyre*, particularly prior
to long trips, and correct the pressure as
necessary.
Notes on driving R
While driving, pay attention to vibrations,
noises and unusual handling characteris-
tics, e.g. pulling to one side. This may indi-
cate that the wheels or tyres are damaged.
If you suspect that a tyre is defective,
reduce your speed and stop the vehicle as
soon as possible to check the wheels and
tyres for damage. Hidden tyre damage
could also be causing the unusual handling
characteristics. If you find no signs of dam-
age, have the wheels and tyres examined
at a specialist workshop, for example at a
Mercedes-Benz Service Centre.
R When parking your vehicle, make sure that
the tyres do not get deformed by the kerb
or other obstacles. If it is necessary to drive
over kerbs, speed humps or similar eleva-
tions, try to do so slowly and at an obtuse
angle. Otherwise, the tyres, particularly the
sidewalls, can get damaged. Direction of rotation
Tyres with a specified direction of rotation
have additional benefits, e.g. if there is a risk
of aquaplaning. You will only gain these ben-
efits if the correct direction of rotation is
observed.
An arrow on the sidewall of the tyre indicates
its correct direction of rotation. MOExtended run-flat system*
The MOExtended run-flat system allows you
to continue driving the vehicle even when one
or more tyres lose all air pressure.
The MOExtended run-flat system may only be
used in conjunction with the tyre pressure
loss warning system or with the tyre pressure
monitor* and on wheels specifically tested by
Mercedes-Benz.
i Vehicles with the MOExtended run-flat
system are not equipped with the TIREFIT
kit. 38
It is therefore recommended to additionally
equip your vehicle with the TIREFIT kit when
fitting tyres that do not feature run-flat
properties, e.g. winter tyres.
i A TIREFIT kit is available from any quali-
fied specialist workshop, e.g. a Mercedes-
Benz Service Centre.
You will find notes on driving with a flat tyre
in the "Practical advice" section
(Y page 318). Tyre tread
G
Risk of accident
Bear in mind that:
R tyre grip decreases rapidly on wet roads
when the tread depth is less than 3 mm.
38 Only for certain countries. 224
Tyres and wheelsOperation
* optional
212_AKB; 2; 4, en-GB
mkalafa,
Version: 2.11.8.1 2009-05-05T14:17:16+02:00 - Seite 224
Dateiname: 6515346702_buchblock.pdf; erzeugt am 07. May 2009 14:16:56; WK
Page 233 of 373
!
On vehicles fitted with a tyre pressure
monitor*, electronic components are loca-
ted in the wheel.
Tyre-fitting tools should not be applied in
the area of the valve, as this could damage
the electronic components.
Always have the wheels interchanged/
changed at a qualified specialist workshop,
e.g. a Mercedes-Benz Service Centre. Winter driving
Points to remember
Have your vehicle winterproofed at a qualified
specialist workshop, e.g. at a Mercedes-Benz
Service Centre, at the onset of winter.
Observe the notes in the "Changing a wheel"
section (Y page 229). Winter tyres
Use winter tyres at temperatures below
+7 ˚C and in wintry road conditions. Only
winter tyres displaying the isnowflake
symbol in addition to the M+S marking pro-
vide optimum grip in wintry road conditions.
Only these tyres will allow the ABS, ESP ®
and
4MATIC* driving systems to function opti-
mally in winter, as these tyres have been
designed specifically for driving in snow.
Use winter tyres of the same make and tread
on all wheels to maintain safe handling char-
acteristics. G
Risk of accident
Winter tyres with a tread depth of less than
4 mm must be replaced immediately. They are
no longer suitable for winter use and can no
longer provide sufficient grip. This could
cause you to lose control of your vehicle and
cause an accident.
Always observe the maximum permissible
speed specified for the winter tyres you have fitted. If you fit winter tyres which have a
lower maximum permissible speed than that
of the vehicle, affix an appropriate warning
sign in the driver's field of vision. This can be
obtained at a qualified specialist workshop,
e.g. from a Mercedes-Benz Service Centre.
Under these circumstances, you should also
restrict the maximum speed of the vehicle
using permanent Speedtronic
39
to the maxi-
mum permissible speed for the winter tyres
(Y page 150).
Once you have fitted the winter tyres:
X Check the tyre pressures (Y page 225).
X Restart the tyre pressure moni-
tor* (Y page 228). G
Risk of accident
If you fit the spare wheel* when driving with
winter tyres, bear in mind that driving stability
will be impaired owing to unstable cornering
characteristics caused by the different tyres.
You should therefore adapt your driving style
and drive carefully.
Have the spare wheel* replaced at the near-
est qualified specialist workshop which has
the necessary specialist knowledge and tools
to carry out the work required. Mercedes-
Benz recommends that you use a Mercedes-
Benz Service Centre for this purpose. In par-
ticular, work relevant to safety or on safety-
related systems must be carried out at a quali-
fied specialist workshop. Snow chains
For safety reasons, Mercedes-Benz recom-
mends that you only use snow chains which
have been specially approved for your vehicle
by Mercedes-Benz, or are of a corresponding
standard of quality.
If you intend to fit snow chains, please bear
the following points in mind:
R you may not attach snow chains to all
wheel-tyre combinations; see the "Tyres
39 Only available for certain countries. 230
Winter drivingOperation
* optional
212_AKB; 2; 4, en-GB
mkalafa,
Version: 2.11.8.1 2009-05-05T14:17:16+02:00 - Seite 230
Dateiname: 6515346702_buchblock.pdf; erzeugt am 07. May 2009 14:16:58; WK
Page 235 of 373
Heavy and light loads
If the brakes have been subjected to a heavy
load, do not stop the vehicle immediately, but
drive on for a short while. This allows the air-
flow to cool the brakes more quickly. G
Risk of accident
Never depress the brake pedal continuously
while the vehicle is in motion, e.g. never cause
the brakes to rub by applying constant slight
pedal pressure. This causes the brake system
to overheat, increases the braking distance
and can lead to the brakes failing completely.
If the brakes have been used only moderately,
you should occasionally test their effective-
ness. To do this, brake more firmly from a
higher speed. This improves the grip of the
brakes.
Wet roads If driving in heavy rain for a prolonged period
of time without braking, there may be a
delayed reaction from the brakes when brak-
ing for the first time. You must brake harder.
You must therefore maintain a greater dis-
tance from the vehicle in front.
After driving on a wet surface, brake firmly
while paying attention to the traffic condi-
tions. This way the brake discs will become
warm, drying more quickly, which will protect
them against corrosion.
Limited braking performance on salt
treated roads G
Risk of accident
The layer of salt on the brake discs and the
brake pads/linings may cause a delay in the
braking effect, resulting in a significantly lon-
ger braking distance, which could lead to an
accident.
To avoid this danger, you should:
R occasionally brake carefully, without put-
ting other road users at risk, when you are
driving on salted roads. This helps to remove any salt that may have started to
build up on the brake discs and the brake
pads/linings.
R maintain a greater distance to the vehicle
ahead and drive with particular care.
R carefully apply the brakes at the end of a
trip and immediately after commencing a
new trip, so that salt residues are removed
from the brake disc.
New brake pads/linings For safety reasons, Mercedes-Benz recom-
mends that you only have brake pads/linings
fitted to your vehicle which have been
approved for Mercedes-Benz vehicles or
which correspond to an equivalent quality
standard. Brake pads/linings which have not
been approved for Mercedes-Benz vehicles or
which are not of an equivalent quality could
affect your vehicle's operating safety.
G
Risk of accident
New brake pads/linings only reach their opti-
mum braking effect after several hundred kil-
ometres of driving. Before this optimum brak-
ing effect is reached, you should compensate
for the reduced braking effect by applying
greater pressure when braking. This also
applies after the brake discs or the brake
pads/linings have been replaced.
High-performance brake system for
AMG vehicles The high-performance brake system is
designed for heavy loads. Braking can there-
fore cause noises. This will depend on:
R
speed
R braking force
R environmental conditions, such as temper-
ature and humidity
The wear of individual components of the
brake system, such as the brake pads/linings
or brake discs, depends on the individual driv-
ing style and operating conditions. 232
Driving tipsOperation
212_AKB; 2; 4, en-GB
mkalafa,
Version: 2.11.8.1 2009-05-05T14:17:16+02:00 - Seite 232
Dateiname: 6515346702_buchblock.pdf; erzeugt am 07. May 2009 14:16:58; WK
Page 259 of 373

Display messages
Possible causes/consequences and
X
X Solutions DISTRONIC
PLUS - - - km/h
A condition for activating Distronic Plus
*has not been met or
the system is outside the operating temperature range.
X Close the bonnet and the driver's door.
X Vehicles with a selector lever: move the selector lever to
D.
Vehicles with a DIRECT SELECT lever*: move the automatic
transmission to D.
X If conditions permit, drive faster than 30 km/h and switch
on Distronic Plus* again.
X Activate ESP ®
.
X Wait until the system is in the operating temperature range. DISTRONIC
PLUS and
SPEED‐
TRONIC inopera‐
tive
Distronic Plus* and Speedtronic are faulty. A warning tone
also sounds.
X
Visit a qualified specialist workshop. Speed
Limit
Assist currently
unavaila‐
ble See
Owner's
Manual
Speed Limit Assist* is deactivated and temporarily inopera-
tive, if:
R
the windscreen is dirty in the camera’s field of vision.
R visibility is impaired due to heavy rain, snow, spray or fog.
Speed Limit Assist* is operational again and the display mes-
sage disappears when:
R the dirt (e.g. slush) drops away while you are driving.
R the system detects that the camera is fully operational
again.
If the display message continues to be shown:
X Clean the windscreen (Y page 242).Speed
Limit
Assist: Unavaila‐
ble in
this coun‐
try
Speed Limit Assist* is only available in certain countries.
X
Drive on.
Speed Limit Assist *is available again as soon as you drive
into a country in which its use is approved. Speed
Limit
Assist inopera‐
tive
Speed Limit Assist* has failed.
X
Visit a qualified specialist workshop. 256
Display messagesPractical advice
* optional
212_AKB; 2; 4, en-GB
mkalafa,
Version: 2.11.8.1 2009-05-05T14:17:16+02:00 - Seite 256
Dateiname: 6515346702_buchblock.pdf; erzeugt am 07. May 2009 14:17:08; WK