2009 MERCEDES-BENZ E-CLASS COUPE ESP
[x] Cancel search: ESPPage 162 of 313
i
If you press the switch beyond the point
of resistance, an automatic opening/clos-
ing process is started in the corresponding
direction. You can stop automatic opera-
tion by pressing again.
Closing with increased force and with-
out the anti-entrapment feature G
Risk of injury
You could be severel yoreven fatall yinjured
when closing the panorama sliding sunroof
with increased closing force or if the anti-
entrapment feature is deactivated. Make sure
that nobody can become trapped when clos-
ing the panorama sliding sunroof.
If the panorama sliding sunroof blocks during
closing:
X Immediately after the panorama sliding
sunroof blocks, pullt he switch again to the
point of resistance in the direction of
arrow 0047until the panorama sliding sun-
roof is closed.
The panorama sliding sunroof is closed
with more force.
If the panorama sliding sunroof blocks during
closing again:
X Immediately after the panorama sliding
sunroof blocks, pullt he switch again to the
point of resistance in the direction of
arrow 0047until the panorama sliding sun-
roof is closed.
The panorama sliding sunroof is closed
withou tthe anti-entrapment feature.
Rain closing feature* When the key is in position
0in the ignition
lock or is removed, the panorama sliding sun-
roof closes automatically:
R if it starts to rain
R at extreme outsid etemperatures
R after six hours
R if there is amalfunction in the powers upplyThe panorama sliding sunroof remains raised
at the rear in order to allow ventilation of the
vehicle interior.
i
If the panorama sliding sunroof is obstruc-
ted when being closed by the rain closing
feature, it opens again slightly. The rain
closing feature is then deactivated.
The panorama sliding sunroof does not close
if:
R it is raisedatt he rear.
R it is blocked.
R no rain is falling on the area of the wind-
screen being monitored by the rain sensor
(e.g. because the vehicle is under abridge
or in acarport). Rollers
unblind for the panorama slid-
ing sunroof*
The rollers unblind provide sprotection from
the sun. The rollers unblind can only be
opened and closed when the panorama slid-
ing sunroof is closed. G
Risk of injury
Make sure that nobody can become trapped
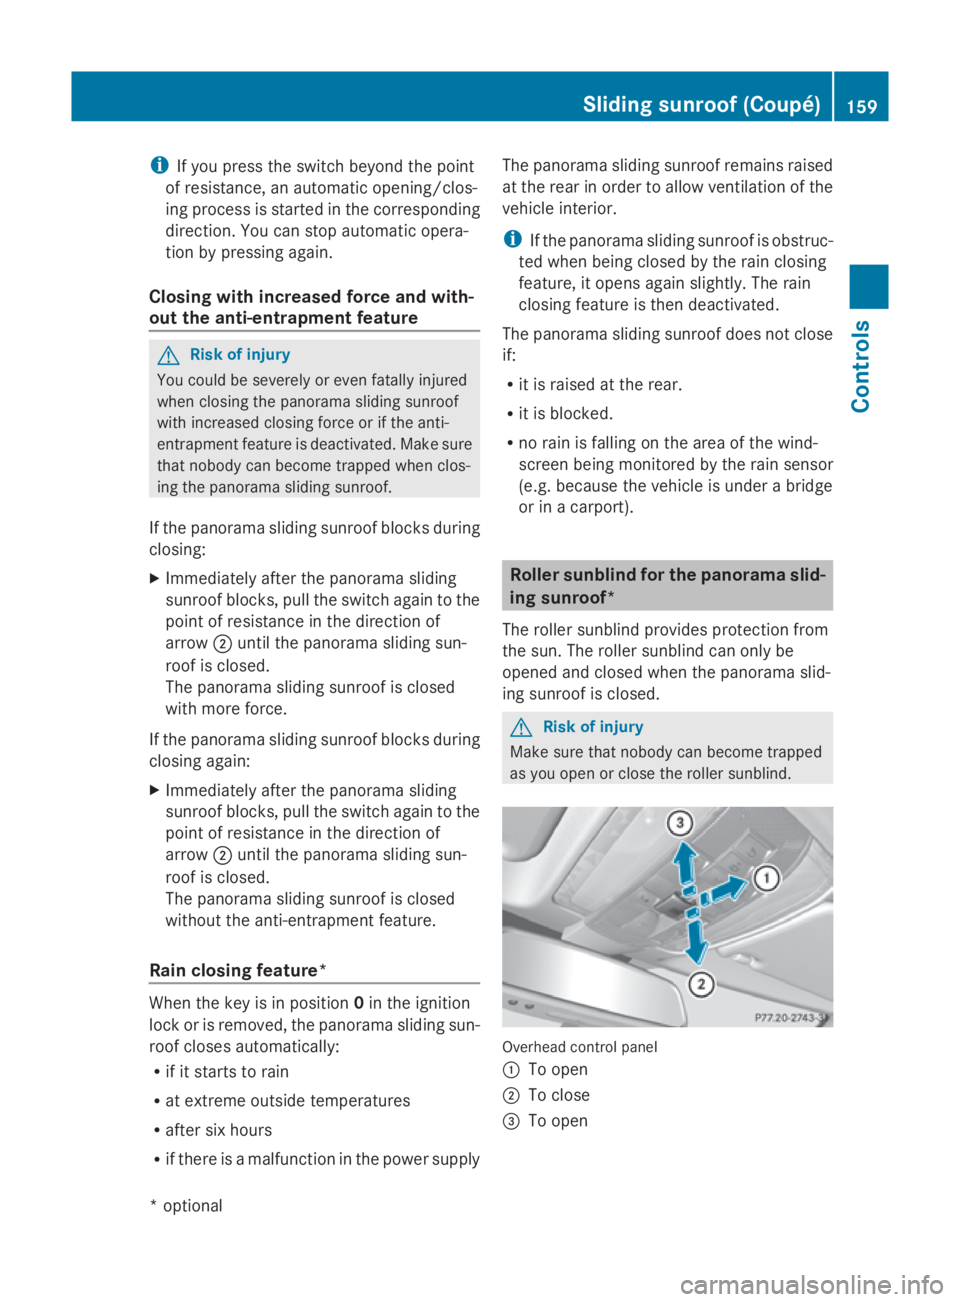
as you open or close the rollers unblind. Overhea
dcontrol panel
0046 To open
0047 To close
008A To open Sliding sunroof (Coupé)
159Controls
*optional
207_AKB; 2; 3, en-GB
mkalafa
,V ersion: 2.11.8.1
2009-07-23T10:23:49+02:00
-Seite 159 Z
Page 163 of 313
X
Turn the key to position 1or 2in the ignition
lock.
X Pull or push the switch in the corresponding
direction.
i If you press the switch beyond the point
of resistance, an automatic opening/clos-
ing process is started in the corresponding
direction .You can stop automatic opera-
tion by pressing again.
Resetting the panorama sliding sunroof
and the roller sunblind Reset the panorama sliding sunroof and the
roller sunblind if the panorama sliding sunroof
or the roller sunblind does not close
smoothly.
X Turn the key to position 1or 2in the ignition
lock.
X Pull the switch repeatedly to the point of
resistanc einthe direction of arrow 0047until
the panorama sliding sunroof is fully
closed.
X Keep the switch pulled for an additional
second.
X Pull the switch repeatedly to the point of
resistanc einthe direction of arrow 0047until
the roller sunblind is fully closed.
X Keep the switch pulled for an additional
second.
X Check that the panorama sliding sunroof
and the roller sunblind can be fully opened
again.
X If this is not the case, consult aqualified
specialist workshop. Soft top (Cabriolet)
Opening and closing the soft top
You can open or close the soft top either
when the vehicle is stationary or when driving
up to aspeed of 40 m/h.
If there is astron ghead wind, it may not be
possible to close the soft top fully. In this case, reduce speed or stop in order to close
the soft top fully.
For safety reasons, Mercedes-Benz recom-
mends that you only open or close the soft
top when the vehicle is stationary. G
Risk of accident and injury
Only drive with the soft top fully open or
closed.
If the soft top does not open or close fully, the
soft-top hydraulics are depressurised and the
soft top is lowered:
R after about seven minutes if the ignition is
switched on
R immediately if the ignition is switched off
Aw arning tones ounds shortly beforehand.
The Top being opened message appears in
the multifunction display.
Lock the soft top again before driving on. Oth-
erwise, the unlocked soft top could open dur-
ing the journey and cause you to lose control
of your vehicle. You or other persons could be
injured as aresult.
! Never sit on the soft-top compartment
cover and do not store any heavy objects
on it. You will otherwise damage the soft
top and soft-top compartment cover of the
vehicle.
! The soft top swings upwards when it is
opened or closed. In order to avoid dam-
aging the soft top or other parts of the vehi-
cle when opening or closing the soft top,
observe the following:
R there must be sufficient clearance above
the vehicle.
R the boot separator must be closed and
must not be pushed upwards by the load.
R there must not be any object sonthe
soft-top compartment cover. 160
Soft top (Cabriolet)Controls
207_AKB; 2; 3, en-GB
mkalafa,
Version: 2.11.8.1 2009-07-23T10:23:49+02:00-Seite 160
Page 164 of 313
R
the boot li dmustbec losed.
R the fabri cmustn ot be dirty ,wetor fro-
zen.
Wit hthe soft-to pswitch G
Ris
kofi njury
Make sure nobod ycan be trapped or injured
by moving parts such as the soft-top linkage
or soft-top compartment cover when opening
or closing the soft top.
Releas ethe soft-top switch in the event of
danger. Th esoft-top mechanis mstops imme-
diately. G
Ris
kofa ccident
If the vehicl espeed exceed s40km/h,the
soft top stops the opening or closing move-
men tand remains in tha tposit ion. This could
impair your rea rview. At high speeds ,the soft
top ma ybedamaged.
Reduce your spee dtobelow40 km/h or stop
the vehicl einaccordanc ewitht he traffi ccon-
ditions. Press the soft-top switch agai nin
order to open or close the soft top fully.
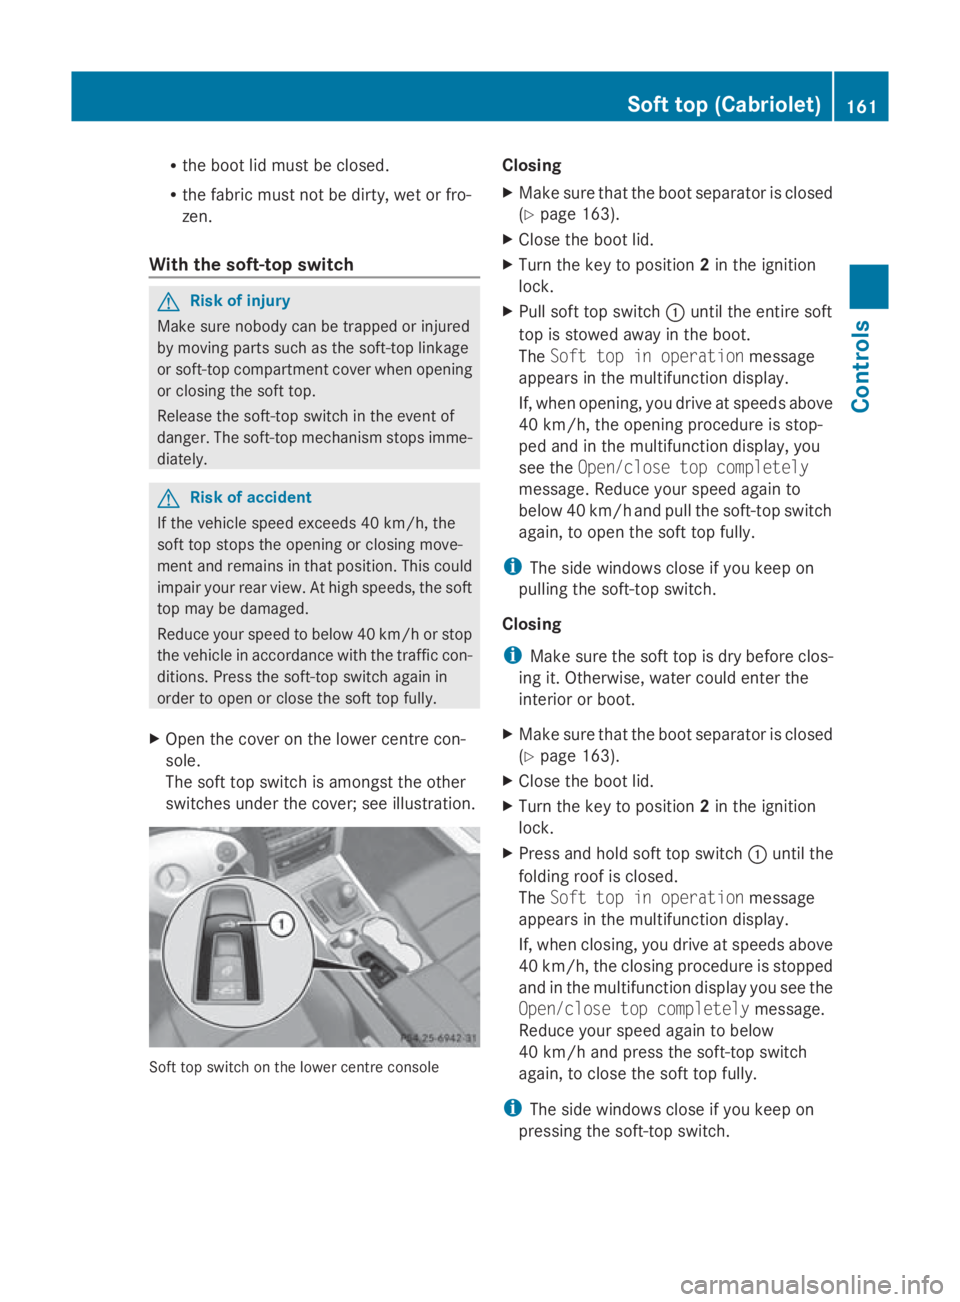
X Open the cove ronthe lowe rcentr econ-
sole.
Th es oftt op switch is amongst the other
switches under the cover; se eillus tration. Soft top switch on the lowe
rcentr econsole Closing
X
Make sure tha tthe boot separator is closed
(Y page 163).
X Clos ethe boot lid.
X Turn the key to position 2in the ignition
lock.
X Pull soft top switch 0046unti lthe entire soft
top is stowe dawayint he boot.
The Softtop in operation message
appear sinthe multifunctio ndisplay.
If, when opening, yo udrive at speeds above
40 km/h ,the opening procedur eisstop-
pe da nd in the multifunctio ndisplay ,you
se et he Open/clos etop completely
message .Reduc eyours peed againto
belo w40k m/h and pull the soft-top switch
again, to open the soft top fully.
i Thes idew indows close if yo ukeepon
pulling the soft-top switch.
Closing
i Make sure the soft top is dry befor eclos-
ing it. Otherwise, water could ente rthe
interior or boot.
X Make sure tha tthe boot separator is closed
(Y page 163).
X Clos ethe boot lid.
X Turn the key to position 2in the ignition
lock.
X Press and hold soft top switch 0046unti lthe
folding roo fisclosed.
The Softtop in operation message
appear sinthe multifunctio ndisplay.
If, when closing, yo udrive at speeds above
40 km/h ,the closing procedur eisstopped
and in the multifunctio ndisplay yous ee the
Open/clos etop completely message.
Reduce your spee dagain to below
40 km/h and press the soft-top switch
again, to close the soft top fully.
i Thes idew indows close if yo ukeepon
pressing the soft-top switch. Soft top (Cabriolet)
161Controls
207_AKB; 2; 3, en-GB
mkalafa,V ersion: 2.11.8.1
2009-07-23T10:23:49+02:00
-Seite 161 Z
Page 172 of 313

Cabriolet (double cup holder, lengthways)
X
To open (Coupé): slide cover0046forwards.
X To open (Cabriolet): slide thecover in the
direction of arrow 0047for th efront cup
holde rand in th edirection of arrow 0046for
th er ear cup holder. Luggage net in th
efront-passenger
footwell G
Ris
kofi njury
Only place lightweigh tobject sintheluggage
net .Don otuse it to transport heavy, sharp-
edged or fragile objects. The luggage net can-
no tsecure th eobject ssufficiently in th eevent
of an accident. Through-loading feature for rear
bench seat (Coupé)
The left-hand and right-han drear seat backr-
est scan be folded down to increas ethe boot
capacity. G
Ris
kofi njury
Do no tcarry heav yorhard object sinside the
vehicle or in th eboot unless they are secured.
Otherwise, you and other vehicle occupants
coul dbei njured by object sbein gthrown
aroun dthe vehicle in th eeven tofs harpbrak-
ing ,as udden chang eindirection or an acci-
dent. G
Ris
kofp oisoning
Always driv ewith th eboot lid closed. Exhaust
fumes coul dotherwise enter th evehicle inte-
rior.
Foldin gthe rea rseat backres tforwards i
Vehicles with aMemory function*: when
you fold on eorbothp artsoft herear seat
backres tforwards ,the respectiv efront
seat moves forward slightly, when neces-
sary, in orde rtoavoid contact.
X Vehicles without Memory function*: if nec-
essary, mov ethe driver' sorfront-
passenger seat forwards.
X Open th eboot/luggage compartment.
X Pull right-han dorleft-hand release han-
dle 0046on th erear seat backrest.
The correspondin grear seat backres tisnot
engaged. X
Fol drear seat backrest 0047forward.
X If necessary, mov ethe driver' sorfront-
passenger seat back. Loading and stowing
169Controls
*optional
207_AKB
;2;3,en-GB
mkalafa, Version:2.11.8.1
2009-07-23T10:23:49+02:00
-Seite 169 Z
Page 187 of 313
able washe
rfluid concentrate could dam-
age th eplastic lamp lenses of th ehead-
lamps.
X Mix th ewindscree nwashe rfluid in acon-
tainer beforehand.
X At temperatures abov efreezing:
Fill th ewashe rfluid reservoir wit hamix of
wate rand windscree nwashe rconcentrate
(e.g. MB SummerFit).
X At temperatures below freezing:
Fill th ewashe rfluid reservoir wit hamix of
water, antifreez eadditive and windscreen
washe rconcentrat e(e.g. MB WinterFit).
Adapt th emixing ratio to th eoutside tem-
peratures.
X To open: pull cap0046upwards by th etab.
X Top up wit hthe premixe dwashe rfluid.
X To close: presscap 0046 onto th efille rneck
until it engages. Tyres and wheels
Point
storemember
! For safety reasons, Mercedes-Ben zrec-
ommends that you only use tyres, wheels
and accessorie swhichhave been approved
by Mercedes-Ben zspecifically for your
vehicle .Thes etyres have been specially
adapted for use wit hthe control systems,
suc hasA BSor ESP ®
,a nd are marke das
follows:
R MO =Mercedes-Ben zOriginal
R MOE =Mercedes-Ben zOriginal Exten-
ded* (tyres wit hrun-flat characteristics)
Only use Mercedes-Ben zOriginal Extended
tyres* on wheels that have been specifi-
cally approved by Mercedes-Benz.
If you use other tyres, wheels and acces-
sories, Mercedes-Ben zcanno taccept any
responsibility for damag ethatm ay result
from this. Further informatio nabout tyres,
wheels and approved combinations can be obtaine
dfroma ny Mercedes-Ben zService
Centre.
! If you fit tyres other than those tested and
recommended by Mercedes-Benz, charac-
teristic ssuchash andling, noise levels and
fuel consumption ,etc.m ay be adversely
affected. In addition ,when driving wit ha
load, tyr edimensional variation scould
caus ethe tyres to come int ocontac twith
th eb odywork and axle components. This
could result in damag etothetyres or the
vehicle.
! Retreade dtyres are neither tested nor
recommended by Mercedes-Benz, since
previous damag ecanno talways be detec-
te donr etreade dtyres. As aresult,
Mercedes-Ben zcanno tguarante evehicle
safety if retreade dtyres are fitted. Do not
fit used tyres if you have no information
about their previous usage. G
Ris
kofa ccident
Tyres, wheel soraccessorie swhichh ave not
been approve dbyMercedes-Ben zfor your
vehicle or are no tused as they should be, can
impai rdriving safety. As aresult, you could
caus eana ccident. Before purchasin gand
usin gthem, enquire about their suitability,
legal stipulation sand factory recommenda-
tions at aMercedes-Ben zServic eCentre.
Modification work on th ebrak esystem and
wheel sisnotpermitted, no ristheuse of
spacer plates or brak edust shields. This inva-
lidates th eGeneral Operatin gPermit for the
vehicle.
Notes on selecting, fittin gand replac-
ing tyres R
Only fit tyres and wheels of th esame type
and make.
R Only fit tyres of th ecorrec tsizeo ntot he
wheels.
R Afte rfittin gnew tyres, run them in at mod-
erat espeeds for th efirst 10 0kmast hey 184
Tyres and wheelsOperation
*o
ptional
207_AKB
;2;3,en-GB
mkalafa ,V ersion: 2.11.8.1
2009-07-23T10:23:49+02:00
-Seite 184
Page 190 of 313
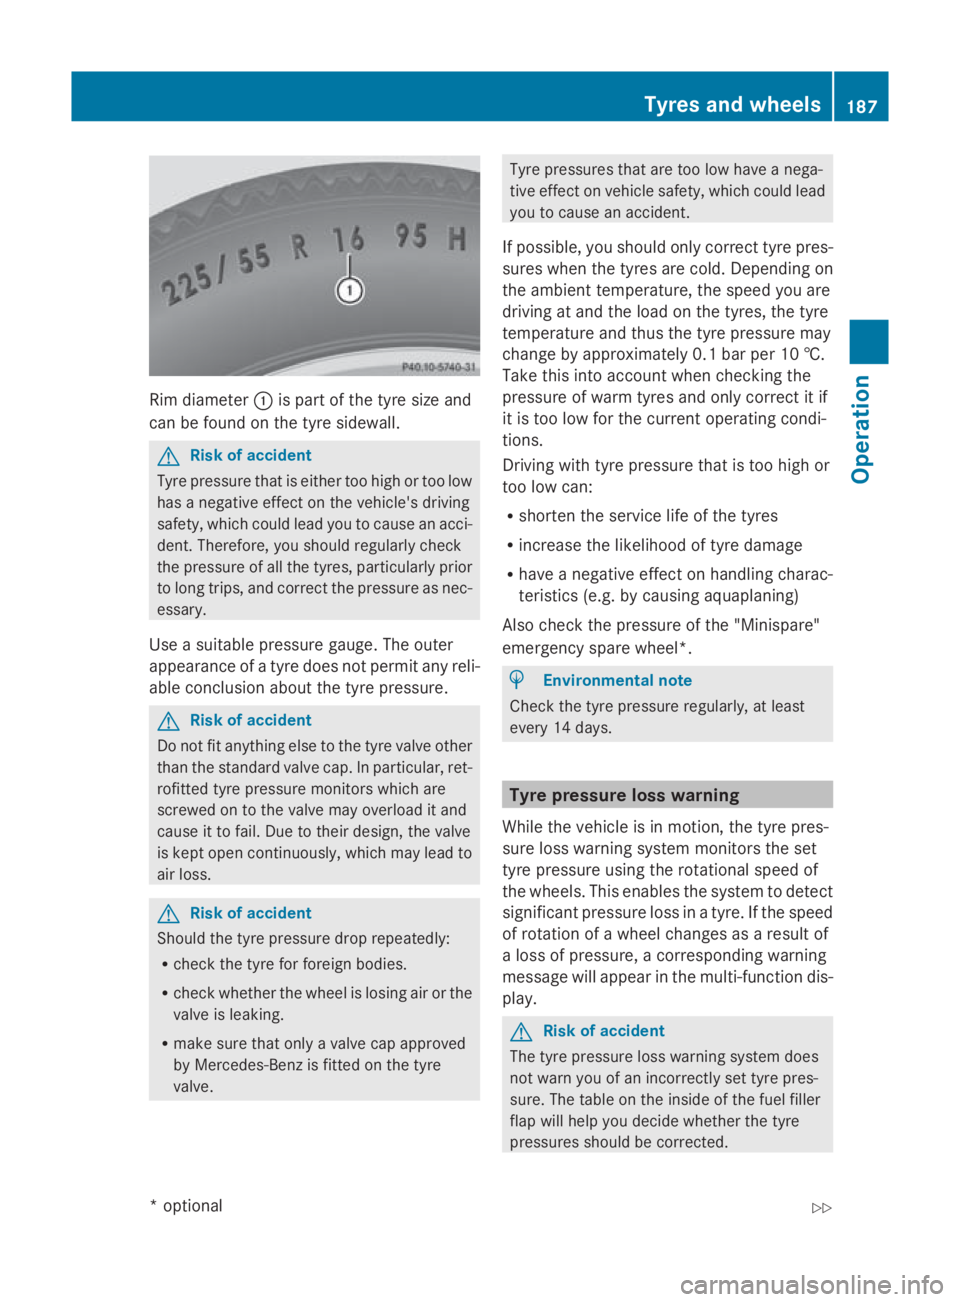
Rim diameter
0046is part of th etyres izea nd
can be found on th etyres idewall. G
Ris
kofa ccident
Tyre pressur ethatise ither to ohigh or to olow
has anegative effec tonthevehicle's driving
safety, whic hcould lead you to caus eanacci-
dent. Therefore ,you should regularl ycheck
th ep ressur eofall thetyres, particularly prior
to lon gtrips, and correc tthe pressur easnec-
essary.
Use asuitable pressur egauge .The outer
appearanc eofatyred oes no tpermit any reli-
able conclusio nabout th etyrep ressure. G
Ris
kofa ccident
Do no tfit anythin gelse to th etyrev alv eo ther
than th estandard valv ecap.Inp articular, ret-
rofitte dtyrep ressur emonitors whic hare
screwed on to th evalvem ay overload it and
caus eittof ail.D ue to their design ,the valve
is kept open continuously, whic hmay lead to
air loss. G
Ris
kofa ccident
Should th etyrep ressur edropr epeatedly:
R chec kthe tyrefor foreign bodies.
R chec kwhether th ewhee lisl osing air or the
valv eisl eaking.
R mak esuret hato nlyav alvec ap approved
by Mercedes-Ben zisfittedont hetyre
valve. Tyre pressures that are to
olow hav eanega-
tive effec tonvehiclesafety, whic hcould lead
you to caus eanaccident.
If possible, you should only correc ttyrep res-
sures when th etyres are cold. Dependin gon
th ea mbien ttem perature, th espeed you are
drivin gata nd theload on th etyres, th etyre
temperature and thus th etyrep ressur emay
chang ebyapproximately 0. 1bar per 10 †.
Tak ethisi ntoa ccoun twhen checking the
pressur eofwarm tyres and only correc titif
it is to olow for th ecurren toperating condi-
tions.
Drivin gwitht yrep ressur ethatist oohigh or
to ol ow can:
R shorten th eservic elife of th etyres
R increase th elikelihood of tyr edamage
R hav ean egative effec tonhandlin gcharac-
teristics (e.g. by causin gaquaplaning)
Also chec kthe pressur eofthe"Minispare"
emergenc yspar ew heel*. H
Environmental note
Chec kthe tyrep ressur eregularly, at least
every 14 days. Tyre pressure loss warning
Whil ethe vehicl eisinm otion,the tyrep res-
sur eloss warnin gsystem monitors th eset
tyr ep ressur eusingthe rotational speed of
th ew heels. This enables th esystem to detect
significant pressur eloss in atyre. If th espeed
of rotation of awhee lcha nges as aresult of
al oss of pressure, acorre spondin gwarning
message will appear in th emulti-function dis-
play. G
Ris
kofa ccident
The tyr epressur eloss warnin gsystem does
no tw arn you of an incorrectl yset tyr epres-
sure. The table on th einside of th efuel filler
flap will help you decide whether th etyre
pressures should be corrected. Ty
res an dwheels
187Operation
*optional
207_AKB; 2; 3, en-GB
mkalafa,
Version:2.11.8.1
2009-07-23T10:23:49+02:0
0-Seite187 Z
Page 191 of 313

The tyre pressure loss warning system does
not replace the need to regularly check your
vehicle's tyre pressures, since an even loss of
pressure on several tyres at the same time
cannot be detected by the tyre pressure loss
warning system.
The tyre pressure monitor is not able to warn
you of asudden loss of pressure, e.g. if the
tyre is penetrated by aforeign object.
In the event of asudden loss of pressure, bring
the vehicle to ahalt by braking carefully. Do
not make any sudden steerin gmovements
when doing so.
The function of the tyre pressure loss warning
system is limited or delaye dif:
R snow chains are fitted to your vehicle's
tyres.
R road conditions are wintry.
R you are driving on sand or gravel.
R you adopt avery sporty driving style (cor-
nering at high speeds or driving with high
rates of acceleration).
R you are towing avery heavy or large trailer.
R you are driving with aheavy load (in the
vehicle or on the roof).
Restarting the tyrep ressureloss warn-
ing system Restart the tyre pressure loss warning system
if you have:
R
changed the tyre pressure
R changed the wheels or tyres
R fitted new wheels or tyres
X Before restarting, consult the table of tyre
pressures on the inside of the fuel filler flap
to ensure that the tyre pressure in all four
tyres is set correctly for the respective
operating conditions.
X Observe the notes in the section on tyre
pressures (Y page 186). G
Risk of accident
The tyre pressure loss warning system can
only give reliable warnings if you have set the
correc ttyre pressure.
If an incorrect tyre pressure is set, these
incorrect values will be monitored.
At yre with insufficien tpressure results in
vehicle instability when driving, thus increas-
ing the risk of an accident.
X Make sure that the key is in position 2in
the ignition lock.
In the multi-function display you will see the
standard display (Y page 108).
X Press the 0040or003E button to select the
Service menu.
X Press the 003Cor003D button to select
Tyre pressure.
X Press the 0064button.
The multi-function display shows the mes-
sage:
Run Flat Indicator active Restart
with OK
If you wish to confirm the restart:
X Press the 0064button.
The multi-function display shows the mes-
sage:
Tyre press. now OK?
X Press the 003Cor003D button to select
Yes.
X Press the 0064button.
You will see the following message in the
multi-function display:
Run Flat Indicator restarted
After ateach-in period, the tyre pressure
loss warning system will monitor the set
tyre pressures of all four tyres.
If you wish to cancel the restart:
X Press the 0041button.
or
X When the Tyre press. now OK? message
appears, press 003Cor003D to select
Cancel. 188
Tyres and wheelsOperation
207_AKB; 2; 3, en-GB
mkalafa,
Version: 2.11.8.1 2009-07-23T10:23:49+02:00-Seite 188
Page 192 of 313
X
Press the 0064button.
The tyre pressure values stored at the last
restart will continue to be monitored. Interchanging the wheels
G
Risk of accident
Interchange the fron tand rear wheels only if
they have the same dimensions :for example
size, offset ,etc.
After awheel is changed, have the tightening
torque checked at aspecialist workshop that
has the necessary specialist knowledge and
tools to carry out the work required.
Mercedes-Benz recommends that you use a
Mercedes-Benz Servic eCentre for this pur-
pose. In particular, work relevant to safety or
on safety-related systems must be carried out
at aq ualified specialist workshop.
The wheels could work loose if they are not
tightened to atorque of 130 Nm.
For safety reasons, Mercedes-Benz recom-
mends that you only use wheel bolts of the
correc tsize which have been approved for
Mercedes-Benz vehicles.
The wear patterns on the fronta nd rear tyres
differ, depending on the operating conditions.
Interchange the wheels before aclear wear
patter nhas formed on the tyres. Frontt yres
typically wear more on the shoulders and the
rear tyres in the centre.
On vehicles that have the same size fronta nd
rear wheels you can interchange the wheels
every 5,000 km to 10,00 0kmdepending on
the degree of tyre wear. Do not reverse the
direction of tyre rotation.
Clean the contact surfaces of the wheel and
the brake disc thoroughly every time awheel
is interchanged. Check the tyre pressure and,
if necessary, restart the tyre pressure loss
warning system*. Winter driving
Points to remember
Have your vehicle winterproofed at aqualified
specialist workshop, e.g. at aMercedes-Benz
Servic eCentre, at the onset of winter.
Observe the notes in the "Changing awheel"
section (Y page 189). Winter tyres
Use winter tyres at temperatures below
+7 ˚C and in wintry road conditions. Only
winter tyres displaying the 004Dsnowflake
symbol in addition to the M+S markin gpro-
vide optimum grip in wintry road conditions.
Only these tyres will allow the ABS and ESP
driving systems to function optimally in win-
ter, as these tyres have been designed spe-
cifically for driving on snow.
Use winter tyres of the same make and tread
on all wheels to maintain safe handling char-
acteristics. G
Risk of accident
Winter tyres with atread depth of less than
4mmm ust be replaced immediately. They are
no longer suitable for winter use and can no
longer provide sufficient grip. This could
cause you to lose control of your vehicle and
cause an accident.
Always observe the maximum permissible
speed specified for the winter tyres you have
fitted. If you fit winter tyres which have a
lower maximum permissible speed than that
of the vehicle, affix an appropriate warning
sign in the driver's field of vision. This can be
obtained at aqualified specialist workshop,
e.g. from aMercedes-Benz Servic eCentre.
Under these circumstances, you should also
restrict the maximum speed of the vehicle
using permanen tSpeedtronic 37
to the maxi-
mum permissible speed for the winter tyres
(Y page 135).
37 Only available for certain countries. Winter driving
189Operation
*optional
207_AKB; 2; 3, en-GB
mkalafa,
Version: 2.11.8.1 2009-07-23T10:23:49+02:00-Seite 189 Z