2009 MERCEDES-BENZ E-CLASS COUPE towing
[x] Cancel search: towingPage 170 of 313
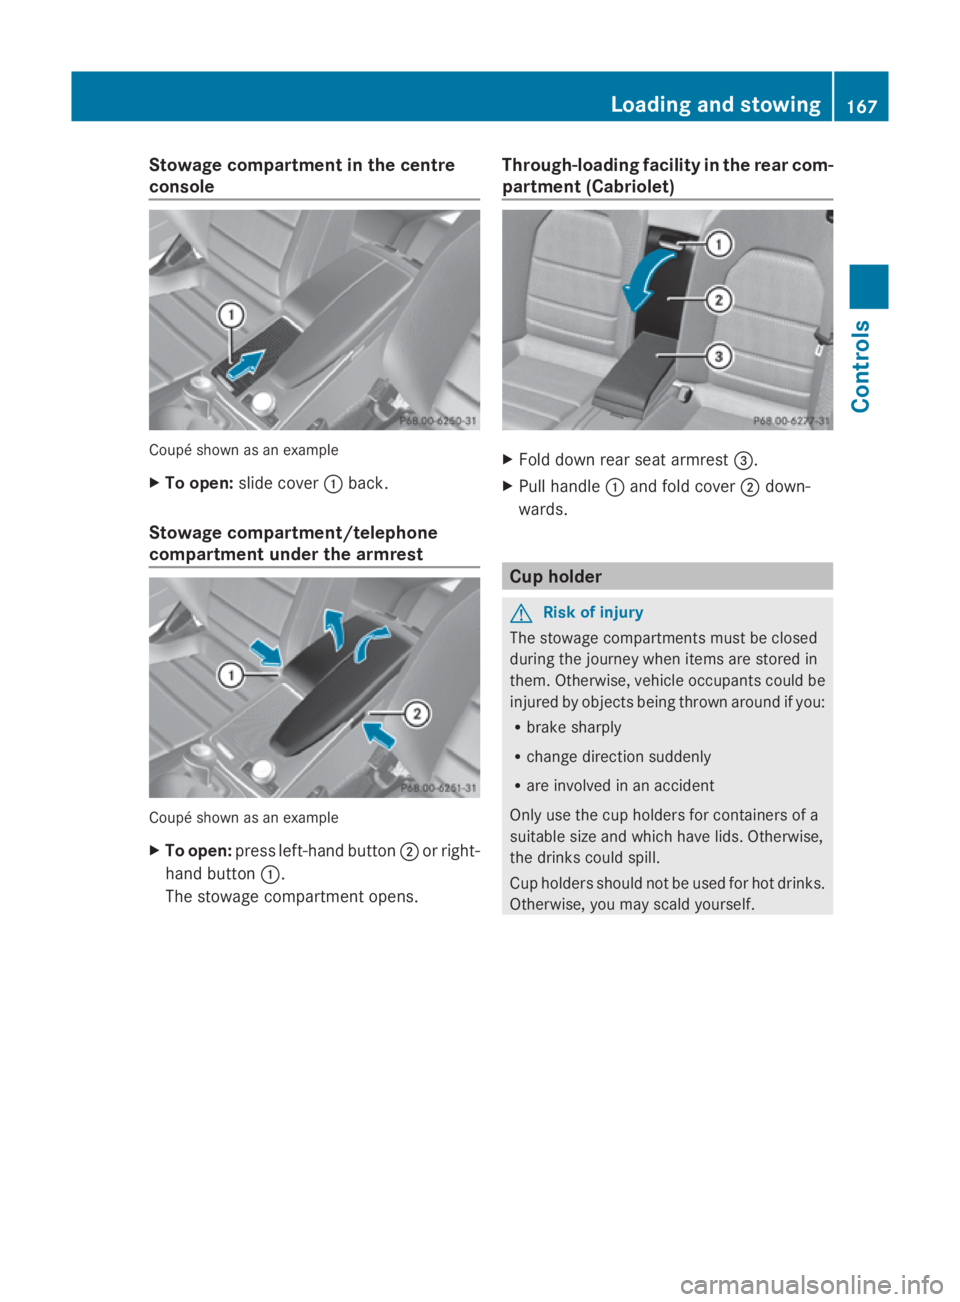
Stowage compartment in the centre
console Coupé shown as an example
X
To open: slide cover 0046back.
Stowage compartment/telephone
compartment under the armrest Coupé shown as an example
X
To open: press left-handb utton0047or right-
hand button 0046.
The stowage compartmen topens. Through-loading facility in the rear com-
partment (Cabriolet) X
Fold down rear seat armrest 008A.
X Pull handle 0046and fold cover 0047down-
wards. Cup holder
G
Risk of injury
The stowage compartments must be closed
during the journey when items are stored in
them. Otherwise, vehicle occupants could be
injured by objectsb eing thrown around if you:
R brake sharply
R change direction suddenly
R are involved in an accident
Only use the cup holders for containers of a
suitable size and which have lids. Otherwise,
the drinks could spill.
Cup holders should not be used for hot drinks.
Otherwise, you may scald yourself. Loading and stowing
167Controls
207_AKB; 2; 3, en-GB
mkalafa, Version: 2.11.8.1 2009-07-23T10:23:49+02:00-Seite 167 Z
Page 171 of 313
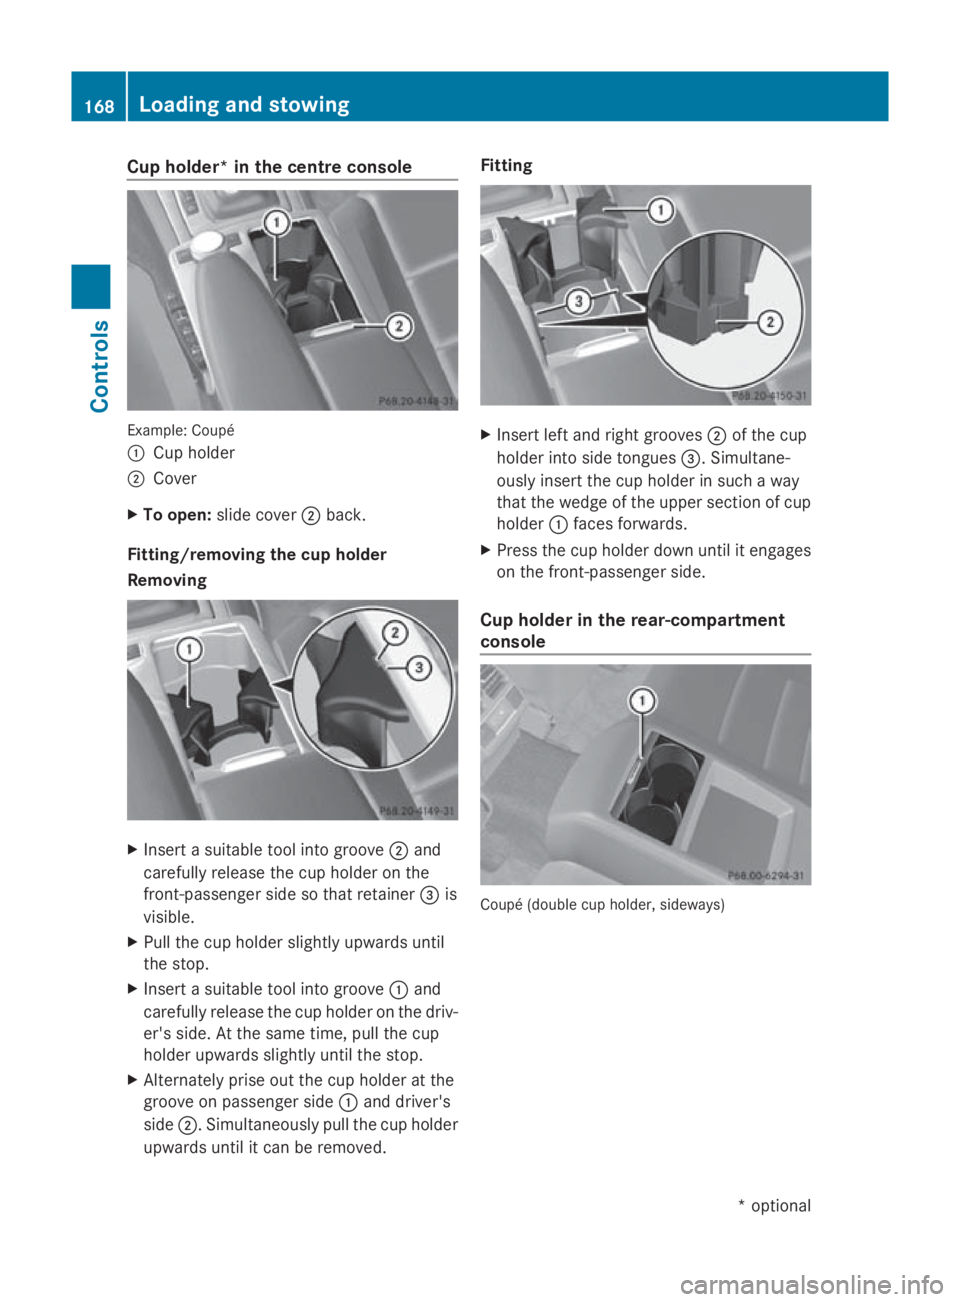
Cup holder* in th
ecentre console Example
:Coupé
0046 Cup holder
0047 Cover
X To open: slide cover 0047back.
Fitting/removing th ecup holder
Removing X
Inser tasuitable tool int ogroove 0047and
carefully release th ecup holde ronthe
front-passenger side so that retainer 008Ais
visible.
X Pull th ecup holde rslightly upwards until
th es top.
X Inser tasuitable tool int ogroove 0046and
carefully release th ecup holde ronthedriv-
er' ss ide. At th esame time, pull th ecup
holde rupwards slightly until th estop.
X Alternately pris eout th ecup holde ratthe
groove on passenger side 0046and driver's
side 0047.S imultaneously pull th ecup holder
upwards until it can be removed. Fitting
X
Inser tleft and righ tgrooves 0047of th ecup
holde rint os ide tongues 008A.Simultane-
ously insert th ecup holde rinsuchaw ay
that th ewedge of th eupper sectio nofcup
holder 0046faces forwards.
X Press th ecup holde rdown until it engages
on th efront-pa ssenger side.
Cup holder in th erear-compartment
console Coupé (doubl
ecup holder, sideways) 168
Loading and stowingControls
*o
ptional
207_AKB
;2;3,en-GB
mkalafa ,V ersion: 2.11.8.1
2009-07-23T10:23:49+02:00
-Seite 168
Page 172 of 313

Cabriolet (double cup holder, lengthways)
X
To open (Coupé): slide cover0046forwards.
X To open (Cabriolet): slide thecover in the
direction of arrow 0047for th efront cup
holde rand in th edirection of arrow 0046for
th er ear cup holder. Luggage net in th
efront-passenger
footwell G
Ris
kofi njury
Only place lightweigh tobject sintheluggage
net .Don otuse it to transport heavy, sharp-
edged or fragile objects. The luggage net can-
no tsecure th eobject ssufficiently in th eevent
of an accident. Through-loading feature for rear
bench seat (Coupé)
The left-hand and right-han drear seat backr-
est scan be folded down to increas ethe boot
capacity. G
Ris
kofi njury
Do no tcarry heav yorhard object sinside the
vehicle or in th eboot unless they are secured.
Otherwise, you and other vehicle occupants
coul dbei njured by object sbein gthrown
aroun dthe vehicle in th eeven tofs harpbrak-
ing ,as udden chang eindirection or an acci-
dent. G
Ris
kofp oisoning
Always driv ewith th eboot lid closed. Exhaust
fumes coul dotherwise enter th evehicle inte-
rior.
Foldin gthe rea rseat backres tforwards i
Vehicles with aMemory function*: when
you fold on eorbothp artsoft herear seat
backres tforwards ,the respectiv efront
seat moves forward slightly, when neces-
sary, in orde rtoavoid contact.
X Vehicles without Memory function*: if nec-
essary, mov ethe driver' sorfront-
passenger seat forwards.
X Open th eboot/luggage compartment.
X Pull right-han dorleft-hand release han-
dle 0046on th erear seat backrest.
The correspondin grear seat backres tisnot
engaged. X
Fol drear seat backrest 0047forward.
X If necessary, mov ethe driver' sorfront-
passenger seat back. Loading and stowing
169Controls
*optional
207_AKB
;2;3,en-GB
mkalafa, Version:2.11.8.1
2009-07-23T10:23:49+02:00
-Seite 169 Z
Page 173 of 313
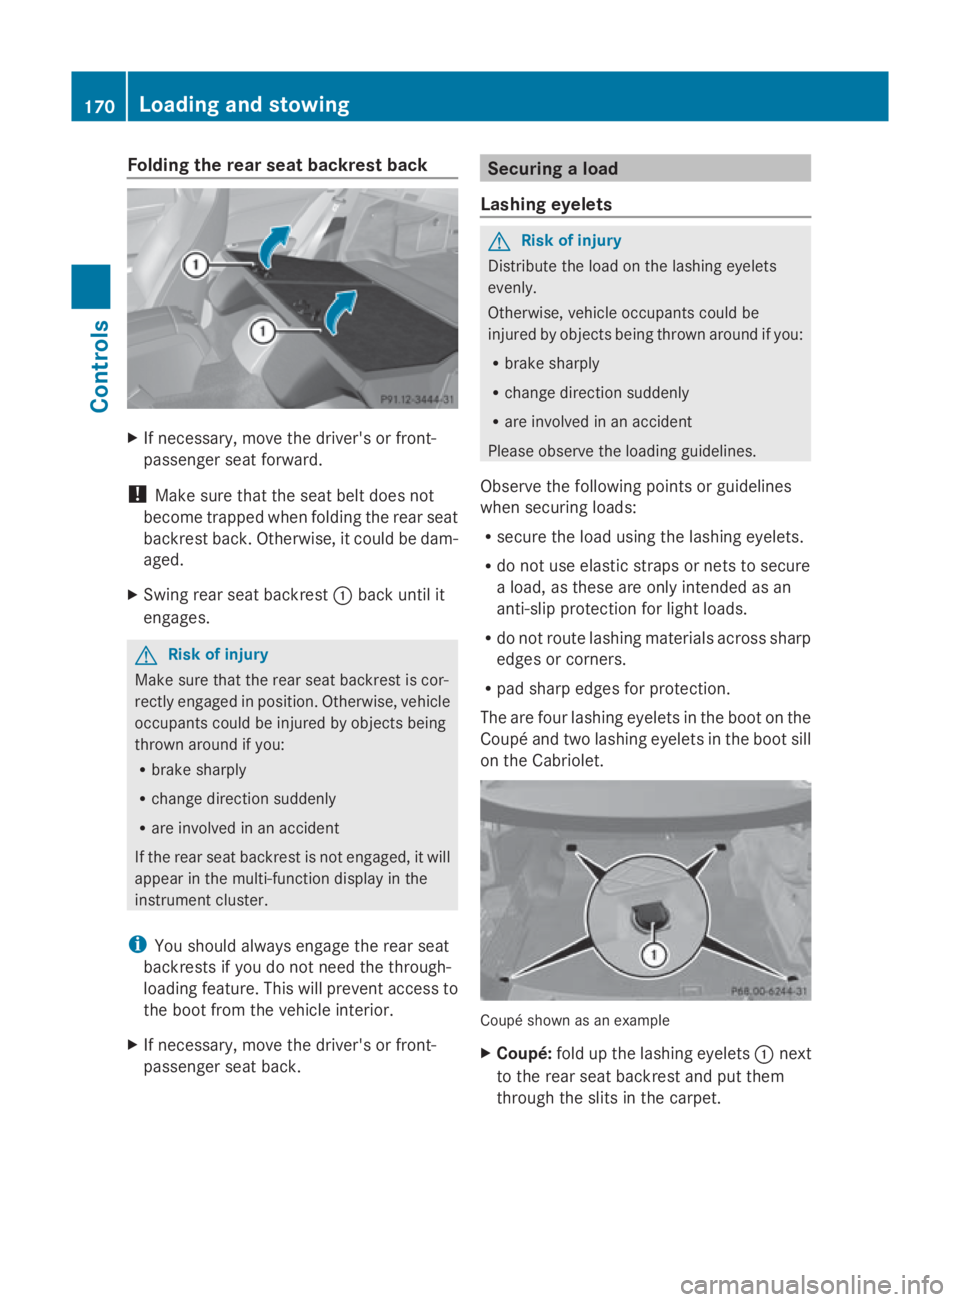
Folding th
erears eat backres tback X
If necessary, mov ethe driver' sorfront-
passenger seat forward.
! Mak esure that th eseat belt does not
become trapped when foldin gthe rear seat
backrest back. Otherwise, it could be dam-
aged.
X Swin grear seat backrest 0046bac kuntil it
engages. G
Ris
kofi njury
Mak esure that th erear seat backrest is cor-
rectl yengage dinp osition .Otherwise, vehicle
occupant scould be injured by object sbeing
thrown aroun difyou:
R brak esharply
R chang edirection suddenly
R are involved in an accident
If th erear seat backrest is no tengaged, it will
appear in th emulti-function display in the
instrumen tcluster.
i You should always engage th erear seat
backrest sifyou do no tneedt he through-
loadin gfeature. This will preven taccess to
th eb oot from th evehicl einterior.
X If necessary, mov ethe driver' sorfront-
passenger seat back. Securing
aload
Lashing eyelets G
Ris
kofi njury
Distribut ethe load on th elashing eyelets
evenly.
Otherwise, vehicl eoccupant scould be
injured by object sbein gthrown aroun difyou:
R brak esharply
R chang edirection suddenly
R are involved in an accident
Pleas eobserv ethe loadin gguidelines.
Observ ethe followin gpoints or guidelines
when securin gloads:
R secure th eload usin gthe lashing eyelets.
R do no tuse elastic straps or nets to secure
al oad, as these are only intended as an
anti-slip protection for light loads.
R do no trout elashing material sacross sharp
edge sorc orners.
R pad shar pedge sfor protection.
The are four lashing eyelet sintheboot on the
Coupé and two lashing eyelet sintheboot sill
on th eCabriolet. Coupé shown as an example
X
Coupé: foldupt helashing eyelets 0046next
to th erear seat backrest and put them
throug hthe slitsint hecarpet. 170
Loading and stowingCont
rols
207_AKB; 2; 3, en-GB
mkalafa,V ersion: 2.11.8.1
2009-07-23T10:23:49+02:00
-Seite 170
Page 174 of 313
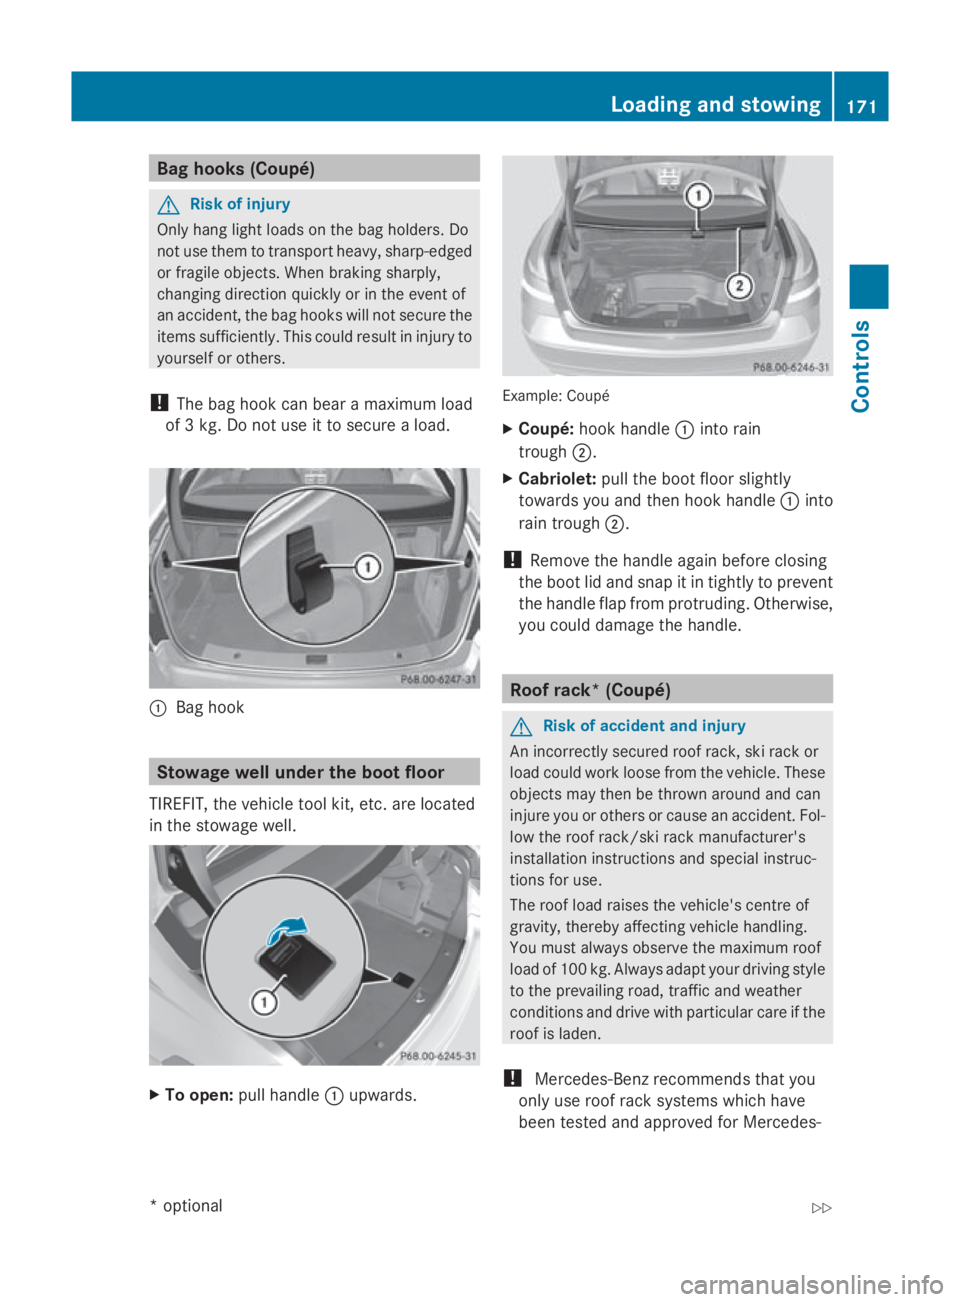
Bag hooks (Coupé)
G
Ris
kofi njury
Onl yhanglight load sonthe bagholders. Do
not us ethem to transport heavy ,sharp-edged
or fragile objects. Whe nbraking sharply,
changing direction quickl yorinthe event of
an accident, the ba ghooks will not secure the
items sufficiently .Thisc ould resul tininjury to
yoursel forothers.
! The ba ghookc an bear amaximu mload
of 3k g. Do not us eittosecureaload. 0046
Bag hook Stowage well unde
rthe boot floor
TIREFIT, the vehicl etool kit, etc. ar eloc ated
in the stowag ewell. X
To open: pull handle 0046upwards. Example: Coupé
X
Coupé: hookhandle 0046into rain
trough 0047.
X Cabriolet: pull the boot floor slightly
towards yo uand then hoo khandle 0046into
rain trough 0047.
! Remove the handl eagain before closing
the boot li dand sna pitint ightlytop revent
the handl eflapf rom protruding .Otherwise,
yo uc ould damage the handle. Roo
frack *(Co upé) G
Ris
kofa ccident and injury
An incorrectly secured roo frack, ski rac kor
load could work loose from the vehicle. These
objects ma ythen be thrown around and can
injure yo uorothers or cause an accident. Fol-
lo wt he roo frack/ski rac kmanufacturer's
installatio ninstructions and specia linstruc-
tions for use.
The roo floa dr aises the vehicle's centre of
gravity ,thereb yaffecting vehicl ehandling.
Yo um usta lway sobserve the maximu mroof
load of 100 kg. Alway sadapt your driving style
to the prevailing road, traffic and weather
conditions and drive with particula rcareift he
roo fisl aden.
! Mercedes-Benz recommends tha tyou
onl yuseroo frac ks ystem swhich have
been teste dand approved for Mercedes- Loadin
gand stowing
171Controls
*optional
207_AKB; 2; 3, en-GB
mkalafa,
Version: 2.11.8.1 2009-07-23T10:23:49+02:00-Seite 171 Z
Page 180 of 313
Running-i
nnotes ............................... 178
Refuelling ........................................... 178
Engine compartment ........................180
Tyres and wheels .............................. 184
Winter driving ................................... 189
Driving tips ........................................ 190
Driving abroad ................................... 192
Trailer towing* .................................. 193
Service ............................................... 197
Care .................................................... 198 177Operation
207_AKB
;2;3,en-GB
mkalafa, Version:2.11.8.1
2009-07-23T10:23:49+02:0
0-Seite 177
Page 191 of 313

The tyre pressure loss warning system does
not replace the need to regularly check your
vehicle's tyre pressures, since an even loss of
pressure on several tyres at the same time
cannot be detected by the tyre pressure loss
warning system.
The tyre pressure monitor is not able to warn
you of asudden loss of pressure, e.g. if the
tyre is penetrated by aforeign object.
In the event of asudden loss of pressure, bring
the vehicle to ahalt by braking carefully. Do
not make any sudden steerin gmovements
when doing so.
The function of the tyre pressure loss warning
system is limited or delaye dif:
R snow chains are fitted to your vehicle's
tyres.
R road conditions are wintry.
R you are driving on sand or gravel.
R you adopt avery sporty driving style (cor-
nering at high speeds or driving with high
rates of acceleration).
R you are towing avery heavy or large trailer.
R you are driving with aheavy load (in the
vehicle or on the roof).
Restarting the tyrep ressureloss warn-
ing system Restart the tyre pressure loss warning system
if you have:
R
changed the tyre pressure
R changed the wheels or tyres
R fitted new wheels or tyres
X Before restarting, consult the table of tyre
pressures on the inside of the fuel filler flap
to ensure that the tyre pressure in all four
tyres is set correctly for the respective
operating conditions.
X Observe the notes in the section on tyre
pressures (Y page 186). G
Risk of accident
The tyre pressure loss warning system can
only give reliable warnings if you have set the
correc ttyre pressure.
If an incorrect tyre pressure is set, these
incorrect values will be monitored.
At yre with insufficien tpressure results in
vehicle instability when driving, thus increas-
ing the risk of an accident.
X Make sure that the key is in position 2in
the ignition lock.
In the multi-function display you will see the
standard display (Y page 108).
X Press the 0040or003E button to select the
Service menu.
X Press the 003Cor003D button to select
Tyre pressure.
X Press the 0064button.
The multi-function display shows the mes-
sage:
Run Flat Indicator active Restart
with OK
If you wish to confirm the restart:
X Press the 0064button.
The multi-function display shows the mes-
sage:
Tyre press. now OK?
X Press the 003Cor003D button to select
Yes.
X Press the 0064button.
You will see the following message in the
multi-function display:
Run Flat Indicator restarted
After ateach-in period, the tyre pressure
loss warning system will monitor the set
tyre pressures of all four tyres.
If you wish to cancel the restart:
X Press the 0041button.
or
X When the Tyre press. now OK? message
appears, press 003Cor003D to select
Cancel. 188
Tyres and wheelsOperation
207_AKB; 2; 3, en-GB
mkalafa,
Version: 2.11.8.1 2009-07-23T10:23:49+02:00-Seite 188
Page 194 of 313
Brakes
G
Ris
kofa ccident
Do not change down for additional engine
braking on aslipper yroads urface. Thi scould
cause the drive wheels to lose thei rgripa nd
the vehicl ecould skid. G
Ris
kofa ccident
Make sure tha tothe rroa du sers are not
endangere dbyyourb raking.
Downhil lgradients On long and stee
pdownhil lstretches ,espe-
ciall yift he vehicl eisladen or towing atrailer,
yo um usts hift to alower gearing oodtime or,
on vehicles with automatic transmission*,
select shift range 1,2or 3.
i Thisalsoa pplies if youhavea ctivated
cruis econtrol, SPEEDTRONIC or DIS-
TRONIC PLUS*.
Thi sw illu se the braking effect of the engine,
so less braking will be required to maintain
the speed .Thisr elieves the load on the brake
system and prevents the brakes from over-
heating and wearing too quickly. If yo uneed
additional braking ,depress the brake pedal
repeatedly rather tha ncontinuously.
Heavy and light loads If the brakes have been subjected to
aheavy
load ,don ot stop the vehicl eimmediately, but
drive on for ashort while. Thi sallow sthe air-
flo wtoc oolthe brakes more quickly. G
Ris
kofa ccident
Never depress the brake peda lcontinuously
whil ethe vehicl eisinmotion, e.g .neve rcause
the brakes to ru bbyapplyingconstant slight
peda lpressure. Thi scauses the brake system
to overheat, increases the braking distance
and can lead to the brakes failing completely.
If the brakes have been used onl ymoderately,
yo us houl doccasionall ytest thei reffective-
ness .Todot his, brake more firmly from a highe
rspeed .Thisi mprove sthe gri pofthe
brakes.
Wet roads If driving in heavy rain for
aprolonged period
of time withou tbraking ,ther em aybe a
delaye dreactio nfrom the brakes when brak-
ing for the first time .Thism ayalso occu rafter
the vehicl ehasbeen washed.
Yo uh avetod epress the brake peda lmore
firmly .Maintain agreate rdistance from the
vehicl einfront.
After driving on awetroa dorh aving the vehi-
cle washed, brake firmly whil epayin gatten-
tio ntot he traffic conditions. Thi swaythe
brake discs will become warm, drying more
quickly, which will protect them against cor-
rosion.
Limite dbraking performanc eonsalt
treate droads G
Ris
kofa ccident
The laye rofsaltont he brake discs and the
brake pads/lining smaycause adelay in the
braking effect, resulting in asignificantly lon-
ger braking distance, which could lead to an
accident.
To avoid thi sdanger ,you should:
R occasionall ybrake carefully, withou tput-
ting othe rroa du sers at risk, when yo uare
driving on salte droads. Thi shelps to
remove any salt tha tmayhave started to
buil dupont he brake discs and the brake
pads/linings.
R maintain agreate rdistance to the vehicle
ahea dand drive with particula rcare.
R carefull yapply the brakes at the end of a
trip and immediatel yaftercommencing a
new trip ,sothats altr esidue sare removed
from the brake discs. Driving tips
191Operation
*optional
207_AKB; 2; 3, en-GB
mkalafa,
Version: 2.11.8.1 2009-07-23T10:23:49+02:00-Seite 191 Z