2009 MERCEDES-BENZ CL COUPE window
[x] Cancel search: windowPage 203 of 421
Side windows
Opening and closing the side win-
dows G
Risk of injury
When opening the side windows, make sure
that nobody can become trapped between the
side window and the door frame. Keep clear
of the side window during the opening proce-
dure. Otherwise, you could be drawn in or
trapped between the side window and the
door frame by the downwards movement of
the window. If there is a risk of becoming
trapped, release the switch or pull it upwards
to close the side window again. G
Risk of injury
Make sure that nobody can become trapped
as you close a hinged window. If there is a risk
of becoming trapped, release the switch or
press it again to open the side window again. G
Risk of injury
Children may injure themselves if they oper-
ate the side windows.
Never leave children unsupervised in the vehi-
cle. Always take the key with you when leaving
the vehicle, even if you are only leaving it for
a short time. G
Risk of injury
Do not leave children unsupervised in the
vehicle, even if they are secured in a child
restraint system. The children could:
R be seriously or even fatally injured on parts
of the vehicle
R be seriously or even fatally injured by pro-
longed exposure to extremely high or
extremely low temperatures
If children open a door, they could:
R seriously or even fatally injure other people
R get out of the vehicle and injure them-
selves, or be seriously or even fatally
injured by a passing vehicle Activate the override feature if children are
travelling in the vehicle. They could otherwise
open side windows while the vehicle is in
motion and thereby injure themselves or oth-
ers.
i Related topics:
R convenience opening from the out-
side (Y page 201) or from the inside
(Y page 269)
R convenience closing from the out-
side (Y page 201) or from the inside
(Y page 269)
R disabling the controls in the rear com-
partment (override feature) (Y page 48)
R automatic closing of the front side win-
dows (PRE-SAFE ®
) (Y page 42) :
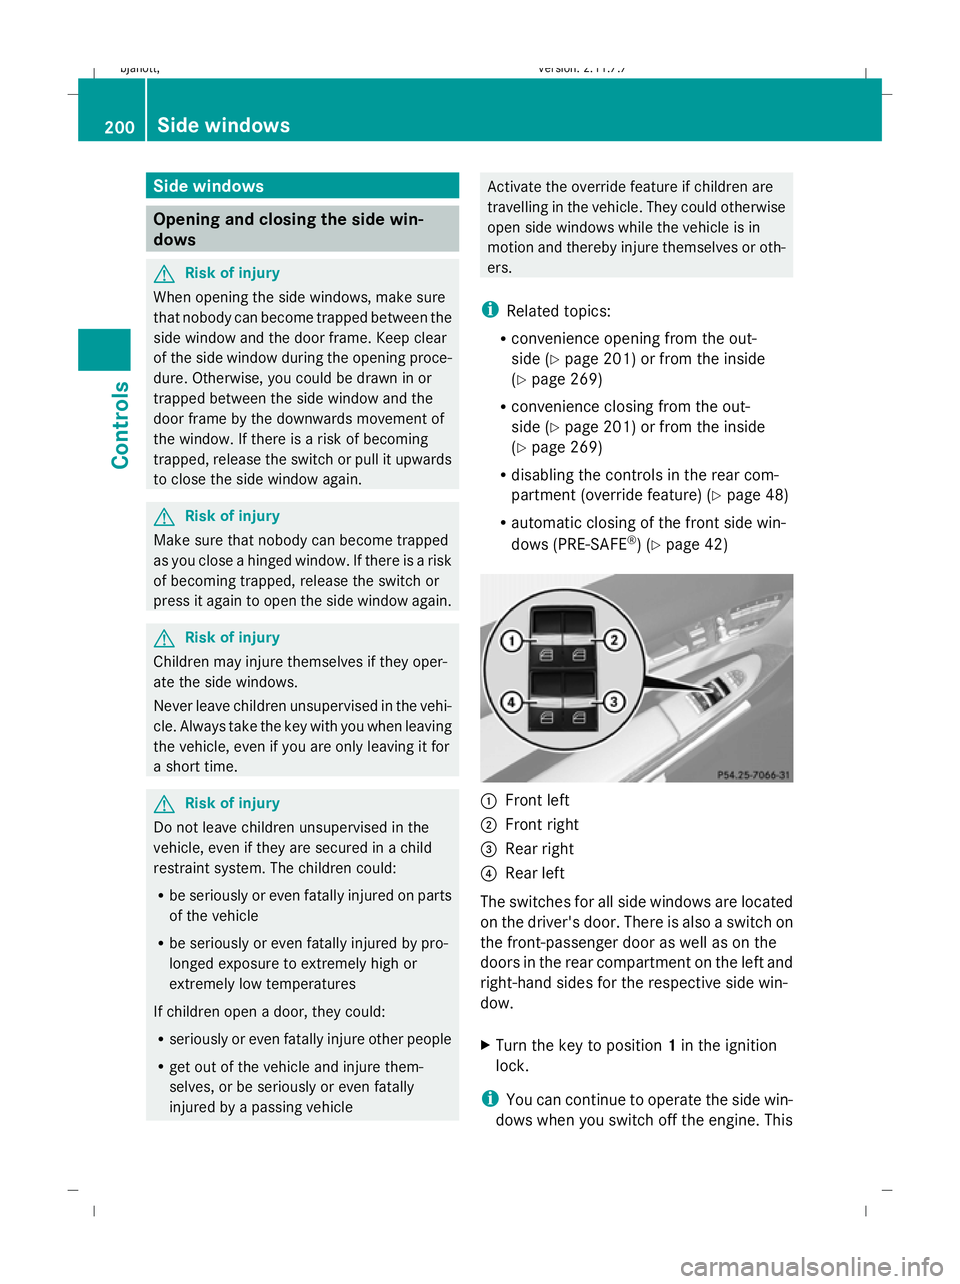
Front left
; Front right
= Rear right
? Rear left
The switches for all side windows are located
on the driver's door. There is also a switch on
the front-passenger door as well as on the
doors in the rear compartment on the left and
right-hand sides for the respective side win-
dow.
X Turn the key to position 1in the ignition
lock.
i You can continue to operate the side win-
dows when you switch off the engine. This 200
Side windowsControls
216_AKB; 2; 3, en-GB
bjanott,
Version: 2.11.7.7 2009-02-27T14:54:17+01:00 - Seite 200
Dateiname: 6515230602_buchblock.pdf; erzeugt am 04. Mar 2009 11:15:46; WK
Page 204 of 421

function remains active for five minutes or
until one of the front doors is opened.
X To open: press the corresponding switch.
X To close: pull the corresponding switch.
i When opening or closing the front side
windows you can start automatic opera-
tion. Briefly press the switch beyond the
point of resistance in the corresponding
direction. By pressing again, you can stop
automatic operation.
Closing with increased force and with-
out the anti-entrapment feature G
Risk of injury
Closing the side windows with increased force
or without the anti-entrapment feature could
lead to serious or even fatal injury. Make sure
that nobody can become trapped when clos-
ing the side windows.
If a side window is blocked during closing and
reopens slightly:
X Immediately after the window blocks, pull
on the corresponding switch again until the
side window has closed.
The side window is closed with increased
force.
If a side window blocks again during closing
and reopens slightly:
X Immediately after the window blocks, pull
on the corresponding switch again until the
side window has closed.
The side window is closed without the anti-
entrapment feature. Convenience opening
You can ventilate the vehicle before a journey.
To do this, you can use the key to simultane-
ously:
R open the side windows
R open the sliding/tilting sunroof
R switch on the seat ventilation* of the driv-
er's seat
i The "Convenience opening" feature can
only be operated using the key. X
Point the tip of the key at the driver's door
handle.
X Unlock the vehicle by pressing the %
button.
X Press and hold the %button until the
side windows and the sliding/tilting sun-
roof are in the desired position. Convenience closing
When you lock the vehicle, you can simulta-
neously:
R close the side windows
R close the sliding/tilting sunroof G
Risk of injury
When using the convenience closing feature,
make sure that nobody can become trapped.
Proceed as follows if there is a risk of entrap-
ment: Side windows
201Controls
* optional
216_AKB; 2; 3, en-GB
bjanott,
Version: 2.11.7.7 2009-02-27T14:54:17+01:00 - Seite 201 Z
Dateiname: 6515230602_buchblock.pdf; erzeugt am 04. Mar 2009 11:15:46; WK
Page 205 of 421
With the key:
R
release the &button.
R press and hold the %button until the
side windows and the sliding/tilting sun-
roof open again.
With KEYLESS GO*:
R release the sensor surface on the door han-
dle.
R pull the door handle immediately and hold
it.
The side windows and the sliding/tilting
sunroof open.
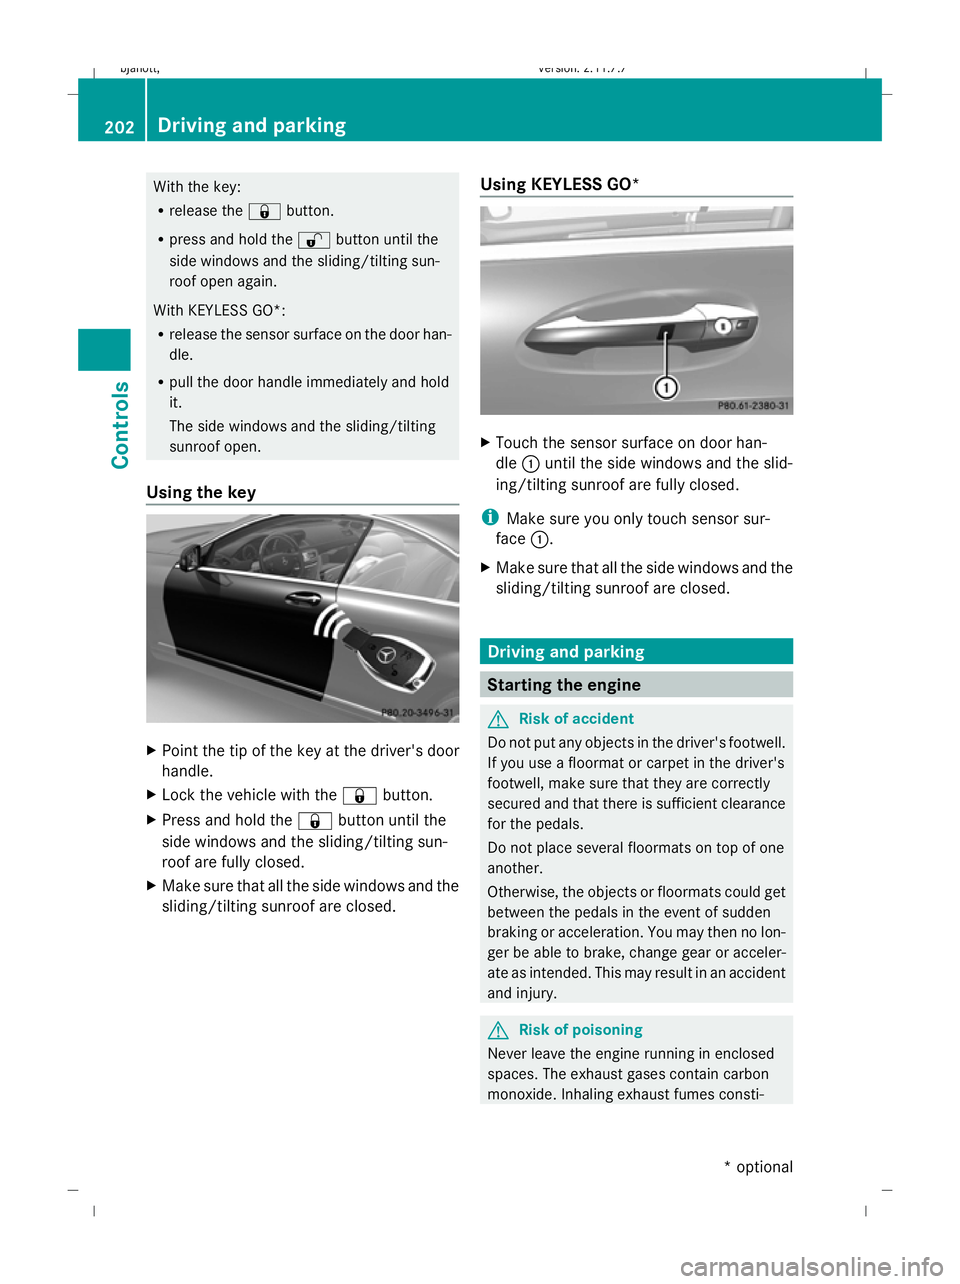
Using the key X
Point the tip of the key at the driver's door
handle.
X Lock the vehicle with the &button.
X Press and hold the &button until the
side windows and the sliding/tilting sun-
roof are fully closed.
X Make sure that all the side windows and the
sliding/tilting sunroof are closed. Using KEYLESS GO* X
Touch the sensor surface on door han-
dle :until the side windows and the slid-
ing/tilting sunroof are fully closed.
i Make sure you only touch sensor sur-
face :.
X Make sure that all the side windows and the
sliding/tilting sunroof are closed. Driving and parking
Starting the engine
G
Risk of accident
Do not put any objects in the driver's footwell.
If you use a floormat or carpet in the driver's
footwell, make sure that they are correctly
secured and that there is sufficient clearance
for the pedals.
Do not place several floormats on top of one
another.
Otherwise, the objects or floormats could get
between the pedals in the event of sudden
braking or acceleration. You may then no lon-
ger be able to brake, change gear or acceler-
ate as intended. This may result in an accident
and injury. G
Risk of poisoning
Never leave the engine running in enclosed
spaces. The exhaust gases contain carbon
monoxide. Inhaling exhaust fumes consti- 202
Driving and parkingControls
* optional
216_AKB; 2; 3, en-GB
bjanott,
Version: 2.11.7.7 2009-02-27T14:54:17+01:00 - Seite 202
Dateiname: 6515230602_buchblock.pdf; erzeugt am 04. Mar 2009 11:15:47; WK
Page 265 of 421

Information and warning display
:
Yellow indicator lamp/red warning lamp
When you turn the key to position 2in the
ignition lock, warning lamps :in the exterior
mirrors light up red.
If Blind Spot Assist is switched on and the
engine is running, indicator lamps :in the
exterior mirrors light up yellow up to a speed
of 30 km/h. At speeds above 30 km/h, the
indicator lamp goes out and Blind Spot Assist
is operational.
If a vehicle is detected within the monitoring
range of Blind Spot Assist at speeds above
30 km/h, warning lamp :on the corre-
sponding side lights up red.
The yellow indicator lamp goes out three sec-
onds after reverse gear is engaged. In this
event, Blind-Spot Assist is no longer active.
The brightness of the indicator/warning
lamps is adjusted automatically according to
the ambient light. G
Risk of accident
Blind Spot Assist is not active at speeds below
30 km/h, and the indicator lamps in the exte-
rior mirrors are yellow. Vehicles in the moni-
toring range are then not indicated.
Always pay attention to traffic conditions and
your surroundings. Otherwise, you may fail to
recognise dangers in time, could cause an
accident and injure yourself and others. Collision warning If a vehicle is detected in the monitoring range
of Blind Spot Assist and you switch on the turn
signal, a double warning tone sounds. Red
warning lamp
:flashes. If the turn signal
remains on, detected vehicles are indicated
by the flashing of red warning lamp :. There
are no further warning tones.
Activating X
Make sure that the radar sensor system
(Y page 226) and Blind Spot Assist
(Y page 224) are activated in the on-board
computer.
X Turn the key to position 2in the ignition
lock.
Red warning lamps :in the exterior mir-
rors are lit.
X Start the engine.
Warning lamps :in the exterior mirrors
now light up yellow. Air conditioning
General notes
The automatic air conditioning controls the
temperature and the humidity of the vehicle
interior and filters out undesirable substan-
ces from the air.
The automatic air conditioning is only opera-
tional when the engine is running. 31
Optimum
operation is only achieved when you drive
with the side windows and sliding/tilting sun-
roof closed.
i Ventilate the vehicle for a brief period
during warm weather, e.g. using the con-
venience opening feature (Y page 201).
This will speed up the cooling process and
the desired vehicle interior temperature
will be reached more quickly.
31 The "residual heat" function can only be switched on/off if the ignition is switched off. 262
Air conditioningCont
rols
216_AKB; 2; 3, en-GB
bjanott, Version: 2.11.7.7 2009-02-27T14:54:17+01:00 - Seite 262
Dateiname: 6515230602_buchblock.pdf; erzeugt am 04. Mar 2009 11:16:09; WK
Page 266 of 421

i
The integrated filter can filter out most
particles of dust and completely filters out
pollen. A clogged filter reduces the amount
of air supplied to the vehicle interior. For
this reason, you should always observe the
interval for replacing the filter, which is
specified in the Service Booklet. As it
depends on environmental conditions, e.g.
heavy air pollution, the interval may be
shorter than stated in the Service Booklet. G
Risk of accident
Observe the settings recommended on the
following pages. Otherwise, the windows
could mist up. This may obstruct your view of
the traffic situation and, as a result, you may
cause an accident. Overview of air-conditioning system functions
Automatic air conditioning Function
:
Controls the air conditioning auto-
matically, left
;
Sets the temperature, left
=
Sets the airflow, left
?
Demists the windscreen
A
Activates/deactivates air-recircu-
lation mode
B
Switches the air conditioning on/
off
32 Switches the residual heat function
on/off
32 Function
C
Activates/deactivates auxiliary
heating*
D
Switches the rear window heating
on/off
E
Sets the airflow, right
F
Sets the temperature, right
G
Controls the air conditioning auto-
matically, right
32
On vehicles without auxiliary heating*, these functions have separate rocker switches. Air conditioning
263Controls
* optional
216_AKB; 2; 3, en-GB
bjanott,
Version: 2.11.7.7 2009-02-27T14:54:17+01:00 - Seite 263 Z
Dateiname: 6515230602_buchblock.pdf; erzeugt am 04. Mar 2009 11:16:09; WK
Page 267 of 421
i
Instructions and recommendations for
optimum air conditioning:
R activate the air conditioning using the
à rocker switch. The indicator lamp
in the Ãrocker switch comes on.
R set the temperature to 22 †.
R only use the "demisting" function briefly,
until the windscreen is clear again.
R only use the "air-recirculation" mode
briefly, e.g. if there are unpleasant out-
side odours or when in a tunnel. Other-
wise, the windows could mist up due to
a lack of fresh air.
R use the "residual heat" function if you
want to heat or ventilate the vehicle inte-
rior when the ignition is switched off. The
"residual heat" function can only be acti-
vated or deactivated with the ignition
switched off. Switching the air conditioning on/off
i When the air conditioning is switched off,
the air supply and air circulation are also
switched off. Only select this setting briefly,
otherwise the windows may mist up.
i Activate the air conditioning primarily
using the Ãrocker switch
(Y page 264).
X Turn the key to position 2in the ignition
lock.
X To activate: press theÇrocker switch
up or down.
The indicator lamp in the rocker switch
goes out. The previously selected settings
come into effect again.
X To deactivate: press theÇrocker
switch up or down.
The indicator lamp in the rocker switch
comes on. Switching cooling with air dehumidi-
fication on/off
The "cooling with air dehumidification" func-
tion is only available when the engine is run-
ning. The air inside the vehicle is cooled and
dehumidified according to the temperature
selected. G
Risk of accident
If the "cooling with air dehumidification" func-
tion is deactivated, the air inside the vehicle
will not be cooled (during warm weather) or
dehumidified. The windows could mist up
more quickly. This may prevent you from
observing the traffic conditions, thereby caus-
ing an accident.
Condensation may drip from the underside of
the vehicle when Thermatic is in cooling
mode.
You can activate or deactivate the "cooling
with air dehumidification" function via
COMAND (Y page 170). Controlling the air conditioning auto-
matically
In automatic mode, the set temperature is
maintained automatically at a constant level.
The system automatically regulates the tem-
perature of the dispensed air, the airflow and
the air distribution.
The automatic air conditioning will achieve
optimal operation if "cooling with air dehu-
midification" is also activated. If necessary,
cooling with air dehumidification can be deac-
tivated.
X Turn the key to position 2in the ignition
lock.
X Set the desired temperature.
X To activate: press theÃrocker switch
up or down.
The indicator lamp in the Ãrocker
switch comes on. 264
Air conditioningControls
216_AKB; 2; 3, en-GB
bjanott,
Version: 2.11.7.7 2009-02-27T14:54:17+01:00 - Seite 264
Dateiname: 6515230602_buchblock.pdf; erzeugt am 04. Mar 2009 11:16:10; WK
Page 270 of 421

=
Control for right-hand rear-compartment
air vent
? Control for left-hand rear-compartment
air vent
X To open/close: turn controls=or? to
the right or left.
i Close the rear-compartment air vents
when heating mode is activated, as no
warm air flows through the rear-compart-
ment air vents in the basic heating setting. Setting the air distribution
The air distribution can be set individually for
the driver's and front-passenger sides.
¯ directs the airflow through the demis-
ter vents
P directs the airflow through the centre
and side air vents
O directs the airflow through the footwell
air vents
S directs the airflow through the centre
and side air vents, as well as the foot-
well air vents
a directs the airflow through the footwell
and demister vents
_ directs the airflow through the demis-
ter, centre and side air vents, as well
as the footwell air vents
b directs the airflow through the centre
and side air vents, as well as the demis-
ter vents
W adjusts the air distribution automati-
cally
The air distribution can be set using COMAND
(Y page 169). Setting the airflow
You can select different airflow settings for
the driver's and front-passenger sides. X
Turn the key to position 2in the ignition
lock.
X To increase/reduce: press theK
rocker switch up or down.
You can also use COMAND to set the airflow
(Y page 169). Demisting the windscreen
i You should only select the "demisting"
function until the windscreen is clear again.
X Turn the key to position 2in the ignition
lock.
X To activate: press the¬rocker switch
up or down.
The indicator lamp in the ¬rocker
switch comes on.
The system automatically switches to the
following functions:
R cooling with air dehumidification on
R high airflow 33
R high temperature 33
R air distribution to the windscreen and
front side windows
R air-recirculation mode off
X To deactivate: press the¬rocker
switch up or down.
The indicator lamp in the ¬rocker
switch goes out. The previously selected
settings come into effect again. The cooling
with air dehumidification function remains
on. Air-recirculation mode remains deacti-
vated.
or
X Press the wrocker switch up or down.
or
X Press the Krocker switch up or down.
33 Depending on the outside temperature. Air conditioning
267Controls
216_AKB; 2; 3, en-GB
bjanott, Version: 2.11.7.7 2009-02-27T14:54:17+01:00 - Seite 267 Z
Dateiname: 6515230602_buchblock.pdf; erzeugt am 04. Mar 2009 11:16:12; WK
Page 271 of 421

Demisting the windows
Windows misted up on the inside X
Activate the "cooling function with air dehu-
midification" function.
X Activate automatic mode.
X If the windows continue to mist up, activate
the demisting function.
i You should only select this setting until
the windscreen is clear again.
Windows misted up on the outside X
Activate the windscreen wipers.
X Activate the automatic air conditioning.
i You should only select this setting until
the windscreen is clear again. Switching the rear window heating
on/off G
Risk of accident
Clear all windows of ice or snow before setting
off. Otherwise, impaired visibility could
endanger you and others.
i The rear window heating has a high cur-
rent draw. You should therefore switch it
off as soon as the window is clear, as it only
switches off automatically after several
minutes.
i If the battery voltage is too low, the rear
window heating may switch off.
X Turn the key to position 2in the ignition
lock.
X Press the ¤rocker switch up or down.
The indicator lamp in the ¤rocker
switch lights up or goes out. Activating/deactivating air-recircula-
tion mode
You can deactivate the flow of fresh air if
unpleasant odours are entering the vehicle
from outside. The air already inside the vehi-
cle will then be recirculated. G
Risk of accident
Only switch over to air-recirculation mode
briefly at low outside temperatures. Other-
wise, the windows could mist up, thus impair-
ing visibility and endangering yourself and
others. This may prevent you from observing
the traffic conditions, thereby causing an
accident.
X Turn the key to position 2in the ignition
lock.
X To activate: press thegrocker switch
up or down.
The indicator lamp in the grocker
switch comes on.
i Air-recirculation mode is activated auto-
matically at high outside temperatures. The
indicator lamp in the grocker switch is
not lit when automatic air-recirculation
mode is activated.
Outside air is added after about 30
minutes.
X To deactivate: press thegrocker
switch up or down.
The indicator lamp in the grocker
switch goes out. 268
Air conditioningCont
rols
216_AKB; 2; 3, en-GB
bjanott, Version: 2.11.7.7 2009-02-27T14:54:17+01:00 - Seite 268
Dateiname: 6515230602_buchblock.pdf; erzeugt am 04. Mar 2009 11:16:12; WK