2009 MERCEDES-BENZ CL COUPE brake
[x] Cancel search: brakePage 387 of 421

ers. The vehicle will then use very little
energy, thus conserving the battery.
i If the battery is discharged, you must use
the emergency key element to unlock the
vehicle. Charging the battery
G
Risk of injury
Only charge the installed battery using a
Mercedes-Benz approved battery charger.
Otherwise, the vehicle's electronic system
may be damaged. Only charge the battery in
a well-ventilated area. As the battery is being
charged, gases can escape and generate
minor explosions. This could injure you and
other persons or cause damage to the paint-
work or acid corrosion on the vehicle.
You can obtain information about battery
chargers which allow the battery to be
charged while still installed from a qualified
specialist workshop, e.g. a Mercedes-Benz
Service Centre. G
Risk of injury
There is a risk of acid burns during the charg-
ing process due to the gases which escape
from the battery. Do not lean over the battery
during the charging process.
X Use the electric parking brake to secure the
vehicle and use the DIRECT SELECT lever
to set the transmission to P.
X Switch off all electrical consumers.
X Turn the key to position 0in the ignition
lock and remove it.
X Open the bonnet.
X Check that the breather hose is fitted and
that there is a cell cap on the opposite side
of the battery.
X Remove the cover from the positive termi-
nal.
X Connect the positive clamp of the battery
charger to the positive terminal of the bat-
tery. X
Connect the negative clamp of the battery
charger to the vehicle's earth point.
X Charge the battery. Observe the notes in
the operating instructions for your battery
charger.
X Disconnect the battery charger after charg-
ing.
X Attach the positive terminal cover.
X Close the bonnet. Jump-starting
If your vehicle's battery is discharged, the
engine can be jump-started from another
vehicle or from an external battery using jump
leads.
Observe the following points:
R jump-starting may only be performed when
the engine and catalytic converter are cold.
R do not start the engine if the battery is fro-
zen. Let the battery thaw first.
R jump-starting may only be performed from
batteries with a nominal voltage of 12 V.
R only use jump leads which have a sufficient
cross-section and insulated terminal
clamps.
i Jump leads and further information about
jump-starting can be obtained from any
Mercedes-Benz Service Centre.
! Avoid repeated and lengthy starting
attempts.
Never start the vehicle using a rapid battery
charger. G
Risk of injury
There is a risk of acid burns when jump-start-
ing a vehicle due to the gases which escape
from the battery. Do not lean over the battery
while the engine is being jump-started. 384
BatteryPractical advice
216_AKB; 2; 3, en-GB
bjanott,
Version: 2.11.7.7 2009-02-27T14:54:17+01:00 - Seite 384
Dateiname: 6515230602_buchblock.pdf; erzeugt am 04. Mar 2009 11:16:52; WK
Page 388 of 421

G
Risk of explosion
Gases escaping from the battery during jump-
starting may cause minor explosions. Avoid
creating sparks. Keep naked flames away
from the battery, and do not smoke.
Comply with safety precautions and take pro-
tective measures when handling batteries.
You will find these under "Battery" in the
index. X
Make sure that the two vehicles do not
touch.
X Secure the vehicle by applying the electric
parking brake.
X Move the DIRECT SELECT lever to P.
X Switch off all electrical consumers (e.g.
radio, blower, etc.).
X Open the bonnet (Y page 292). X
Remove the cover from positive termi-
nal :.
X Connect positive terminal :on your vehi-
cle to positive terminal ;of donor battery
A using the jump lead, beginning with your
own battery.
X Start the engine of the donor vehicle and
run it at idling speed.
X Connect negative terminal =of donor bat-
tery Ato earth point ?of your vehicle
using the jump lead, connecting the jump
lead to donor battery Afirst.
X Start the engine.
X First, remove the jump lead from earth
point ?and negative terminal =, then
from positive terminal :and positive ter- minal
;, each time disconnecting from the
battery on your own vehicle first.
X Have the battery checked at a qualified
specialist workshop, e.g. a Mercedes-Benz
Service Centre. Disconnecting and removing the bat-
tery
G
Risk of accident
If the battery is disconnected:
R the brake boosting effect will not be avail-
able. Greater braking force will then be
required and brake pedal travel will be lon- Battery
385Practical advice
216_AKB; 2; 3, en-GB
bjanott, Version: 2.11.7.7 2009-02-27T14:54:17+01:00 - Seite 385 Z
Dateiname: 6515230602_buchblock.pdf; erzeugt am 04. Mar 2009 11:16:52; WK
Page 389 of 421

ger. If necessary, depress the brake pedal
with maximum force.
R you can no longer turn the key in the igni-
tion lock and, on vehicles with KEYLESS
GO*, pressing the start/stop button will
have no effect.
R the selector lever is locked in position P.
! Always disconnect the battery in
the order described below. Never swap the
terminal clamps. Otherwise, you may dam-
age the vehicle electronics.
i On vehicles with KEYLESS GO*: pull the
start/stop button out (Y page 183) and use
the key with KEYLESS GO like the normal
key.
Disconnecting the battery X
Use the electric parking brake to secure the
vehicle and use the DIRECT SELECT lever
to set the transmission to P.
X Switch off all electrical consumers.
X Turn the key to position 0in the ignition
lock and remove it.
X Open the bonnet.
X Remove the negative terminal clamp from
the battery.
X Remove the cover from the positive termi-
nal.
X Remove the positive terminal clamp from
the battery.
X Disconnect the breather hose.
Removing the battery X
Loosen the brackets which hold the battery
in place and remove the battery. Fitting and connecting the battery
Fitting the battery X
Insert the battery into the battery case.
X Secure the battery with the bracket in the
battery case.
Reconnecting the battery !
Always reconnect the battery in the
sequence described below. Never swap the
terminal clamps. You may otherwise dam-
age the vehicle electronics.
X Switch off all electrical consumers.
X Connect the positive terminal clamp and
secure the cover.
X Connect the negative terminal clamp.
X Connect the breather hose. Make sure that
a cell cap is fitted between the battery and
the breather hose.
X Close the bonnet. Towing and tow-starting
Points to remember
G
Risk of accident
If you have the vehicle towed, you must use a
rigid towing bar if:
R the engine is not running.
R there is a brake system malfunction.
R there is a malfunction in the power supply
or the vehicle's electrical system.
The power steering and the brake force boos-
ter do not work when the engine is not run-
ning. Greater braking force will then be
required and brake pedal travel will be longer.
If necessary, depress the brake pedal with full
force.
Before towing away, make sure that the steer-
ing can be moved and is not locked. 386
Towing and tow-startingPractical advice
* optional
216_AKB; 2; 3, en-GB
bjanott
,V ersion: 2.11.7.7
2009-02-27T14:54:17+01:00 - Seite 386
Dateiname: 6515230602_buchblock.pdf; erzeugt am 04. Mar 2009 11:16:53; WK
Page 390 of 421

If you tow or tow-start another vehicle, its
weight must not exceed the maximum per-
missible gross vehicle weight of your vehicle. G
Risk of accident
The vehicle is braked when Hold or Distronic
Plus* is activated. Therefore, deactivate
HOLD and Distronic Plus if the vehicle is to be
towed.
It is better to have the vehicle transported
than to have it towed.
When towing, observe the legal requirements
in all countries concerned.
! Make sure that the electric parking brake
is released. If the electric parking brake is
faulty, consult a qualified specialist work-
shop. Mercedes-Benz recommends that
you use a Mercedes-Benz Service Centre.
! When towing, pull away slowly and with-
out jerking. If the tractive power is too high,
the vehicles could be damaged.
! Do not use the towing eye for recovery,
as this could damage the vehicle. If in
doubt, recover the vehicle with a crane.
! You may tow the vehicle for a maximum
of 50 km. A towing speed of 50 km/h must
not be exceeded.
For towing distances over 50 km, the entire
vehicle must be lifted up and transported.
! On vehicles with KEYLESS GO*, use the
key instead of the Start/Stop button. Turn
the key to position 2in the ignition lock and
set the automatic transmission to N. Then
turn the key back to 0and leave it in the
ignition lock.
! Only secure the tow cable or towing bar
to the towing eyes. You could otherwise
damage the vehicle. R
Tow-starting the vehicle is not permitted.
R Vehicles with 4MATIC* must not be towed
with the front or rear axle raised.
R If the engine does not start, try jump-start-
ing it (Y page 384).
R If it is not possible to jump-start the vehicle,
have it towed to the nearest qualified spe-
cialist workshop, e.g. a Mercedes-Benz
Service Centre.
R If the vehicle has suffered transmission
damage, only tow it with the propeller shaft
disconnected.
R The automatic transmission DIRECT
SELECT lever must be in the Nposition
when towing the vehicle.
R The ignition must be switched off if you are
towing the vehicle with the front/rear axle
raised. Otherwise, intervention by ESP ®
could damage the brake system.
R Before towing the vehicle, make sure that
the battery is connected and charged. Oth-
erwise:
- you cannot switch on the ignition.
- you cannot move the DIRECT SELECT
lever to N.
- you have no support when braking.
R On vehicles with KEYLESS GO*, use the key
instead of the Start/Stop button
(Y page 182).
i Switch off the automatic locking feature
before the vehicle is towed (Y page 167).
Otherwise, you could be locked out when
pushing or towing the vehicle. Towing and tow-starting
387Practical advice
* optional
216_AKB; 2; 3, en-GB
bjanott,
Version: 2.11.7.7 2009-02-27T14:54:17+01:00 - Seite 387 Z
Dateiname: 6515230602_buchblock.pdf; erzeugt am 04. Mar 2009 11:16:53; WK
Page 391 of 421

Fitting the towing eye
Opening the covers The mountings for the removable towing eyes
are located in the bumpers. They are located
at the front and rear behind covers. X
Press cover :inwards on the marking in
the direction of the arrow.
X Take cover :off the opening.
Securing the towing eye X
Take the towing eye and the wheel wrench
from the vehicle tool kit (Y page 315).
X Screw in the towing eye clockwise to the
stop.
X Insert the wheel wrench handle into the
towing eye and tighten it. Towing the vehicle
! You may tow the vehicle for a maximum
of 50 km. A towing speed of 50 km/h must
not be exceeded.
For towing distances over 50 km, the entire
vehicle must be lifted up and transported. !
Vehicles with 4MATIC* may not be towed
with the front or rear axle raised.
! The engine must be switched off (key in
ignition lock in position 0or position 1) if
the vehicle is being towed with the front
axle raised or if the parking brake is being
tested on a dynamometer. Otherwise,
intervention by ESP ®
could damage the
brake system.
X Turn the key to position 2(Y page 182) in
the ignition lock.
i On vehicles with KEYLESS GO*: use the
key instead of the start-stop button.
X Move the DIRECT SELECT lever to the N
position. Removing the towing eye
X Take the wheel wrench from the vehicle
tool kit (Y page 315).
X Insert the wheel wrench handle into the
towing eye and turn it anti-clockwise.
X Unscrew the towing eye.
X Replace the cover and press it until it
engages.
X Return the towing eye and the wheel
wrench to the vehicle tool kit. Transporting the vehicle
The towing eyes or trailer coupling *can be
used to pull the vehicle onto a trailer or trans-
porter if you wish to transport it.
! Only secure the vehicle by the wheels or
wheel rims, not by parts of the vehicle such
as axle or steering components. Otherwise,
the vehicle could be damaged. 388
Towing and tow-startingPractical advice
* optional
216_AKB; 2; 3, en-GB
bjanott,
Version: 2.11.7.7 2009-02-27T14:54:17+01:00 - Seite 388
Dateiname: 6515230602_buchblock.pdf; erzeugt am 04. Mar 2009 11:16:53; WK
Page 399 of 421
approved wavebands, maximum output
and aerial positions on the vehicle.
Vehicle identification plates
Vehicle identification plate with vehi-
cle identification number (VIN) and
paint code number
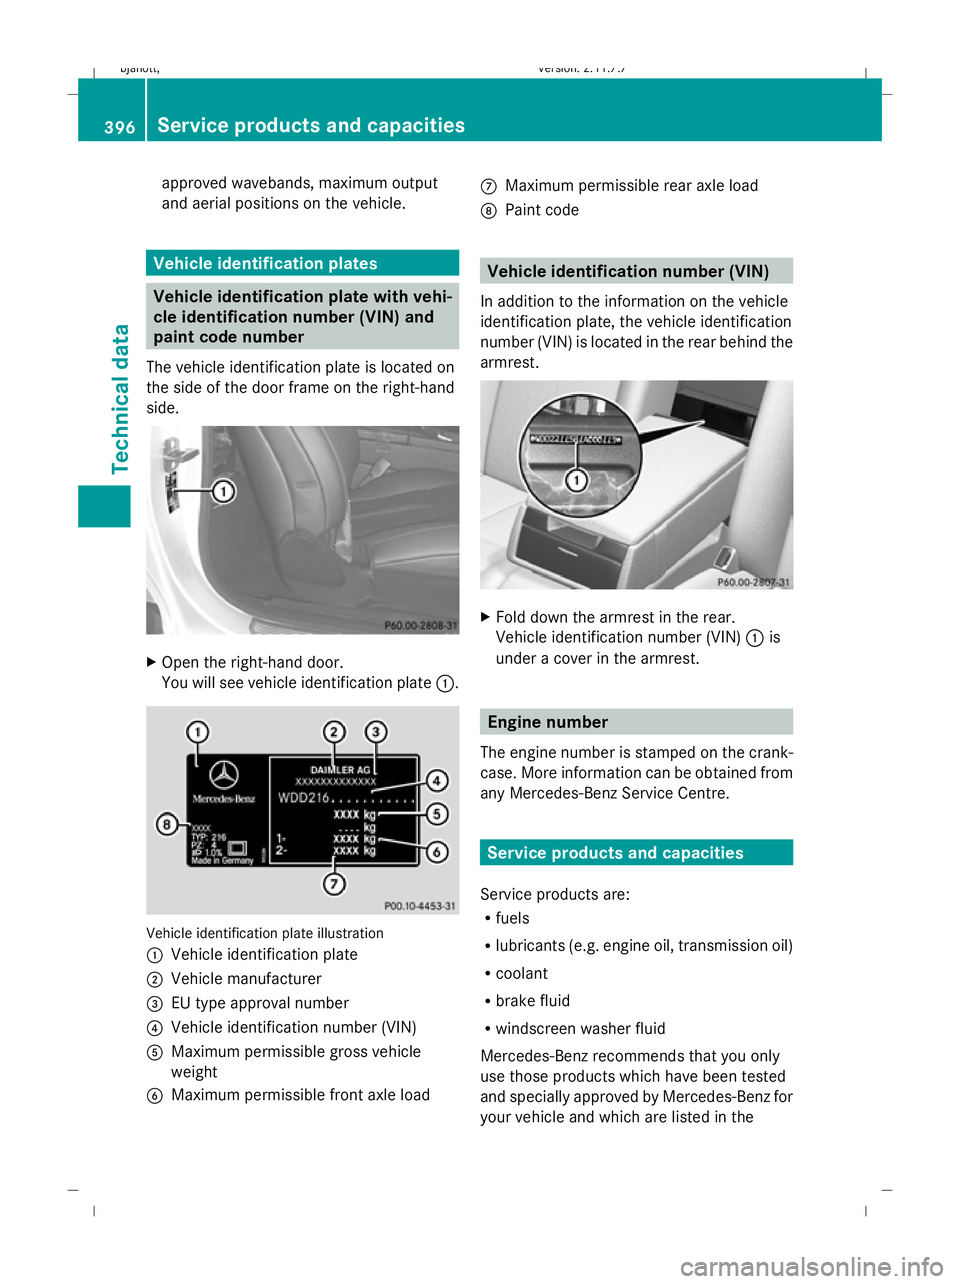
The vehicle identification plate is located on
the side of the door frame on the right-hand
side. X
Open the right-hand door.
You will see vehicle identification plate :.Vehicle identification plate illustration
:
Vehicle identification plate
; Vehicle manufacturer
= EU type approval number
? Vehicle identification number (VIN)
A Maximum permissible gross vehicle
weight
B Maximum permissible front axle load C
Maximum permissible rear axle load
D Paint code Vehicle identification number (VIN)
In addition to the information on the vehicle
identification plate, the vehicle identification
number (VIN) is located in the rear behind the
armrest. X
Fold down the armrest in the rear.
Vehicle identification number (VIN) 1is
under a cover in the armrest. Engine number
The engine number is stamped on the crank-
case. More information can be obtained from
any Mercedes-Benz Service Centre. Service products and capacities
Service products are:
R fuels
R lubricants (e.g. engine oil, transmission oil)
R coolant
R brake fluid
R windscreen washer fluid
Mercedes-Benz recommends that you only
use those products which have been tested
and specially approved by Mercedes-Benz for
your vehicle and which are listed in the 396
Service products and capacitiesTechnical data
216_AKB; 2; 3, en-GB
bjanott
,V ersion: 2.11.7.7
2009-02-27T14:54:17+01:00 - Seite 396
Dateiname: 6515230602_buchblock.pdf; erzeugt am 04. Mar 2009 11:16:57; WK
Page 403 of 421

if the recommended mixture ratio is
observed.
Brake fluid
Over a period of time, the brake fluid absorbs
moisture from the air; this lowers its boiling
point. G
Risk of accident
If the boiling point of the brake fluid is too low,
vapour pockets may form in the brake system
when the brakes are applied hard (e.g. when
driving downhill). This would impair braking
efficiency.
Have the brake fluid renewed every two years
with a brake fluid that has been approved by
Mercedes-Benz and have this confirmed in
the Service Booklet.
i There is usually a notice in the engine
compartment to remind you when the next
brake fluid change is due. Vehicle data, CL 500
Vehicle dimensions
Vehicle length
(ECE)
5065 mm
Vehicle width
including exterior
mirrors
2139 mm
Vehicle height
1418 mm
Wheelbase
2955 mm Vehicle weights
Unladen weight (in
accordance with
EC directive)
1995 kg
The unladen weight includes the driver
(68 kg), luggage (7 kg) and all fluids (fuel
tank 90% full). Items of optional equipment
increase the unladen weight and reduce the
maximum payload.
Maximum luggage
compartment load
100 kg
You will find weight information specific to
the vehicle on the vehicle identification
plate (Y page 396). Vehicle data, CL 500 4MATIC
Vehicle dimensions
Vehicle length
(ECE)
5065 mm
Vehicle width
including exterior
mirrors 2139 mm
Vehicle height
1418 mm
Wheelbase
2955 mm400
Vehicle data, CL 500 4MATICTechnical data
216_AKB; 2; 3, en-GB
bjanott
,V ersion: 2.11.7.7
2009-02-27T14:54:17+01:00 - Seite 400
Dateiname: 6515230602_buchblock.pdf; erzeugt am 04. Mar 2009 11:16:58; WK
Page 414 of 421

24-GHz radar sensor system* (coun-
try overview)
The 24 GHz radar sensor system requires
separate approval for each country. When
you are driving in a country in which the radar
sensor system is not approved, you must
deactivate the system using the on-board
computer (Y page 226). The current country
overview can be obtained from a Mercedes-
Benz Service Centre.
Vehicles with COMAND and navigation
system*: the radar sensor system is deacti-
vated automatically near radio telescope
facilities. If Distronic Plus*, Park Assist*, Parking Guidance*, Blind Spot Assist* or
PRE-SAFE
®
Brake* are activated at this point,
a corresponding warning will appear in the
multi-function display to tell you that the
radar sensor system is being switched off.
BAS PLUS* is also no longer available. If the
deactivation does not occur automatically,
you must deactivate the radar sensor system
using the on-board computer (Y page 226).
Vehicles without COMAND and naviga-
tion system* and vehicles for Australia:
deactivate the radar sensor system in the on-
board computer when you are near a radio
telescope facility (Y page 226). Country Radio telescope
facilities Geographic coordinates
(latitude/longitude) Distance to be
maintained from the facility Egypt – – –
Andorra – – –
Australia Parkes 32°59'59"S, 148°15'44" E 10 km
Narrabri 30°18'52"S, 149°32'56" E 10 km
Canberra 35°23'54"S, 148°58'40" E 3 km
Western Australia 26°37'13"S, 117°30'40" E 10 km
Bahrain – – –
Belgium – – –
Bosnia-Herzego-
vina – – –
Bulgaria – – –
Denmark – – –
Germany Effelsberg 50°31'32"N, 06°53'00" E 6.5 km
Estonia – – –
Finland Metsähovi 60°13'04" N, 24°23'37" E 7 km
Tuorla 60°24'56" N, 22°26'31" E 5 km24-GHz radar sensor system* (country overview)
411Technical data
* optional
216_AKB; 2; 3, en-GB
bjanott
,V ersion: 2.11.7.7
2009-02-27T14:54:17+01:00 - Seite 411 Z
Dateiname: 6515230602_buchblock.pdf; erzeugt am 04. Mar 2009 11:17:00; WK