2009 KIA Spectra wheel nut
[x] Cancel search: wheel nutPage 144 of 291

Driving your vehicle18
4
1
2
3
4
5
6
7
8
9
Power steeringPower Steering uses energy from the
engine to assist you in steering the
vehicle. If the engine is off or if the
power steering system becomes
inoperative, the vehicle may still be
steered, but it will require increased
steering effort.
Should you notice any change in the
effort required to steer during normal
vehicle operation, have the power
steering checked by an Authorized
Kia Dealer.
✽ ✽
NOTICEIf the vehicle is parked for extended
periods outside in cold weather
(below -10 °C/14 °F), the power
steering may require increased
effort when the engine is first start-
ed. This is caused by increased fluid
viscosity due to the cold weather and
does not indicate a malfunction.
When this happens, increase the
engine RPM by depressing accelera-
tor until the RPM reaches 1,500 rpm
then release or let the engine idle for
two or three minutes to warm up the
fluid.
STEERING WHEEL
CAUTION
Never hold the steering wheel
against a stop (extreme rightor left turn) for more than 5seconds with the engine run-ning. Holding the steeringwheel for more than 5 sec-onds in either position maycause damage to the powersteering pump.
If the power steering drive belt breaks or if the power steeringpump malfunctions, the steer-ing effort will greatly increase.
Page 151 of 291

425
1
2
3
4
5
6
7
8
9
Driving your vehicle
The Traction Control System (TCS)
helps the vehicle accelerate on slip-
pery road surfaces by preventing the
drive wheels from spinning exces-
sively. It also provides improved driv-
ing force and steering.
TCS operationTCS ON condition
ON, TCS and TCS OFF
indicator light illuminate for
approximately 3 seconds,
then TCS is turned on.
turn TCS off. (TCS OFF
indicator will illuminate). To
turn the TCS on, press the
TCS button (TCS OFF
indicator light will go off).
you may hear a slight tick-
ing sound. This is the TCS
performing an automatic
system self-check and does
not indicate a problem.
When operating
When the TCS is in opera-
tion, TCS indicator light
blinks.
system is operating prop-
erly, you can feel a slight
pulsation in the vehicle.
This is only the effect of
brake control and indi-
cates nothing unusual.
or driving on a slippery
road, pressing the accel-
erator pedal may not
cause the engine rpm
(revolutions per minute) to
increase.
TRACTION CONTROL SYSTEM (IF EQUIPPED)
-
TCS
OLD026118
Page 215 of 291

In case of an emergency66Changing a tire with TPMSIf you have a flat tire, the Low Tire
Pressure telltale will turn on. Have
the flat tire repaired by an authorized
Kia dealer as soon as possible or
replace the flat tire with the tempo-
rary spare tire.✽ ✽NOTICENEVER use a puncture-repairing
agent to repair and/or inflate a low
pressure tire. If used, you will have
to replace the tire pressure sensor. Each wheel is equipped with a tire
pressure sensor mounted inside the
tire behind the valve stem. You must
use TPMS specific wheels. It is rec-
ommended that you always have
your tires serviced by an authorized
Kia dealer as soon as possible. After you replace the low pressure
tire with the temporary spare tire, the
TPMS malfunction indicator may illu-
minate after restarting and about 20
minutes of continuous driving.
Once the low pressure tire is re-inflat-
ed to the recommended pressure
and installed on the vehicle, the
TPMS malfunction indicator and the
low tire pressure telltale will be soon
extinguished. If the low pressure and
TPMS malfunction indicators are not
extinguished after about 20 minutes
of continuous driving, please visit an
authorized Kia dealer.
You may not be able to identify a low
tire by simply looking at it. Always use
a good quality tire pressure gauge to
measure the tire's inflation pressure.
Please note that a tire that is hot
(from being driven) will have a higher
pressure measurement than a tire
that is cold (from sitting stationary for
at least 3 hours and driven less than
1.6 km (1 mile) during that 3 hour
period). Allow the tire to cool before
measuring the inflation pressure.Always be sure the tire is cold before
inflating to the recommended pres-
sure.
A cold tire means the vehicle has
been sitting for 3 hours and driven for
less than 1.6 km (1 mile) in that 3
hour period.
1
2
3
4
5
6
7
8
9
CAUTION
• Do not use any tire sealant if
your vehicle is equipped witha Tire Pressure MonitoringSystem. The liquid sealant candamage the tire pressure sen-sors.
In order for the system to cor- rectly monitor tires for under-inflation, there should be atotal of exactly 4 sensors fit-ted to each of the four drivenwheel positions. There shouldbe no other sensors in thevehicle since this could causethe system to monitor thewrong sensors
Page 233 of 291
In case of an emergency24
6
1
2
3
4
5
6
7
8
9
IF YOU HAVE A FLAT TIRE The spare tire, jack, jack handle,
wheel lug nut wrench are stored in
the trunk compartment. Move the
carpeting out of the way to reach this
equipment.
Removing the spare tire Turn the tire hold-down wing bolt
counterclockwise.
Store the tire in the reverse order of
removal.
To prevent the spare tire and tools
from “rattling” while the vehicle is in
motion, store them properly.
Important - use of compact
spare tireYour vehicle is equipped with a com-
pact spare tire. This compact spare
tire takes up less space than a regu-
lar-size tire. This tire is smaller than a
conventional tire and is designed for
temporary use only.
1LDN4009
1LDA4010
CAUTION
- Compact
spare
You should drive carefully when the compact spare is inuse. The compact spareshould be replaced by theproper conventional tire andrim at the first opportunity.
The operation of this vehicle is not recommended withmore than one compact sparetire in use at the same time.
Page 236 of 291
627
In case of an emergency
1
2
3
4
5
6
7
8
9
Tire replacement 1. Park on a level surface and applythe parking brake firmly.
2. Shift the shift lever into R (Reverse) with manual transaxle
or P (Park) with automatic
transaxle.
3. Activate the hazard warning flash- er. 4. Remove the wheel lug nut wrench,
jack, jack handle, and spare tire
from the vehicle.
5. Block both the front and rear of the wheel that is diagonally opposite
the jack position.
WARNING
- Changing a tire
To prevent vehicle movementwhile changing a tire, always
set the parking brake fully, and
always block the wheel diago-
nally opposite the wheel being
changed.
It is recommended that the wheels of the vehicle be
chocked, and that no person
should remain in a vehicle that
is being jacked.
1JBA6021
1JBA6504
Page 237 of 291

In case of an emergency28
6
1
2
3
4
5
6
7
8
9
6. Loosen the wheel lug nuts coun-
terclockwise one turn each, but do
not remove any nut until the tire
has been raised off the ground. 7. Place the jack at the front or rear
jacking position closest to the tire
you are changing. Place the jack
at the designated locations under
the frame. The jacking positions
are plates welded to the frame
with two tabs and a raised dot to
index with the jack. 8. Insert the jack handle into the jack
and turn it clockwise, raising the
vehicle until the tire just clears the
ground. This measurement is
approximately 30 mm (1.2 in).
Before removing the wheel lug
nuts, make sure the vehicle is sta-
ble and that there is no chance for
movement or slippage.
9. Remove the wheel lug nuts by turning them counterclockwise,
then remove the wheel.
10. Mount the spare tire into position and install the wheel lug nuts
with the beveled edge inward.
WARNING
- Jack location
To reduce the possibility of
injury, be sure to use only the
jack provided with the vehicle
and in the correct jack position;
never use any other part of the
vehicle for jack support.
1LDN4016
1LDA4015
OLD046014
Page 238 of 291

629
In case of an emergency
1
2
3
4
5
6
7
8
9
11. Once the wheel lug nuts havebeen tightened, lower the vehicle
fully to the ground and continue to
tighten the lug nuts until they are
fully secured. Tighten the wheel
lug nuts firmly in a “X” pattern.
If you are unsure of the tightness
of the wheel lug nuts, have them
checked at the nearest service
station. The specified tightening
torque is 9~11 kg
88-107 N Improperly tight-
ened wheel lug nuts could cause
brake pedal vibration while brak-
ing. To prevent the jack, jack handle,
wheel lug nut wrench and spare tire
from rattling while the vehicle is in
motion, store them properly.
CAUTION
Your vehicle has metric threads
on the wheel bolts and nuts.Make certain during wheelremoval that the same nutsremoved are reinstalled - or, ifreplaced, that nuts with metricthreads and the same chamferconfiguration are used.Installation of a non-metricthread nut on a metric bolt orvice-versa will not secure thewheel to the hub properly andwill damage the bolt so that itmust be replaced.
Note that most lug nuts do nothave metric threads. Be sure touse extreme care in checkingfor thread style before installingaftermarket lug nuts or wheels.If in doubt, consult anAuthorized Kia Dealer.
WARNING
- Wheel bolts
If the bolts are damaged or if
non-metric nut is used on a met-
ric bolts or vice versa, they may
lose their ability to retain the
wheel. This could lead to the
loss of the wheel resulting in
severe injury or death.
WARNING
Check the inflation pressures as
soon as possible after installing
the spare tire. Adjust it to the
specified pressure, if necessary.
Refer to Section 8, Specifications.
OLD046018
Page 243 of 291
75
Maintenance
1
2
3
4
5
6
7
8
9
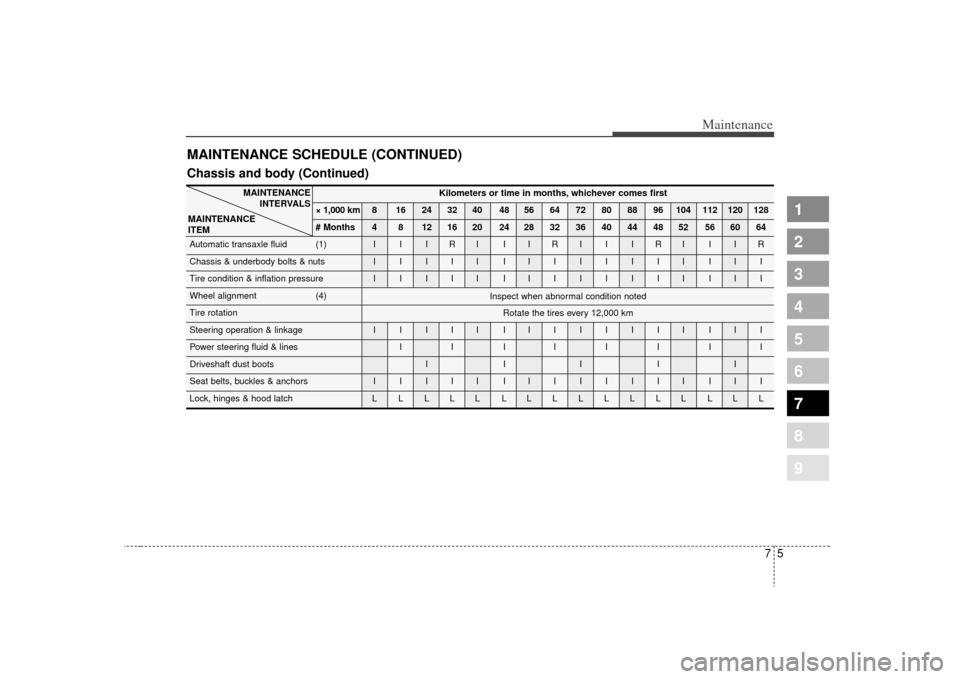
MAINTENANCE SCHEDULE (CONTINUED)
Kilometers or time in months, whichever comes first
× 1,000 km 8 16 24 32 40 48 56 64 72 80 88 96 104 112 120 128
# Months 4 8 12 16 20 24 28 32 36 40 44 48 52 56 60 64
Automatic transaxle fluid (1) I I I R I I I R I I I R I I I R
Chassis & underbody bolts & nuts I I I I I I IIIIIII III
Tire condition & inflation pressure I I I I I I IIIIIII III
Wheel alignment (4)
Tire rotation
Steering operation & linkage I I I I I I IIIIIII III
Power steering fluid & lines I I I IIIII
Driveshaft dust boots I I I I I
Seat belts, buckles & anchors I I I I I I IIIIIII III
Lock, hinges & hood latch L L L L L L LLLLLLL LLL
MAINTENANCE
INTERVALS
MAINTENANCE
ITEM
Inspect when abnormal condition noted
Rotate the tires every 12,000 km
Chassis and body (Continued)