Page 31 of 291
321
1
2
3
4
5
6
7
8
9
Knowing your vehicle
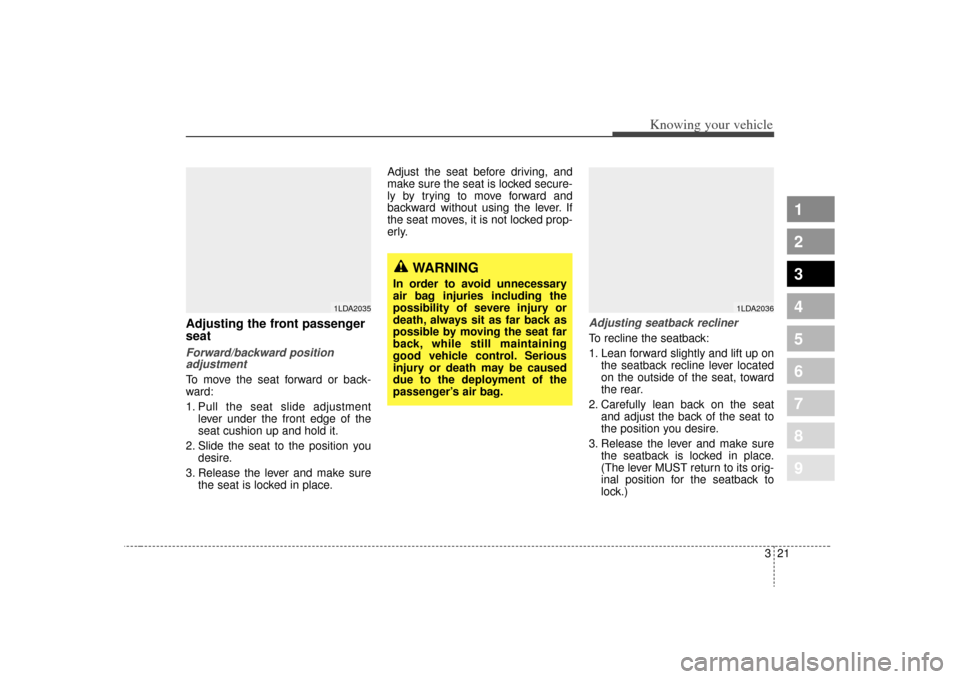
Adjusting the front passenger
seatForward/backward positionadjustmentTo move the seat forward or back-
ward:
1. Pull the seat slide adjustment
lever under the front edge of the
seat cushion up and hold it.
2. Slide the seat to the position you desire.
3. Release the lever and make sure the seat is locked in place. Adjust the seat before driving, and
make sure the seat is locked secure-
ly by trying to move forward and
backward without using the lever. If
the seat moves, it is not locked prop-
erly.
Adjusting seatback reclinerTo recline the seatback:
1. Lean forward slightly and lift up on
the seatback recline lever located
on the outside of the seat, toward
the rear.
2. Carefully lean back on the seat and adjust the back of the seat to
the position you desire.
3. Release the lever and make sure the seatback is locked in place.
(The lever MUST return to its orig-
inal position for the seatback to
lock.)
1LDA2035
WARNING
In order to avoid unnecessary
air bag injuries including the
possibility of severe injury or
death, always sit as far back as
possible by moving the seat far
back, while still maintaining
good vehicle control. Serious
injury or death may be caused
due to the deployment of the
passenger’s air bag.
1LDA2036
Page 33 of 291

323
1
2
3
4
5
6
7
8
9
Knowing your vehicle
Active headrest (if equipped)
The active headrest is designed to
move forward and upward during a
rear impact. This helps to prevent the
driver's and front passenger’s head
from moving backward and thus
helps prevent neck injuries.
Rear seatSplit folding rear seat (if equipped)The rear seatbacks fold forward to
provide additional cargo space and
to provide access to the cargo area.
To fold the rear seatback(s) down, pull the lock release lever, then fold
the seatback forward and down.
To raise the seatback, lift and push it firmly until it clicks into place.
When you return the seatback to its upright position, reposition the
rear safety belts so that they can
be used by rear seat passengers.
4 Door (if equipped)
1. Pull the lock release lever.
2. Move the rear three-point seatbelts to the outside (1) so that they
don’t interfere with the seatback
when lowering.
3. Fold the seatback forward and down firmly (2).
1LDN20381LDN3025
HNF2041-1
Page 34 of 291
Knowing your vehicle24
3
1
2
3
4
5
6
7
8
9
5 Door (if equipped)
1. Lift the front of seat cushion (1) up.
2. Lift the rear of seat cushion up (
2). 3 Move the seat cushion firmly until it
clicks ( 3).
4. Remove the headrest and put the headrest poles into the holes on
the rear of the seat cushion (4). 5. Pull the lock release lever (5).
6. Fold the seatback forward and
down firmly (6).
1LDA22431LDA2244
1LDA22411LDA2242
1LDA22391LDA2240
Page 35 of 291
325
1
2
3
4
5
6
7
8
9
Knowing your vehicle
✽ ✽NOTICEWhen you fold the rear seatback or
put luggage on the rear seat cushion,
insert the buckle in the pocket
between the rear seatback and cush-
ion. Doing so can prevent the buckle
from being damaged by the rear
seatback or luggage.
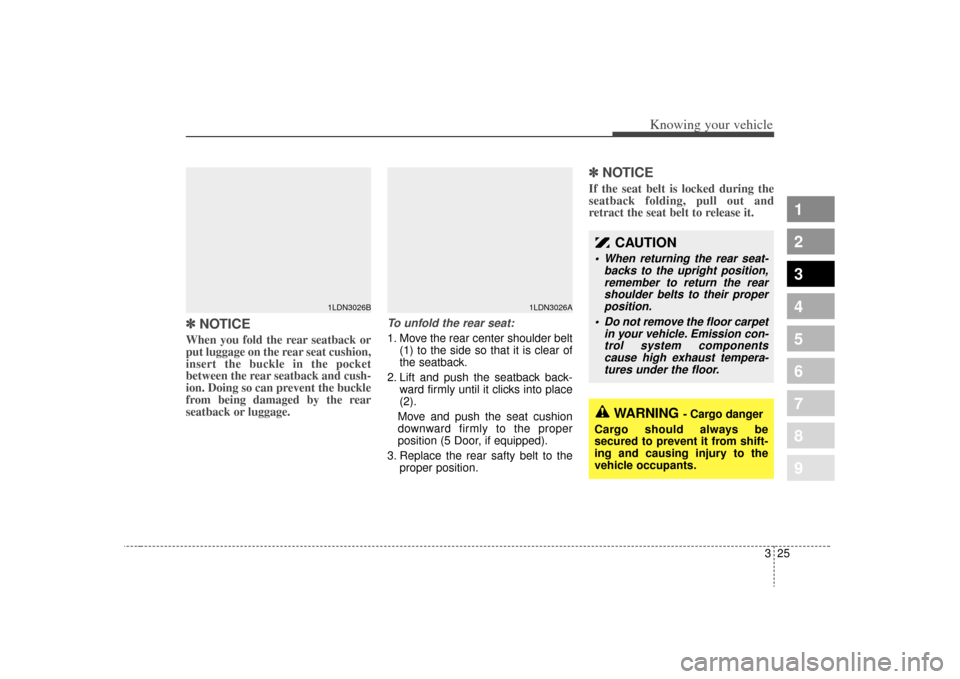
To unfold the rear seat:1. Move the rear center shoulder belt
(1) to the side so that it is clear of
the seatback.
2. Lift and push the seatback back- ward firmly until it clicks into place
(2).
Move and push the seat cushion
downward firmly to the proper
position (5 Door, if equipped).
3. Replace the rear safty belt to the proper position.
✽ ✽NOTICEIf the seat belt is locked during the
seatback folding, pull out and
retract the seat belt to release it.
1LDN3026A
1LDN3026B
CAUTION
When returning the rear seat-
backs to the upright position,remember to return the rearshoulder belts to their properposition.
Do not remove the floor carpet in your vehicle. Emission con-trol system componentscause high exhaust tempera-tures under the floor.
WARNING
- Cargo danger
Cargo should always be
secured to prevent it from shift-
ing and causing injury to the
vehicle occupants.
Page 37 of 291
327
1
2
3
4
5
6
7
8
9
Knowing your vehicle
Pre-tensioner seat beltYour vehicle is equipped with driver’s
and front passenger’s pre-tensioner
seat belts. The purpose of the pre-
tensioner is to make sure that the
seat belts fit tightly against the occu-
pant’s body in certain frontal colli-
sions. The pre-tensioner seat belts
can be activated together with the air
bags, where the frontal collision is
severe enough.When the vehicle stops suddenly, or
if the occupant tries to lean forward
too quickly, the seat belt retractor will
lock into position. In certain frontal
collisions, the pre-tensioner will acti-
vate and pull the seat belt into tighter
contact against the occupant's body.
If the system senses excessive seat
belt tension on the driver or passen-
ger's seat belt when the pre-tension-
er activates, the load limiter inside
the pre-tensioner will release some
of the pressure on the affected seat
belt. (if equipped)
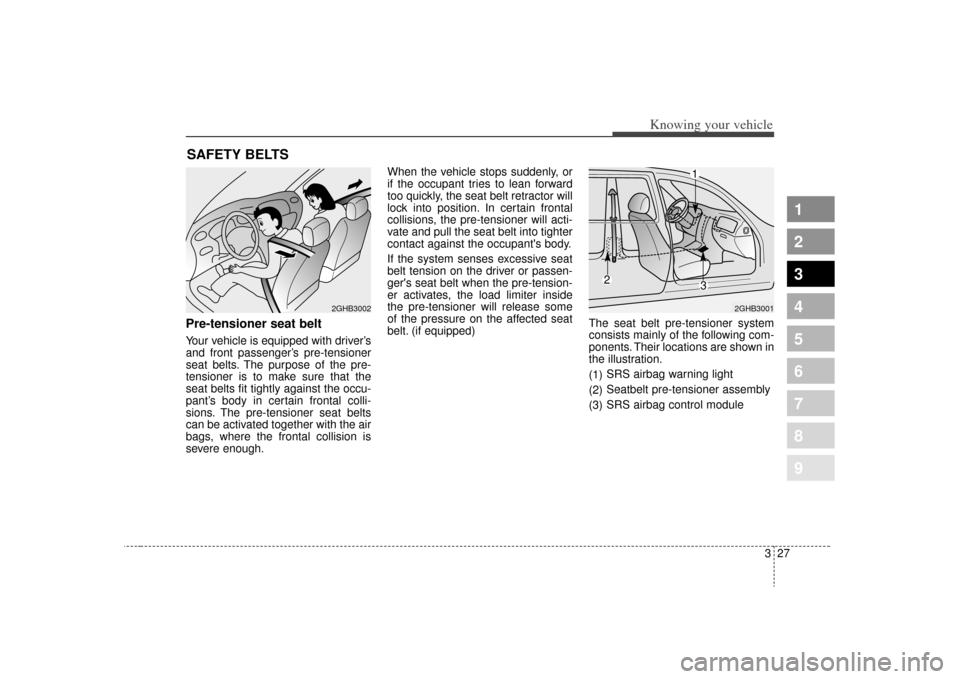
The seat belt pre-tensioner system
consists mainly of the following com-
ponents. Their locations are shown in
the illustration.
(1)
SRS airbag warning light
(2) Seatbelt pre-tensioner assembly
(3) SRS airbag control moduleSAFETY BELTS
2GHB3002
2GHB3001
1
2
3
Page 40 of 291
Knowing your vehicle30
3
1
2
3
4
5
6
7
8
9
We strongly recommend that the
driver and all passengers be proper-
ly restrained at all times by using the
safety belts provided with the vehi-
cle. Proper use of the safety belts
decreases the risk of severe injury or
death in accidents or sudden stops.
In most states, and in Canada, the
law requires their use.
All seats have lap/shoulder belts.
Inertial locks in the safety belt retrac-
tors allow all of the lap/shoulder safe-
ty belts to remain unlocked during
normal vehicle operation. This allows
the occupants some freedom of
movement and increased comfort
while using the safety belts. If a force
is applied to the vehicle, such as a
strong stop, a sharp turn, or a colli-
sion, the safety belt retractors will
automatically lock the safety belts. Since the inertial locks do not require
a collision in order to lock up, you
may become aware of the safety
belts locking while braking or going
around sharp corners.
Always use the rear seat position(s)
to install your child restraint(s).
Never install a child restraint system
in the front passenger position, as an
inflating air bag could cause serious
or fatal injury to a child in that posi-
tion.
The rear safety belts use a special
auto-lock feature designed to allow a
child restraint to be used in these
positions without an added locking
clip. They normally lock only under
extreme or emergency conditions
(emergency lock mode). However
they can be adjusted so that they
remain in fixed and locked when a
child restraint system is placed in
these positions. (Use this auto-lock
mode only to secure a child restraint,
never for passengers restrained by
the safety belts.) Page 3-44 gives
instructions on placing the safety belt
in the auto lock mode.
The drivers safety belt can only oper-
ate in the emergency lock mode.
Page 43 of 291
333
1
2
3
4
5
6
7
8
9
Knowing your vehicle
If the lap/shoulder belt is unfastened
while the lap/shoulder belt is fas-
tened with the ignition switch ON, the
safety belt warning light will blink for
about 6 seconds and if the vehicle
speed exceeds 10 km/h (6 mph) the
safety belt warning light and chime
will activate until it is fastened.
Lap/shoulder beltTo fasten the lap/shoulder belt:1. Grasp the buckle and tongueplate.
2. Slowly pull the lap/shoulder belt out from the retractor.
3. Insert the tongue plate ( 1) into the
open end of the buckle ( 2) until an
audible “click” is heard, indicating
the belt is locked in the buckle. 4. Position the lap portion of the belt
across your lap as LOW ON THE
HIPS as possible to reduce the
risk of sliding under it during an
accident. Adjust the belt to a
SNUG FIT by pulling up on the
shoulder portion of the safety belt.
The belt retractor is designed to
take up excess webbing automati-
cally and to maintain tension on
the belt. For your safety, do not put
any excess slack into the safety
belt at any location.
B180A01NF-1
B200A02NF
Page 44 of 291
Knowing your vehicle34
3
1
2
3
4
5
6
7
8
9
✽ ✽
NOTICEIf you are not able to pull out the
safety belt from the retractor, firmly
pull the belt out and release it. Then
you will be able to pull the belt out
smoothly.
5. Adjust the shoulder anchor posi-
tion to your size. To raise the
anchor position, push the anchor
up ( 1). To lower the anchor posi-
tion, press ( 2) the button and slide
the anchor down ( 3). After adjust-
ment, make sure the anchor is
locked in position.
If the height of the adjusting seat belt
is too near your neck, you will not be
getting the most effective protection.
The shoulder portion should be
adjusted so that it lies across your
chest and midway over your shoulder
nearest the door and not your neck.
OUN026100
WARNING -
Beld adjust
The height adjuster must be in the locked position when the
vehicle is moving.
The misadjustment of height of the shoulder belt could
reduce the effectiveness of
the seat belt in a crash.