2009 KIA SOUL turn signal
[x] Cancel search: turn signalPage 152 of 328
Features of your vehicle
80
4
1. ON : The light turns on.
2. MOOD : The light shade changes
automatically at regular inter-
val.
3. MUSIC : The light blinks or changes shade according to the
sound of the audio.
If the audio is not turned on,
the light does not turn on.
4. OFF : The light turns off.
5. +/- : When the lights are on, push the illumination button to adjust the
light intensity.
✽✽NOTICE
The lighting around the front speaker may not illuminate when the sound of
the audio is low.
D300800AAM
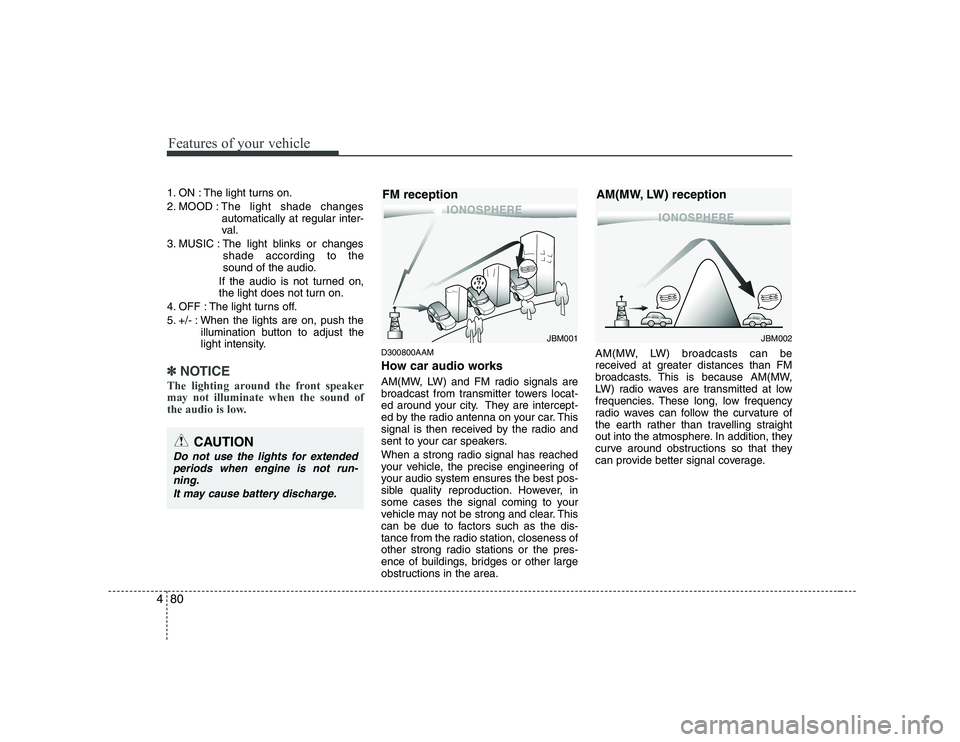
How car audio works
AM(MW, LW) and FM radio signals are
broadcast from transmitter towers locat-
ed around your city. They are intercept-
ed by the radio antenna on your car. This
signal is then received by the radio and
sent to your car speakers.
When a strong radio signal has reached
your vehicle, the precise engineering of
your audio system ensures the best pos-
sible quality reproduction. However, in
some cases the signal coming to your
vehicle may not be strong and clear. This
can be due to factors such as the dis-
tance from the radio station, closeness of
other strong radio stations or the pres-
ence of buildings, bridges or other large
obstructions in the area. AM(MW, LW) broadcasts can be
received at greater distances than FM
broadcasts. This is because AM(MW,
LW) radio waves are transmitted at low
frequencies. These long, low frequency
radio waves can follow the curvature of
the earth rather than travelling straight
out into the atmosphere. In addition, they
curve around obstructions so that they
can provide better signal coverage.
¢¢¢
JBM001
FM reception
CAUTION
Do not use the lights for extended
periods when engine is not run-ning.
It may cause battery discharge.
¢¢¢¢¢¢
JBM002
AM(MW, LW) reception
Page 212 of 328
Driving your vehicle
42
5
E140401AUN
Following distance
Stay at least twice as far behind the vehi-
cle ahead as you would when driving
your vehicle without a trailer. This can
help you avoid situations that require
heavy braking and sudden turns.
E140402AUN
Passing
You’ll need more passing distance up
ahead when you’re towing a trailer. And,
because of the increased vehicle length,
you’ll need to go much farther beyond the
passed vehicle before you can return to
your lane.
E140403AUN
Backing up
Hold the bottom of the steering wheel
with one hand. Then, to move the trailer
to the left, just move your hand to the left.
To move the trailer to the right, move your
hand to the right. Always back up slowly
and, if possible, have someone guide
you. E140404AUN
Making turns
When you’re turning with a trailer, make
wider turns than normal. Do this so your
trailer won’t strike soft shoulders, curbs,
road signs, trees, or other objects. Avoid
jerky or sudden maneuvers. Signal well
in advance.
E140405AUN
Turn signals when towing a trailer
When you tow a trailer, your vehicle has
to have a different turn signal flasher and
extra wiring. The green arrows on your
instrument panel will flash whenever you
signal a turn or lane change. Properly
connected, the trailer lights will also flash
to alert other drivers you’re about to turn,
change lanes, or stop.
When towing a trailer, the green arrows
on your instrument panel will flash for
turns even if the bulbs on the trailer are
burned out. Thus, you may think drivers
behind you are seeing your signals
when, in fact, they are not. It’s important
to check occasionally to be sure the trail-
er bulbs are still working. You must also
check the lights every time you discon-
nect and then reconnect the wires.
Do not connect a trailer lighting system
directly to your vehicle’s lighting system.
Use only an approved trailer wiring har-
ness.An authorized KIA dealer can assist you
in installing the wiring harness. E140406ASA-C1Driving on grades
Reduce speed and shift to a lower gear
before you start down a long or steep
downgrade. If you don’t shift down, you
might have to use your brakes so much
that they would get hot and no longer
operate efficiently.
On a long uphill grade, shift down and
reduce your speed to around 70 km/h (45mph) to reduce the possibility of engine
and transaxle overheating.
If your trailer weighs more than the max-
imum trailer weight without trailer brakes
and you have an automatic transaxle,
you should drive in D (Drive) when tow-
ing a trailer.
Operating your vehicle in D (Drive) when
towing a trailer will minimize heat build up
and extend the life of your transaxle.
WARNING
Failure to use an approved trailer wiring harness could result in dam-
age to the vehicle electrical system
and/or personal injury.
Page 219 of 328
What to do in an emergency
2
6
ROAD WARNING
F010100AUN
Hazard warning flasher
The hazard warning flasher serves as a
warning to other drivers to exercise
extreme caution when approaching,
overtaking, or passing your vehicle. It should be used whenever emergency
repairs are being made or when the vehi-cle is stopped near the edge of a road-
way.
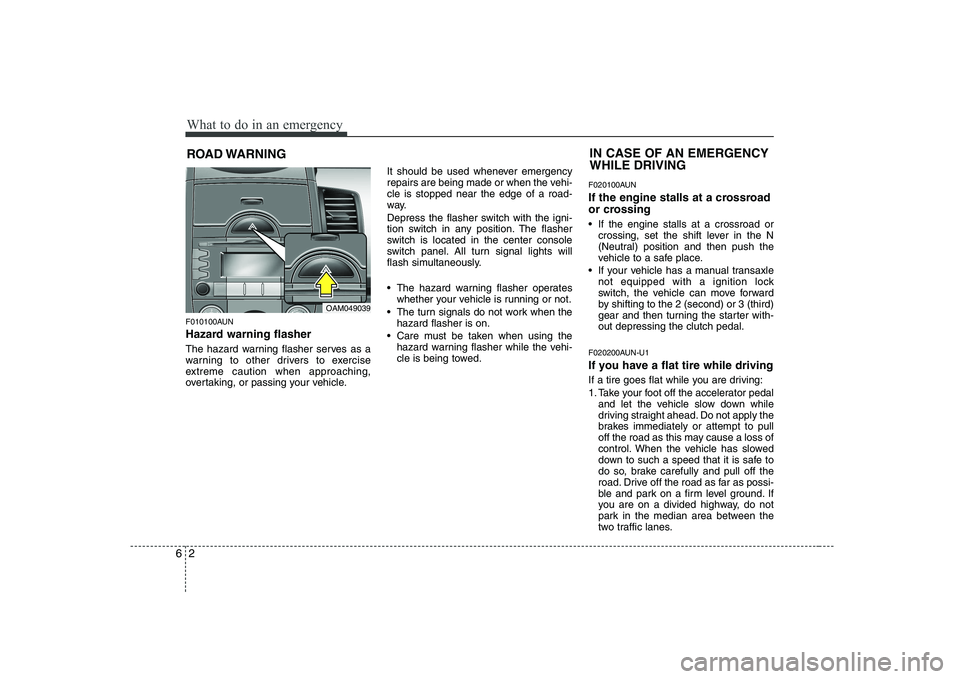
Depress the flasher switch with the igni-
tion switch in any position. The flasher
switch is located in the center console
switch panel. All turn signal lights will
flash simultaneously.
• The hazard warning flasher operates
whether your vehicle is running or not.
The turn signals do not work when the hazard flasher is on.
Care must be taken when using the hazard warning flasher while the vehi-
cle is being towed. F020100AUN
If the engine stalls at a crossroad
or crossing
If the engine stalls at a crossroad or
crossing, set the shift lever in the N
(Neutral) position and then push the
vehicle to a safe place.
If your vehicle has a manual transaxle not equipped with a ignition lock
switch, the vehicle can move forward
by shifting to the 2 (second) or 3 (third)
gear and then turning the starter with-out depressing the clutch pedal.
F020200AUN-U1
If you have a flat tire while driving
If a tire goes flat while you are driving:
1. Take your foot off the accelerator pedal and let the vehicle slow down while
driving straight ahead. Do not apply the
brakes immediately or attempt to pull
off the road as this may cause a loss of
control. When the vehicle has slowed
down to such a speed that it is safe to
do so, brake carefully and pull off the
road. Drive off the road as far as possi-
ble and park on a firm level ground. If
you are on a divided highway, do not
park in the median area between the
two traffic lanes.
IN CASE OF AN EMERGENCY WHILE DRIVING
OAM049039
Page 301 of 328
Maintenance
60
7
LIGHT BULBS
G220000AUN
Use only the bulbs of the specified wattage.
✽✽ NOTICE
After heavy, driving rain or washing, headlight and taillight lenses could
appear frosty. This condition is caused by
the temperature difference between the
lamp inside and outside. This is similar
to the condensation on your windows
inside your vehicle during the rain and
doesn’t indicate a problem with your
vehicle. If the water leaks into the lamp
bulb circuitry, have the vehicle checked
by an authorized KIA dealer.
G220100APB(UN-KM)
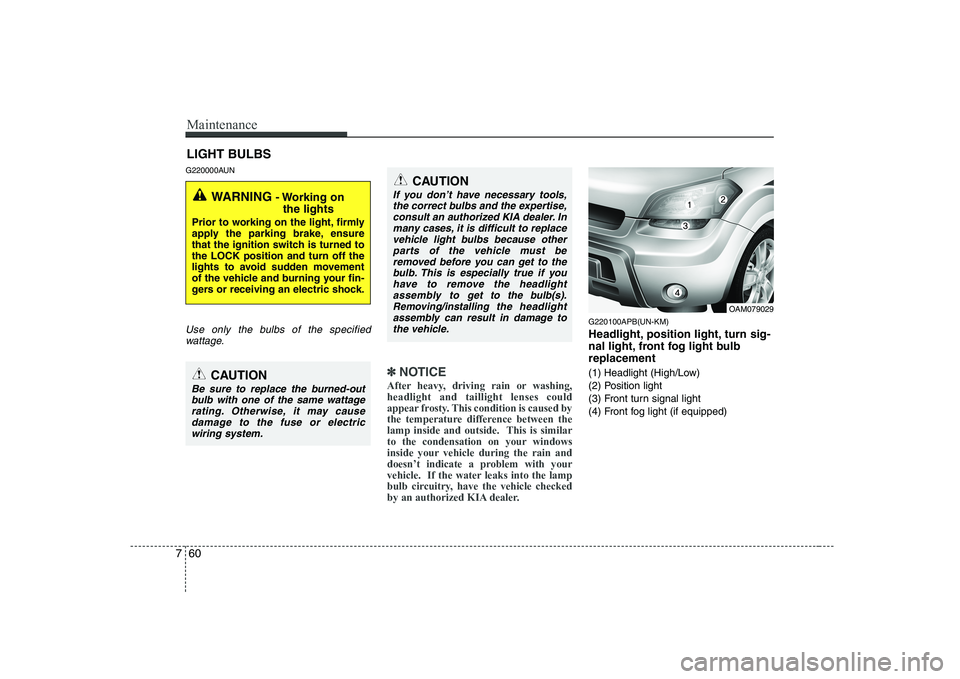
Headlight, position light, turn sig-
nal light, front fog light bulbreplacement
(1) Headlight (High/Low)
(2) Position light
(3) Front turn signal light
(4) Front fog light (if equipped)
WARNING - Working on
the lights
Prior to working on the light, firmly
apply the parking brake, ensure
that the ignition switch is turned tothe LOCK position and turn off the
lights to avoid sudden movement
of the vehicle and burning your fin-
gers or receiving an electric shock.
CAUTION
Be sure to replace the burned-out bulb with one of the same wattage rating. Otherwise, it may cause damage to the fuse or electricwiring system.
CAUTION
If you don’t have necessary tools,
the correct bulbs and the expertise,consult an authorized KIA dealer. In many cases, it is difficult to replace
vehicle light bulbs because otherparts of the vehicle must be removed before you can get to the bulb. This is especially true if you
have to remove the headlight assembly to
get to the bulb(s).
Removing/installingthe headlight
assembly can result in damage to the vehicle.OAM079029
Page 303 of 328
Maintenance
62
7
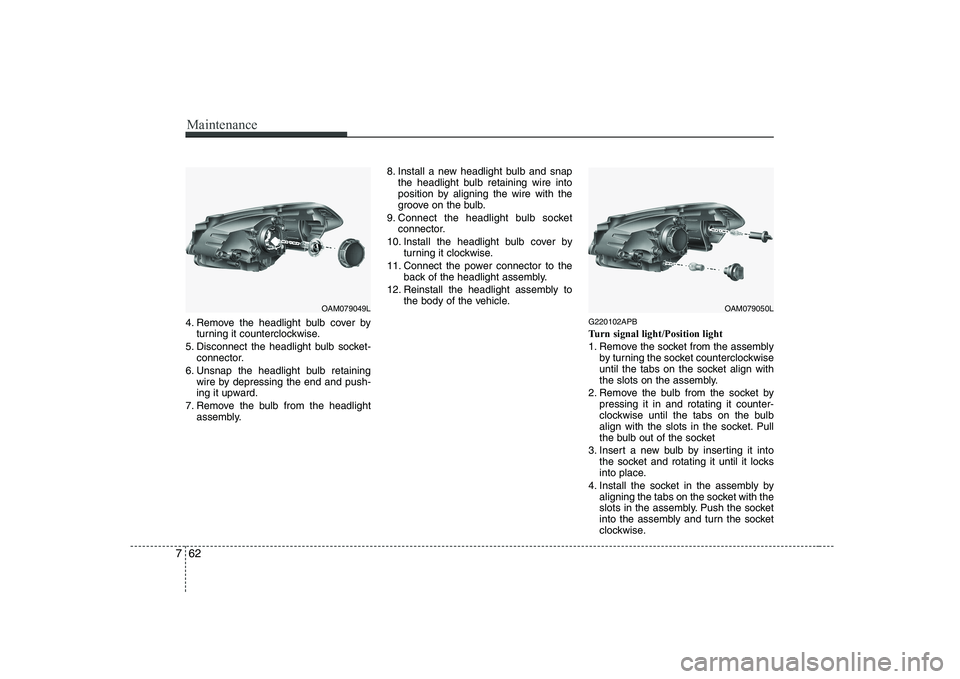
4. Remove the headlight bulb cover by
turning it counterclockwise.
5. Disconnect the headlight bulb socket- connector.
6. Unsnap the headlight bulb retaining wire by depressing the end and push-
ing it upward.
7. Remove the bulb from the headlight assembly. 8. Install a new headlight bulb and snap
the headlight bulb retaining wire into
position by aligning the wire with the
groove on the bulb.
9. Connect the headlight bulb socket connector.
10. Install the headlight bulb cover by turning it clockwise.
11. Connect the power connector to the back of the headlight assembly.
12. Reinstall the headlight assembly to the body of the vehicle.
G220102APB
Turn signal light/Position light
1. Remove the socket from the assemblyby turning the socket counterclockwise
until the tabs on the socket align with
the slots on the assembly.
2. Remove the bulb from the socket by pressing it in and rotating it counter-
clockwise until the tabs on the bulb
align with the slots in the socket. Pull
the bulb out of the socket
3. Insert a new bulb by inserting it into the socket and rotating it until it locks
into place.
4. Install the socket in the assembly by aligning the tabs on the socket with the
slots in the assembly. Push the socket
into the assembly and turn the socket
clockwise.
OAM079049LOAM079050L
Page 305 of 328
Maintenance
64
7
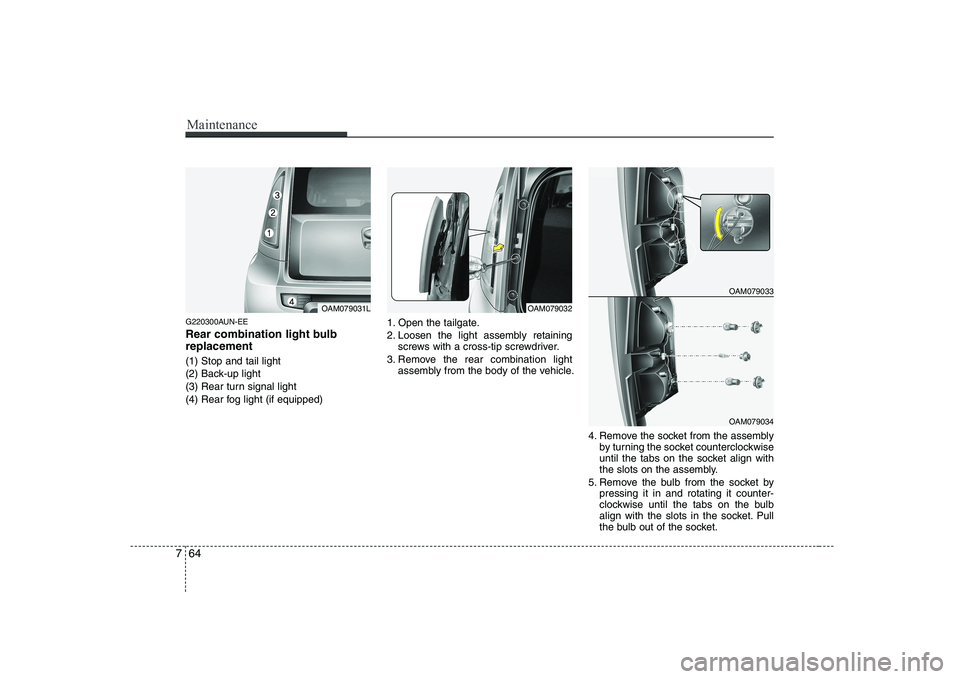
G220300AUN-EE
Rear combination light bulb replacement (1) Stop and tail light
(2) Back-up light
(3) Rear turn signal light
(4) Rear fog light (if equipped) 1. Open the tailgate.
2. Loosen the light assembly retaining
screws with a cross-tip screwdriver.
3. Remove the rear combination light assembly from the body of the vehicle.
4. Remove the socket from the assemblyby turning the socket counterclockwise
until the tabs on the socket align with
the slots on the assembly.
5. Remove the bulb from the socket by pressing it in and rotating it counter-
clockwise until the tabs on the bulb
align with the slots in the socket. Pull
the bulb out of the socket.
OAM079031LOAM079032
OAM079033
OAM079034
Page 319 of 328
Specifications & Consumer information
2
8
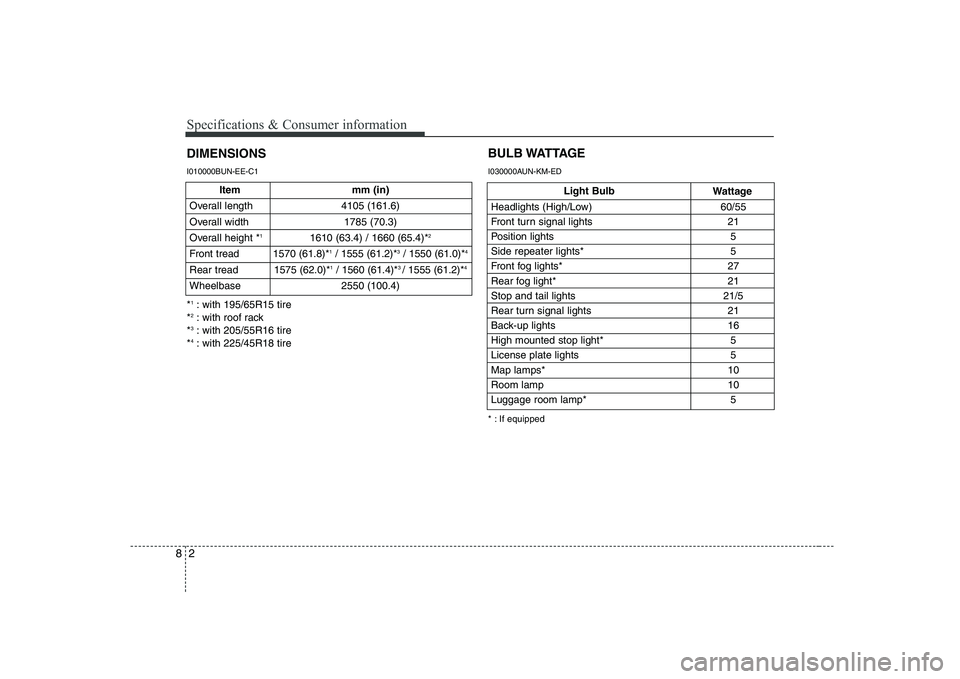
Item mm (in)
Overall length 4105 (161.6)
Overall width 1785 (70.3)
Overall height * 1
1610 (63.4) / 1660 (65.4)* 2
Front tread 1570 (61.8)* 1
/ 1555 (61.2)* 3
/ 1550 (61.0)* 4
Rear tread 1575 (62.0)* 1
/ 1560 (61.4)* 3
/ 1555 (61.2)* 4
Wheelbase 2550 (100.4)
DIMENSIONS
Headlights (High/Low) 60/55
Front turn signal lights 21
Position lights 5
Side repeater lights* 5
Front fog lights* 27
Rear fog light* 21
Stop and tail lights 21/5
Rear turn signal lights 21
Back-up lights 16
High mounted stop light* 5
License plate lights 5 Map lamps* 10
Room lamp 10
Luggage room lamp* 5
BULB WATTAGE
* : If equipped
*
1
: with 195/65R15 tire
* 2
: with roof rack
* 3
: with 205/55R16 tire
* 4
: with 225/45R18 tire
I010000BUN-EE-C1
I030000AUN-KM-ED
Light Bulb Wattage