Page 72 of 457

Airbag Warning Light
The light should come on and remain on for six to eight
seconds as a bulb check when the ignition switch is first
turned ON. If the LED is not lit during starting, have it
checked. If the light stays on, flickers, or comes on while
driving, have the system checked by an authorized
dealer.
Defroster
Check operation by selecting the defrost mode and place
the blower control on high speed. You should be able to
feel the air directed against the windshield. See your
authorized dealer for service if your defroster is
inoperable.
Periodic Safety Checks You Should Make Outside
The Vehicle
Tires
Examine tires for excessive tread wear or uneven wear
patterns. Check for stones, nails, glass, or other objects
lodged in the tread. Inspect tread and sidewall for cuts or
cracks. Check the wheel nuts for tightness. Check the
tires (including spare) for proper pressure.
Lights
Have someone observe the operation of exterior lights
while you work the controls. Check turn signal and high
beam indicator lights on the instrument panel.
Fluid Leaks
Check the area under the vehicle after overnight parking
for fuel, engine coolant, oil or other fluid leaks. Also, if
gasoline fumes are detected or fuel, power steering fluid,
transmission fluid or brake fluid leaks are suspected, the
cause should be located and corrected immediately.
70 THINGS TO KNOW BEFORE STARTING YOUR VEHICLE
Page 175 of 457

WARNING!
A hot engine cooling system is dangerous. You or
others could be badly burned by steam or boiling
coolant. You may want to call an authorized dealer-
ship for service if your vehicle overheats. If you
decide to look under the hood yourself, see Section 7
of this manual. Follow the warnings under the Cool-
ing System Pressure Cap paragraph.
18. Cruise Indicator — If Equipped
This indicator shows that the Speed Control
System is ON.
19. Cruise SET Indicator — If Equipped
This indicator shows that the Speed Control System is
SET.20. Shift Lever Indicator
This display indicator shows the automatic transmission
shift lever selection.
NOTE:You must apply the brakes before shifting from
PARK.
21. Odometer/Trip Odometer Reset Button
Press this button to change the display from odometer to
either of the two trip odometer settings. Trip A or Trip B
will appear when in the trip odometer mode. Push in and
hold the button for two seconds to reset the trip odometer
to 0 miles (0 km). The odometer must be in Trip mode to
reset.
22. Tire Pressure Monitoring Telltale Light
Each tire, including the spare (if provided),
should be checked monthly, when cold and
inflated to the inflation pressure recommended
by the vehicle manufacturer on the vehicle
placard or tire inflation pressure label. (If your vehicle
UNDERSTANDING YOUR INSTRUMENT PANEL 173
4
Page 255 of 457
�Parking Brake........................ 287
�Brake System......................... 289
▫Anti-Lock Brake System (ABS) — If
Equipped.......................... 290
�Electronic Brake Control System........... 292
▫Anti-Lock Brake System (ABS)........... 292
▫Brake Assist System (BAS).............. 293
▫Traction Control System (TCS)........... 294
▫Electronic Roll Mitigation (ERM).......... 294
▫Hill Descent Control (HDC) — If Equipped . . 295
▫Electronic Stability Program (ESP)......... 296
�Tire Safety Information.................. 300
▫Tire Markings....................... 300▫Tire Identification Number (TIN).......... 304
▫Tire Loading And Tire Pressure........... 305
�Tires — General Information.............. 309
▫Tire Pressure........................ 309
▫Tire Inflation Pressures................. 310
▫Tire Pressures For High Speed Operation.... 312
▫Radial Ply Tires...................... 312
▫Compact Spare Tire — If Equipped........ 312
▫Limited-Use Spare — If Equipped......... 313
▫Tire Spinning....................... 314
▫Tread Wear Indicators................. 315
▫Life Of Tire......................... 315
▫Replacement Tires.................... 316
STARTING AND OPERATING 253
5
Page 303 of 457
NOTE:
•P (Passenger) - Metric tire sizing is based on U.S.
design standards. P-Metric tires have the letter “P”
molded into the sidewall preceding the size designa-
tion. Example: P215/65R15 95H.
•European-Metric tire sizing is based on European
design standards. Tires designed to this standard have
the tire size molded into the sidewall beginning with
the section width. The letter�P�is absent from this tire
size designation. Example: 215/65R15 96H.
•LT (Light Truck) - Metric tire sizing is based on U.S.
design standards. The size designation for LT-Metrictires is the same as for P-Metric tires except for the
letters “LT” that are molded into the sidewall preced-
ing the size designation. Example: LT235/85R16.
•Temporary spare tires are high-pressure compact
spares designed for temporary emergency use only.
Tires designed to this standard have the letter “T”
molded into the sidewall preceding the size designa-
tion. Example: T145/80D18 103M.
•High flotation tire sizing is based on U.S. design
standards and it begins with the tire diameter molded
into the sidewall. Example: 31x10.5 R15 LT.
STARTING AND OPERATING 301
5
Page 304 of 457
Tire Sizing Chart
EXAMPLE:
Size Designation:
P= Passenger car tire size based on U.S. design standards
�....blank....�= Passenger car tire based on European design standards
LT= Light truck tire based on U.S. design standards
T= Temporary spare tire
31= Overall diameter in inches (in)
215= Section width in millimeters (mm)
65= Aspect ratio in percent (%)
— Ratio of section height to section width of tire
10.5= Section width in inches (in)
R= Construction code
—�R�means radial construction
—�D�means diagonal or bias construction
15= Rim diameter in inches (in)
302 STARTING AND OPERATING
Page 307 of 457
Tire Loading and Tire Pressure
Tire Placard Location
NOTE:The proper cold tire inflation pressure is listed
on the driver’s side B-Pillar.
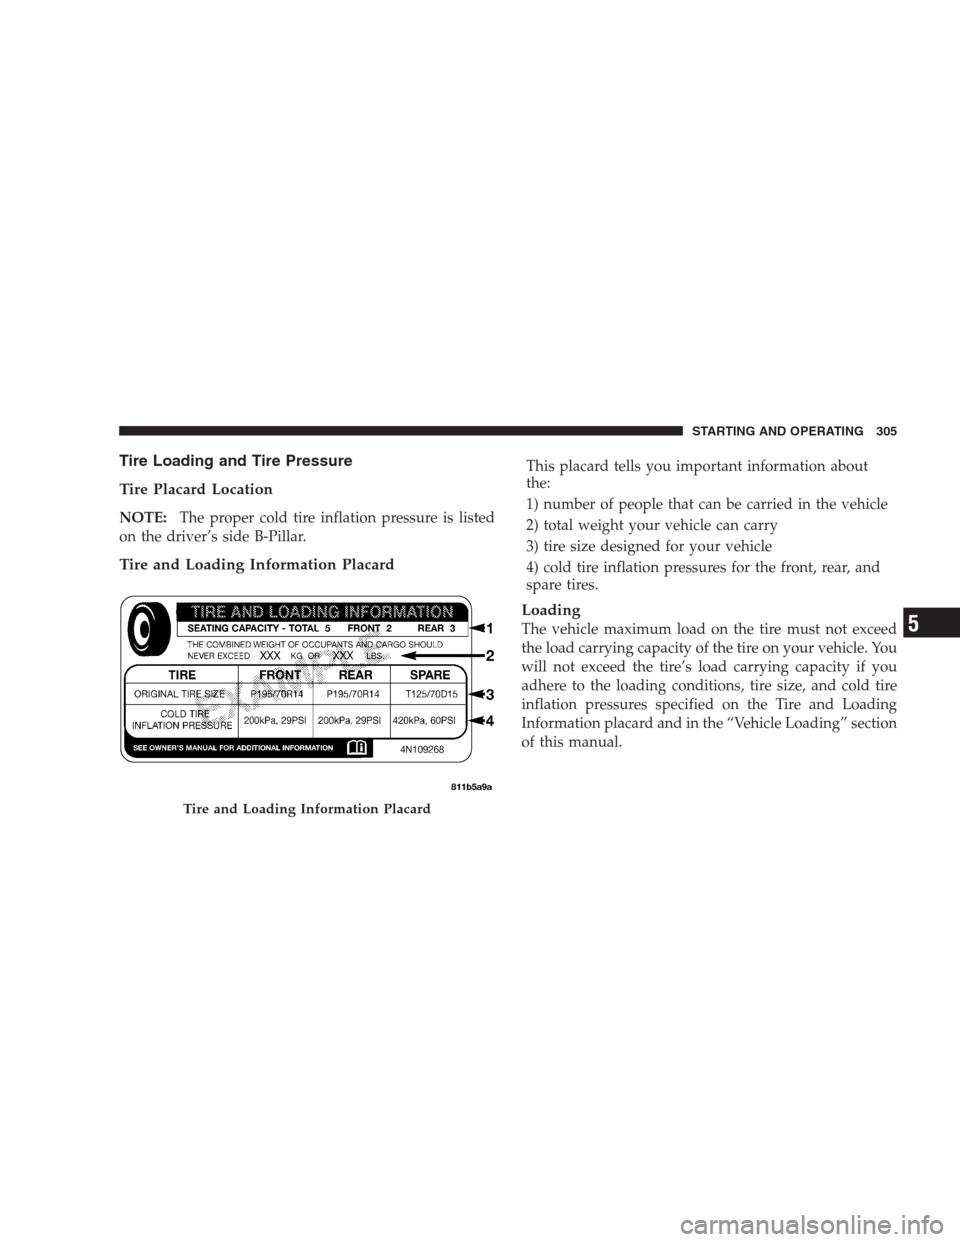
Tire and Loading Information Placard
This placard tells you important information about
the:
1) number of people that can be carried in the vehicle
2) total weight your vehicle can carry
3) tire size designed for your vehicle
4) cold tire inflation pressures for the front, rear, and
spare tires.
Loading
The vehicle maximum load on the tire must not exceed
the load carrying capacity of the tire on your vehicle. You
will not exceed the tire’s load carrying capacity if you
adhere to the loading conditions, tire size, and cold tire
inflation pressures specified on the Tire and Loading
Information placard and in the “Vehicle Loading” section
of this manual.
Tire and Loading Information Placard
STARTING AND OPERATING 305
5
Page 314 of 457

Tire Pressures for High Speed Operation
The manufacturer advocates driving at safe speeds
within posted speed limits. Where speed limits or condi-
tions are such that the vehicle can be driven at high
speeds, maintaining correct tire inflation pressure is very
important. Increased tire pressure and reduced vehicle
loading may be required for high-speed vehicle opera-
tion. Refer to original equipment or an authorized tire
dealer for recommended safe operating speeds, loading
and cold tire inflation pressures.
WARNING!
High speed driving with your vehicle under maxi-
mum load is dangerous. The added strain on your
tires could cause them to fail. You could have a
serious accident. Do not drive a vehicle loaded to the
maximum capacity at continuous speeds above
75 mph (120 km/h).
Radial Ply Tires
WARNING!
Combining radial ply tires with other types of tires
on your vehicle will cause your vehicle to handle
poorly. The instability could cause an accident. Al-
ways use radial ply tires in sets of four (or six, in the
case of trucks with dual rear wheels). Never combine
them with other types of tires.
Cuts and punctures in radial tires are repairable only in
the tread area because of sidewall flexing. Consult your
authorized tire dealer for radial tire repairs.
Compact Spare Tire — If Equipped
The compact spare is for temporary emergency use with
radial tires. It is engineered to be used on your style
vehicle only. Since this tire has limited tread life, the
original tire should be repaired (or replaced) and rein-
stalled at the first opportunity.
312 STARTING AND OPERATING
Page 315 of 457
WARNING!
•Temporary use spare tires are for emergency use
only. With these tires, do not drive more than
50 mph (80 km/h).
•Temporary-use spare tires have limited tread life.
When the tread is worn to the tread wear indica-
tors, the temporary use spare tire needs to be
replaced.
•Be sure to follow the warnings which apply to
your spare. Failure to do so could result in spare
tire failure and loss of vehicle control.
Do not install a wheel cover or attempt to mount a
conventional tire on the compact spare wheel, since the
wheel is designed specifically for the compact spare.
Do not install more than one compact spare tire/wheel
on the vehicle at any given time.
CAUTION!
Because of the reduced ground clearance, do not take
your vehicle through an automatic car wash with the
compact spare installed. Damage to the vehicle may
result.
Limited-Use Spare — If Equipped
The limited-use spare tire is for temporary emergency
use on your vehicle. This tire is identified by a limited-
use spare tire warning label located on the limited-use
spare tire and wheel assembly. This tire may look like the
original equipped tire on the front or rear axle of your
vehicle, but it is not. Installation of this limited-use spare
tire affects vehicle handling. Since it is not the same tire,
replace (or repair) the original tire and reinstall on the
vehicle at the first opportunity.
STARTING AND OPERATING 313
5