Page 323 of 457

CAUTION!
•The TPMS has been optimized for the original
equipment tires and wheels. TPMS pressures and
warnings have been established for the tire size
equipped on your vehicle. Undesirable system
operation or sensor damage may result when us-
ing replacement equipment that is not of the same
size, type, and/or style. Aftermarket wheels can
cause sensor damage. Do not use aftermarket tire
sealants or balance beads if your vehicle is
equipped with a TPMS, as damage to the sensors
may result.
•After inspecting or adjusting the tire pressure,
always reinstall the valve stem cap. This will
prevent moisture and dirt from entering the valve
stem, which could damage the Tire Pressure Moni-
toring Sensor.NOTE:
•The TPMS is not intended to replace normal tire care
and maintenance or to provide warning of a tire failure
or condition.
•The TPMS should not be used as a tire pressure gauge
while adjusting your tire pressure.
•Driving on a significantly under-inflated tire causes
the tire to overheat and can lead to tire failure.
Under-inflation also reduces fuel efficiency and tire
tread life, and may affect the vehicle’s handling and
stopping ability.
•The TPMS is not a substitute for proper tire mainte-
nance, and it is the driver ’s responsibility to maintain
correct tire pressure using an accurate tire gauge, even
if under-inflation has not reached the level to trigger
illumination of the Tire Pressure Monitoring Telltale
light.
STARTING AND OPERATING 321
5
Page 324 of 457

•Seasonal temperature changes will affect tire pressure,
and the TPMS will monitor the actual tire pressure in
the tire.
Base System
This is the TPMS warning indicator located in the
instrument cluster.
The TPMS uses wireless technology with wheel rim
mounted electronic sensors to monitor tire pressure lev-
els. Sensors, mounted to each wheel as part of the valve
stem, transmit tire pressure readings to the Receiver
Module.
NOTE:It is particularly important for you to check the
tire pressure in all of the tires on your vehicle regularly
and to maintain the proper pressure.The TPMS consists of the following components:
•Receiver Module
•Four Tire Pressure Monitoring Sensors
•Tire Pressure Monitoring Telltale Light
Tire Pressure Monitoring Low Pressure Warnings
The Tire Pressure Monitoring Telltale Light will illumi-
nate in the instrument cluster, and an audible chime will
be activated when one or more of the four active road tire
pressures are low. Should this occur, you should stop as
soon as possible, check the inflation pressure of each tire
on your vehicle, and inflate each tire to the vehicle’s
recommended cold placard pressure value. The system
will automatically update and the Tire Pressure Monitor-
ing Light will extinguish once the updated tire pressures
have been received. The vehicle may need to be driven
for up to 20 minutes above 15 mph (25 km/h) to receive
this information.
322 STARTING AND OPERATING
Page 327 of 457
•Various Tire Pressure Monitoring System Messages,
which display in the Electronic Vehicle Information
Center (EVIC)
•Yellow Tire Pressure Monitoring Telltale Light
Tire Pressure Monitoring Low Pressure Warnings
The Tire Pressure Monitoring Telltale Light will illumi-
nate in the instrument cluster and an audible chime will
be activated when one or more of the four active road tire
pressures are low. The audible chime will sound once
every ignition cycle for each condition that it detects. In
addition, the EVIC will display a graphic of the pressure
value(s) with the low tire(s) flashing.
Should a low tire condition occur on any of the four
active road tire(s), you should stop as soon as possible
and inflate all tires that are flashing on the graphic
display to the vehicle’s recommended cold placard pres-
sure value. The system will automatically update, the
Low Tire Pressure Display
STARTING AND OPERATING 325
5
Page 337 of 457

VEHICLE LOADING
As required by National Highway Traffic Safety Admin-
istration regulations, your vehicle has a certification label
affixed to the driver’s side door or B-Pillar.
Vehicle Certification Label
Your vehicle has a Vehicle Certification Label attached to
the driver’s door B-Pillar.
The label contains the following information:
•Name of manufacturer
•Month and year of manufacture
•Gross Vehicle Weight Rating (GVWR)
•Vehicle Identification Number (VIN)
•Type of Vehicle
•Month, Day and Hour of Manufacture (MDH)The bar code allows a computer scanner to read the
Vehicle Identification Number (VIN).
Gross Vehicle Weight Rating (GVWR)
The GVWR is the total allowable weight of your vehicle.
This includes driver, passengers, and cargo. The total
load must be limited so that you do not exceed the
GVWR.
Tire Size
The tire size on the Vehicle Certification Label represents
the actual tire size on your vehicle. Replacement tires
must be equal to the load capacity of this tire size.
Rim Size
This is the rim size that is appropriate for the tire size
listed.
Inflation Pressure
This is the cold tire inflation pressure for your vehicle, for
all loading conditions.
STARTING AND OPERATING 335
5
Page 345 of 457
•Safety chains must always be used between your
vehicle and trailer. Always connect the chains to the
frame or hook retainers of the vehicle hitch. Cross the
chains under the trailer tongue and allow enough
slack for turning corners.
•Vehicles with trailers should not be parked on a grade.
When parking, apply the parking brake on the tow
vehicle. Put the tow vehicle automatic transmission in
PARK. Always block or�chock�the trailer wheels.
•GCWR must not be exceeded.
•Total weight must be distributed between the tow
vehicle and the trailer such that the following four
ratings are not exceeded:
1. GVWR
2. GTW
3. GAWR4. Tongue weight rating for the trailer hitch utilized
(This requirement may limit the ability to always
achieve the 10% to 15% range of tongue weight as a
percentage of total trailer weight).
Towing Requirements — Tires
Do not attempt to tow a trailer while using a compact
spare tire.
Proper tire inflation pressures are essential to the safe
and satisfactory operation of your vehicle. Refer to
“Tires – General Information” in this section for proper
tire inflation procedures.
Also, check the trailer tires for proper tire inflation
pressures before trailer usage.
Check for signs of tire wear or visible tire damage
before towing a trailer. Refer to “Tires–General Infor-
mation” in this section for the proper inspection pro-
cedure.
STARTING AND OPERATING 343
5
Page 357 of 457
WARNING! (Continued)
•If working on or near a roadway, be extremely
careful of motor traffic.
•To assure that spare tires, flat or inflated are
securely stowed, spares must be stowed with the
valve stem facing the ground.
•Turn on the Hazard Warning flasher.
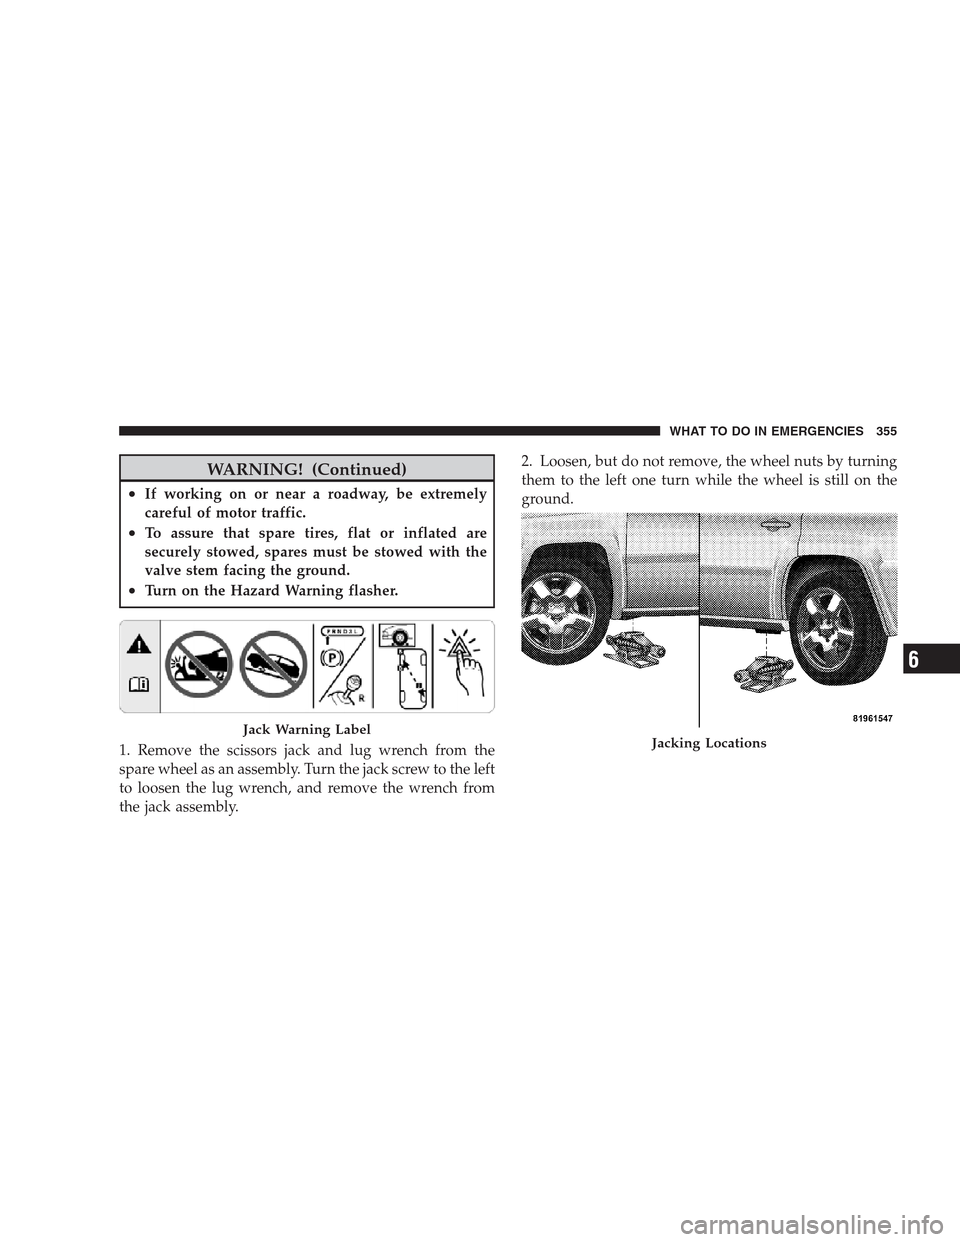
1. Remove the scissors jack and lug wrench from the
spare wheel as an assembly. Turn the jack screw to the left
to loosen the lug wrench, and remove the wrench from
the jack assembly.2. Loosen, but do not remove, the wheel nuts by turning
them to the left one turn while the wheel is still on the
ground.
Jack Warning LabelJacking Locations
WHAT TO DO IN EMERGENCIES 355
6
Page 359 of 457
6. Remove the wheel nuts and pull the wheel (and
bolt-on center cap if equipped) off the hub. Install the
spare wheel and wheel nuts with the cone shaped end of
the nuts toward the wheel. Lightly tighten the nuts. To
avoid the risk of forcing the vehicle off the jack, do not
tighten the nuts fully until the vehicle has been lowered.
7. Lower the vehicle by turning the jack screw to the left.
8. Finish tightening the nuts. Push down on the wrench
while tightening the wheel nuts. Alternate nuts until each
nut has been tightened twice. Correct wheel nut torque is
100 ft lbs (135 N·m). If you doubt that you have tightened
the nuts correctly, have them checked with a torque
wrench by your authorized dealer or at a service station.
9. Remove the wheel blocks and lower the jack until it is
free. Reassemble the lug wrench to the jack assembly and
stow it in the spare tire area. Secure the assembly using
the means provided.WARNING!
A loose tire or jack thrown forward in a collision or
hard stop could endanger the occupants of the ve-
hicle. Always stow the jack parts and the spare tire in
the places provided.
10. Place the deflated (flat) tire in the cargo area.Have
the tire repaired or replaced as soon as possible.
WARNING!
A loose tire thrown forward in a collision or hard
stop could injure the occupants in the vehicle. Have
the deflated (flat) tire repaired or replaced immedi-
ately.
11. Check the tire pressure as soon as possible. Correct
pressure as required.
WHAT TO DO IN EMERGENCIES 357
6
Page 436 of 457
Temperature Grades
The temperature grades are A (the highest), B, and C,
representing the tire’s resistance to the generation of heat
and its ability to dissipate heat, when tested under
controlled conditions on a specified indoor laboratory
test wheel. Sustained high temperature can cause the
material of the tire to degenerate and reduce tire life, and
excessive temperature can lead to sudden tire failure. The
grade C corresponds to a level of performance, which all
passenger car tires must meet under the Federal Motor
Vehicle Safety Standard No. 109. Grades B and A repre-
sent higher levels of performance on the laboratory test
wheel, than the minimum required by law.WARNING!
The temperature grade for this tire is established for
a tire that is properly inflated and not overloaded.
Excessive speed, under-inflation, or excessive load-
ing, either separately or in combination, can cause
heat buildup and possible tire failure.
434 IF YOU NEED CONSUMER ASSISTANCE