Page 114 of 521

Commands
The Voice Recognition system understands two types of
commands. Universal commands are available at all
times. Local commands are available if the supported
radio mode is active.
Changing the Volume
1. Start a dialogue by pressing the VR button.
2. Say a command (e.g., “Help”).
3. Use the ON/OFF VOLUME rotary knob to adjust the
volume to a comfortable level while the Voice Recogni-
tion system is speaking. Please note the volume setting
for VR is different than the audio system.
Main Menu
Start a dialogue by pressing the VR button. You may say
“Main Menu” to switch to the main menu.In this mode, you can say the following commands:
•“Radio” (to switch to the radio mode)
•“Disc” (to switch to the disc mode)
•“Memo” (to switch to the memo recorder)
•“System Setup” (to switch to system setup)
Radio AM (or Radio Long Wave or Radio Medium
Wave — If Equipped)
To switch to the AM band say “AM” or “Radio AM”. In
this mode, you may say the following commands:
•“Frequency” (to change the frequency)
•“Next Station” (to select the next station)
•“Previous Station” (to select the previous station)
•“Radio Menu” (to switch to the radio menu)
•“Main Menu” (to switch to the main menu)
112 UNDERSTANDING THE FEATURES OF YOUR VEHICLE
Page 116 of 521
 — During the
recording you may press the VR butto")
Memo
To switch to the voice recorder mode say “Memo”. In this
mode, you may say the following commands:
•“New Memo” (to record a new memo) — During the
recording you may press the VR button to stop record-
ing. You proceed by saying one of the following
commands:
�“Save” (to save the memo)
�“Continue” (to continue recording)
�“Delete” (to delete the recording)
•“Play Memos” (to play previously recorded memos)
— During the playback you may press the VR button
to stop playing memos. You proceed by saying one of
the following commands:
�“Repeat” (to repeat a memo)
�“Next” (to play the next memo)
�“Previous” (to play the previous memo)
�“Delete” (to delete a memo)
•“Delete All” (to delete all memos)
System Setup
To switch to system setup say “Setup”. In this mode, you
may say the following commands:
•“Language German”
•“Language Dutch”
•“Language Italian”
•“Language English”
•“Language French”
•“Language Spanish”
•“Tutorial”
•“Voice Training”
114 UNDERSTANDING THE FEATURES OF YOUR VEHICLE
Page 149 of 521

To Accelerate For Passing
Press the accelerator as you would normally. When the
pedal is released, the vehicle will return to the set speed.
Using Electronic Speed Control On Hills
The transmission may downshift on hills to maintain the
vehicle set speed.
NOTE:The Electronic Speed Control system maintains
speed up and down hills. A slight speed change on
moderate hills is normal.
On steep hills, a greater speed loss or gain may occur so
it may be preferable to drive without Electronic Speed
Control.
REAR PARK ASSIST — IF EQUIPPED
The Rear Park Assist provides visible and audible indi-
cations of the distance between the rear fascia and the
detected obstacle when backing up. Refer to the WarningSection and Note Section for limitations of this system
and recommendations.
The Rear Park Assist will remember the last system state
(enabled or disabled) from the last ignition cycle when
the ignition is changed to the ON position.
The Rear Park Assist can be active only when the shift
lever is in REVERSE. If the Rear Park Assist is enabled at
this shift lever position, the system will be active until the
vehicle speed is increased to approximately 11 mph
(18 km/h) or above. The system will be active again if the
vehicle speed is decreased to speeds less than approxi-
mately 10 mph (16 km/h).
Rear Park Assist Sensors
The four Rear Park Assist Sensors, located in the rear
fascia, monitor the area behind the vehicle that is within
the sensors’ field of view.
UNDERSTANDING THE FEATURES OF YOUR VEHICLE 147
3
Page 154 of 521

•To avoid vehicle damage, the vehicle must be
driven slowly when using the Rear Camera system
to be able to stop in time when an obstacle is seen.
It is recommended that the dri")
CAUTION! (Continued)
•To avoid vehicle damage, the vehicle must be
driven slowly when using the Rear Camera system
to be able to stop in time when an obstacle is seen.
It is recommended that the driver look frequently
over his/her shoulder when using the Rear Camera
system.
NOTE:If snow, ice, mud, or anything else builds up on
the camera lens, clean the lens, rinse with water, and dry
with a soft cloth. Do not cover the lens.
Turning the Rear Camera On or Off — With
Navigation Radio
1. Press the�menu�hard key.
2. Select�system setup�soft key.
3. Press the “camera setup” soft key.4. Enable or disable the rear camera feature by selecting
�enable rear camera in reverse�soft key.
5. Press the “save” soft key.
6. When the vehicle is shifted into REVERSE, an image of
the rear of the vehicle will appear with a caution note to
�check entire surroundings�displayed across the top of
the screen. After five seconds this note will disappear.
7. When the vehicle is shifted out of REVERSE, the rear
camera mode is exited and the navigation or audio screen
appears again.
Turning the Rear Camera On or Off — Without
Navigation Radio
1. Press the�menu�hard key.
2. Select�system setup�soft key.
3. Enable or disable the rear camera feature by selecting
�enable rear camera in reverse�soft key.
152 UNDERSTANDING THE FEATURES OF YOUR VEHICLE
Page 155 of 521
4. When the vehicle is shifted into REVERSE, an image of
the rear of the vehicle will appear with a caution note to
�check entire surroundings�displayed across the top of
the screen. After five seconds this note will disappear.
5. When the vehicle is shifted out of REVERSE, the rear
camera mode is exited and the audio screen appears
again.
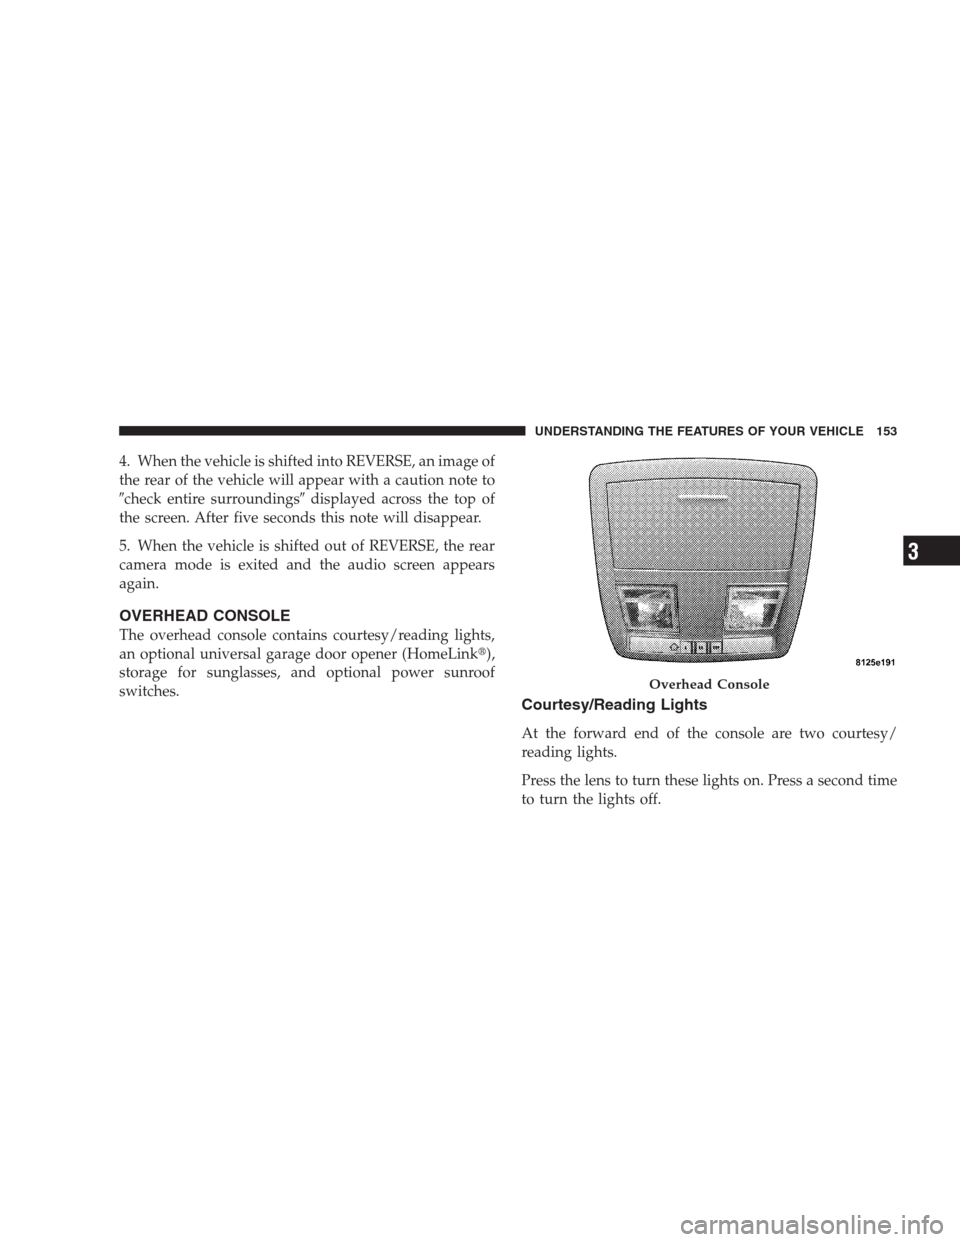
OVERHEAD CONSOLE
The overhead console contains courtesy/reading lights,
an optional universal garage door opener (HomeLink�),
storage for sunglasses, and optional power sunroof
switches.
Courtesy/Reading Lights
At the forward end of the console are two courtesy/
reading lights.
Press the lens to turn these lights on. Press a second time
to turn the lights off.
Overhead Console
UNDERSTANDING THE FEATURES OF YOUR VEHICLE 153
3
Page 157 of 521

WARNING!
•Your motorized door or gate will open and close
while you are training the Universal Transceiver.
Do not train the transceiver if people or pets are in
the path of the door or gate. Only use this trans-
ceiver with a garage door opener that has a “stop
and reverse” feature as required by federal safety
standards. This includes most garage door opener
models manufactured after 1982. Do not use a
garage door opener without these safety features.
Call toll-free 1–800–355–3515 or, on the Internet at
www.HomeLink.com for safety information or as-
sistance.
•Vehicle exhaust contains carbon monoxide, a dan-
gerous gas. Do not run your vehicle in the garage
while training the transceiver. Exhaust gas can
cause serious injury or death.
Programming HomeLink�
Before You Begin
If you have not trained any of the HomeLink�buttons,
erase all channels before you begin training.
To do this, press and hold the two outside buttons for up
to 20 seconds. The EVIC will display “CLEARING
CHANNELS.” Release the buttons when the EVIC mes-
sage states “CHANNELS CLEARED.”
It is recommended that a new battery be placed in the
hand-held transmitter of the device being programmed
to HomeLink�for more efficient training and accurate
transmission of the radio-frequency signal.
Your vehicle should be parked outside of the garage
while training.
1. Turn the ignition switch to the ON/RUN position.
UNDERSTANDING THE FEATURES OF YOUR VEHICLE 155
3
Page 180 of 521
......... 220
▫Info Button (Disc Mode For MP3/WMA
Play)............................. 221
�AM/FM/CD/DVD Radio (")
▫Notes On Playing MP3/WMA Files....... 218
▫List Button
(Disc Mode For MP3/WMA Play)......... 220
▫Info Button (Disc Mode For MP3/WMA
Play)............................. 221
�AM/FM/CD/DVD Radio (RER/REN) – If
Equipped............................ 223
▫Operating Instructions — Voice Recognition
System (VR) — If Equipped............. 223
▫Operating Instructions — uconnect�phone
— If Equipped...................... 223
▫Clock Setting Procedure............... 223
�Sales Code RES — AM/FM Stereo Radio With
CD Player (MP3 AUX Jack)............... 226
▫Operating Instructions — Radio Mode..... 226▫Operation Instructions — CD Mode For CD
And MP3 Audio Play................. 229
▫Notes On Playing MP3 Files............ 231
▫Operation Instructions - Auxiliary Mode.... 234
�Sales Code RES/RSC — AM/FM Stereo Radio
With CD Player (MP3 AUX Jack) And Sirius
Radio............................... 235
▫Operating Instructions — Radio Mode..... 235
▫Operation Instructions — CD Mode For CD
And MP3 Audio Play................. 241
▫Notes On Playing MP3 Files............ 243
▫List Button (CD Mode For MP3 Play)...... 245
▫Info Button (CD Mode For MP3 Play)...... 246
178 UNDERSTANDING YOUR INSTRUMENT PANEL
Page 193 of 521

17. 4WD LOW Indicator — If Equipped
This light alerts the driver that the vehicle is in
the 4WD LOW mode. The front and rear drive-
shafts are mechanically locked together forcing
the front and rear wheels to rotate at the same
speed.
18. Seat Belt Reminder Light
When the ignition switch is first turned ON, this
light will turn on for five to eight seconds as a bulb
check. During the bulb check, if the driver’s seat
belt is unbuckled, a chime will sound. After the bulb
check or when driving, if the driver or front passenger
seat belt remains unbuckled, the Seat Belt Indicator Light
will flash or remain on continuously. Refer to�Occupant
Restraints/Enhanced Seat Belt Use Reminder System
(BeltAlert�)�in Section 2 for more information.19. Cruise Indicator
This indicator lights when the speed control
system is turned ON.
20. Odometer
The odometer shows the total distance the vehicle has
been driven.
U.S. federal regulations require that upon transfer of
vehicle ownership, the seller certify to the purchaser the
correct mileage that the vehicle has been driven. There-
fore, if the odometer reading is changed during repair or
replacement, be sure to keep a record of the reading
before and after the service so that the correct mileage can
be determined.
21. Shift Lever Indicator
This display indicator shows the automatic transmission
shift lever selection.
UNDERSTANDING YOUR INSTRUMENT PANEL 191
4