Page 68 of 519

Here are some tips for getting the most out of your child
restraint:
•Before buying any restraint system, make sure that it
has a label certifying that it meets all applicable Safety
Standards. Chrysler LLC also recommends that you
try a child restraint in the vehicle seats where you will
use it before you buy it.
•The restraint must be appropriate for your child’s
weight and height. Check the label on the restraint for
weight and height limits.
•Carefully follow the instructions that come with the
restraint. If you install the restraint improperly, it may
not work when you need it.
•The front passenger seat belt is equipped with a
cinching latch plate. The second and third row seating
positions have automatic locking retractors. Both types
of seat belts are designed to keep the lap portion tight
around the child restraint so that it is not necessary touse a locking clip. If the seat belt has a cinching latch
plate, pulling up on the shoulder portion of the
lap/shoulder belt will tighten the belt (the cinching
latch plate will keep the belt tight, however, any seat
belt system will loosen with time, so check the belt
occasionally and pull it tight if necessary). For the
second and third row seat belts with the automatic
locking retractor, pull the belt from the retractor until
there is enough to allow you to pass through the child
restraint and slide the latch plate into the buckle. Then,
pull the belt until it is fully extracted from the retrac-
tor. Allow the belt to return to the retractor, pulling on
the excess webbing to tighten the lap portion about the
child restraint. For additional information, refer to
�Automatic Locking Mode�earlier in this section.•In your vehicle’s 2nd row outboard seating positions,
you may have trouble tightening the lap/shoulder belt
on the child restraint because the buckle or latch plate
is too close to the belt path opening on the restraint.
Disconnect the latch plate from the buckle and twist
66 THINGS TO KNOW BEFORE STARTING YOUR VEHICLE
Page 144 of 519

NOTE:If the windshield or SmartBeam mirror is re-
placed, the SmartBeam mirror must be re-aimed to
ensure proper performance. See your local authorized
dealer.
To Activate
1. Select “Auto Headlamp Low/High Beams? — Low/
High Beam.” Refer to “Electronic Vehicle Information
Center (EVIC) — Customer Programmable Features” in
Section 4 of this manual.
2. Turn the end of the multifunction lever to the AUTO
headlight position.
3. Push the multifunction lever away from you (toward
front of vehicle) to engage the high beam mode.
NOTE:This system will not activate until the vehicle is
at or above 20 mph (32 km/h).
To Deactivate
1. Pull back on the multifunction lever to manually
deactivate the system (normal operation of high beams).
2. Pull back on the multifunction lever once again to
reactivate the system.
NOTE:Broken, muddy, or obstructed headlights and
taillights of vehicles in the field of view will cause
headlights to remain on longer (closer to the vehicle).
Also, dirt, film, and other obstructions (sticker, toll box,
etc.) on the windshield or camera lens will cause the
system to function improperly.
Automatic Headlight Leveling — HID Headlights
Only
This feature prevents the headlights from interfering
with the vision of oncoming drivers. Headlight leveling
automatically adjusts the height of the headlight beam in
reaction to changes in vehicle pitch.
142 UNDERSTANDING THE FEATURES OF YOUR VEHICLE
Page 341 of 519
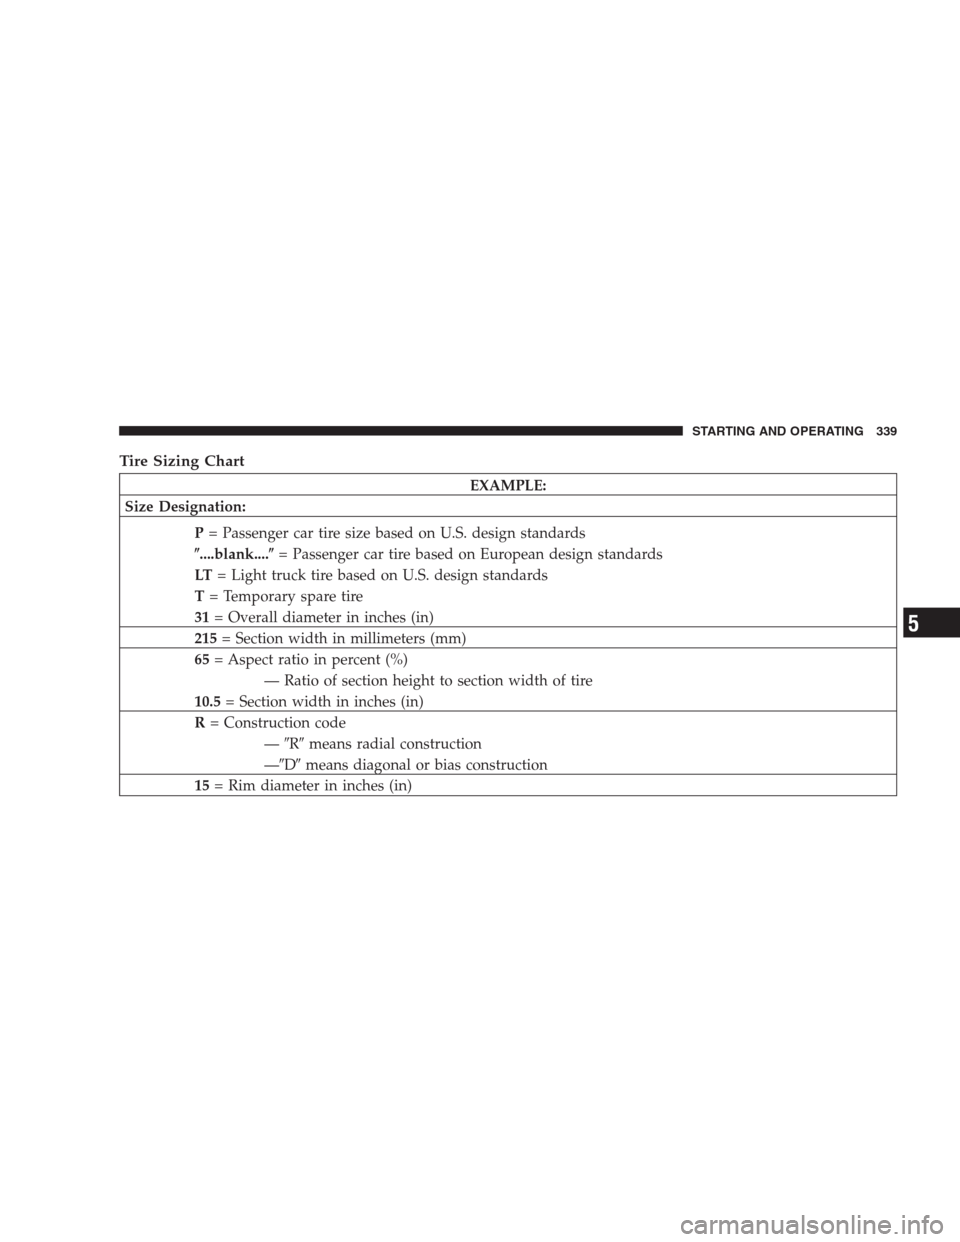
Tire Sizing Chart
EXAMPLE:
Size Designation:
P= Passenger car tire size based on U.S. design standards
�....blank....�= Passenger car tire based on European design standards
LT= Light truck tire based on U.S. design standards
T= Temporary spare tire
31= Overall diameter in inches (in)
215= Section width in millimeters (mm)
65= Aspect ratio in percent (%)
— Ratio of section height to section width of tire
10.5= Section width in inches (in)
R= Construction code
—�R�means radial construction
—�D�means diagonal or bias construction
15= Rim diameter in inches (in)
STARTING AND OPERATING 339
5
Page 383 of 519

The GCWR is the total permis")
measure GTW is to put your fully loaded trailer on a
vehicle scale. The entire weight of the trailer must be
supported by the scale.
Gross Combination Weight Rating (GCWR)
The GCWR is the total permissible weight of your vehicle
and trailer when weighed in combination. (Note that
GCWR ratings include a 150 lbs (68 kg) allowance for the
presence of a driver).
Gross Axle Weight Rating (GAWR)
The GAWR is the maximum capacity of the front and rear
axles. Distribute the load over the front and rear axles
evenly. Make sure that you do not exceed either front or
rear GAWR.
WARNING!
It is important that you do not exceed the maximum
front or rear GAWR. A dangerous driving condition
can result if either rating is exceeded. You could lose
control of the vehicle and have an accident.
Trailer Tongue Weight (TW)
The TW is the downward force exerted on the hitch ball
by the trailer. In most cases, it should not be less than 10%
or more than 15% of the trailer load. You must consider
this as part of the load on your vehicle.
Frontal Area
The frontal area is the maximum height and maximum
width of the front of a trailer.
STARTING AND OPERATING 381
5