Page 265 of 519
number 888-539-7474, or visit the Sirius web site at
www.sirius.com, or at www.siriuscanada.ca for Cana-
dian residents.
Electronic Serial Number/Sirius Identification
Number (ESN/SID)
Please have the following information available when
calling:
1. The Electronic Serial Number/Sirius Identification
Number (ESN/SID).
2. Your Vehicle Identification Number.
To access the ESN/SID, refer to the following steps:
ESN/SID Access With REQ/RES Radios
With the ignition switch in the ON/RUN or ACC posi-
tion and the radio on, press the SETUP button and scroll
using the Tune/Scroll control knob until Sirius ID is
selected. Press the Tune/Scroll control knob and theSirius ID number will display. The Sirius ID number
display will time out in two minutes. Press any button on
the radio to exit this screen.
ESN/SID Access With REN/RER Radios
While in SAT mode, press the MENU button on the radio
faceplate.
Next, touch the SUBSCRIPTION tab on the touch screen.
All the ESNs that apply to your vehicle will display.
Selecting Satellite Mode
Press the SAT button until�SAT�appears in the display. A
CD may remain in the radio while in the Satellite radio
mode.
UNDERSTANDING YOUR INSTRUMENT PANEL 263
4
Page 267 of 519
INFO Button
Pressing the INFO button will cycle the display informa-
tion between Artist, Song Title, and Composer (if avail-
able). Also, pressing and holding the INFO button for an
additional three seconds will make the radio display the
Song Title all of the time (press and hold again to return
to normal display).
RW/FF
Pressing the RW (Rewind) or FF (Fast Forward) buttons
causes the tuner to search for the next channel in the
direction of the arrows.
TUNE Control (Rotary)
Turn the rotary Tune/Scroll control knob clockwise to
increase or counterclockwise to decrease the channel.
MUSIC TYPE Button
Pressing this button once will turn on the Music Type
mode for five seconds. Pressing the MUSIC TYPE button
or turning the Tune/Scroll control knob within five
seconds will allow the program format type to be se-
lected.
Toggle the MUSIC TYPE button again to select the music
type.
By pressing the SEEK button when the Music Type
function is active, the radio will be tuned to the next
channel with the same selected Music Type name.
If a preset button is activated while in the Music Type
(Program Type) mode, the Music Type mode will be
exited and the radio will tune to the preset channel.
UNDERSTANDING YOUR INSTRUMENT PANEL 265
4
Page 268 of 519
SETUP Button
Pressing the SETUP button allows you to select the
following items:
•Display Sirius ID number — Press the AUDIO/
SELECT button to display the Sirius ID number. This
number is used to activate, deactivate, or change the
Sirius subscription.
SET Button – To Set the Pushbutton Memory
When you are receiving a channel that you wish to
commit to pushbutton memory, press the SET button.
The symbol SET 1 will now show in the display window.
Select the button (1-6) you wish to lock onto this channel
and press and release that button. If a button is not
selected within five seconds after pressing the SET but-
ton, the channel will continue to play but will not be
stored into pushbutton memory.You may add a second channel to each pushbutton by
repeating the above procedure with this exception: Press
the SET button twice and SET 2 will show in the display
window. Each button can be set for SET 1 and SET 2. This
allows a total of 12 Satellite channels to be stored into
pushbutton memory. The channels stored in SET 2
memory can be selected by pressing the pushbutton
twice.
Every time a preset button is used, a corresponding
button number will display.
Buttons1-6
These buttons tune the radio to the channels that you
commit to pushbutton memory (12 Satellite stations).
Operating Instructions - Hands-Free Phone (If
Equipped)
Refer to “Hands-Free Communication (UConnect�)” in
Section 3.
266 UNDERSTANDING YOUR INSTRUMENT PANEL
Page 269 of 519
SIRIUS BACKSEAT TV™ — IF EQUIPPED
Satellite video uses direct satellite receiver broadcasting
technology to provide streaming video. The subscription
service provider is SIRIUS Satellite Radio. SIRIUS Backseat
TV™ offers three video channels for family entertainment,
directly from its satellites and broadcasting studios.
NOTE:SIRIUS service is not available in Hawaii and
has limited coverage in Alaska.
Refer to your Video Entertainment System (VES)™, RER
Navigation or REN Multimedia User Manuals for de-
tailed operating instructions.
VIDEO ENTERTAINMENT SYSTEM™ (SALES
CODE XRV) — IF EQUIPPED
The optional VES™ (Video Entertainment System) con-
sists of a LCD (liquid crystal display) screen, a battery-
powered remote control, and two headsets. Refer to your
VES™ User’s Manual for detailed operating instructions.The LCD screen is located on the headliner behind the
front seats.Lowering the Display Screen
UNDERSTANDING YOUR INSTRUMENT PANEL 267
4
Page 303 of 519
Electronic Range Select (ERS)Operation
The Electronic Range Select (ERS) shift control allows
you to move the shift lever left (-) or right (+) when the
shift lever is in the DRIVE position, allowing you to limit
the highest available gear. For example, if the driver
shifts the transmission into ERS 3 (third gear), the trans-
mission will never shift above third gear, but can shift
down to 2 (second) or 1 (first), when needed.
3.7L Engine
When in the DRIVE position, the first tap to the left (-),
will shift down one gear and will display that gear. For
example, if you are in DRIVE and are in 5th gear, when
you tap the shift lever one time to the left (-), the
transmission will downshift to 4th gear and the display
will show 4. Another tap to the left (-) will shift the
transmission into 3rd gear.4.7L and 5.7L Engine
On vehicles equipped with 4.7L or 5.7L engines, use of
ERS (or TOW/HAUL mode) also enables an additional
underdrive gear which is not normally used during
through-gear accelerations. This additional gear im-
proves vehicle performance and cooling capability when
towing a trailer on certain grades. ERS 1,2, and 3 are
underdrive gears; ERS 4 is direct drive. ERS 5 (Overdrive)
is the same as the normal 4th gear. When in the DRIVE
position in 1st through 4th gear, the first tap to the left (-),
will display the ERS designation for the current gear (the
transmission will not downshift). For example, if you are
in DRIVE and are in 3rd (direct) gear, when you tap the
shift lever one time to the left (-), the display will show 4
(ERS 4 is direct gear). Another tap to the left (-) will shift
the transmission down to ERS 3 (the added underdrive
gear). When in the DRIVE position in 5th gear, the first
tap to the left (-) will downshift the transmission and
STARTING AND OPERATING 301
5
Page 304 of 519
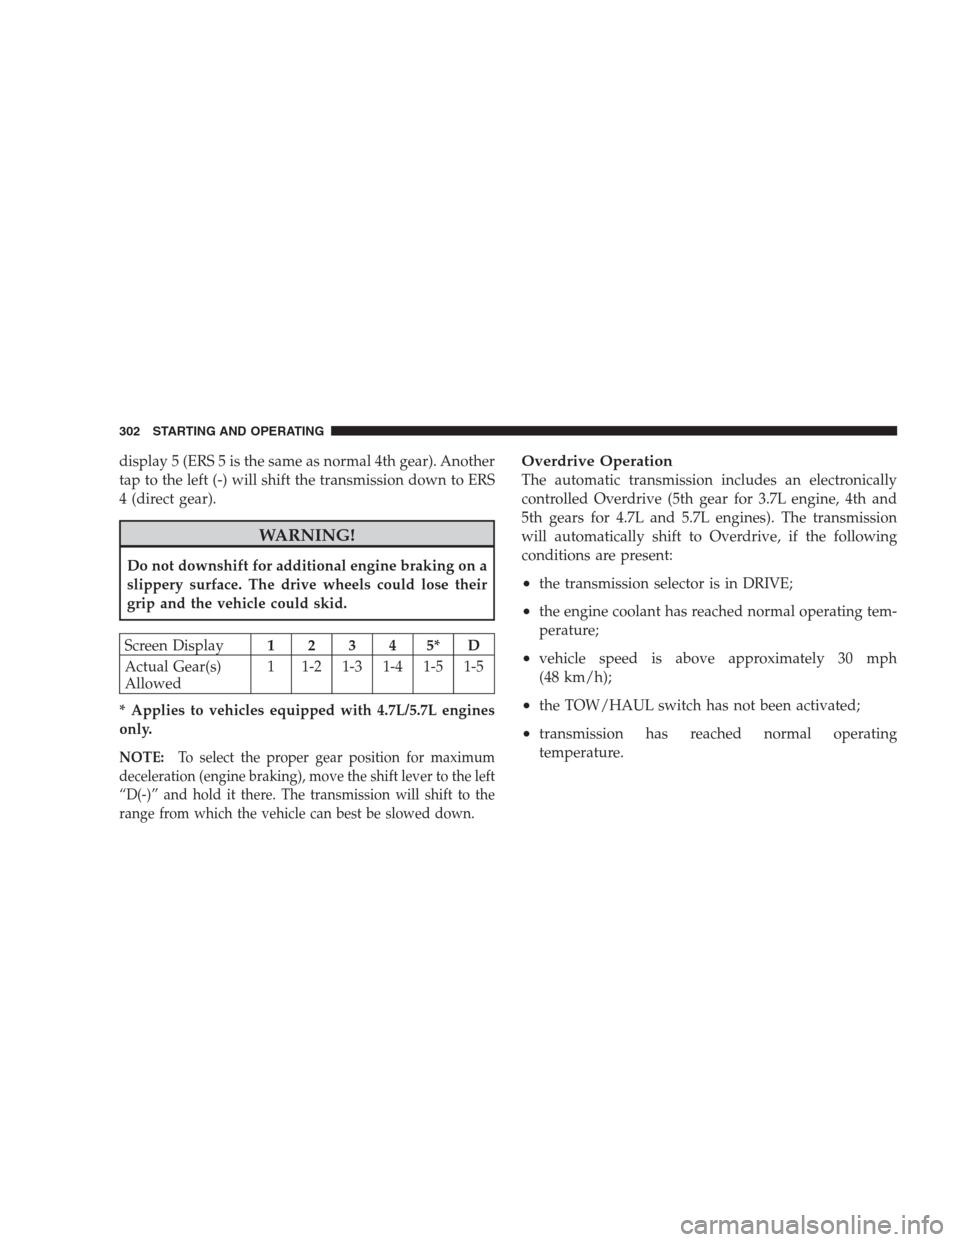
display 5 (ERS 5 is the same as normal 4th gear). Another
tap to the left (-) will shift the transmission down to ERS
4 (direct gear).
WARNING!
Do not downshift for additional engine braking on a
slippery surface. The drive wheels could lose their
grip and the vehicle could skid.
Screen Display12345*D
Actual Gear(s)
Allowed1 1-2 1-3 1-4 1-5 1-5
* Applies to vehicles equipped with 4.7L/5.7L engines
only.
NOTE:To select the proper gear position for maximum
deceleration (engine braking), move the shift lever to the left
“D(-)” and hold it there. The transmission will shift to the
range from which the vehicle can best be slowed down.
Overdrive Operation
The automatic transmission includes an electronically
controlled Overdrive (5th gear for 3.7L engine, 4th and
5th gears for 4.7L and 5.7L engines). The transmission
will automatically shift to Overdrive, if the following
conditions are present:
•the transmission selector is in DRIVE;
•the engine coolant has reached normal operating tem-
perature;
•vehicle speed is above approximately 30 mph
(48 km/h);
•the TOW/HAUL switch has not been activated;
•transmission has reached normal operating
temperature.
302 STARTING AND OPERATING
Page 305 of 519
NOTE:If the vehicle is started in extremely cold tem-
peratures, the transmission may not shift into Overdrive
and will automatically select the most desirable gear for
operation at this temperature. Normal operation will
resume when the transmission fluid temperature has
risen to a suitable level. Refer also to the Note under
torque converter clutch, later in this section.
During cold temperature operation you may notice de-
layed upshifts, depending on engine and transmission
temperature. This feature improves the warmup time of
the engine and transmission.
If the transmission temperature gets extremely hot, the
transmission will automatically select the most desirable
gear for operation at this temperature. If the transmission
temperature becomes hot enough, the “TRANSMISSIONOVER TEMP” message may display, and the transmis-
sion may downshift out of Overdrive until the transmis-
sion cools down. After cool down, the transmission will
resume normal operation.
In high ambient temperatures with sustained high engine
speed and load, an upshift, followed shortly thereafter by
a downshift, may occur. This is a normal part of the
overheat protection strategy when operating in the
TOW/HAUL mode.
The transmission will downshift from Overdrive, to the
most desirable gear, if the accelerator pedal is fully
depressed at vehicle speeds above approximately 35 mph
(56 km/h).
STARTING AND OPERATING 303
5
Page 313 of 519
clutch teeth alignment and shift completion to occur.
The preferred method is with the vehicle rolling 0 to
3 mph (0 to 5 km/h). If the vehicle is moving faster
than 3 mph (5 km/h), the transfer case will not allow
the shift.
NEUTRAL Shift Procedure
1. Key ON, engine off.
2. Vehicle stopped, with foot on brake.
3. Place transmission into NEUTRAL.
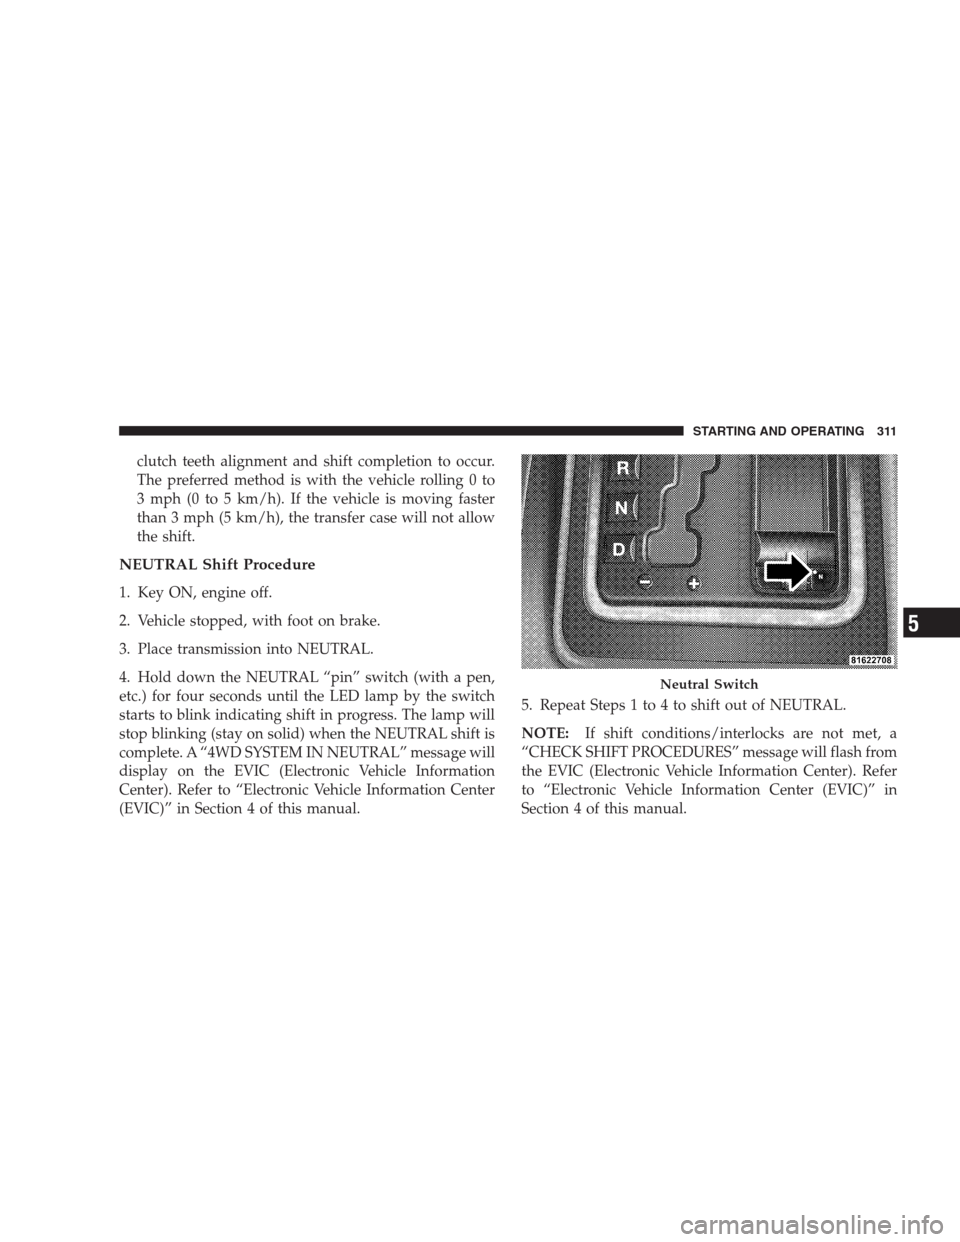
4. Hold down the NEUTRAL “pin” switch (with a pen,
etc.) for four seconds until the LED lamp by the switch
starts to blink indicating shift in progress. The lamp will
stop blinking (stay on solid) when the NEUTRAL shift is
complete. A “4WD SYSTEM IN NEUTRAL” message will
display on the EVIC (Electronic Vehicle Information
Center). Refer to “Electronic Vehicle Information Center
(EVIC)” in Section 4 of this manual.5. Repeat Steps 1 to 4 to shift out of NEUTRAL.
NOTE:If shift conditions/interlocks are not met, a
“CHECK SHIFT PROCEDURES” message will flash from
the EVIC (Electronic Vehicle Information Center). Refer
to “Electronic Vehicle Information Center (EVIC)” in
Section 4 of this manual.
Neutral Switch
STARTING AND OPERATING 311
5