2009 JAGUAR XF remove seats
[x] Cancel search: remove seatsPage 44 of 391
Seats
44
HEAD RESTRAINTS
For information on adjusting power-operated
head restraints, refer to the Electric seats
section. SeeELECTRIC SEATS (page 42).
Whiplash protection
Both front seats are equi pped with Active Head
Restraints (AHR), which reduce the risk of neck
and spinal injury (whiplash) in the event of a
rear impact. See WHIPLASH PROTECTION
(page 57).
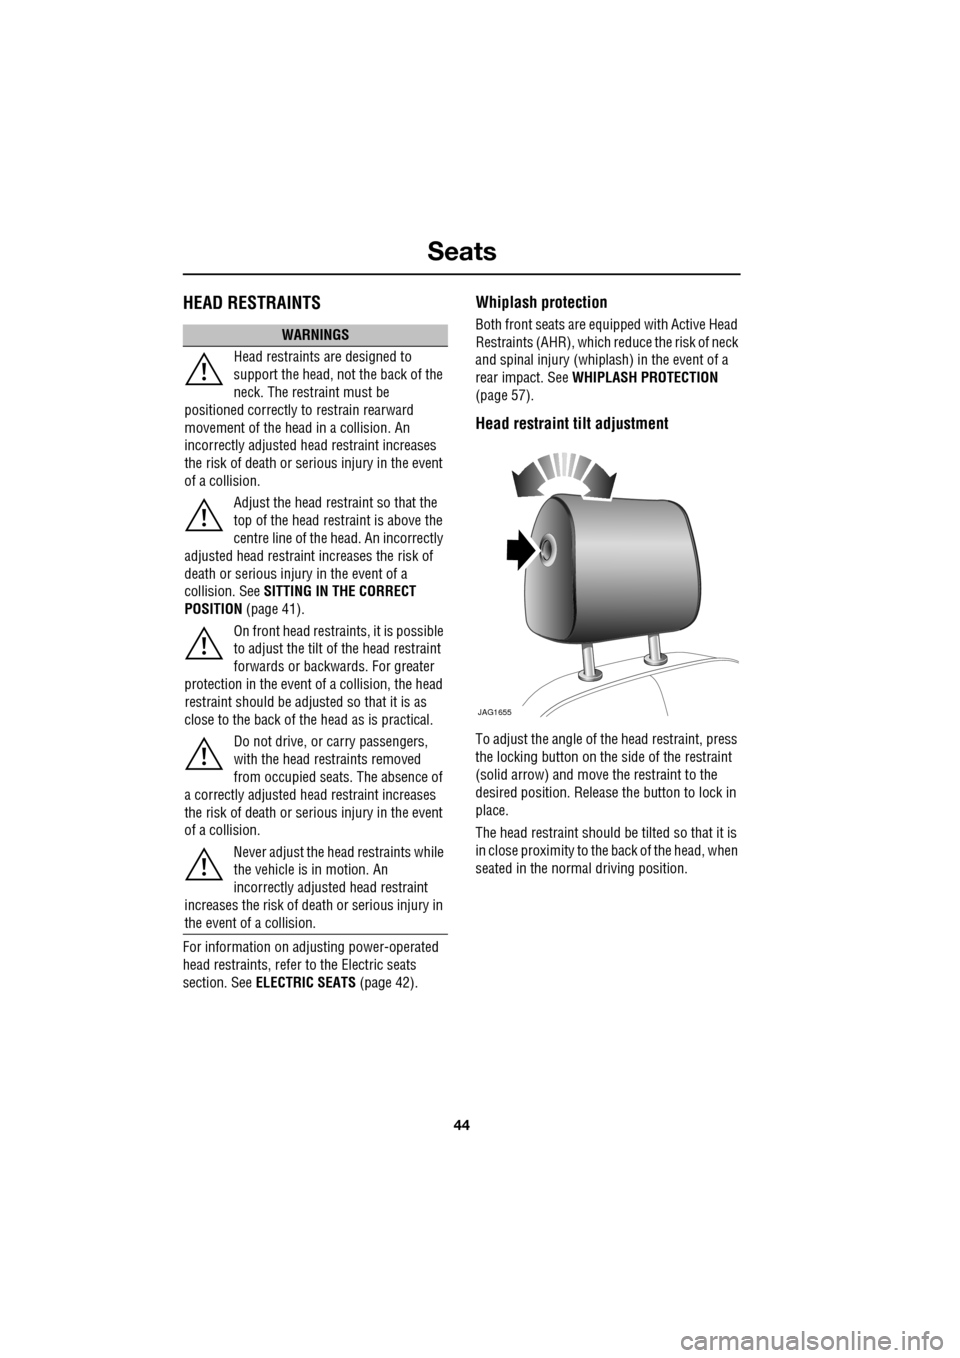
Head restraint tilt adjustment
To adjust the angle of the head restraint, press
the locking button on the side of the restraint
(solid arrow) and move the restraint to the
desired position. Release the button to lock in
place.
The head restraint should be tilted so that it is
in close proximity to the back of the head, when
seated in the normal driving position.
WARNINGS
Head restraints are designed to
support the head, not the back of the
neck. The restraint must be
positioned correctly to restrain rearward
movement of the head in a collision. An
incorrectly adjusted head restraint increases
the risk of death or seri ous injury in the event
of a collision.
Adjust the head restraint so that the
top of the head restraint is above the
centre line of the head. An incorrectly
adjusted head restraint increases the risk of
death or serious injury in the event of a
collision. See SITTING IN THE CORRECT
POSITION (page 41).
On front head restra ints, it is possible
to adjust the tilt of the head restraint
forwards or backwards. For greater
protection in the event of a collision, the head
restraint should be adjust ed so that it is as
close to the back of the head as is practical.
Do not drive, or carry passengers,
with the head restraints removed
from occupied seat s. The absence of
a correctly adjusted head restraint increases
the risk of death or seri ous injury in the event
of a collision.
Never adjust the head restraints while
the vehicle is in motion. An
incorrectly adjusted head restraint
increases the risk of death or serious injury in
the event of a collision.
JAG1655
Page 45 of 391
45
Seats
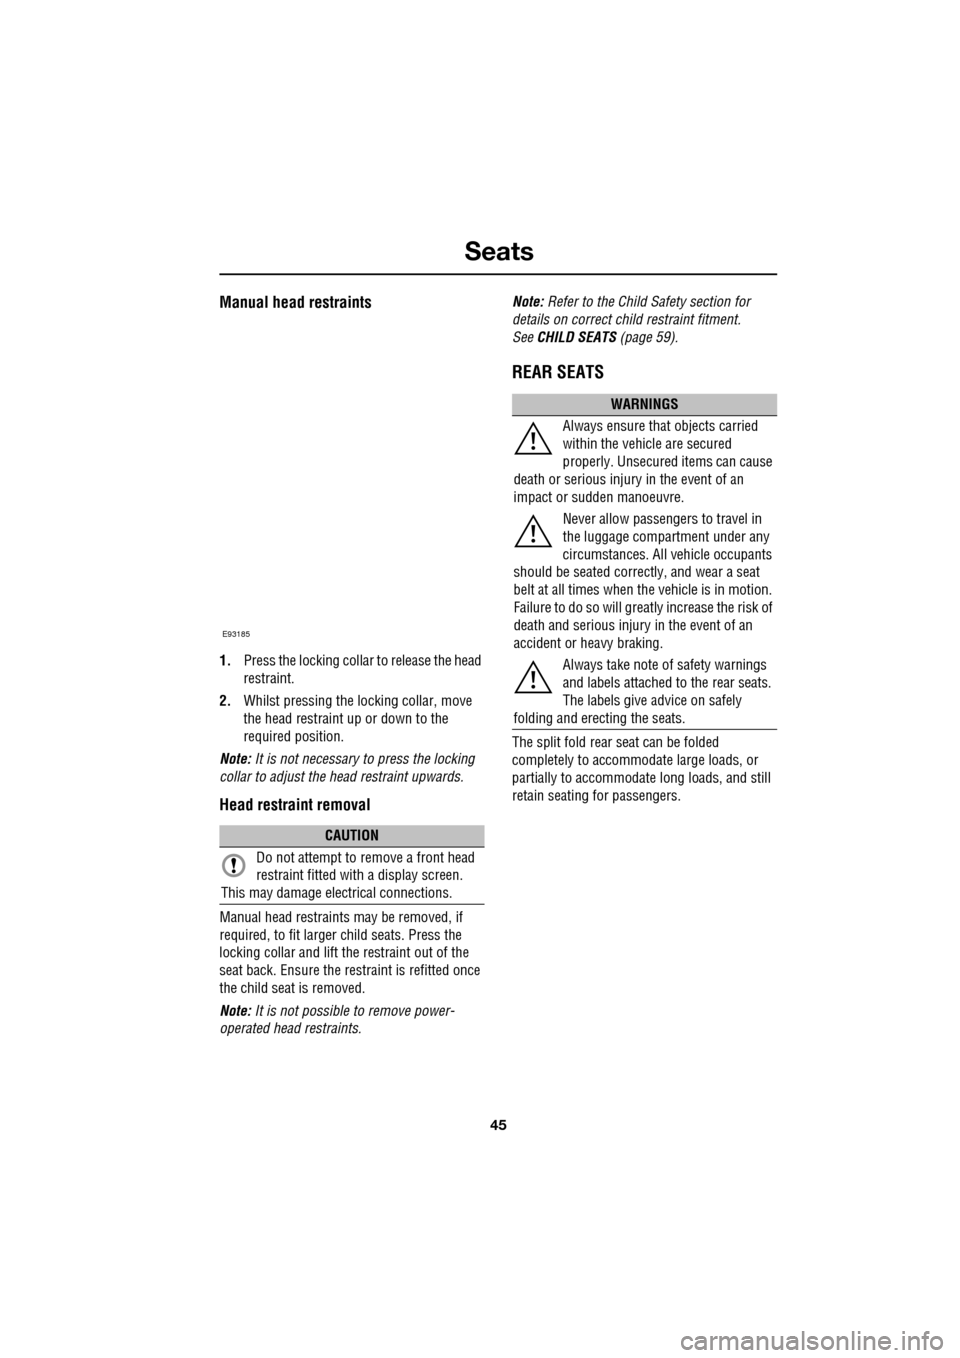
Manual head restraints
1.Press the locking collar to release the head
restraint.
2. Whilst pressing the locking collar, move
the head restraint up or down to the
required position.
Note: It is not necessary to press the locking
collar to adjust the head restraint upwards.
Head restraint removal
Manual head restraints may be removed, if
required, to fit larger child seats. Press the
locking collar and lift the restraint out of the
seat back. Ensure the restraint is refitted once
the child seat is removed.
Note: It is not possible to remove power-
operated head restraints. Note:
Refer to the Child Safety section for
details on correct child restraint fitment.
See CHILD SEATS (page 59).
REAR SEATS
The split fold rear seat can be folded
completely to accommodate large loads, or
partially to accommodate long loads, and still
retain seating for passengers.
CAUTION
Do not attempt to remove a front head
restraint fitted with a display screen.
This may damage elec trical connections.
E93185
WARNINGS
Always ensure that objects carried
within the vehicle are secured
properly. Unsecure d items can cause
death or serious injury in the event of an
impact or sudden manoeuvre.
Never allow passengers to travel in
the luggage compartment under any
circumstances. All vehicle occupants
should be seated correct ly, and wear a seat
belt at all times when the vehicle is in motion.
Failure to do so will greatl y increase the risk of
death and serious injury in the event of an
accident or heavy braking.
Always take note of safety warnings
and labels attached to the rear seats.
The labels give advice on safely
folding and erecting the seats.
Page 46 of 391

Seats
46
Folding the rear seats
Stow the rear seat armrest.
With the luggage compartment open, pull the
relevant seat release handle, located as shown
(illustration shows view from the rear of the
vehicle, with the luggage compartment open).Fold the seat back part-way forward and
remove the head restraint(s) from the folded
seat back. See
HEAD RESTRAINTS (page 44).
Fully fold the seat back forward and, if required,
repeat the process for the second seat section.
JAG0925
JAG0926
WARNING
Ensure that the removed rear head
restraints are stored securely. Never
leave them loose in the vehicle, as
they can cause serious injury or death in the
event of an accident, he avy braking, or sudden
manoeuvres.
JAG0927
JAG0928
Page 49 of 391

49
Seat belts
PRINCIPLE OF OPERATION
Seat beltsSeat belt safety
WARNINGS
Seat belts are designed to bear upon
the bony structure of the body, and
should be worn low across the front
of the pelvis or the pe lvis chest and shoulders,
as applicable; wearing the lap section of the
belt across the abdominal area must be
avoided.
Seat belts should be adjusted as
firmly as possible, consistent with
comfort, to provide the protection for
which they have been designed. A slack belt
will greatly reduce the protection afforded to
the wearer.
Care should be taken to avoid
contamination of the webbing with
polishes, oils and chemicals, and
particularly battery acid . Cleaning may safely
be carried out using mild soap and water.
The belt should be replaced if
webbing becomes frayed,
contaminated or damaged.
It is essential to replace the entire
assembly after it has been worn in a
severe impact even if damage to the
assembly is not obvious.
Belts should not be worn with the
straps twisted.
E82942
WARNINGS
Do not carry hard, fragile or sharp
items between your person and the
seat belt. In an impact, the pressure
from the seat belt on such items can cause
them to break, which in turn may cause death
or serious injuries.
Each belt assembly must only be used
by one occupant; it is dangerous to
put a belt around a child being carried
on the occupant's lap.
The occupants of the front seats
should not travel with the seat back at
more than 30 degrees from upright.
Doing so will reduce the protection afforded by
the seat belt.
WARNINGS
Seat belts should be worn by all
vehicle occupants, for every journey,
no matter how short. Failure to do so,
will greatly increase the risk of death or
serious injury in the event of an accident.
Never wear just the la p belt or just the
shoulder belt of a lap/shoulder
diagonal seat belt. Both of these
actions are extremel y dangerous and may
increase your risk of injury.
No modifications or additions should
be made by the user which will either
prevent the seat belt adjusting
devices from operating to remove slack, or
prevent the seat belt assembly from being
adjusted to remove slack.
A slack seat belt offers a greatly reduced level
of occupant protect ion in an impact.
Page 60 of 391
Child safety
60
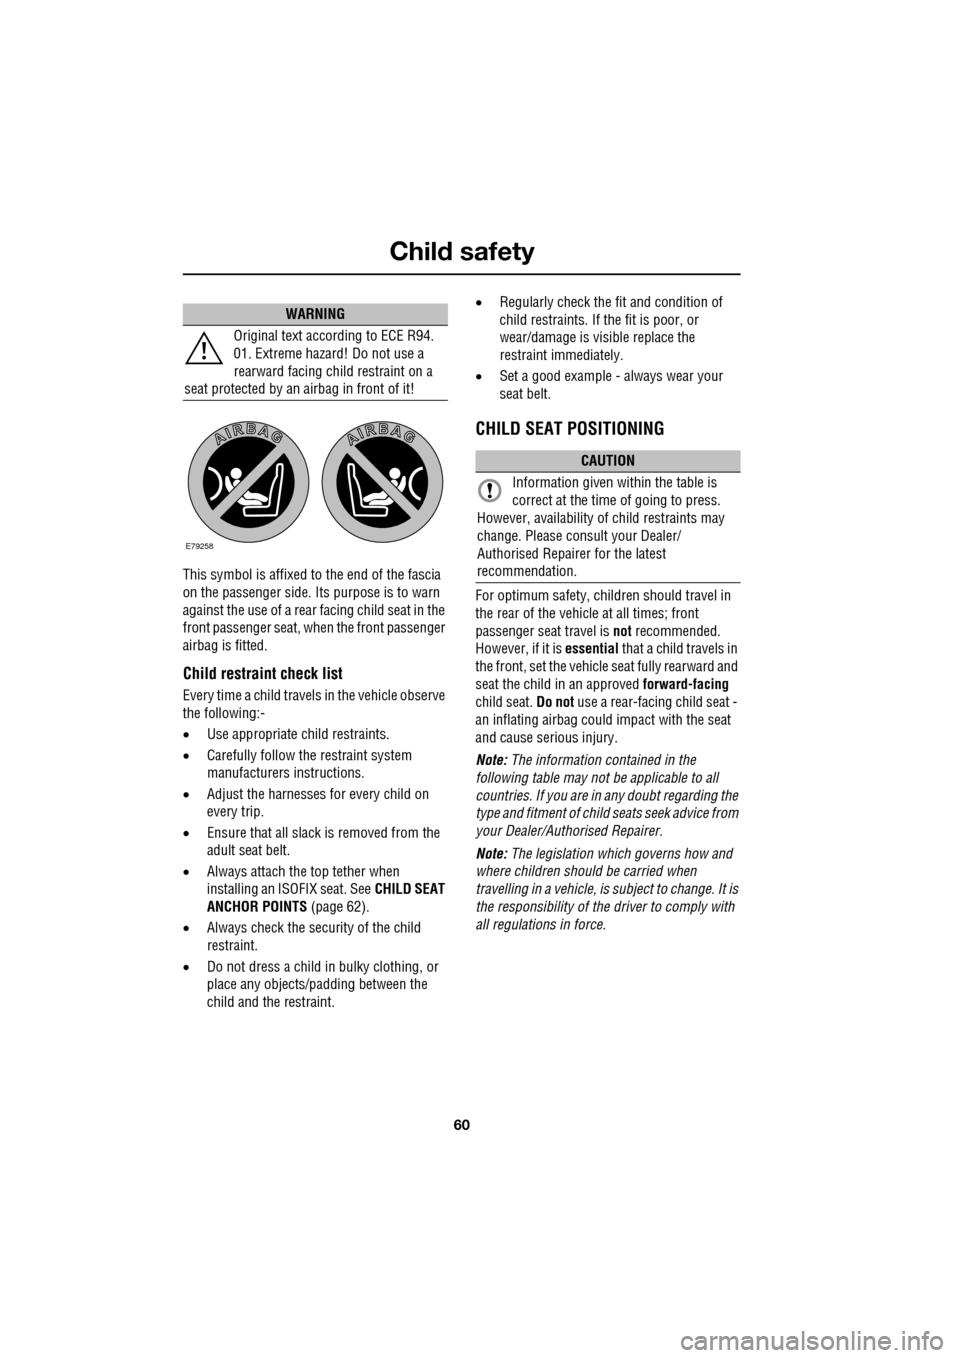
This symbol is affixed to the end of the fascia
on the passenger side. Its purpose is to warn
against the use of a rear facing child seat in the
front passenger seat, when the front passenger
airbag is fitted.
Child restraint check list
Every time a child travels in the vehicle observe
the following:-
•Use appropriate ch ild restraints.
• Carefully follow the restraint system
manufacturers instructions.
• Adjust the harnesses for every child on
every trip.
• Ensure that all slack is removed from the
adult seat belt.
• Always attach the top tether when
installing an ISOFIX seat. See CHILD SEAT
ANCHOR POINTS (page 62).
• Always check the security of the child
restraint.
• Do not dress a child in bulky clothing, or
place any objects/padding between the
child and the restraint. •
Regularly check the fit and condition of
child restraints. If the fit is poor, or
wear/damage is visible replace the
restraint immediately.
• Set a good example - always wear your
seat belt.
CHILD SEAT POSITIONING
For optimum safety, child ren should travel in
the rear of the vehicle at all times; front
passenger seat travel is not recommended.
However, if it is essential that a child travels in
the front, set the vehicle seat fully rearward and
seat the child in an approved forward-facing
child seat. Do not use a rear-facing child seat -
an inflating airbag could impact with the seat
and cause serious injury.
Note: The information contained in the
following table may not be applicable to all
countries. If you are in any doubt regarding the
type and fitment of child seats seek advice from
your Dealer/Authorised Repairer.
Note: The legislation which governs how and
where children should be carried when
travelling in a vehicle, is subject to change. It is
the responsibility of the driver to comply with
all regulations in force.
WARNING
Original text according to ECE R94.
01. Extreme hazard! Do not use a
rearward facing child restraint on a
seat protected by an airbag in front of it!
E79258
CAUTION
Information given within the table is
correct at the time of going to press.
However, availability of child restraints may
change. Please consult your Dealer/
Authorised Repairer for the latest
recommendation.
Page 63 of 391
63
Child safety
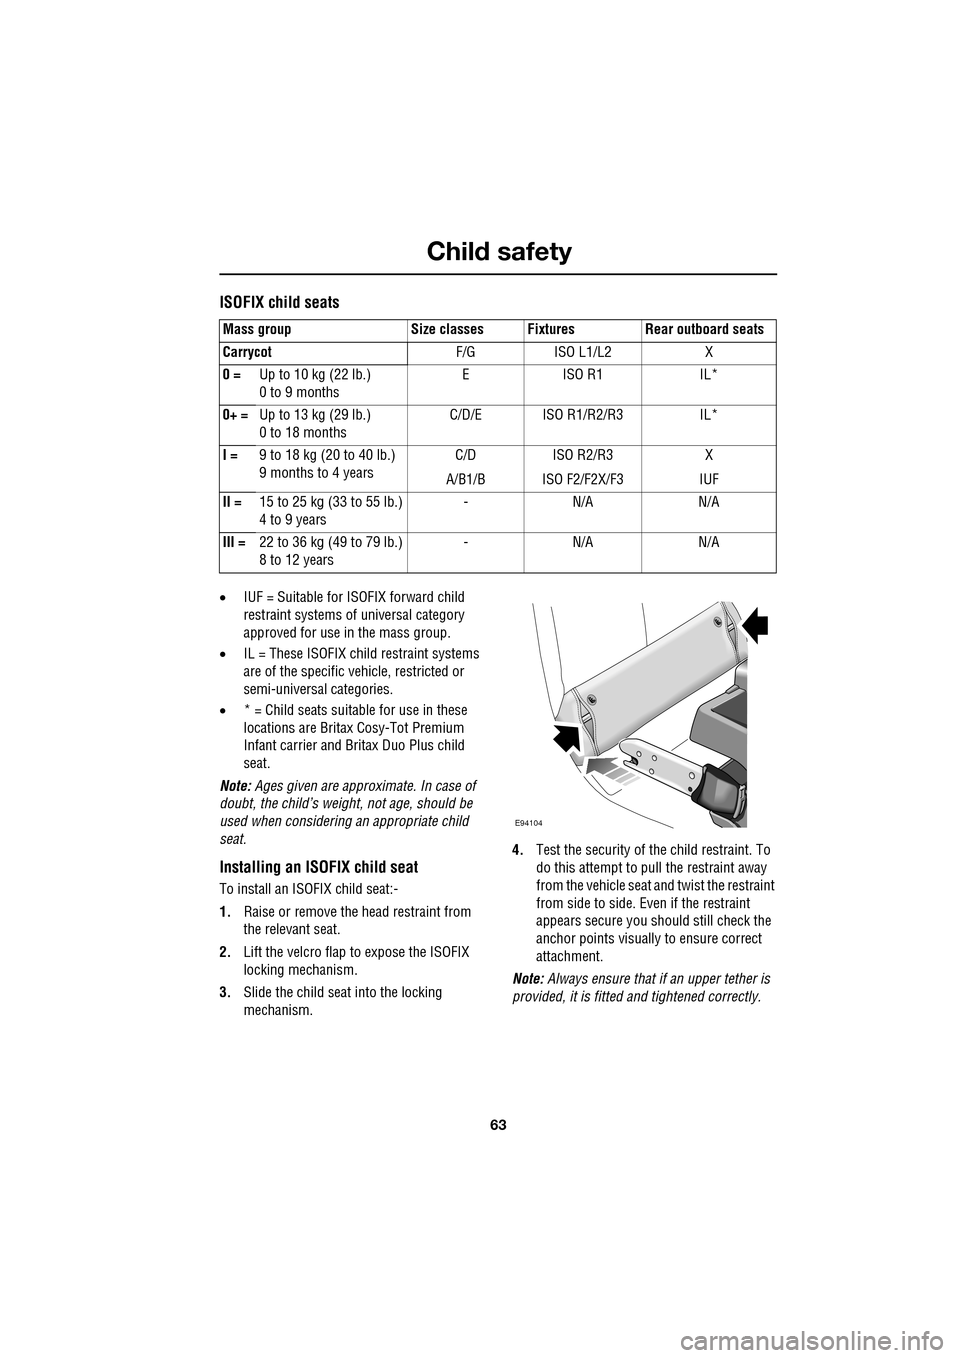
ISOFIX child seats
•IUF = Suitable for ISOFIX forward child
restraint systems of universal category
approved for use in the mass group.
• IL = These ISOFIX child restraint systems
are of the specific vehicle, restricted or
semi-universal categories.
• * = Child seats suitable for use in these
locations are Britax Cosy-Tot Premium
Infant carrier and Br itax Duo Plus child
seat.
Note: Ages given are approximate. In case of
doubt, the child’s weight, not age, should be
used when considering an appropriate child
seat.
Installing an ISOFIX child seat
To install an ISOFIX child seat:-
1. Raise or remove the head restraint from
the relevant seat.
2. Lift the velcro flap to expose the ISOFIX
locking mechanism.
3. Slide the child seat into the locking
mechanism. 4.
Test the security of the child restraint. To
do this attempt to pull the restraint away
from the vehicle seat and twist the restraint
from side to side. Even if the restraint
appears secure you s hould still check the
anchor points visually to ensure correct
attachment.
Note: Always ensure that if an upper tether is
provided, it is fitted and tightened correctly.
Mass group Size classes Fixtures Rear outboard seats
Carrycot
F/G ISO L1/L2 X
0 = Up to 10 kg (22 lb.)
0 to 9 months EISO R1 IL*
0+ = Up to 13 kg (29 lb.)
0 to 18 months C/D/E ISO R1/R2/R3 IL*
I = 9 to 18 kg (20 to 40 lb.)
9 months to 4 years C/D
A/B1/B ISO R2/R3
ISO F2/F2X/F3 X
IUF
II = 15 to 25 kg (33 to 55 lb.)
4 to 9 years -N/A N/A
III = 22 to 36 kg (49 to 79 lb.)
8 to 12 years -N/A N/A
E94104
Page 190 of 391
Vehicle care
190
Leather
Leather is an easy to maintain natural product.
However, dust and subs tances can penetrate
the pores and crease the leather, causing
surface wear and brittleness.
To prevent ingrained dirt and staining, inspect
the seat upholstery regularly and clean every
one to two months, as follows:
• Wipe off fine dust from the seat surfaces
using a clean, damp, non-coloured cloth.
Change frequently to a clean area of cloth,
to avoid abrasive action on the leather
surface. Avoid over-wetting.
• If this is not suffic ient, use a cloth which
has been dampened with warm soapy
water and then wrung out. Use only mild
non-caustic soap.
• Use Jaguar Leather Cleaner for heavily
soiled areas. Dry off and rub with a clean
soft cloth, changing surfaces regularly.
When staining (e.g. from clothing) or spillage
occurs, clean the affected area immediately as
described above.
Use Jaguar Leather Cleaner several times a
year to maintain its appearance and
suppleness. The clea ner will nourish and
moisturise and help to improve the surface
protective film agains t dust and substances.
• Do not use solvents. Do not use
detergents, furniture polish or household
cleaners. While these products may
initially give impressi ve results, their use
will lead to rapid deterioration of the
leather and will inva lidate the warranty.
Jaguar recommend a basic set of products
that have been specially selected for the
type of leather in your vehicle.
• Dark clothing may stain leather seats just
like other upholstery products. •
Sharp objects such as belts, zip fasteners,
rivets, etc., can leave permanent scratches
and scratch marks on the leather surface.
• Unless spillages such as tea, coffee or ink
are washed away immediately, permanent
staining may have to be accepted.
If a valet service is used, ensure that the
specialist concerned is aware of, and follows,
these instructions precisely.
Cloth and fabric
Use Jaguar Upholstery Cleaner, following the
instructions. Avoid over-wetting.
Removing stains
Most stains on woollen fabric can be removed
if treatment is carried out immediately, before
the stain has a chance to dry-in.
Most stains can be treated with one of three
cleaning fluids: Jaguar U pholstery Cleaner, dry
cleaning fluid or clean water. Follow the
instructions on the package.
Instrument pack, clock, and audio
equipment
Only use a soft dry cloth to clean the
instrument pack, clock and audio equipment.
Do not use cleaning fluids or sprays.
CAUTIONS
Never use soap, ammonia, bleach or
other cleaners intended for use on hard
surfaces.
Do not use upholst ery cleaner on
electrical equipment such as fascia
switches.
When cleaning around electrical
equipment such as switches, ensure
that fluids do not leak into any gaps around the
components or between panels or trim.