2009 JAGUAR XF gear s
[x] Cancel search: gear sPage 152 of 391

Rear view camera
152
PRINCIPLE OF OPERATION
The system provides a rear view image to
assist in reversing the vehicle.
The camera is positioned centrally and
unobtrusively, just above the rear license plate.
When reverse gear (R) is selected, the rear
view camera displays a wide-angle, colour view
from the rear of the vehicle, displayed on the
touch-screen. The camera display also incorporates graphic
overlays to aid the driver in assessing vehicle
direction, width and pr
oximity to surrounding
objects. These are detailed under Camera
overlays later in this section.
The camera display on the touch-screen has
priority over the parki ng aid display. To view
the parking aid display instead, touch the
touch-screen.
If a parking aid sensor is activated with the
camera in use, a corresponding red shaded
area will appear on the camera display to
identify which sensor has been activated.
To cancel the rear view camera display at any
time, touch the touch-screen.
The camera image will not be displayed when
any of the following apply:
• D is selected and the vehicle speed is
greater than 16 km/h (10 mph).
• D is selected for longer than 2 seconds and
the vehicle speed is less than 16 km/h
(10 mph).
WARNINGS
It remains the driver's responsibility
to detect obstacles and estimate the
vehicle's distance from them when
reversing. Some ov erhanging objects or
barriers, which could possibly cause damage
to the vehicle, may not be detected by the
camera.
Always be vigilant when reversing.
E96469
Page 157 of 391
157
Cruise control
Changing the speed
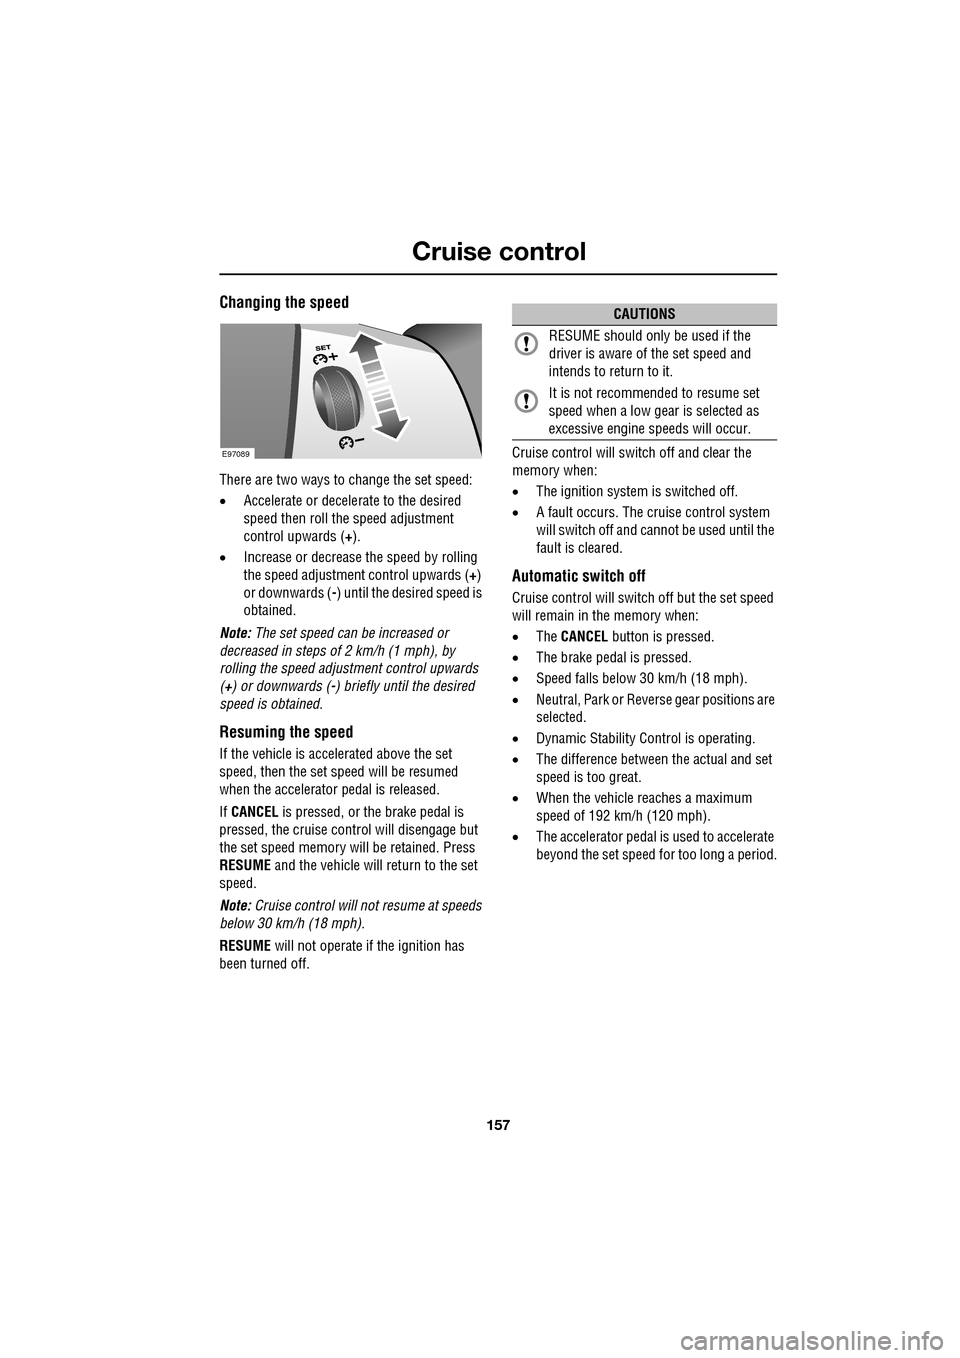
There are two ways to change the set speed:
•Accelerate or decele rate to the desired
speed then roll the speed adjustment
control upwards (+).
• Increase or decrease the speed by rolling
the speed adjustment control upwards ( +)
or downwards ( -) until the desired speed is
obtained.
Note: The set speed can be increased or
decreased in steps of 2 km/h (1 mph), by
rolling the speed adjustment control upwards
(+) or downwards ( -) briefly until the desired
speed is obtained.
Resuming the speed
If the vehicle is accelerated above the set
speed, then the set speed will be resumed
when the accelerator pedal is released.
If CANCEL is pressed, or the brake pedal is
pressed, the cruise cont rol will disengage but
the set speed memory will be retained. Press
RESUME and the vehicle will return to the set
speed.
Note: Cruise control will not resume at speeds
below 30 km/h (18 mph).
RESUME will not operate if the ignition has
been turned off. Cruise control will switch off and clear the
memory when:
•
The ignition system is switched off.
• A fault occurs. The cruise control system
will switch off and cannot be used until the
fault is cleared.
Automatic switch off
Cruise control will switch off but the set speed
will remain in the memory when:
•The CANCEL button is pressed.
• The brake pedal is pressed.
• Speed falls below 30 km/h (18 mph).
• Neutral, Park or Reve rse gear positions are
selected.
• Dynamic Stability Control is operating.
• The difference between the actual and set
speed is too great.
• When the vehicle reaches a maximum
speed of 192 km/h (120 mph).
• The accelerator pedal is used to accelerate
beyond the set speed for too long a period.
E97089
CAUTIONS
RESUME should only be used if the
driver is aware of the set speed and
intends to return to it.
It is not recomme nded to resume set
speed when a low gear is selected as
excessive engine speeds will occur.
Page 162 of 391
Adaptive cruise control (ACC)
162
Automatic low speed switch off
If the speed of the vehicle decreases below
30 km/h (18 mph), the ACC system will be
automatically switched off and the instrument
warning indicator will go out.
If the brakes were being applied by the ACC
system, they will be slowly released.
This will be accompanied by an audible
warning, and DRIVER INTERVENE will be
displayed on the message centre. The driver
must take control.
Automatic switch off
ACC will disengage, but not clear the memory
when;
• the CANCEL button ( 3) is pressed
• the brake pedal is pressed
• Neutral ( N), Park ( P) or Reverse ( R) gear
positions are selected
• Dynamic Stability Control activates.
ACC will disengage, and clear the memory
when;
• the ignition system is switched off
• maximum vehicle speed is reached
• a fault occurs in the ACC system.
Resuming the speed and follow mode
By pressing the RESUME button (4) after ACC
has been cancelled, for example, after braking,
the ACC will become active again provided that
the set speed memory has not been erased.
The original set speed will be resumed (unless
a vehicle ahead causes the follow mode to
become active) and the set speed will be
displayed in the message centre for four
seconds.
Hints on driving with ACC
The system acts by regulating the speed of the
vehicle using engine c ontrol and the brakes.
Gear changes may occur in response to
deceleration or acceleration whilst in ACC.
ACC is not a collision avoidance system.
However, during some situations the system
may provide the driver with an indication that
intervention is required.
An audible alarm will sound, accompanied by
the message DRIVER INTERVENE if the ACC
detects:
• A failure has occurred whilst the system is
active
• That using maximum ACC braking only is
not sufficient.
Note: ACC operates when the gear selector
lever is in position S or D.
Note: When engaged, the accelerator pedal
rests in the raised position. Fully release the
pedal to allow normal ACC operation.
Note: When braking is applied by the ACC, the
vehicle brake lamps will be switched on
although the brake pedal will not move.
CAUTION
RESUME should only be used if the
driver is aware of the set speed and
intends to return to it.
Page 169 of 391
169
Driving dynamics
GENERAL INFORMATION
JaguarDrive Control
JaguarDrive Control is a selectable vehicle
optimisation system, designed to fine-tune the
driving characteristics of the vehicle by
accommodating different dr iving conditions or
driving styles.
The system allows the performance envelope
of the vehicle to be stretched and prevents the
necessity for a single, compromised
configuration for all conditions, thereby
increasing the vehicle's abilities.
The vehicle systems optimised by JaguarDrive
Control are:
• Engine management.
• Transmission management.
• Dynamic Stability Control and traction
control.
• Adaptive dynamics.
• Active Differential Control (E-diff) -
Supercharged vehicles only.
Note: Changing from one special mode to
another, will introduce noticeably different
vehicle responses. For example, the engine
revs produced by the accelerator position when
a special mode is not selected, may increase or
decrease when a mode is selected.
To familiarise y ourself with, and get the best
from, the JaguarDrive Control modes, you
should try out the mode s in circumstances
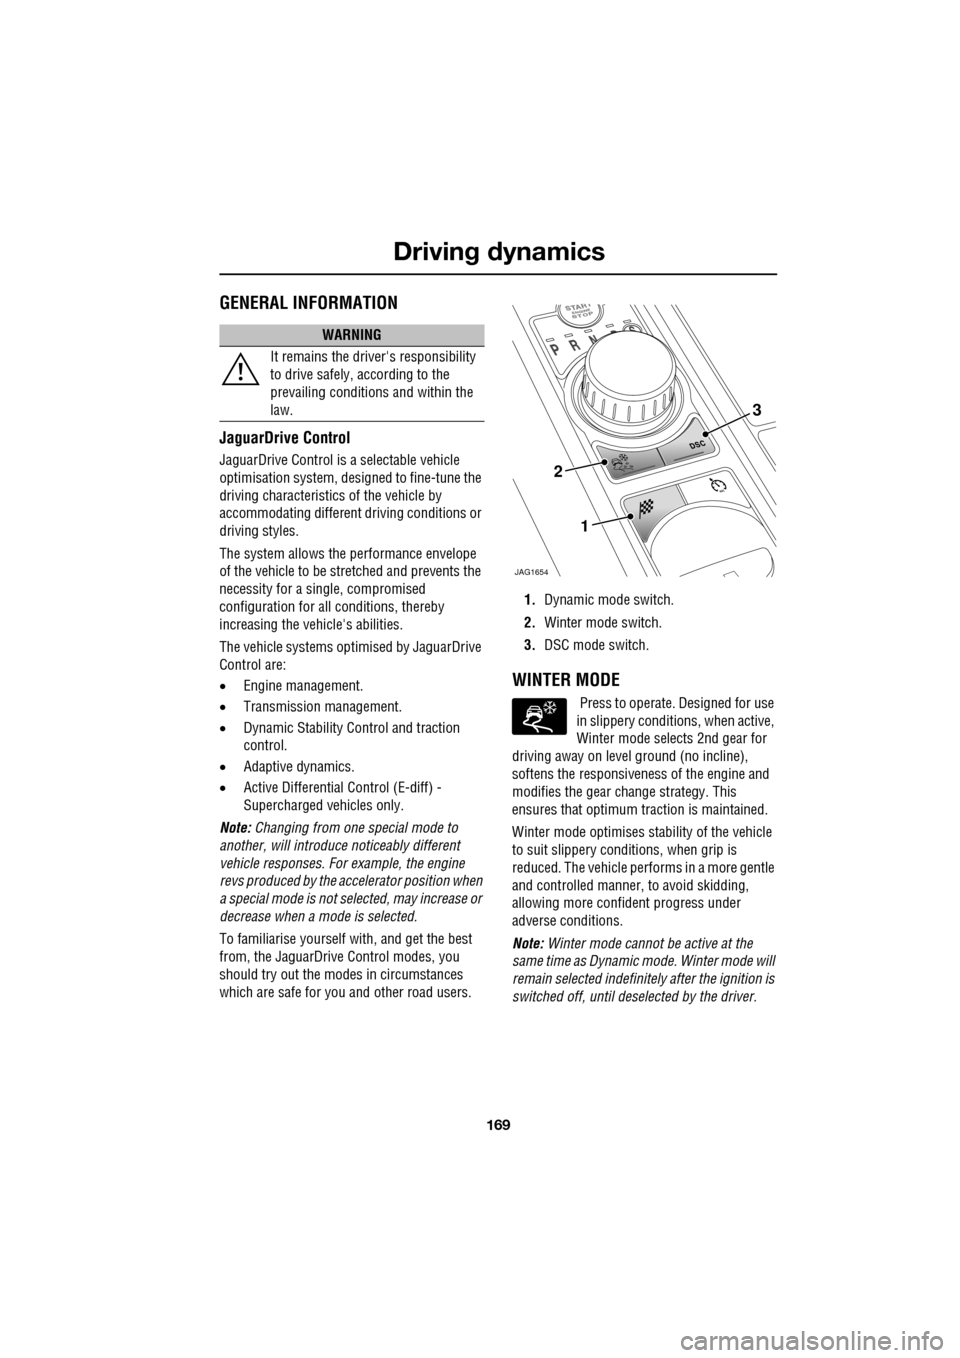
which are safe for you and other road users. 1.
Dynamic mode switch.
2. Winter mode switch.
3. DSC mode switch.
WINTER MODE
Press to operate. Designed for use
in slippery conditi ons, when active,
Winter mode selects 2nd gear for
driving away on level ground (no incline),
softens the responsiveness of the engine and
modifies the gear ch ange strategy. This
ensures that optimum traction is maintained.
Winter mode optim ises stability of the vehicle
to suit slippery conditions, when grip is
reduced. The vehicle perfor ms in a more gentle
and controlled manner, to avoid skidding,
allowing more confident progress under
adverse conditions.
Note: Winter mode cannot be active at the
same time as Dynamic mode. Winter mode will
remain selected indefinite ly after the ignition is
switched off, until deselected by the driver.
WARNING
It remains the driver's responsibility
to drive safely, according to the
prevailing conditions and within the
law.
JAG1654
1
2
3
Page 170 of 391
Driving dynamics
170
DYNAMIC MODE
(V8 petrol and diesel vehicles only)
Press to operate. Dynamic mode
co-ordinates the vehicle's control
systems to deliver a high
performance driving experience. This setting
enhances key vehicle systems so that the
vehicle's full potential can be exploited. The
vehicle's responses are aimed at involving the
driver more in focused and purposeful driving,
helping swift progress.
Note: When the transmission is set to
permanent manual mode (i.e. using the
paddles to change gear while in Sport mode)
and Dynamic mode is selected, transmission
upshifts are fully controlled by the driver. This
means that the transmissi on will not change up
a gear automatically, even when the vehicle's
rev limit is reached. When the rev limit is
reached, the gear position indicator in the
message centre will glow amber, to indicate
that the next gear should be selected.
Note: Dynamic mode cannot be active at the
same time as Winter m ode. Dynamic mode will
remain selected for approximately six hours
after the ignition is swit ched off, after which
point it will need to be reselected if required.
STABILITY CONTROL
Dynamic Stability Control (DSC)
Dynamic Stability Contro l (DSC) is operational
whenever the engine is running, unless it has
been manually switched off. When the system
is operating, the warn ing indicator in the
instrument panel will flash.
The DSC system controls the Anti-lock Braking
System (ABS), traction control and yaw control
of the vehicle.
The DSC system assists the driver in retaining
directional control of th e vehicle in situations
where the vehicle is sliding (understeer or
oversteer). It must not encourage the driver to
drive beyond the limit of adhesion or at speeds
higher than those suitable for the prevailing
road and traffic conditions.
DSC applies braking pres sure to individual
wheels if excessive variation is detected. This
ensures that the vehicle follows the driver’s
intended direction of travel as closely as
possible.
Traction control will intervene to control wheel
spin by automatically reducing the power
output from the engine and applying braking to
individual wheels. This improves acceleration,
particularly on surfaces with uneven friction
(e.g. one wheel on ice with another on tarmac).
Note: For recommended DSC mode selection,
refer to the JaguarDri ve Control scenarios
section in this handbook.
WARNING
The fact that the vehicle is fitted with
DSC, must never allow the driver to
be tempted into taking risks which
could affect his or her sa fety or that of other
road users. In all cases, it remains the driver’s
responsibility to drive sa fely according to the
prevailing conditions.
Page 228 of 391

Wheels and tyres
228
Wheel changing procedure
1.Ensure that all passengers are in a safe
place, clear of the vehicle.
2. Apply the parking brake and select gear
position P (Park).
3. Ensure that the jack is placed on firm and
level ground.
Observe the instructions printed on the jack.
Use the jack only for lifting the vehicle during
wheel changing and only us e the jack which is
stored in the vehicle.
Before raising the vehi cle slacken but do not
remove the wheel nuts. There are four jacking points on the underside
of the floor. Two indented, triangular indicators
are provided on each sill cover. These indicate
the location for the jack.
The simplest way to correctly locate the jacking
point is to feel along
the sill panel to the
triangular indentation and then fit the jack to
the body, not to the sill panel.
Carefully raise the vehicle by turning the jack
handle. Stop jacking the vehicle when the tyre
just clears the ground. Minimum tyre lift gives
maximum vehicle stability.
Remove the wheel nuts and the wheel.
To remove the centre badge use the plastic
tipped end of the wheel nut wrench handle,
push the centre badge from its housing from
the inside of the wheel.
Push the centre badge into the replacement
wheel. If the temporary use spare wheel is to be
fitted, keep the centre badge safely and fit it to
the repaired full size wheel when it has been
refitted.
Fit the spare wheel and loosely secure with the
wheel nuts.
WARNINGS
Do not attempt to lift the vehicle
unless the jack head is fully engaged
in the jacking point.
Ensure that the park brake is applied.
CAUTION
Ensure before raising the vehicle that
the jack is correctly positioned to avoid
any damage to the vehicle sills or sill panels.
E95185
Page 255 of 391

255
Vehicle recovery
4.Using a flat-bladed screwdriver, turn the
locking device 90° counter-clockwise.
5. Apply the foot brake.
6. Use the strap to pull the EPR lever
upwards, until it latches in the vertical
position.
When EPR is activated, the JaguarDrive
selector will remain in P , but the selector
indicator and the gear display in the message
centre will both flash N (if ignition is on), to
indicate that EPR is active.
When vehicle transportation has been
completed, EPR should be cancelled, to allow
Park to be re-engaged.
Cancelling EPR
1. Using a flat-bladed sc rewdriver, release
the latch (arrowed).
2. Return the EPR lever to its horizontal
position.
3. Turn the locking device 90° clockwise to
secure.
4. Replace the trim pane l and close the cubby
box and twin cup holder lids.E96408
4
5
62
1
E96409
3
Page 256 of 391
Vehicle recovery
256
TOWING THE VEHICLE ON FOUR
WHEELS
Note: The recommended recovery method is
to raise all four wheels.
Towing procedure
1. The vehicle should be parked on firm level
ground, with the parking brake on, and the
gear selector in P (Park).
2. Secure the towing attachment from the
recovery vehicle to the front towing eye.
See TOWING POINTS (page 253).
3. Dock the Jaguar Smart Key and switch on
the ignition. See GENERAL INFORMATION
(page 132). 4.
Apply the foot brake and release the
parking brake.
5. With the foot brake st ill applied, activate
the Emergency Park Release (EPR).
See TRANSPORTING THE VEHICLE
(page 254).
6. The vehicle can now be towed a maximum
of 0.8 km (0.5 miles) at a maximum speed
of 48 kmh (30 mph).
7. Upon arrival at the destination, ensure
wherever possible that the vehicle is
parked on firm level ground.
8. Lower the Emergency Park Release (EPR)
lever, to cancel EP R and to re-engage P
(Park).
9. Apply the parking brake.
10. Switch off the ignition and remove the
Jaguar Smart Key.
11. Remove the towing attachment from the
towing eye.
WARNINGS
Ensure that the remote control
remains docked whilst the vehicle is
being towed. Removing the remote
control will engage the steering lock, which
will prevent the vehicle from steering
correctly.
If the engine cannot be run whilst the
vehicle is being towed, there will be
no power assistance for the steering
or brakes. This will result in greater effort
being required to steer or slow the vehicle, and
greatly increased stopping distances.
CAUTIONS
The vehicle should only be towed in a
forward direction with all four wheels on
the ground.
The vehicle should only be towed for a
maximum of 0.8 km (0.5 miles), at a
maximum speed of 48 km/h (30 mph). Towing
for a greater distance or at a higher speed, may
result in serious damage to the transmission.
CAUTION
Leaving the ignition switched on for
extended periods will cause the battery
to drain.
WARNING
Use extreme caution when detaching
towing equipment. Vehicle movement
is possible which can result in serious
injuries.