2009 JAGUAR XF secure
[x] Cancel search: securePage 59 of 391
59
Child safety
CHILD SEATS
The seat belts fitted to your vehicle are
designed for adults and larger children. For
their safety, it is very important for all infants
and children under 12 years of age to be
restrained in a suitable child safety seat
appropriate to their age and size.
Children are always safest when seated in a
rear seating position.
If it is essential that a child travels in the front
passenger seat, Jaguar recommends that the
following preparations are made before fitting
the child restraint.
• Adjust the front passenger seat fully
rearwards.
• Adjust the lumbar support to its minimum
support position.
• Adjust the seat cushion to its highest
position. If cushion front tilt adjustment is
possible, adjust it to its lowest position.
• Adjust the seat back to the fully upright
position.
• Adjust the seat be lt adjustable upper
anchorage to its lowest position.
In some countries, legislation prohibits
children travelling in the front of a vehicle.
Ensure that you are familiar with the legislation
in force where the vehicle is being used and are
in full compliance.
WARNINGS
Do not use a child restraint on a seat
protected by an airbag in front of it.
There is a risk of death or serious
injury when the airbag deploys.
Crash statistics show that children
are safest when properly restrained in
a child or infant restraint system that
is secured in a rear seating position.
For optimum safety , children should
travel in the rear of the vehicle at all
times; front passenge r seat travel is
not recommended. However, if it is
essential that a child travels in the front, set the
vehicle seat fully rearward and seat the child in
an approved forward-facing child seat. Do not
use a rear-facing child seat - an inflating airbag
could impact with the seat and cause serious
injury.
Do not use a forward facing child seat
until the child using it is above the
minimum weight of 9 kg (20 lb.) and
able to sit up unaided. Up to the age of two, a
child's spine and neck are not sufficiently
developed to avoid injury in a frontal impact.
Do not allow a baby or infant to be
held or carried on the lap. The force of
a crash can increase effective body
weight by as much as thirty times, making it
impossible to hold onto the child.
Children typically require the use of a
booster seat appropriate to their age
and size, thereby enabling the seat
belts to be properly fitted, reducing the risk of
injury in a crash. Children could be
endangered in a crash if their child restraints
are not properly secured in the vehicle.Do not use a chil d seat that hooks
over the seat back. This type of seat
cannot be satisfacto rily secured and
is unlikely to be safe for your child.
WARNINGS
Page 62 of 391
Child safety
62
CHILD SEAT ANCHOR POINTS
ISOFIX anchor points (not Australia)
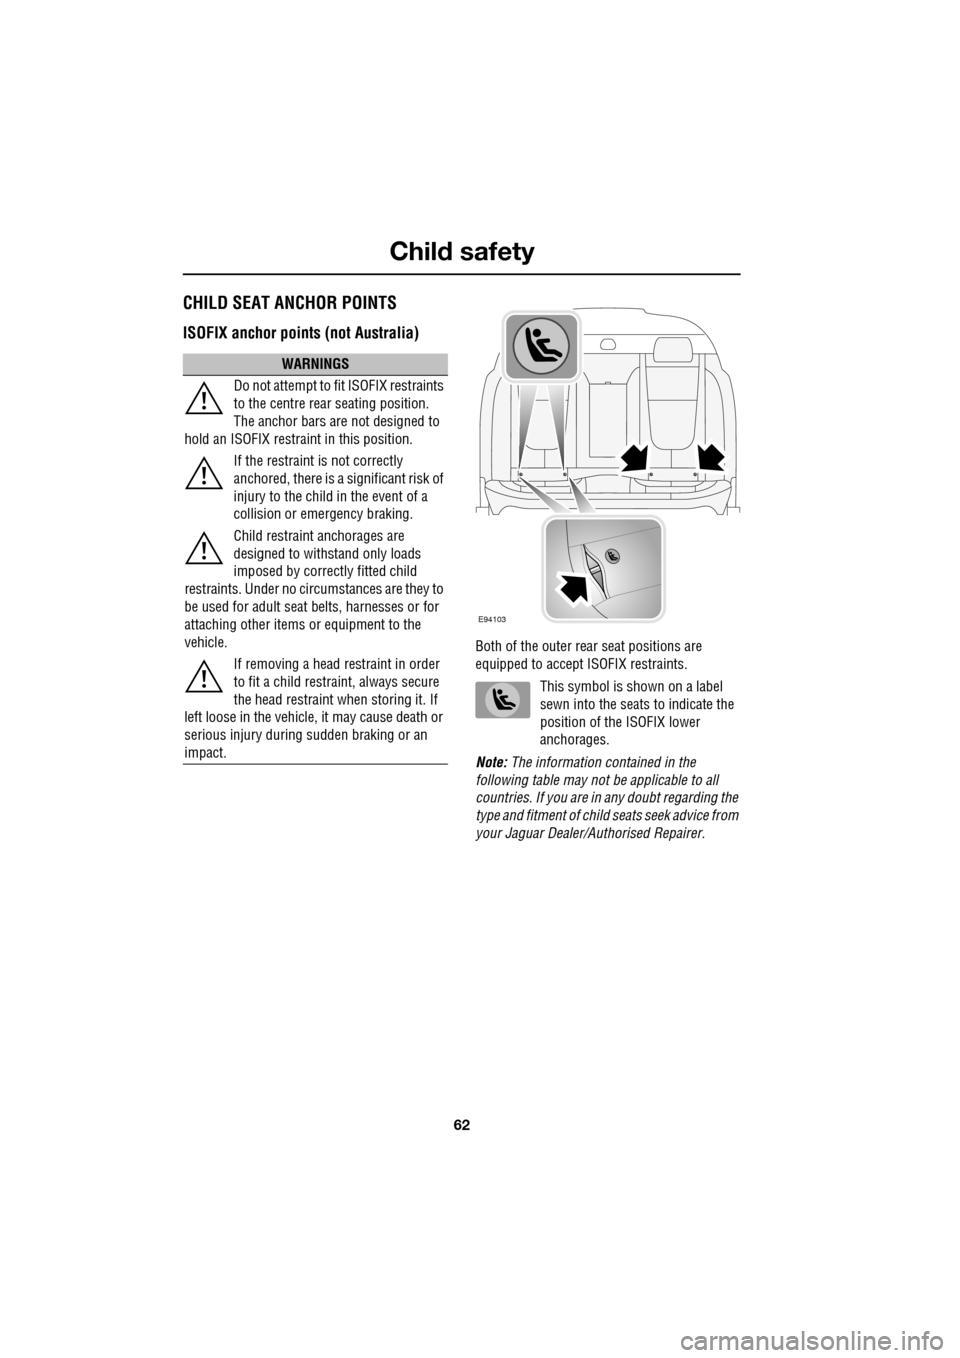
Both of the outer rear seat positions are
equipped to accept ISOFIX restraints.
This symbol is shown on a label
sewn into the seats to indicate the
position of the ISOFIX lower
anchorages.
Note: The information contained in the
following table may not be applicable to all
countries. If you are in any doubt regarding the
type and fitment of child seats seek advice from
your Jaguar Dealer/A uthorised Repairer.
WARNINGS
Do not attempt to fit ISOFIX restraints
to the centre rear seating position.
The anchor bars are not designed to
hold an ISOFIX restraint in this position.
If the restraint is not correctly
anchored, there is a significant risk of
injury to the child in the event of a
collision or emergency braking.
Child restraint anchorages are
designed to withstand only loads
imposed by correctly fitted child
restraints. Under no circumstances are they to
be used for adult seat belts, harnesses or for
attaching other items or equipment to the
vehicle.
If removing a head restraint in order
to fit a child restraint, always secure
the head restraint when storing it. If
left loose in the vehicle, it may cause death or
serious injury during sudden braking or an
impact.
E94103
Page 63 of 391
63
Child safety
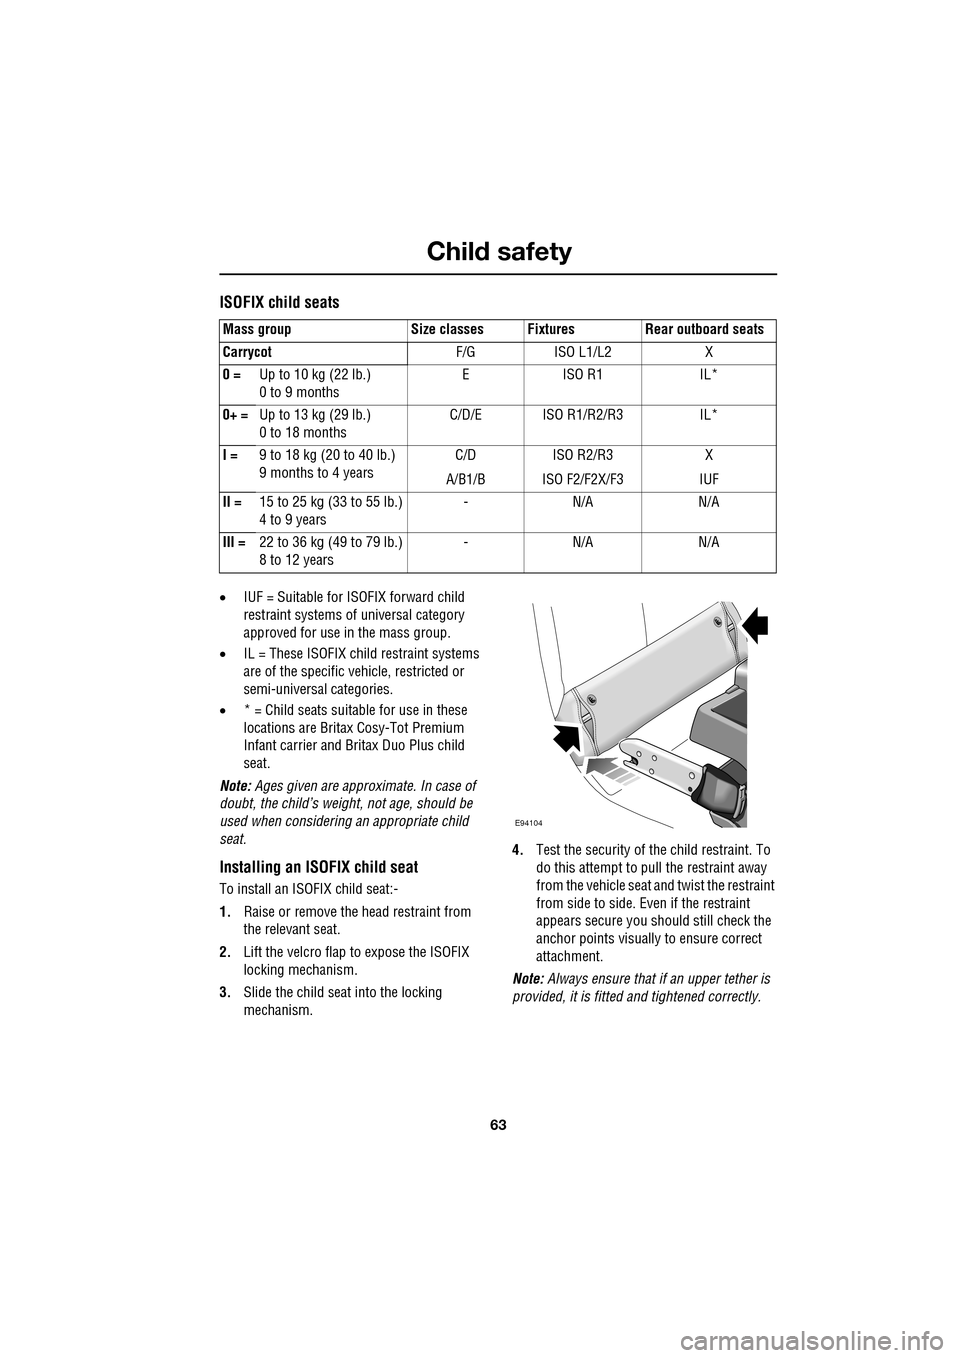
ISOFIX child seats
•IUF = Suitable for ISOFIX forward child
restraint systems of universal category
approved for use in the mass group.
• IL = These ISOFIX child restraint systems
are of the specific vehicle, restricted or
semi-universal categories.
• * = Child seats suitable for use in these
locations are Britax Cosy-Tot Premium
Infant carrier and Br itax Duo Plus child
seat.
Note: Ages given are approximate. In case of
doubt, the child’s weight, not age, should be
used when considering an appropriate child
seat.
Installing an ISOFIX child seat
To install an ISOFIX child seat:-
1. Raise or remove the head restraint from
the relevant seat.
2. Lift the velcro flap to expose the ISOFIX
locking mechanism.
3. Slide the child seat into the locking
mechanism. 4.
Test the security of the child restraint. To
do this attempt to pull the restraint away
from the vehicle seat and twist the restraint
from side to side. Even if the restraint
appears secure you s hould still check the
anchor points visually to ensure correct
attachment.
Note: Always ensure that if an upper tether is
provided, it is fitted and tightened correctly.
Mass group Size classes Fixtures Rear outboard seats
Carrycot
F/G ISO L1/L2 X
0 = Up to 10 kg (22 lb.)
0 to 9 months EISO R1 IL*
0+ = Up to 13 kg (29 lb.)
0 to 18 months C/D/E ISO R1/R2/R3 IL*
I = 9 to 18 kg (20 to 40 lb.)
9 months to 4 years C/D
A/B1/B ISO R2/R3
ISO F2/F2X/F3 X
IUF
II = 15 to 25 kg (33 to 55 lb.)
4 to 9 years -N/A N/A
III = 22 to 36 kg (49 to 79 lb.)
8 to 12 years -N/A N/A
E94104
Page 64 of 391

Child safety
64
Tether anchorage points (Australia only)
Note: A tether anchorage is provided for the
centre seat position. Do not use this anchor
position with an ISOFIX child seat.
Attaching tether straps
1. Install the child restrain t securely in one of
the rear seating positions.
2. Pass the tether strap over the seat back
and beneath the head restraint.
3. Attach the tether strap hook to the tether
anchor point on the back of the seat.
Ensure that the tether strap hook is facing
the correct way. See illustration.
4. Tighten the tether strap according to the
manufacturer's instructions.
WARNING
Child restraint anchorages are
designed to withstand only those
loads imposed by correctly fitted
child restraints. Under no circumstances are
they to be used for adult seat belts, harnesses
or for attaching other items or equipment to
the vehicle.
If a child seat or restraint system is to
be fitted to the centre seating
position, the centre armrest must be
in the stowed position (folded into the seat).
E94105
Page 127 of 391
127
Convenience features
Twin cup holder
The twin cup holder can be converted into a
storage compartment by removing the insert.
Use one hand to squeeze the two sides of the
insert together and, lifting the edge nearest the
driver first, use the other hand to rotate the
insert up and out of it s compartment, towards
the passenger seat.
Note: An ashtray and cigar lighter pack, which
replaces the front twin cup holder, is available
from your Dealer/A uthorised Repairer.
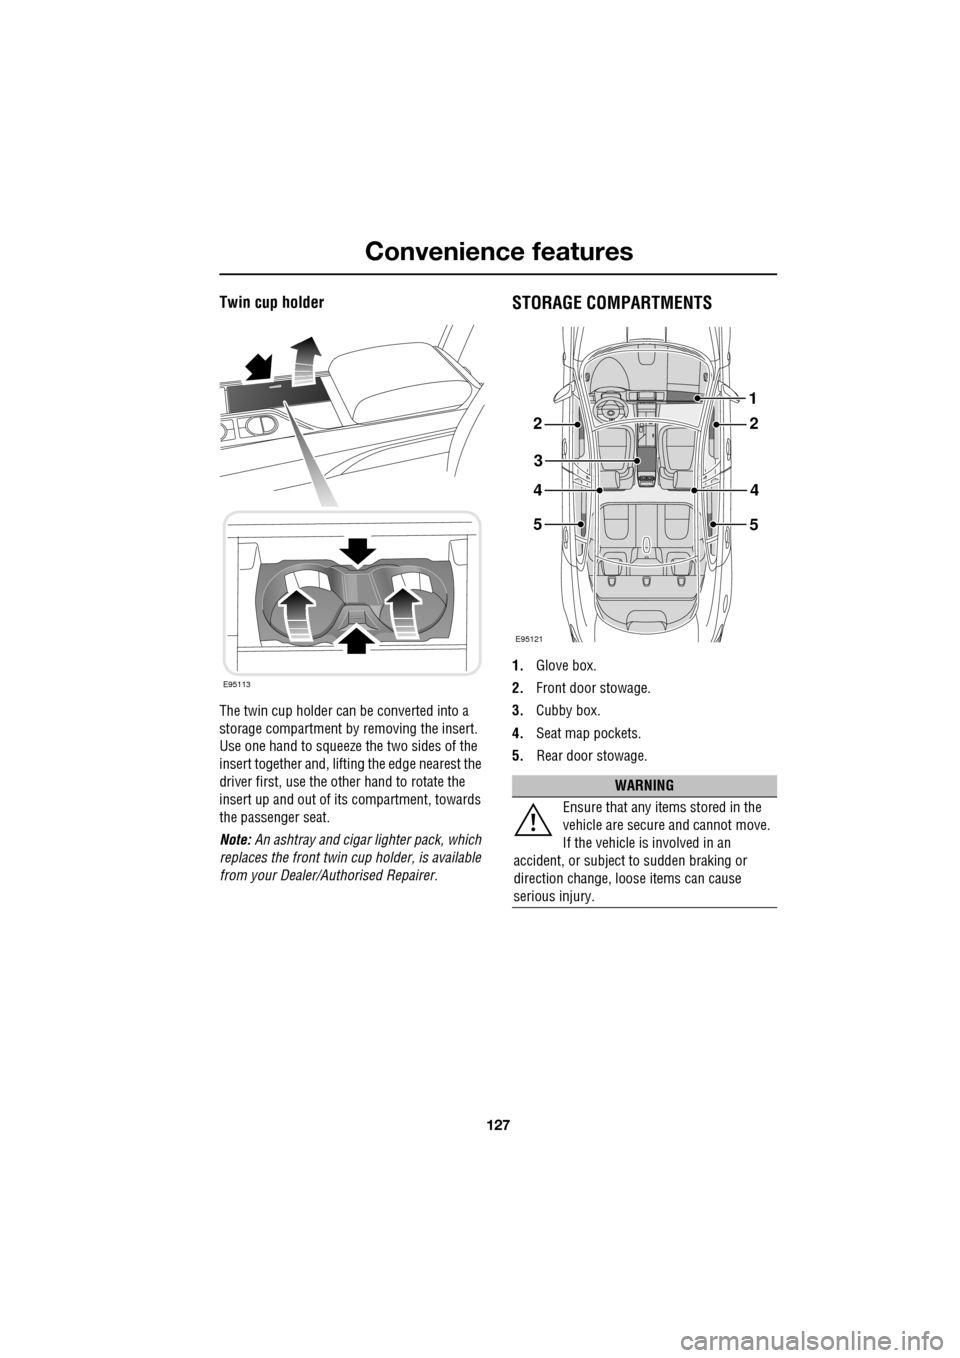
STORAGE COMPARTMENTS
1.Glove box.
2. Front door stowage.
3. Cubby box.
4. Seat map pockets.
5. Rear door stowage.
E95113
WARNING
Ensure that any items stored in the
vehicle are secure and cannot move.
If the vehicle is involved in an
accident, or subject to sudden braking or
direction change, loose items can cause
serious injury.
E95121
22
3
44
5
1
5
Page 180 of 391

Fuel and refuelling
180
DIESEL MISFUELLING PROTECTION
DEVICE
Diesel engine vehicles in some markets are
equipped with a misfuelling protection device,
incorporated into the fuel filler neck, designed
to alert that the wrong fuel type has been
selected. If the narrow filler nozzle fitted to
pumps delivering unleaded petrol is correctly
inserted (i.e. fully inserted) into the filler neck,
the misfuel protection de vice will activate.
The protection device c ontinually interrupts the
fuel flow from the pump, until the protector
mechanism in the filler neck is reset.
When activated, the yellow protection device
will be visible in the f iller neck. The device will
need to be reset before the tank can be
correctly filled with dies el fuel. This is achieved
using the reset tool, lo cated in the luggage
compartment, clipped onto the battery
restraining bar.
Note: It is the driver’s responsibility to fill the
vehicle with the correct fuel. The diesel
misfuelling protection devi ce only reduces the
risk of filling the vehicle with the incorrect fuel.
Note: When refuelling the vehicle using a
disposable fuel canister, use a canister
designed for diesel fuel where possible. The
spout on petrol canist ers may activate the
protection device. The device may also be
activated by fuel pumps with a smaller nozzle
than those fitted to standard diesel pumps.
Resetting the protection device
To reset the misfuelling protection device:
1. Insert the reset tool (with the teeth
uppermost) into the fi ller neck opening, as
far as it will go. The triangular section on
the reset tool stop s on the protection
device at the requi red insertion depth.
2. Pivot the reset tool handle downwards to
engage the teeth into the protection device.
3. Keeping the reset tool handle held down,
slowly pull the reset tool out of the filler
neck to reset the misfuelling protection
device.
Note: To ensure that the pr otection device is
correctly reset, check that the yellow protector
is no longer visible in the filler neck.
After resetting the misfuelling protection
device, remove the tool fr om the filler neck and
secure it to the battery restraining bar. If
subsequent driveability difficulties are
encountered, seek assistance from your
Dealer/Authorised Repairer.
WARNINGS
When the misfuelling protection
device is activated, it could cause fuel
to be discharged from the filler neck.
CAUTIONS
Using the incorrect fuel can result in
major damage to your vehicle’s engine
and fuel system.
JAG1618
1
2
3
Page 182 of 391
Load carrying
182
GENERAL INFORMATION
Weights and load capacities
Note: It is the driver's re sponsibility to ensure
that the maximum weights are not exceeded,
and that the load is distributed correctly within
the vehicle.
Information and values for the maximum
weights can be found in the Weights section.
See WEIGHTS (page 259).
Roof racks
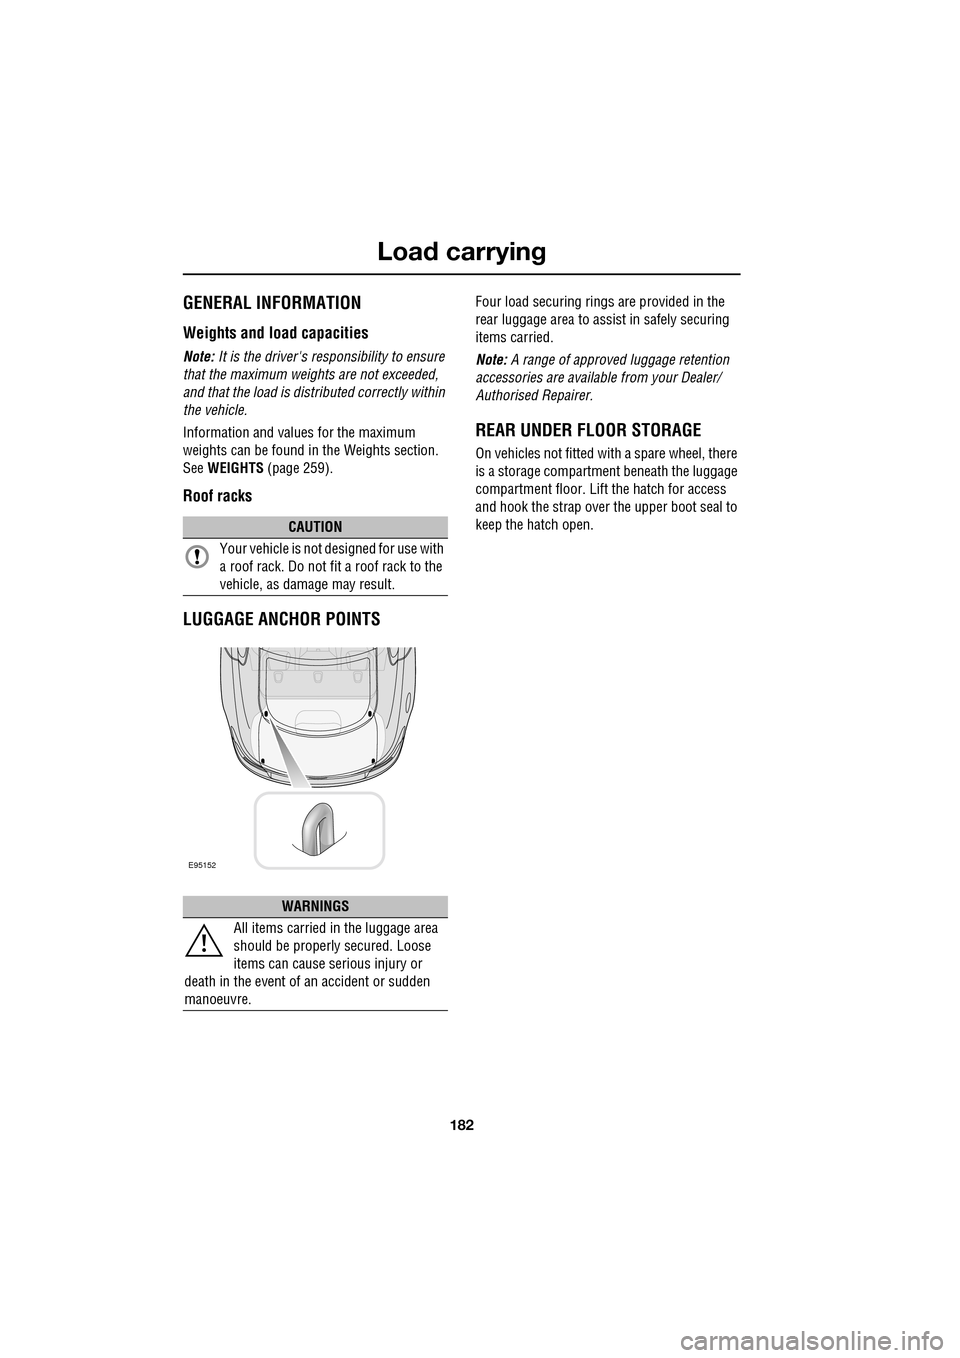
LUGGAGE ANCHOR POINTS
Four load securing rings are provided in the
rear luggage area to assi st in safely securing
items carried.
Note: A range of approved luggage retention
accessories are available from your Dealer/
Authorised Repairer.
REAR UNDER FLOOR STORAGE
On vehicles not fitted with a spare wheel, there
is a storage compartment beneath the luggage
compartment floor. Lift the hatch for access
and hook the strap over the upper boot seal to
keep the hatch open.
CAUTION
Your vehicle is not designed for use with
a roof rack. Do not fit a roof rack to the
vehicle, as damage may result.
WARNINGS
All items carried in the luggage area
should be properly secured. Loose
items can cause serious injury or
death in the event of an accident or sudden
manoeuvre.
E95152
Page 185 of 391

185
Towing
RECOMMENDED TOWING WEIGHTS
Nose/tongue weight must be the greater of
50 kg (110 lbs) or 7% of the actual trailer
weight, up to the maximum tow hitch load.
Nose/tongue weight can be measured using a
proprietary brand of nose weight indicator.
If it is necessary to increase the nose/tongue
weight up to the maximu m allowed, the vehicle
load should be reduced accordingly. This
ensures that the Gross Vehicle Weight (GVW),
and maximum rear axle load, are not exceeded.
Note: When towing the maximum permissible
gross vehicle weight can be increased by a
maximum of 100 kg (220 lb.) provided that the
road speed is limited to 100 km/h (60 mph).
Note: When calculating rear axle loading,
remember that the trailer nose/tongue weight,
the load in the vehicle's luggage area and the
weight of rear seat pa ssengers must all be
added together.
Towing weights - Australia only
The weight of a traile r must not exceed 1.5
times the towing vehicle’s weight. The
nose/tongue weight must be a minimum of 7%
of gross caravan/trai ler weight, up to a
maximum of 350 kg (722 lbs).
ESSENTIAL TOWING CHECKS
• The trailer should be parallel to the ground
when loaded and connected to the vehicle.
• When calculating the laden weight of the
trailer remember to include the weight of
the trailer, plus the weight of the load.
• If the load can be divided between the
vehicle and trailer, loading more weight
into the vehicle will generally improve
stability. Do not exceed the vehicle's
weight limits. See WEIGHTS (page 259).
• Ensure that all applic able regulations and
legislation are complied with when loading
and towing a trailer.
• Increase rear tyre pressures of the towing
vehicle to those for maximum vehicle
loading conditions.
• Ensure trailer tyre pressures are set to
trailer manufacturer' s recommendations.
• If the vehicle is loaded to maximum Gross
Vehicle Weight (GVW) the nose weight is
limited (see Towi ng weights table).
• Ensure that a suitable breakaway cable or
secondary coupling is used. Refer to the
trailer manufacturer' s instructions for
guidance.
• Ensure that the tow ball is secure.
• Check the operation of all trailer lights.
Maximum permissible
towing weights
Unbraked trailers 750 kg (1653 lb.) Trailers with
overrun brakes 1850 kg (4080 lb.)
Nose/Tongue weight 75 kg (165 lb.)
WARNING
Do not exceed the Gross Vehicle
Weight (GVW), m aximum rear axle
weight, maximum trailer weight, or
nose/tongue weight. Exceeding any of these
limits could cause inst ability and loss of
control. See WEIGHTS (page 259).
WARNING
Do not loop the breakaway cable over
the tow ball as it may slide off.