2009 JAGUAR XF ABS
[x] Cancel search: ABSPage 145 of 391

145
Brakes
During emergency braking conditions ABS
constantly monitors the speed of each wheel.
ABS varies the brake pressure to individual
wheels, according to the grip available. The
constant alteration of brake pressure can be
felt as a pulsing sensation through the brake
pedal. This is not a caus e for concern, as it is
designed to demonstrate to the driver that ABS
is operating.
ABS braking techniques
For optimum ABS performance, these
instructions on braking techniques during ABS
operation should be followed:
• Do not release the brake pressure when
the pulsating effect is felt. Maintain a
constant pressure until the manoeuvre is
completed.
• To familiarise y ourself with the feel of the
brake pedal during ABS braking, practise
an emergency stop pr ocedure, always
making sure it is safe to do so. With the
seat belts fitted to all occupants, drive the
vehicle at 32 km/h (20 mph) and brake
sharply.
• ABS enables the driver to steer around
obstacles during em ergency braking.
However, the consequences of turning
sharply at high speed cannot be overcome
by the ABS.
• Do not attempt to pump the brakes to
avoid skidding, as this can interfere with
ABS operation. The ABS will not allow the
wheels to skid under normal road
conditions.
• The ABS will tend to keep the vehicle
straight during braki ng. Because braking
distances may increase under certain road
conditions, it is nece ssary to plan and
make turning manoeuvres as early as
possible.
Electronic Brakeforce Distribution (EBD)
EBD balances the distribution of braking forces
between the wheels on the front and rear axles,
to maintain maximum braking under all vehicle
loading conditions.
For example; Under light loads, EBD applies
less braking effort to the rear wheels, to
maintain stability. Conv ersely, it allows full
braking effort to the rear wheels when the
vehicle is towing or is heavily laden.
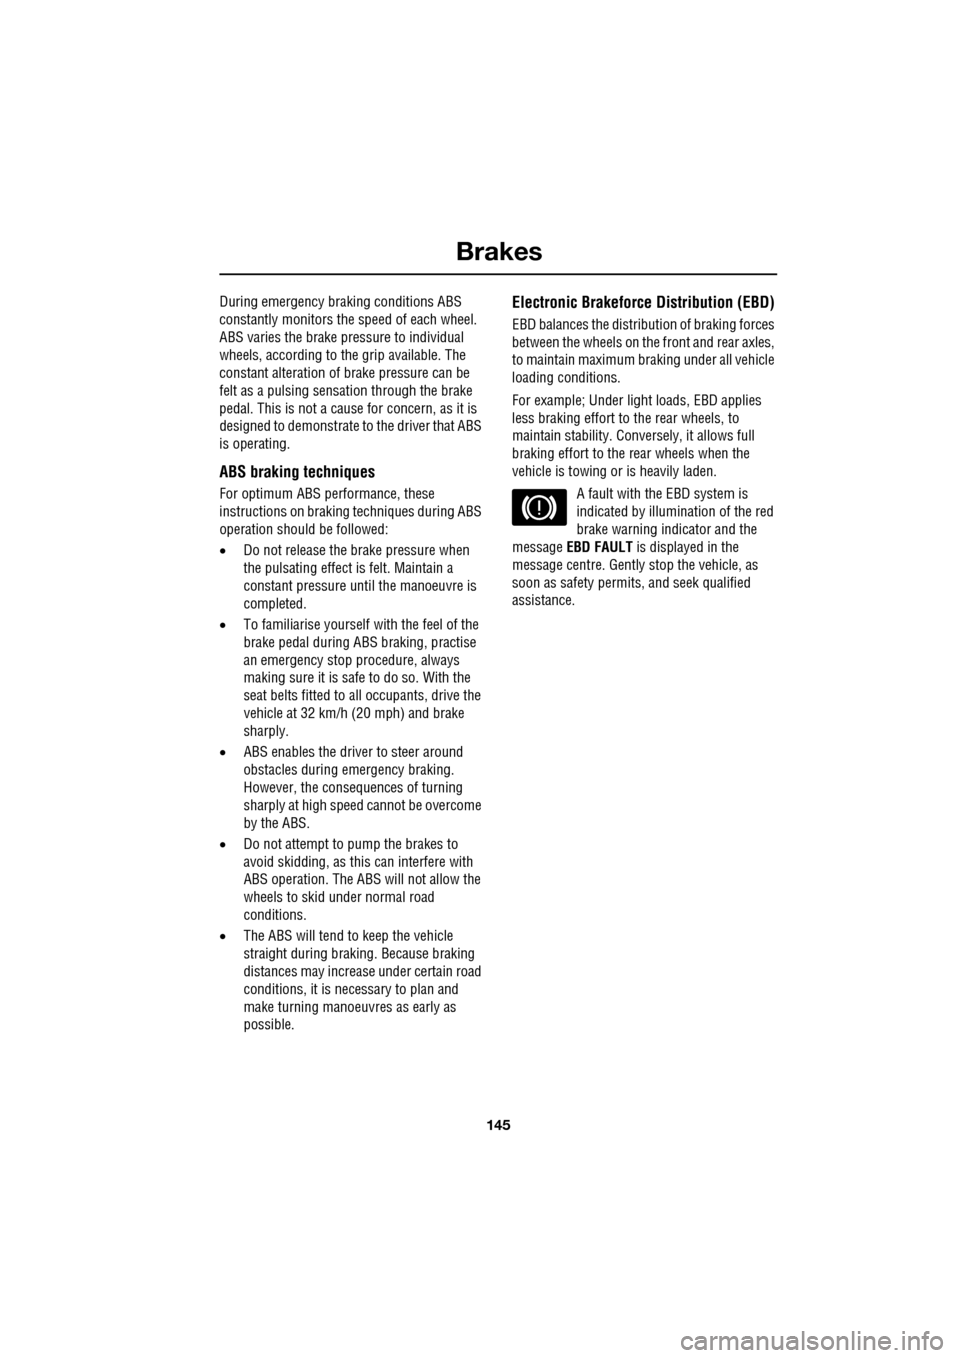
A fault with the EBD system is
indicated by illumination of the red
brake warning indicator and the
message EBD FAULT is displayed in the
message centre. Gently stop the vehicle, as
soon as safety permit s, and seek qualified
assistance.
Page 165 of 391

165
Adaptive cruise control (ACC)
ADVANCED EMERGENCY BRAKE
ASSIST
On vehicles fitted with Advanced Emergency
Brake Assist, brake response is improved
during emergency braking when a moving
vehicle is detected close ahead.
Advanced Emergency Brake Assist activates If
the risk of collision increases after the
FORWARD ALERT warning is displayed.
See FORWARD ALERT FUNCTION (page 164).
The brakes are automatica lly applied gently in
preparation for rapid braking (which may be
noticeable). If the brake pedal is then pressed
quickly, then braking is implemented fully,
even if the pressure on the pedal is light.
See HINTS ON DRIVING WITH ABS
(page 144).
Advanced Emergency Brake Assist is available
at speeds above approximately 7 km/h (5 mph)
and will function even if Forward Alert and
Adaptive Cruise Control are switched off. A
fault with the system will be indicated by the
warning FORWARD ALER T UNAVAILABLE
appearing in the mess age centre. Advanced
Emergency Brake Assist will not be available
until the fault is rectified.
WARNING
Advanced Emergency Brake Assist, is
an additional safety system and is not
intended to relieve the driver of the
responsibility for exer cising due care and
attention when driving.
CAUTION
The system may not react to slow
moving vehicles and will not react to
stationary vehicles or vehicles not
travelling in the same direction as your vehicle.
Advanced Emergency Brake Assist can
only improve braking performance if the
driver applies the brakes.
Warnings may not appear if the distance
to the vehicle ahead is very small or if
steering wheel and pedal movements
are large (e.g. to avoid a collision).
Advanced Emergency Brake Assist
utilises the same radar sensor as
Adaptive Cruise Control and Forward
Alert - the same limita tions of performance
apply.
See PRINCIPLE OF OPERATION (page 159).
See USING ACC (page 159).
See FORWARD ALERT FUNCTION
(page 164).
Page 170 of 391

Driving dynamics
170
DYNAMIC MODE
(V8 petrol and diesel vehicles only)
Press to operate. Dynamic mode
co-ordinates the vehicle's control
systems to deliver a high
performance driving experience. This setting
enhances key vehicle systems so that the
vehicle's full potential can be exploited. The
vehicle's responses are aimed at involving the
driver more in focused and purposeful driving,
helping swift progress.
Note: When the transmission is set to
permanent manual mode (i.e. using the
paddles to change gear while in Sport mode)
and Dynamic mode is selected, transmission
upshifts are fully controlled by the driver. This
means that the transmissi on will not change up
a gear automatically, even when the vehicle's
rev limit is reached. When the rev limit is
reached, the gear position indicator in the
message centre will glow amber, to indicate
that the next gear should be selected.
Note: Dynamic mode cannot be active at the
same time as Winter m ode. Dynamic mode will
remain selected for approximately six hours
after the ignition is swit ched off, after which
point it will need to be reselected if required.
STABILITY CONTROL
Dynamic Stability Control (DSC)
Dynamic Stability Contro l (DSC) is operational
whenever the engine is running, unless it has
been manually switched off. When the system
is operating, the warn ing indicator in the
instrument panel will flash.
The DSC system controls the Anti-lock Braking
System (ABS), traction control and yaw control
of the vehicle.
The DSC system assists the driver in retaining
directional control of th e vehicle in situations
where the vehicle is sliding (understeer or
oversteer). It must not encourage the driver to
drive beyond the limit of adhesion or at speeds
higher than those suitable for the prevailing
road and traffic conditions.
DSC applies braking pres sure to individual
wheels if excessive variation is detected. This
ensures that the vehicle follows the driver’s
intended direction of travel as closely as
possible.
Traction control will intervene to control wheel
spin by automatically reducing the power
output from the engine and applying braking to
individual wheels. This improves acceleration,
particularly on surfaces with uneven friction
(e.g. one wheel on ice with another on tarmac).
Note: For recommended DSC mode selection,
refer to the JaguarDri ve Control scenarios
section in this handbook.
WARNING
The fact that the vehicle is fitted with
DSC, must never allow the driver to
be tempted into taking risks which
could affect his or her sa fety or that of other
road users. In all cases, it remains the driver’s
responsibility to drive sa fely according to the
prevailing conditions.
Page 205 of 391

205
Maintenance
Topping up the coolant
Top-up to the upper level indicator mark
located on the side of the expansion tank. Use
only a 50% mix of water and antifreeze to
specification WSS M97B44 (coloured orange)
Extended Life Coolant.
Note: In an emergency - and only if the
approved antifreeze is unavailable - top-up the
cooling system with clea n water, but be aware
of the resultant reduction in frost protection.
Do not top-up or refill with conventional
antifreeze formulations . If in doubt consult a
qualified technician.
Ensure the cap is tightened fully after top-up is
completed by turning the cap until the ratchet
cap clicks.
Antifreeze
Antifreeze contains important corrosion
inhibitors. The antifreeze content of the coolant
must be maintained at 50% ± 5% all year round
(not just in cold conditions). To ensure that the
anti-corrosion properties of the coolant are
retained, the antifreeze content should be
checked once a year and completely renewed
every ten years, regardless of distance
travelled. Failure to do so may cause corrosion
of the radiator and engine components.
The specific gravity of a 50% antifreeze
solution at 20°C (68°F) is 1.068 and protects
against frost down to -40°C (-40°F).
Use antifreeze to specification WSS M97B44
(coloured orange) Extended Life Coolant.
WARNINGS
Never remove the filler cap when the
engine is hot - escaping steam or
scalding water coul d cause serious
personal injury.
Antifreeze is highly inflammable. Do
not allow antifreeze to come into
contact with naked flames or other
sources of ignition (e.g. a hot engine) - a fire
may result.
Unscrew the filler cap slowly,
allowing the pressure to escape
before removing completely.
CAUTION
When travelling in territories where the
water supply contains salt, always
ensure you carry a supply of fresh (rain or
distilled) water. Topping up with salt water will
cause serious e ngine damage.
WARNINGS
Antifreeze is poisonous and can be
fatal if swallowed - keep containers
sealed and out of the reach of
children. If accident al consumption is
suspected, seek medical attention
immediately.
If the fluid comes into contact with
the skin or eyes, rinse immediately
with plenty of water.
CAUTIONS
The use of non-approved antifreeze will
have an adverse effect on the engine
cooling system and therefore engine
durability.
Antifreeze will damage painted surfaces;
soak up any spillage with an absorbent
cloth immediately and wash the area with a
mixture of car shampoo and water.
Page 207 of 391

207
Maintenance
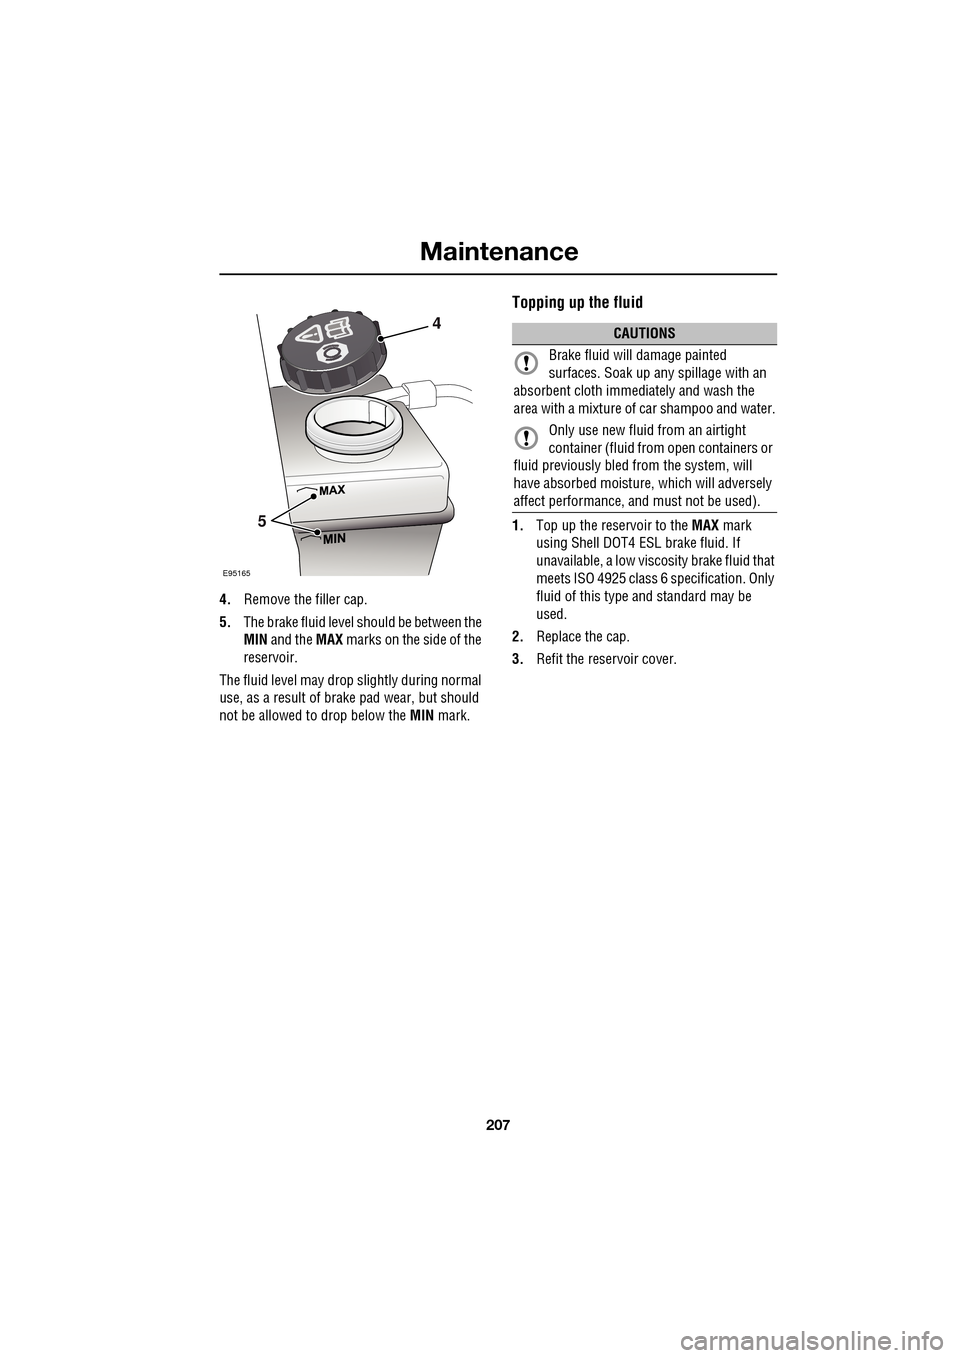
4.Remove the filler cap.
5. The brake fluid level should be between the
MIN and the MAX marks on the side of the
reservoir.
The fluid level may drop slightly during normal
use, as a result of brake pad wear, but should
not be allowed to drop below the MIN mark.
Topping up the fluid
1.Top up the reservoir to the MAX mark
using Shell DOT4 ESL brake fluid. If
unavailable, a low viscosity brake fluid that
meets ISO 4925 class 6 sp ecification. Only
fluid of this type and standard may be
used.
2. Replace the cap.
3. Refit the reservoir cover.
E95165
4
5
CAUTIONS
Brake fluid will damage painted
surfaces. Soak up an y spillage with an
absorbent cloth immediately and wash the
area with a mixture of car shampoo and water.
Only use new fluid from an airtight
container (fluid from open containers or
fluid previously bled from the system, will
have absorbed moisture, which will adversely
affect performa nce, and must not be used).
Page 208 of 391

Maintenance
208
POWER STEERING FLUID CHECK
Checking the fluid level
Check and top-up the fluid with the vehicle on
level ground, with the e ngine switched off and
the system cold. Ensure that the steering wheel
is not turned after stopping the engine.
The level of fluid can be seen through the
translucent body of the reservoir. The fluid level shoul
d be between the MIN and
the MAX marks.
Topping up the fluid
1.Clean the filler cap before removing to
prevent dirt from entering the reservoir.
2. Remove filler cap.
3. Using Mobil ATF320, top-up the reservoir
until the fluid level is between the MIN and
MAX marks.
4. Replace filler cap.
WARNINGS
Power steering fluid is highly toxic.
Keep containers sealed and out of
reach of children. If accidental
consumption of fluid is suspected, seek
medical attenti on immediately.
If the fluid comes into contact with
the skin or eyes, rinse immediately
with plenty of water.
Power steering fluid is highly
inflammable. Do not allow power
steering fluid to come into contact
with naked flames or other sources of ignition
(e.g. a hot engine) - a fire may result.
CAUTIONS
The engine must not be started if the
fluid level has dropped below the MIN
mark. Severe damage to the steering pump
could result.
Seek qualified assistance immediately if
there is a noticeable drop in the fluid
level. Severe damage to the steering pump
could result.
If fluid loss is slow, the reservoir may be
topped-up to the upper level mark to
enable the vehicle to be driven to a repair
facility for examination. However, it is
recommended that you seek qualified
assistance before driving the vehicle.CAUTIONS
It is imperative that the power steering
system does not beco me contaminated
in any way. Always use new fluid and clean the
area around the filler neck both before
removing the filler ca p and after topping up.
Never return drained fluid to the system.
Power steering fluid will damage
painted surfaces. So ak up any spillage
with an absorbent cloth immediately and wash
the area with a mixture of car shampoo and
water.
Do not fill the reservoir above the MAX
mark.
E95166
Page 301 of 391

301
Portable audio
Connecting an auxiliary device
On the audio Home screen, select Audio/TV
and then select Portable audio.
Note: You can also press the SOURCE button
repeatedly to select Portable audio device .
Insert the AUX jack plug into the socket
indicated.
Select AUX.
Play will start when you switch on and start
playing the auxiliary device.
Note: You cannot operate or search the
auxiliary audio device using the touch-screen,
so all buttons on the touch-screen are
unavailable.
Connecting more than one device
You can connect an iPod and a USB device
simultaneously to the portable audio interface
and switch between them using the
touch-screen. Select iPod, USB or AUX , to
switch between modes.
The device docked first will remain the active
device until you choose to change.
If, after changing to the newly-docked device,
you change back to the first device, play will
resume at the point you left it (USB and iPod
only).
Note: You cannot use a USB hub to connect
more than one USB device to the audio unit.
Note: Devices connected to the iPod and USB
ports will be charged, but devices that are fully
discharged will not play. Please disconnect
your iPod when leaving the vehicle. Failure to
do so may result in the iPod battery
discharging.
Note: Options such as Repeat and Mix relate
to the device currently playing, they will not
apply to any subsequent device.
E94340
Audio/TV
DAB radio
CD
AM/FM
12 : 26 pm
iPod AUX
RepeUSB
Settings
Folders
TP TA PTY DPLIITr 04
Portable audio
TV
Sing for absolution
00:36
E94709
Page 303 of 391

303
Portable audio
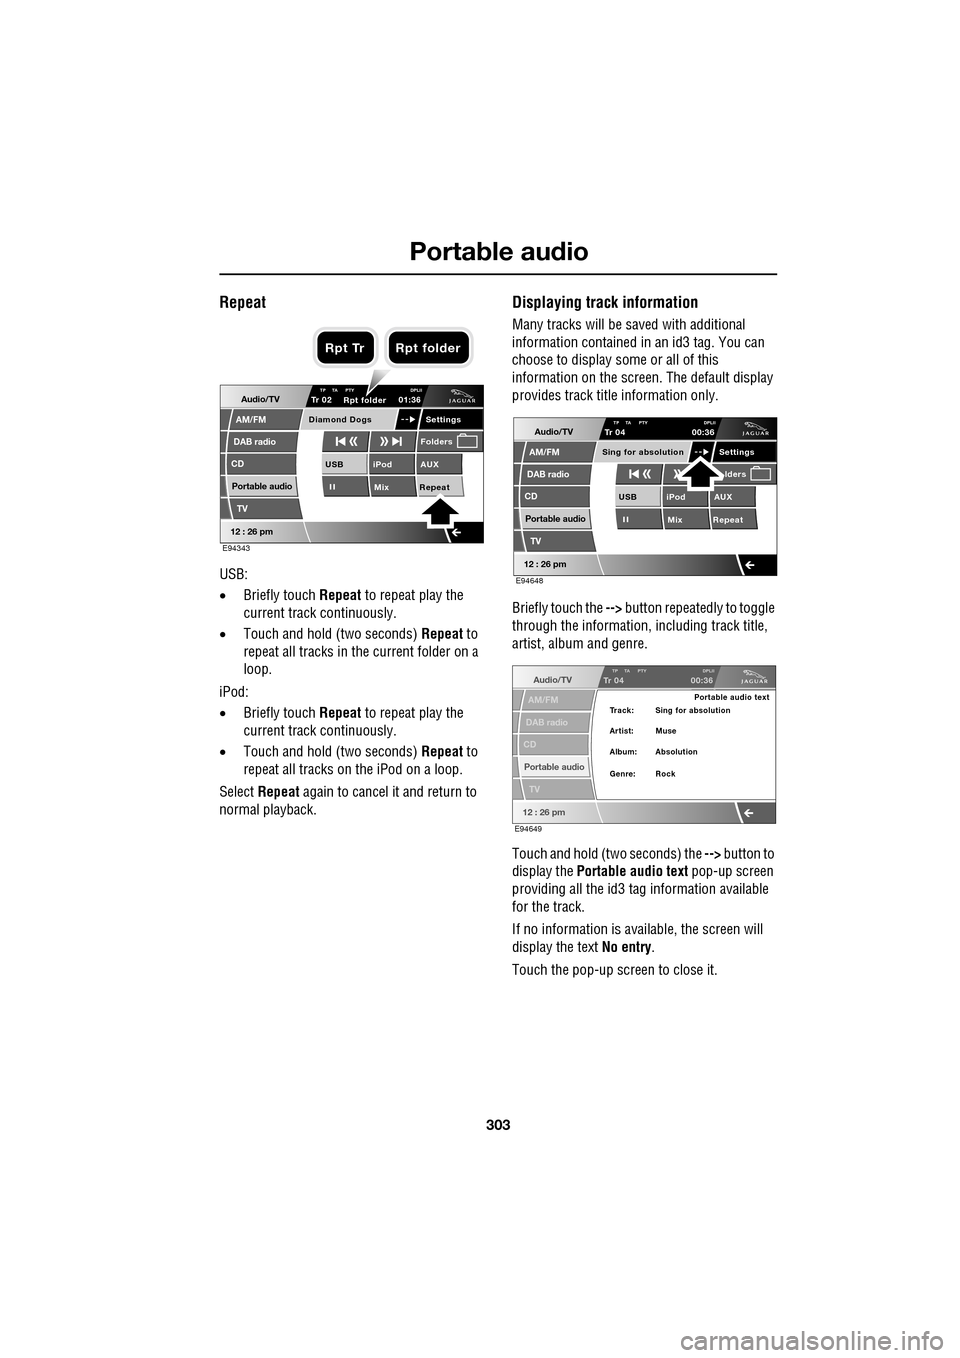
Repeat
USB:
•Briefly touch Repeat to repeat play the
current track continuously.
• Touch and hold (two seconds) Repeat to
repeat all tracks in the current folder on a
loop.
iPod:
• Briefly touch Repeat to repeat play the
current track continuously.
• Touch and hold (two seconds) Repeat to
repeat all tracks on the iPod on a loop.
Select Repeat again to cancel it and return to
normal playback.
Displaying track information
Many tracks will be saved with additional
information contained in an id3 tag. You can
choose to display some or all of this
information on the screen. The default display
provides track title information only.
Briefly touch the --> button repeatedly to toggle
through the information, including track title,
artist, album and genre.
Touch and hold (two seconds) the --> button to
display the Portable audio text pop-up screen
providing all the id3 ta g information available
for the track.
If no information is available, the screen will
display the text No entry.
Touch the pop-up screen to close it.
Audio/TV
DAB radio
CD
AM/FM
12 : 26 pm
iPod AUX
Mix RepeatUSB
Settings
Folders
TP TA PTY DPLIITr 02
Portable audio
TV
Diamond Dogs
01:36
E94343
Rpt folder
Rpt Tr Rpt folder
Audio/TV
DAB radio
CD
AM/FM
12 : 26 pm
iPod AUX
Mix RepeatUSB
Settings lders
TP TA PTY DPLIITr 04
Portable audio
TV
Sing for absolution
00:36
E94648
Audio/TV
DAB radio
CD
AM/FM
12 : 26 pm
TP TA PTY DPLIITr 04
Portable audio
TV
00:36
Portable audio text
Artist: Muse Track: Sing for absolution
Genre: Rock Album: Absolution
E94649