2009 INFINITI QX56 200
[x] Cancel search: 200Page 3228 of 4171
SUSPENSION CONTROL SYSTEMSCS-35
< SYMPTOM DIAGNOSIS >
C
DF
G H
I
J
K L
M A
B
SCS
N
O P
SYMPTOM DIAGNOSIS
SUSPENSION CONTROL SYSTEM
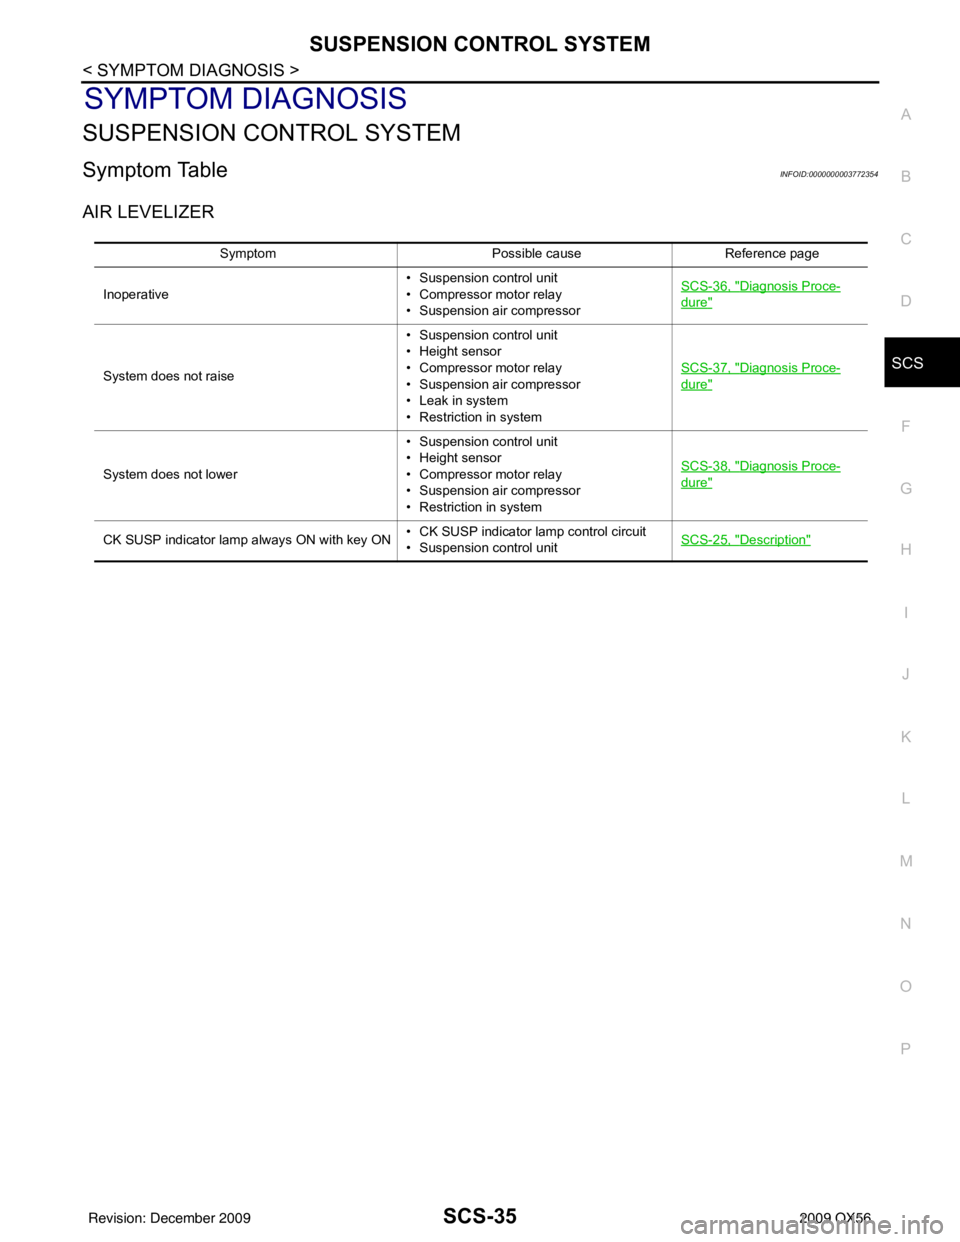
Symptom TableINFOID:0000000003772354
AIR LEVELIZER
Symptom Possible causeReference page
Inoperative • Suspension control unit
• Compressor motor relay
• Suspension air compressorSCS-36, "
Diagnosis Proce-
dure"
System does not raise • Suspension control unit
• Height sensor
• Compressor motor relay
• Suspension air compressor
• Leak in system
• Restriction in systemSCS-37, "Diagnosis Proce-
dure"
System does not lower
• Suspension control unit
• Height sensor
• Compressor motor relay
• Suspension air compressor
• Restriction in systemSCS-38, "Diagnosis Proce-
dure"
CK SUSP indicator lamp always ON with key ON
• CK SUSP indicator lamp control circuit
• Suspension control unitSCS-25, "Description"
Revision: December 20092009 QX56
Page 3229 of 4171
SCS-36
< SYMPTOM DIAGNOSIS >
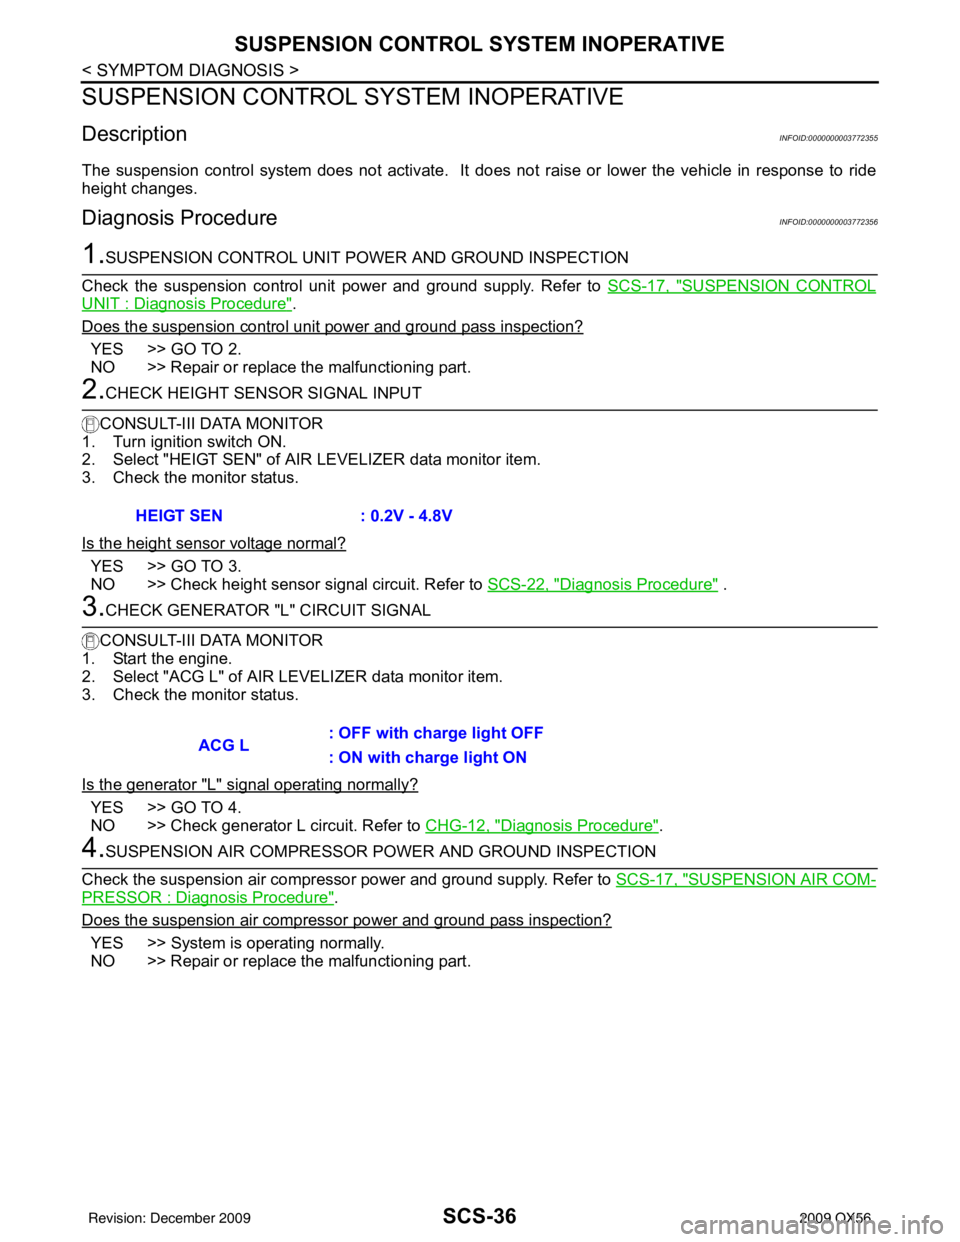
SUSPENSION CONTROL SYSTEM INOPERATIVE
SUSPENSION CONTROL SYSTEM INOPERATIVE
DescriptionINFOID:0000000003772355
The suspension control system does not activate. It does not raise or lower the vehicle in response to ride
height changes.
Diagnosis ProcedureINFOID:0000000003772356
1.SUSPENSION CONTROL UNIT PO WER AND GROUND INSPECTION
Check the suspension control unit power and ground supply. Refer to SCS-17, "
SUSPENSION CONTROL
UNIT : Diagnosis Procedure".
Does the suspension control unit power and ground pass inspection?
YES >> GO TO 2.
NO >> Repair or replace the malfunctioning part.
2.CHECK HEIGHT SENSOR SIGNAL INPUT
CONSULT-III DATA MONITOR
1. Turn ignition switch ON.
2. Select "HEIGT SEN" of AI R LEVELIZER data monitor item.
3. Check the monitor status.
Is the height sensor voltage normal?
YES >> GO TO 3.
NO >> Check height sensor signal circuit. Refer to SCS-22, "
Diagnosis Procedure" .
3.CHECK GENERATOR "L" CIRCUIT SIGNAL
CONSULT-III DATA MONITOR
1. Start the engine.
2. Select "ACG L" of AIR LE VELIZER data monitor item.
3. Check the monitor status.
Is the generator "L" signal operating normally?
YES >> GO TO 4.
NO >> Check generator L circuit. Refer to CHG-12, "
Diagnosis Procedure".
4.SUSPENSION AIR COMPRESSOR POWER AND GROUND INSPECTION
Check the suspension air compressor power and ground supply. Refer to SCS-17, "
SUSPENSION AIR COM-
PRESSOR : Diagnosis Procedure".
Does the suspension air compressor power and ground pass inspection?
YES >> System is operating normally.
NO >> Repair or replace the malfunctioning part. HEIGT SEN
: 0.2V - 4.8V
ACG L: OFF with charge light OFF
: ON with charge light ON
Revision: December 20092009 QX56
Page 3230 of 4171
SUSPENSION CONTROL SYSTEM DOES NOT RAISE
SCS-37
< SYMPTOM DIAGNOSIS >
C
D F
G H
I
J
K L
M A
B
SCS
N
O P
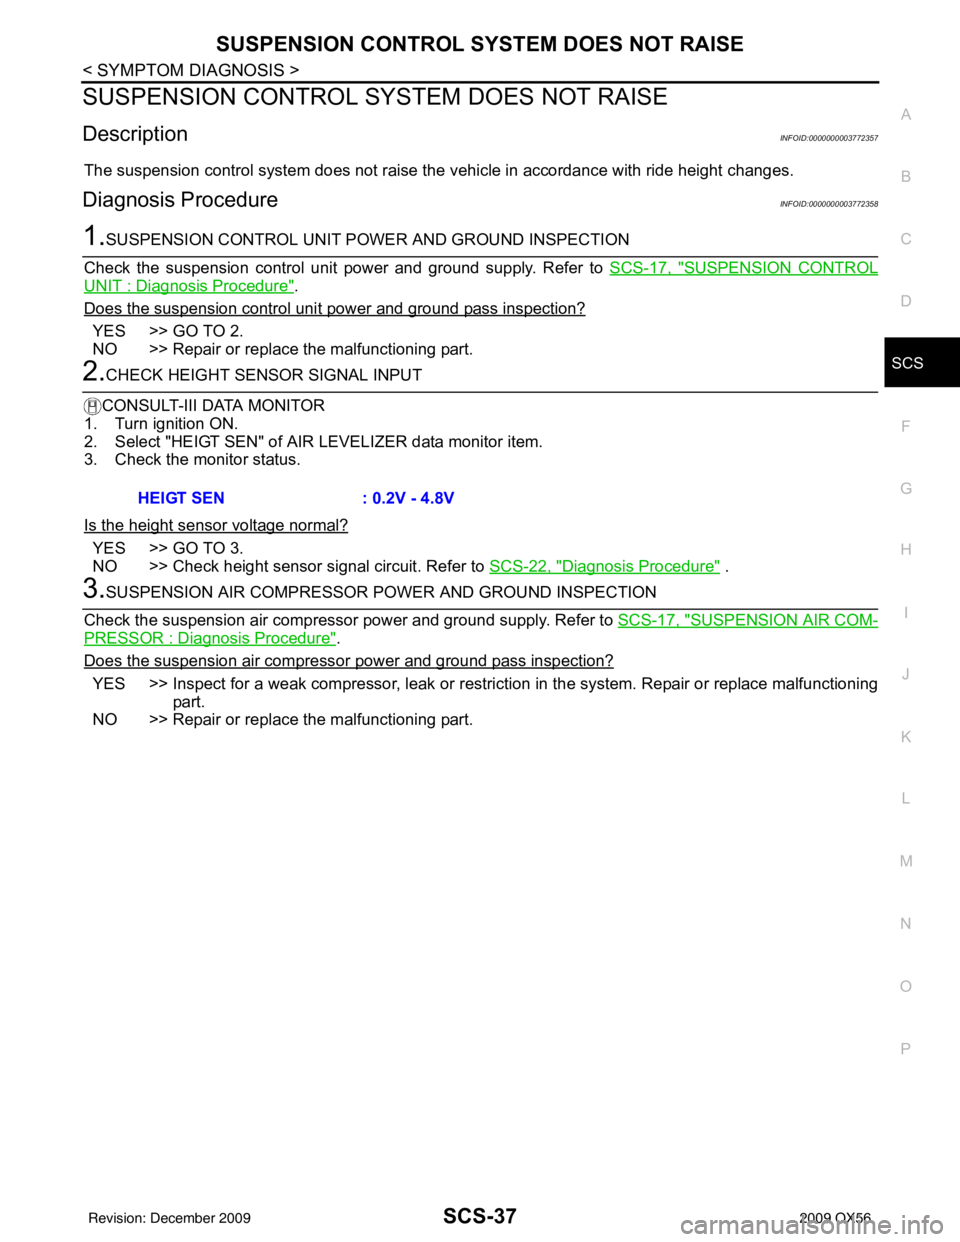
SUSPENSION CONTROL SYST EM DOES NOT RAISE
DescriptionINFOID:0000000003772357
The suspension control system does not raise the vehicle in accordance with ride height changes.
Diagnosis ProcedureINFOID:0000000003772358
1.SUSPENSION CONTROL UNIT PO WER AND GROUND INSPECTION
Check the suspension control unit power and ground supply. Refer to SCS-17, "
SUSPENSION CONTROL
UNIT : Diagnosis Procedure".
Does the suspension control uni t power and ground pass inspection?
YES >> GO TO 2.
NO >> Repair or replace the malfunctioning part.
2.CHECK HEIGHT SENSOR SIGNAL INPUT
CONSULT-III DATA MONITOR
1. Turn ignition ON.
2. Select "HEIGT SEN" of AI R LEVELIZER data monitor item.
3. Check the monitor status.
Is the height sensor voltage normal?
YES >> GO TO 3.
NO >> Check height sensor signal circuit. Refer to SCS-22, "
Diagnosis Procedure" .
3.SUSPENSION AIR COMPRESSOR POWER AND GROUND INSPECTION
Check the suspension air compressor power and ground supply. Refer to SCS-17, "
SUSPENSION AIR COM-
PRESSOR : Diagnosis Procedure".
Does the suspension air compress or power and ground pass inspection?
YES >> Inspect for a weak compressor, leak or restriction in the system. Repair or replace malfunctioning
part.
NO >> Repair or replace the malfunctioning part. HEIGT SEN
: 0.2V - 4.8V
Revision: December 20092009 QX56
Page 3231 of 4171
SCS-38
< SYMPTOM DIAGNOSIS >
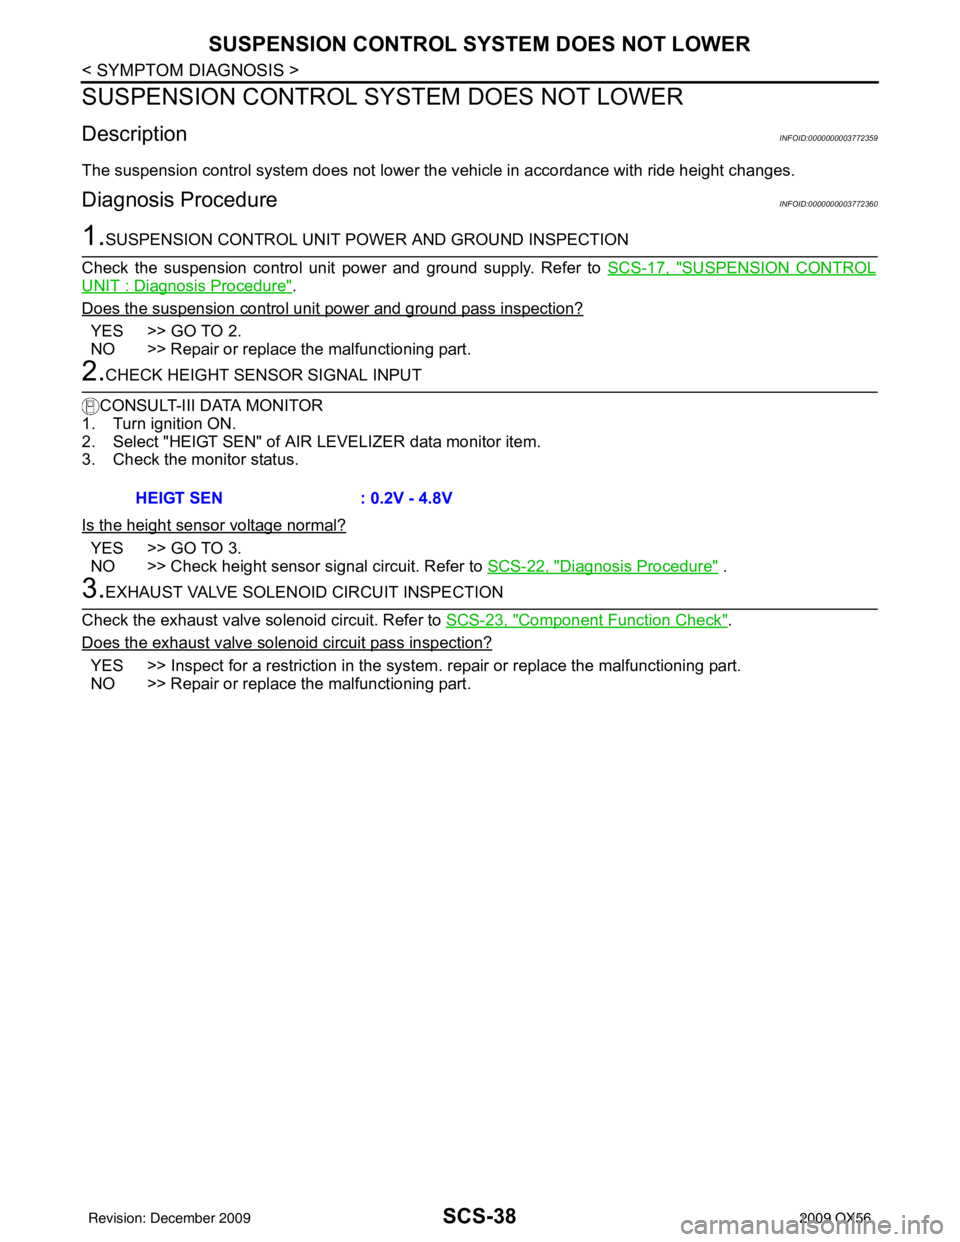
SUSPENSION CONTROL SYSTEM DOES NOT LOWER
SUSPENSION CONTROL SYSTEM DOES NOT LOWER
DescriptionINFOID:0000000003772359
The suspension control system does not lower the vehicle in accordance with ride height changes.
Diagnosis ProcedureINFOID:0000000003772360
1.SUSPENSION CONTROL UNIT PO WER AND GROUND INSPECTION
Check the suspension control unit power and ground supply. Refer to SCS-17, "
SUSPENSION CONTROL
UNIT : Diagnosis Procedure".
Does the suspension control unit power and ground pass inspection?
YES >> GO TO 2.
NO >> Repair or replace the malfunctioning part.
2.CHECK HEIGHT SENSOR SIGNAL INPUT
CONSULT-III DATA MONITOR
1. Turn ignition ON.
2. Select "HEIGT SEN" of AI R LEVELIZER data monitor item.
3. Check the monitor status.
Is the height sensor voltage normal?
YES >> GO TO 3.
NO >> Check height sensor signal circuit. Refer to SCS-22, "
Diagnosis Procedure" .
3.EXHAUST VALVE SOLENOID CIRCUIT INSPECTION
Check the exhaust valve solenoid circuit. Refer to SCS-23, "
Component Function Check".
Does the exhaust valve solenoid circuit pass inspection?
YES >> Inspect for a restriction in the system . repair or replace the malfunctioning part.
NO >> Repair or replace the malfunctioning part. HEIGT SEN
: 0.2V - 4.8V
Revision: December 20092009 QX56
Page 3232 of 4171
PRECAUTIONSSCS-39
< PRECAUTION >
C
DF
G H
I
J
K L
M A
B
SCS
N
O P
PRECAUTION
PRECAUTIONS
Precaution for Supplemental Restraint System (SRS) "AIR BAG" and "SEAT BELT
PRE-TENSIONER"
INFOID:0000000005867805
The Supplemental Restraint System such as “AIR BAG” and “SEAT BELT PRE-TENSIONER”, used along
with a front seat belt, helps to reduce the risk or severi ty of injury to the driver and front passenger for certain
types of collision. This system includes seat belt switch inputs and dual stage front air bag modules. The SRS
system uses the seat belt switches to determine the front air bag deployment, and may only deploy one front
air bag, depending on the severity of a collision and w hether the front occupants are belted or unbelted.
Information necessary to service the system safely is included in the SR and SB section of this Service Man-
ual.
WARNING:
• To avoid rendering the SRS inoper ative, which could increase the risk of personal injury or death in
the event of a collision which would result in air bag inflation, all maintenance must be performed by
an authorized NISSAN/INFINITI dealer.
• Improper maintenance, including in correct removal and installation of the SRS, can lead to personal
injury caused by unintentional act ivation of the system. For removal of Spiral Cable and Air Bag
Module, see the SR section.
• Do not use electrical test equipm ent on any circuit related to the SRS unless instructed to in this
Service Manual. SRS wiring harnesses can be identi fied by yellow and/or orange harnesses or har-
ness connectors.
PRECAUTIONS WHEN USING POWER TOOLS (AIR OR ELECTRIC) AND HAMMERS
WARNING:
• When working near the Airbag Diagnosis Sensor Un it or other Airbag System sensors with the Igni-
tion ON or engine running, DO NOT use air or el ectric power tools or strike near the sensor(s) with a
hammer. Heavy vibration could activate the sensor( s) and deploy the air bag(s), possibly causing
serious injury.
• When using air or electric power tools or hammers, always switch the Ignition OFF, disconnect the battery, and wait at least 3 minutes before performing any service.
Precaution for Rear SuspensionINFOID:0000000003772362
• When installing the rubber bushings, the final tightening must be done under unladen condition and with thetires on level ground. Oil will shorten the life of the rubber bushings, so wipe off any spilled oil immediately.
• Unladen condition means the fuel tank, engine coolant and lubricants are at the full specification. The spare tire, jack, hand tools, and mats are in their designated positions.
• After installing suspension components, check the wheel alignment.
• Caulking nuts are not reusable. Always use new caulking nuts for installation. New caulking nuts are pre-
oiled, do not apply any additional lubrication.
Revision: December 20092009 QX56
Page 3233 of 4171

SE-1
BODY INTERIOR
C
DE
F
G H
I
K L
M
SECTION SE
A
B
SE
N
O P
CONTENTS
SEAT
BASIC INSPECTION ....... .............................3
DIAGNOSIS AND REPAIR WORKFLOW ..... .....3
Work Flow ........................................................... ......3
INSPECTION AND ADJUSTMENT .....................5
Preliminary Check ............................................... ......5
FUNCTION DIAGNOSIS ...............................6
THIRD ROW POWER FOLDING SEAT ......... .....6
System Description ............................................. ......6
Component Parts Location ........................................7
Component Description .............................................7
COMPONENT DIAGNOSIS ..........................8
POWER SEAT .....................................................8
Wiring Diagram — Passenger Side — ................ ......8
HEATED SEAT ...................................................12
Description ..............................................................12
Wiring Diagram .......................................................13
THIRD SEAT ......................................................19
Power Supply and Ground Circuit Check for Third
Row Power Folding Seat Control Unit ................. ....
19
Third Row Power Folding Seat Switch ....................20
Third Row Power Folding Seat Motor .....................20
ECU DIAGNOSIS .........................................22
THIRD ROW POWER FOLDING SEAT CON-
TROL UNIT .........................................................
22
Reference Value ................................................. ....22
Wiring Diagram .......................................................24
DTC Index ...............................................................29
Fail Safe ..................................................................30
SYMPTOM DIAGNOSIS ..............................31
THIRD ROW POWER FOLDING SEAT ......... ....31
Symptom Table ................................................... ....31
NONE OF THE THIRD ROW POWER FOLD-
ING SEATS WILL OPERATE WITH ANY
SWITCH. ............................................................
32
None of the Third Row Power Folding Seats Will
Operate With Any Third Row Power Folding Seat
Switch .................................................................. ....
32
ONLY ONE THIRD ROW POWER FOLDING
SEAT WILL OPERATE. ....................................
33
Only One Third Row Power Folding Seat Will Op-
erate .................................................................... ....
33
THIRD ROW POWER FOLDING SEAT WILL
OPERATE IN ONLY ONE DIRECTION. ...........
35
Third Row Power Folding Seat Will Operate in
Only One Direction .............................................. ....
35
THIRD ROW POWER FOLDING SEAT WILL
STOP SHORT OF IT’S FULLY UP OR DOWN
POSITION. .........................................................
36
Third Row Power Folding Seat Stops Short of it's
Fully Up or Down Position .......................................
36
THIRD ROW POWER FOLDING SEAT
MAKES EXCESSIVE NOISE WHILE MOV-
ING. ...................................................................
37
Third Row Power Folding Seat Makes Excessive
Noise While Moving ............................................. ....
37
SQUEAK AND RATTLE TROUBLE DIAG-
NOSES ..............................................................
38
Work Flow ................................................................38
Generic Squeak and Rattle Troubleshooting ...........40
Diagnostic Worksheet ..............................................42
PRECAUTION ..............................................44
PRECAUTIONS .................................................44
Precaution for Supplemental Restraint System
(SRS) "AIR BAG" and "SEAT BELT PRE-TEN-
SIONER" ............................................................. ....
44
Revision: December 20092009 QX56
Page 3234 of 4171

SE-2
Precaution Necessary for Steering Wheel Rota-
tion After Battery Disconnect ..................................
44
Precaution for Work ................................................45
PREPARATION ...........................................46
PREPARATION .............................................. ...46
Special Service Tool ............................................ ...46
Commercial Service Tool .......................................46
ON-VEHICLE REPAIR ................................47
FRONT SEAT ................................................. ...47
Exploded View ..................................................... ...47
Removal and Installation ........................................50
SECOND SEAT .................................................51
Exploded View ..................................................... ...51
Removal and Installation ........................................55
THIRD SEAT ......................................................56
Exploded View ..................................................... ...56
LH Side Seat ...........................................................58
Power seat cross beam ..........................................59
RH Side Seat ..........................................................63
DISASSEMBLY AND ASSEMBLY ............65
FRONT SEAT ................................................. ...65
Exploded View ..................................................... ...65
Disassembly and Assembly ....................................68
SECOND SEAT .................................................71
Disassembly and Assembly ................................. ...71
THIRD SEAT ......................................................76
Exploded View ..................................................... ...76
Revision: December 20092009 QX56
Page 3235 of 4171

DIAGNOSIS AND REPAIR WORKFLOWSE-3
< BASIC INSPECTION >
C
DE
F
G H
I
K L
M A
B
SE
N
O P
BASIC INSPECTION
DIAGNOSIS AND REPAIR WORKFLOW
Work FlowINFOID:0000000003775439
WORK FLOW
DETAILED FLOW
1.CUSTOMER INFORMATION
Interview the customer to obtain detailed information about the symptom.
>> GO TO 2
2.PRELIMINARY CHECK
Perform preliminary check. Refer to SE-5, "
Preliminary Check".
>> GO TO 3
3.SELF-DIAGNOSIS
Perform self-diagnosis. Refer to SE-29, "
DTC Index".
AWJIA0363GB
Revision: December 20092009 QX56