Page 3859 of 4171
CONTROL VALVE WITH TCMTM-211
< ON-VEHICLE REPAIR >
CEF
G H
I
J
K L
M A
B
TM
N
O P
2. Install A/T fluid temperature sens or 2 (with bracket) in control
valve with TCM. Tighten A/T flui d temperature sensor 2 bolt to
the specified torque. Refer to TM-203, "Control Valve with TCM
and A/T Fluid Temperature Sensor 2".
CAUTION:
Adjust bolt hole of bracket to bolt hole of control valve with
TCM.
3. Connect A/T fluid temperature sensor 2 connector (A).
4. Securely fasten A/T fluid temperature sensor 2 harness with ter- minal clip .
5. Install oil pan to transmission case. Refer to TM-201, "Oil Pan"
.
6. Connect the negative battery terminal. Refer to PG-77, "Removal and Installation"
.
7. Refill the A/T with fluid and check the fluid level and for fluid leakage. Refer to TM-179, "Checking the A/T
Fluid (ATF)".
SCIA5253E
SCIA8125E
Revision: December 20092009 QX56
Page 3860 of 4171
TM-212
< ON-VEHICLE REPAIR >
REAR OIL SEAL
REAR OIL SEAL
Rear Oil SealINFOID:0000000004187482
REMOVAL AND INSTALLATION
Removal
1. Remove rear propeller shaft. Refer to DLN-196, "Removal and Installation".
2. Remove transfer from transmission (4WD models). Refer to DLN-141, "Removal and Installation"
.
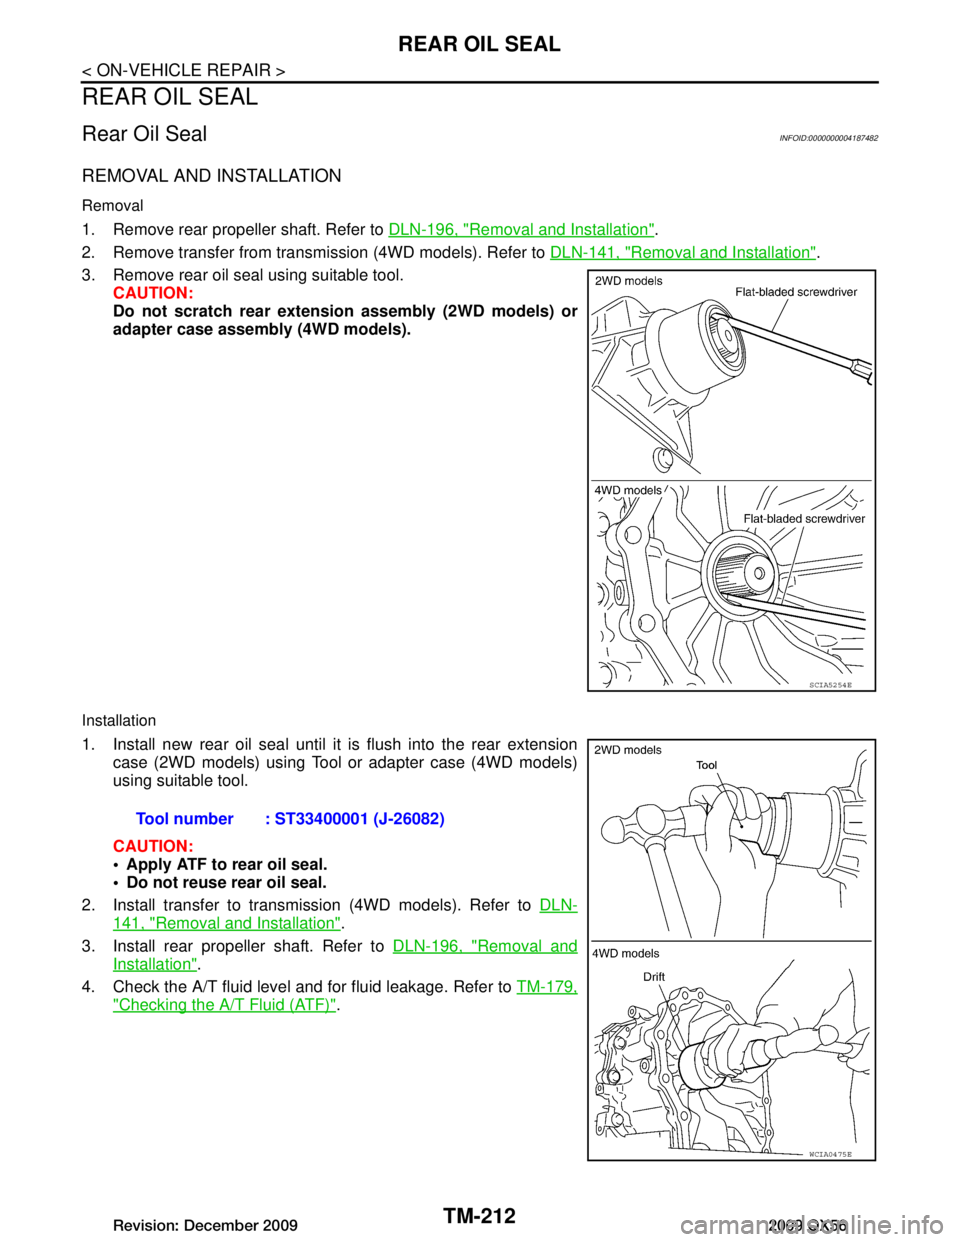
3. Remove rear oil seal using suitable tool. CAUTION:
Do not scratch rear extension assembly (2WD models) or
adapter case assembly (4WD models).
Installation
1. Install new rear oil seal until it is flush into the rear extension
case (2WD models) using Tool or adapter case (4WD models)
using suitable tool.
CAUTION:
Apply ATF to rear oil seal.
Do not reuse rear oil seal.
2. Install transfer to transmission (4WD models). Refer to DLN-
141, "Removal and Installation".
3. Install rear propeller shaft. Refer to DLN-196, "Removal and
Installation".
4. Check the A/T fluid level and for fluid leakage. Refer to TM-179,
"Checking the A/T Fluid (ATF)".
SCIA5254E
Tool number : ST33400001 (J-26082)
WCIA0475E
Revision: December 20092009 QX56
Page 3864 of 4171
TM-216
< REMOVAL AND INSTALLATION >
TRANSMISSION ASSEMBLY
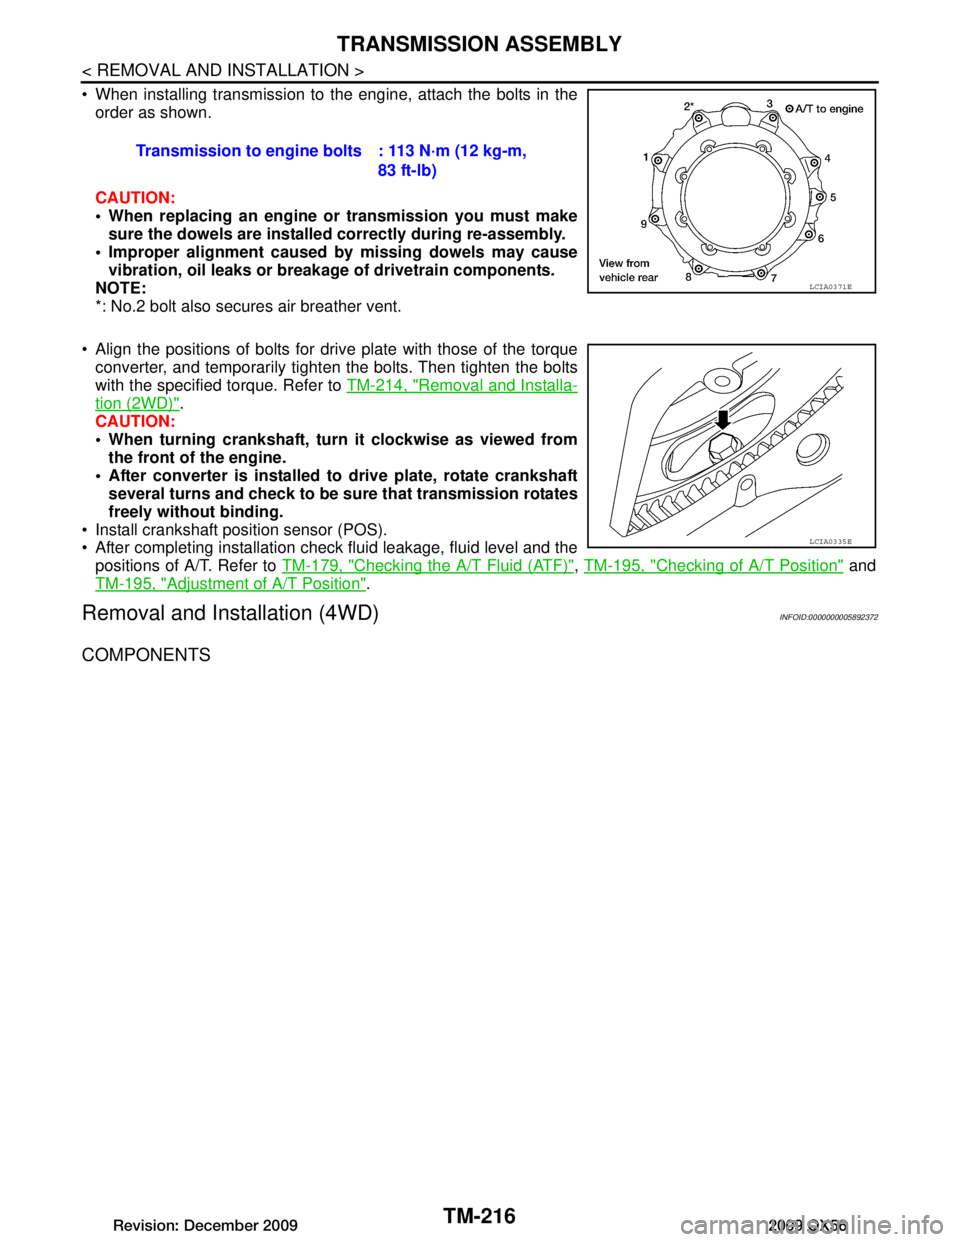
When installing transmission to the engine, attach the bolts in theorder as shown.
CAUTION:
When replacing an engine or transmission you must make
sure the dowels are installe d correctly during re-assembly.
Improper alignment caused by missing dowels may cause
vibration, oil leaks or breakage of drivetrain components.
NOTE:
*: No.2 bolt also secures air breather vent.
Align the positions of bolts for drive plate with those of the torque converter, and temporarily tight en the bolts. Then tighten the bolts
with the specified torque. Refer to TM-214, "Removal and Installa-
tion (2WD)".
CAUTION:
When turning crankshaft, turn it clockwise as viewed from
the front of the engine.
After converter is installed to drive plate, rotate crankshaft several turns and check to be su re that transmission rotates
freely without binding.
Install crankshaft position sensor (POS).
After completing installation check fluid leakage, fluid level and the positions of A/T. Refer to TM-179, "Checking the A/T Fluid (ATF)"
, TM-195, "Checking of A/T Position" and
TM-195, "Adjustment of A/T Position"
.
Removal and Installation (4WD)INFOID:0000000005892372
COMPONENTS
Transmission to engine bolts : 113 N·m (12 kg-m,
83 ft-lb)
LCIA0371E
LCIA0335E
Revision: December 20092009 QX56
Page 3867 of 4171
TRANSMISSION ASSEMBLYTM-219
< REMOVAL AND INSTALLATION >
CEF
G H
I
J
K L
M A
B
TM
N
O P
INSPECTION
Installation and Inspection of Torque Converter
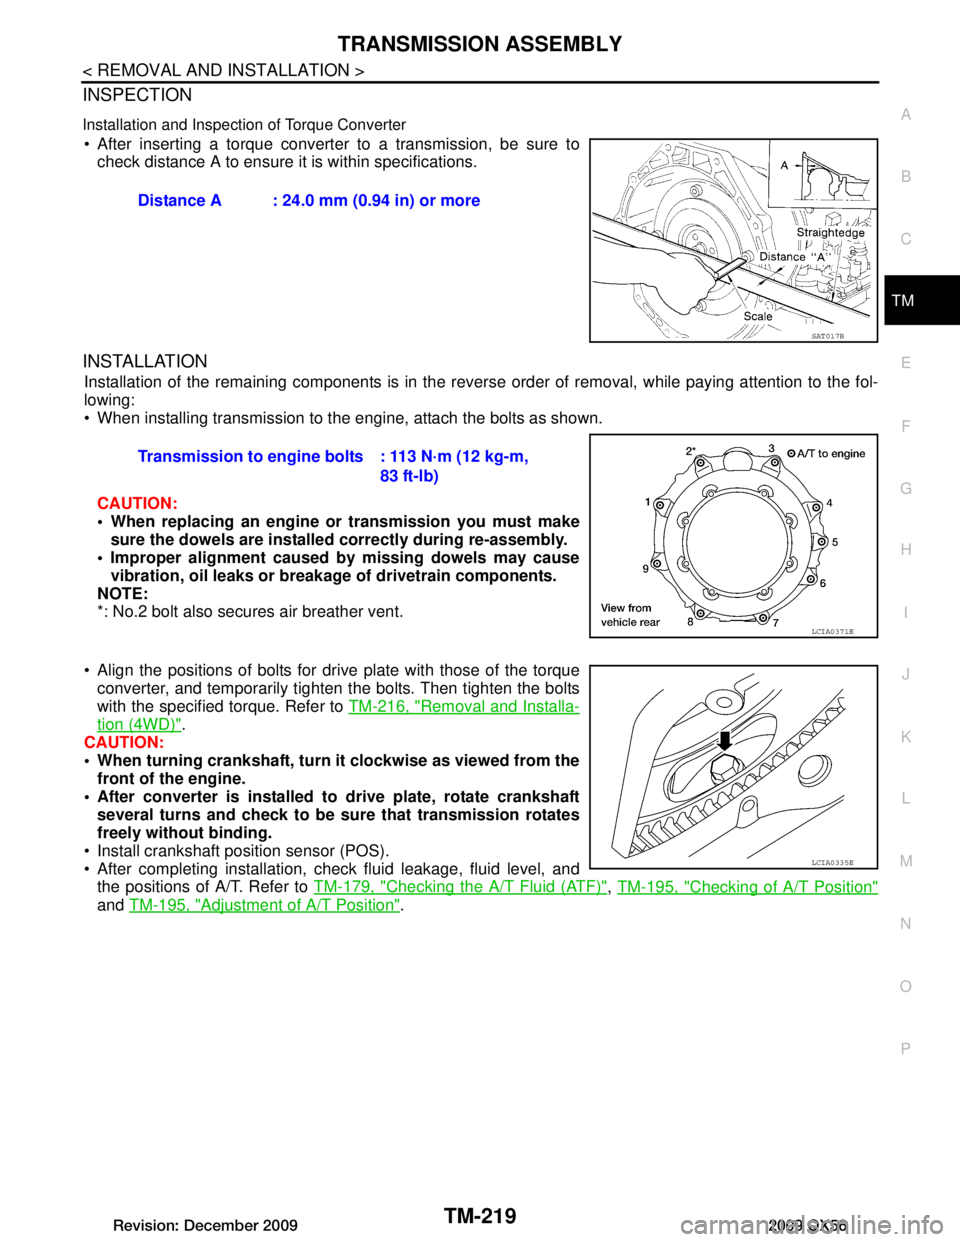
After inserting a torque converter to a transmission, be sure to check distance A to ensure it is within specifications.
INSTALLATION
Installation of the remaining components is in the revers e order of removal, while paying attention to the fol-
lowing:
When installing transmission to the engine, attach the bolts as shown.
CAUTION:
When replacing an engine or transmission you must make sure the dowels are installed correctly during re-assembly.
Improper alignment caused by missing dowels may cause vibration, oil leaks or breakage of drivetrain components.
NOTE:
*: No.2 bolt also secures air breather vent.
Align the positions of bolts for dr ive plate with those of the torque
converter, and temporarily tighten the bolts. Then tighten the bolts
with the specified torque. Refer to TM-216, "Removal and Installa-
tion (4WD)".
CAUTION:
When turning crankshaft, turn it clockwise as viewed from the
front of the engine.
After converter is installed to drive plate, rotate crankshaft
several turns and check to be sure that transmission rotates
freely without binding.
Install crankshaft position sensor (POS).
After completing installation, check fluid leakage, fluid level, and the positions of A/T. Refer to TM-179, "Checking the A/T Fluid (ATF)"
, TM-195, "Checking of A/T Position"
and TM-195, "Adjustment of A/T Position".
Distance A : 24.0 mm (0.94 in) or more
SAT017B
Transmission to engine bolts : 113 N·m (12 kg-m,
83 ft-lb)
LCIA0371E
LCIA0335E
Revision: December 20092009 QX56
Page 3886 of 4171
TM-238
< DISASSEMBLY AND ASSEMBLY >
DISASSEMBLY
27. Push A/T assembly harness connector.CAUTION:
Do not damage connector.
28. Remove oil pan and oil pan gasket. Refer to TM-201, "Oil Pan"
.
29. Check foreign materials in oil pan to help determine causes of malfunction. If the A/T fluid is very dark, smells burned, or con-
tains foreign particles, the frictional material (clutches, band)
may need replacement. A tacky film that will not wipe clean indi-
cates varnish build up. Varnish can cause valves, servo, and
clutches to stick and can inhibit pump pressure.
If frictional material is de tected, perform A/T fluid cooler
cleaning. Refer to TM-183, "A/T Fluid Cooler Cleaning"
.
30. Remove magnets from oil pan.
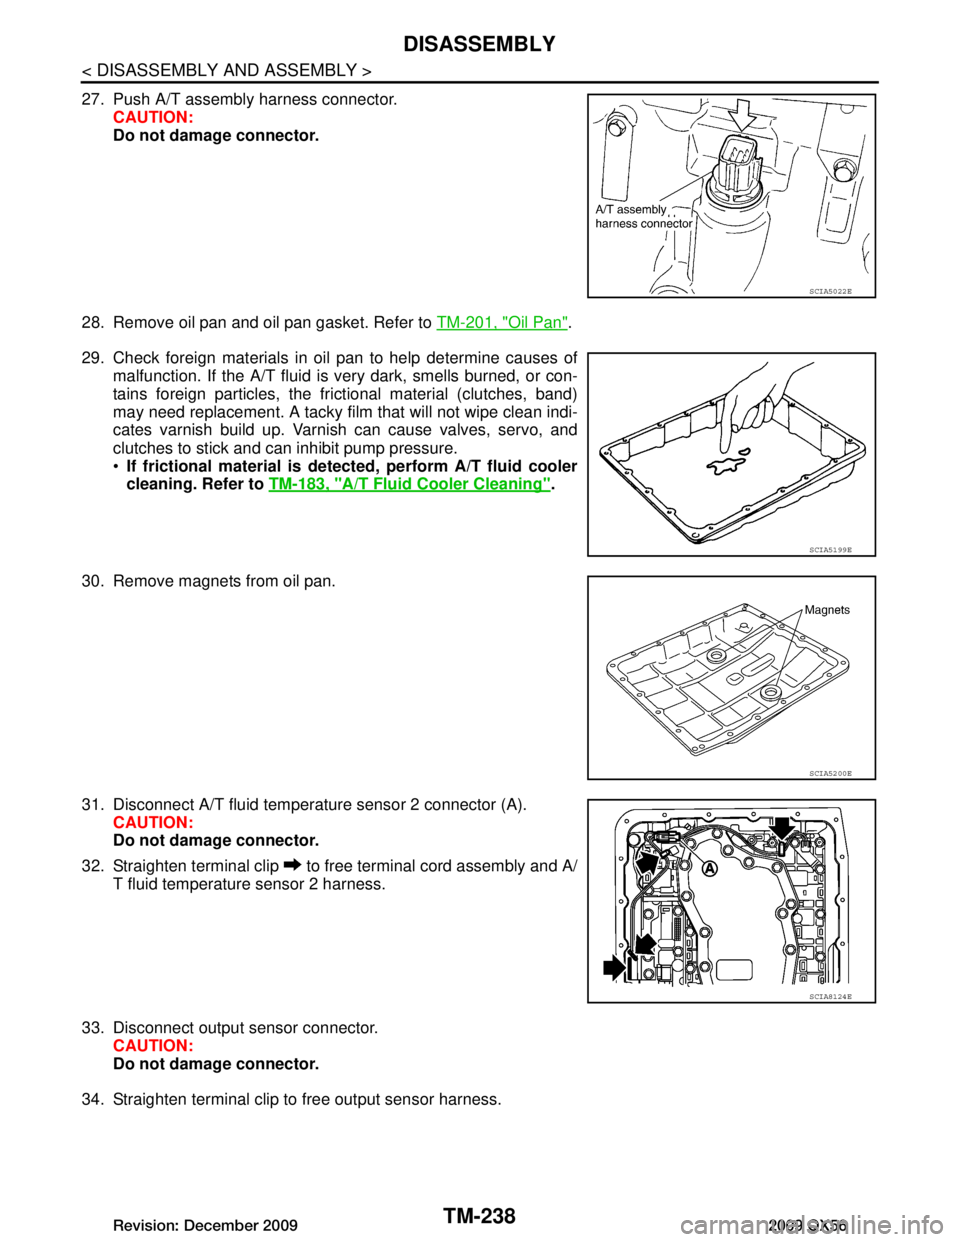
31. Disconnect A/T fluid temperat ure sensor 2 connector (A).
CAUTION:
Do not damage connector.
32. Straighten terminal clip to free terminal cord assembly and A/ T fluid temperature sensor 2 harness.
33. Disconnect output sensor connector. CAUTION:
Do not damage connector.
34. Straighten terminal clip to free output sensor harness.
SCIA5022E
SCIA5199E
SCIA5200E
SCIA8124E
Revision: December 20092009 QX56
Page 3891 of 4171
DISASSEMBLYTM-243
< DISASSEMBLY AND ASSEMBLY >
CEF
G H
I
J
K L
M A
B
TM
N
O P
47. Remove seal rings from output shaft.
48. Remove needle bearing from transmission case.
49. Remove output speed sensor from transmission case. CAUTION:
Do not subject it to impact by dropping or hitting it.
Do not disassemble.
Do not allow metal filings or any foreign material to get on
the sensor's front edge magnetic area.
Do not place in an area affected by magnetism.
50. Remove reverse brake snap ring using two flat-bladed screw- drivers.
NOTE:
Press out snap ring from the transmission case oil pan side gap
using a flat-bladed screwdriver, and remove it using a another
screwdriver.
51. Remove reverse brake retaining plate from transmission case. Check facing for burns, cracks or damage. If necessary,replace the plate.
52. Remove N-spring from transmission case.
SCIA5209E
SCIA5031E
SCIA2320E
SCIA5032E
SCIA5214E
Revision: December 20092009 QX56
Page 3901 of 4171
REPAIR FOR COMPONENT PARTSTM-253
< DISASSEMBLY AND ASSEMBLY >
CEF
G H
I
J
K L
M A
B
TM
N
O P
2. Install snap ring in front sun gear using suitable tool.
3. Check operation of 3rd one-way clutch.
a. Hold oil pump assembly and turn front sun gear.
b. Check 3rd one-way clutch for correct locking and unlocking directions.
CAUTION:
If not as shown, check installati on direction of 3rd one-way
clutch.
Front Carrier, Input Clut ch, Rear Internal GearINFOID:0000000004187492
COMPONENTS
SCIA3110E
SCIA3131E
Revision: December 20092009 QX56
Page 3943 of 4171
PRECAUTIONSVTL-3
< PRECAUTION >
C
DE
F
G H
J
K L
M A
B
VTL
N
O P
5. When the repair work is completed, return the ignition switch to the ″LOCK ″ position before connecting
the battery cables. (At this time, the steering lock mechanism will engage.)
6. Perform a self-diagnosis check of al l control units using CONSULT-III.
Precaution for Working with HFC-134a (R-134a)INFOID:0000000003775256
WARNING:
• CFC-12 (R-12) refrigerant and HFC-134a (R-134a) refr igerant are not compatible. If the refrigerants
are mixed compressor failure is likely to occur. Refer to HA-4, "
Contaminated Refrigerant". To deter-
mine the purity of HFC-134a (R-134a) in the vehicle and recovery tank, use recovery/recycling equip-
ment and refrigerant identifier.
• Use only specified oil for the HFC-134a (R-134a) A/C system and HFC-134a (R-134a) components. If
oil other than that specified is used, compressor fa ilure is likely to occur.
• The specified HFC-134a (R-134a) oil rapidly absorb s moisture from the atmosphere. The following
handling precautions must be observed:
- When removing refrigerant components from a vehicle, immediately cap (seal) the component to
minimize the entry of mois ture from the atmosphere.
- When installing refrigerant components to a vehicle, do not remove the caps (unseal) until just
before connecting the co mponents. Connect all refrigerant lo op components as quickly as possible
to minimize the entry of moisture into system.
- Only use the specified oil from a sealed container. Immediately r eseal containers of oil. Without
proper sealing, oil will become moisture saturat ed and should not be used.
- Avoid breathing A/C refrigerant and oil vapor or mist. Exposure may irritate eyes, nose and throat.
Remove HFC-134a (R-134a) from the A/C system usi ng certified service equipment meeting require-
ments of SAE J2210 [HFC-134a (R-134a) recycling eq uipment], or J2209 [HFC-134a (R-134a) recovery
equipment]. If accidental system discharge occurs , ventilate work area before resuming service.
Additional health and safety information may be ob tained from refrigerant and oil manufacturers.
- Do not allow A/C oil to come in contact with styrofoam parts. Damage may result.
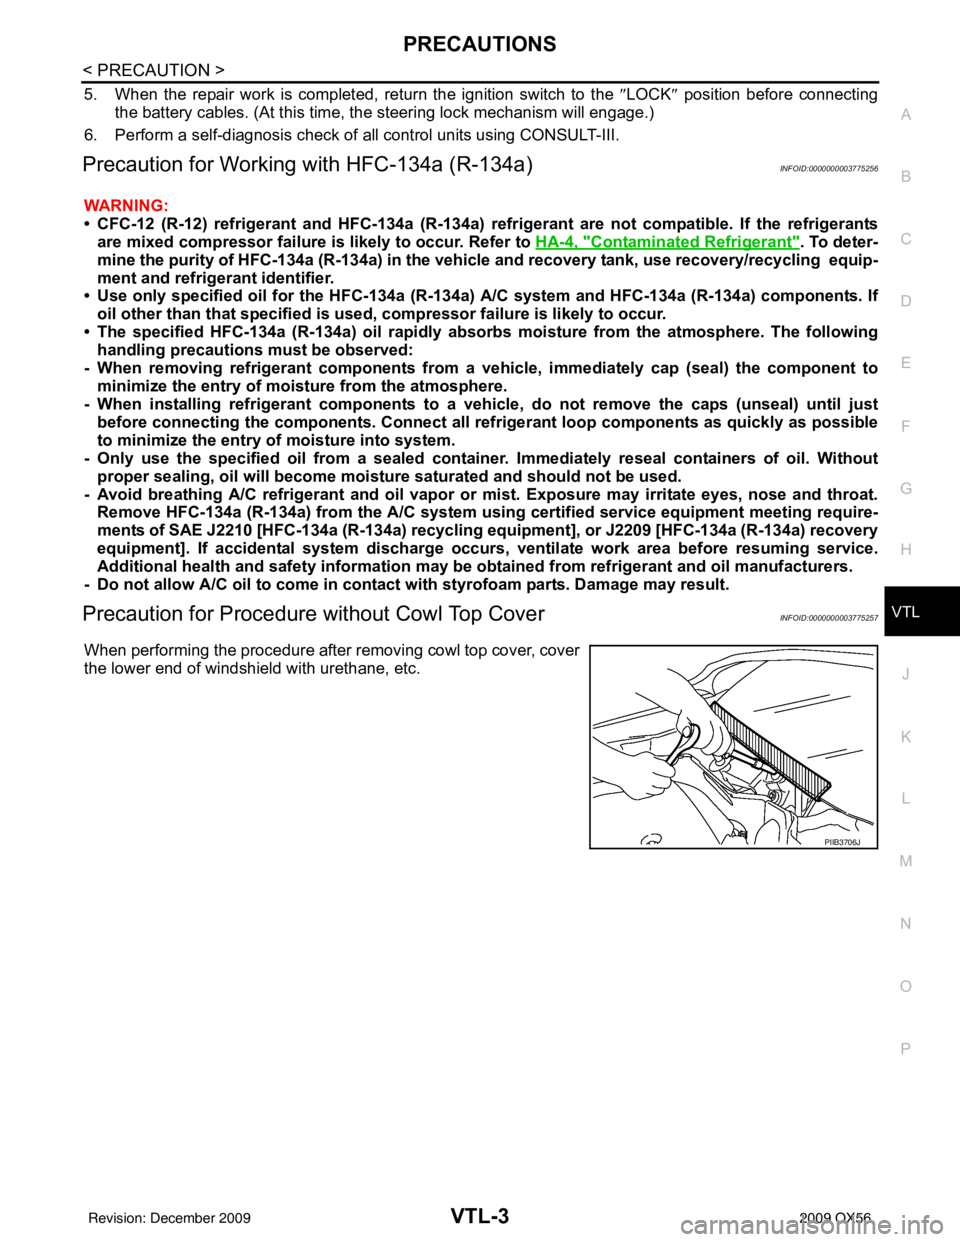
Precaution for Procedur e without Cowl Top CoverINFOID:0000000003775257
When performing the procedure after removing cowl top cover, cover
the lower end of windshield with urethane, etc.
PIIB3706J
Revision: December 20092009 QX56