2009 Hyundai Sonata oil temperature
[x] Cancel search: oil temperaturePage 62 of 286
1
FEATURES OF YOUR HYUNDAI
49
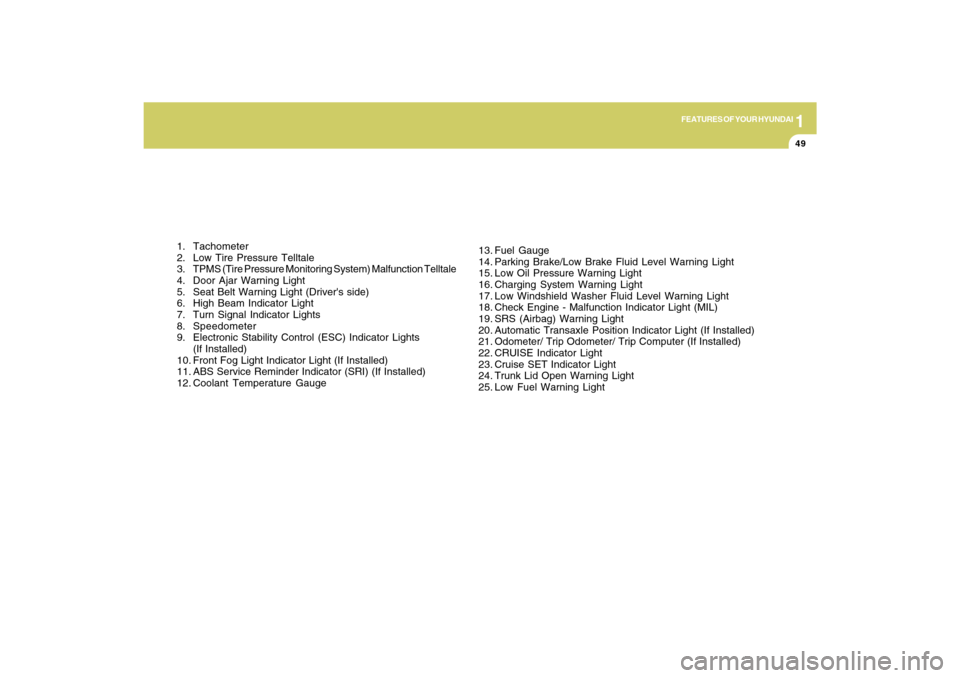
1. Tachometer
2. Low Tire Pressure Telltale
3. TPMS (Tire Pressure Monitoring System) Malfunction Telltale
4. Door Ajar Warning Light
5. Seat Belt Warning Light (Driver's side)
6. High Beam Indicator Light
7. Turn Signal Indicator Lights
8. Speedometer
9. Electronic Stability Control (ESC) Indicator Lights
(If Installed)
10. Front Fog Light Indicator Light (If Installed)
11. ABS Service Reminder Indicator (SRI) (If Installed)
12. Coolant Temperature Gauge13. Fuel Gauge
14. Parking Brake/Low Brake Fluid Level Warning Light
15. Low Oil Pressure Warning Light
16. Charging System Warning Light
17. Low Windshield Washer Fluid Level Warning Light
18. Check Engine - Malfunction Indicator Light (MIL)
19. SRS (Airbag) Warning Light
20. Automatic Transaxle Position Indicator Light (If Installed)
21. Odometer/ Trip Odometer/ Trip Computer (If Installed)
22. CRUISE Indicator Light
23. Cruise SET Indicator Light
24. Trunk Lid Open Warning Light
25. Low Fuel Warning Light
Page 211 of 286
5
VEHICLE MAINTENANCE REQUIREMENTS6
MAINTENANCE UNDER SEVERE USAGE
CONDITIONS
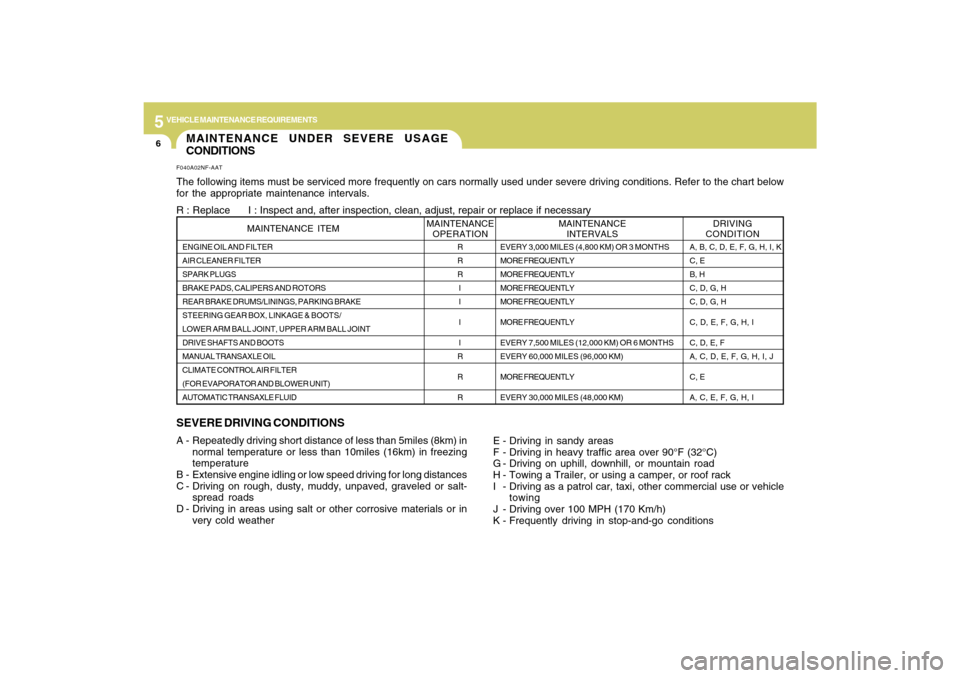
SEVERE DRIVING CONDITIONSA - Repeatedly driving short distance of less than 5miles (8km) in
normal temperature or less than 10miles (16km) in freezing
temperature
B - Extensive engine idling or low speed driving for long distances
C - Driving on rough, dusty, muddy, unpaved, graveled or salt-
spread roads
D - Driving in areas using salt or other corrosive materials or in
very cold weatherF040A02NF-AATThe following items must be serviced more frequently on cars normally used under severe driving conditions. Refer to the chart below
for the appropriate maintenance intervals.
R : Replace I : Inspect and, after inspection, clean, adjust, repair or replace if necessary
E - Driving in sandy areas
F - Driving in heavy traffic area over 90°F (32°C)
G - Driving on uphill, downhill, or mountain road
H - Towing a Trailer, or using a camper, or roof rack
I - Driving as a patrol car, taxi, other commercial use or vehicle
towing
J - Driving over 100 MPH (170 Km/h)
K - Frequently driving in stop-and-go conditionsENGINE OIL AND FILTER
AIR CLEANER FILTER
SPARK PLUGS
BRAKE PADS, CALIPERS AND ROTORS
REAR BRAKE DRUMS/LININGS, PARKING BRAKE
STEERING GEAR BOX, LINKAGE & BOOTS/
LOWER ARM BALL JOINT, UPPER ARM BALL JOINT
DRIVE SHAFTS AND BOOTS
MANUAL TRANSAXLE OIL
CLIMATE CONTROL AIR FILTER
(FOR EVAPORATOR AND BLOWER UNIT)
AUTOMATIC TRANSAXLE FLUID
MAINTENANCE ITEM
R
R
R
I
I
I
I
R
R
R
EVERY 3,000 MILES (4,800 KM) OR 3 MONTHS
MORE FREQUENTLY
MORE FREQUENTLY
MORE FREQUENTLY
MORE FREQUENTLY
MORE FREQUENTLY
EVERY 7,500 MILES (12,000 KM) OR 6 MONTHS
EVERY 60,000 MILES (96,000 KM)
MORE FREQUENTLY
EVERY 30,000 MILES (48,000 KM)
DRIVING
CONDITION MAINTENANCE
INTERVALS MAINTENANCE
OPERATION
A, B, C, D, E, F, G, H, I, K
C, E
B, H
C, D, G, H
C, D, G, H
C, D, E, F, G, H, I
C, D, E, F
A, C, D, E, F, G, H, I, J
C, E
A, C, E, F, G, H, I
Page 213 of 286
5
VEHICLE MAINTENANCE REQUIREMENTS8
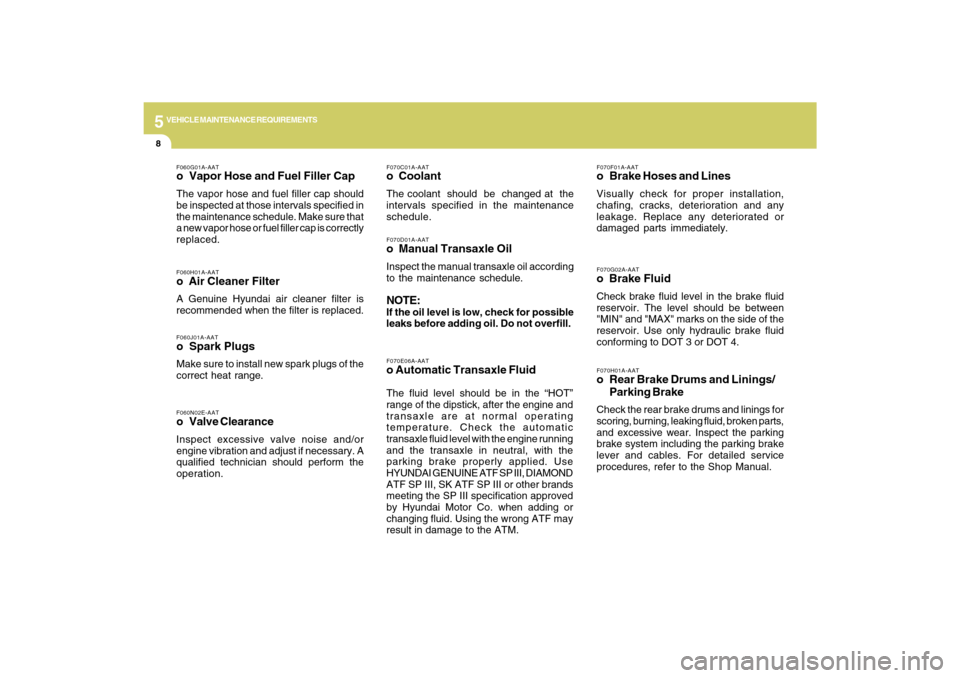
F070G02A-AATo Brake FluidCheck brake fluid level in the brake fluid
reservoir. The level should be between
"MIN" and "MAX" marks on the side of the
reservoir. Use only hydraulic brake fluid
conforming to DOT 3 or DOT 4.F070F01A-AATo Brake Hoses and LinesVisually check for proper installation,
chafing, cracks, deterioration and any
leakage. Replace any deteriorated or
damaged parts immediately.
F070E06A-AATo Automatic Transaxle FluidThe fluid level should be in the “HOT”
range of the dipstick, after the engine and
transaxle are at normal operating
temperature. Check the automatic
transaxle fluid level with the engine running
and the transaxle in neutral, with the
parking brake properly applied. Use
HYUNDAI GENUINE ATF SP III, DIAMOND
ATF SP III, SK ATF SP III or other brands
meeting the SP III specification approved
by Hyundai Motor Co. when adding or
changing fluid. Using the wrong ATF may
result in damage to the ATM.
F070H01A-AATo Rear Brake Drums and Linings/
Parking BrakeCheck the rear brake drums and linings for
scoring, burning, leaking fluid, broken parts,
and excessive wear. Inspect the parking
brake system including the parking brake
lever and cables. For detailed service
procedures, refer to the Shop Manual.
F070C01A-AATo CoolantThe coolant should be changed at the
intervals specified in the maintenance
schedule.
F060J01A-AATo Spark PlugsMake sure to install new spark plugs of the
correct heat range.F060H01A-AATo Air Cleaner FilterA Genuine Hyundai air cleaner filter is
recommended when the filter is replaced.F060G01A-AATo Vapor Hose and Fuel Filler CapThe vapor hose and fuel filler cap should
be inspected at those intervals specified in
the maintenance schedule. Make sure that
a new vapor hose or fuel filler cap is correctly
replaced.
F070D01A-AATo Manual Transaxle OilInspect the manual transaxle oil according
to the maintenance schedule.NOTE:If the oil level is low, check for possible
leaks before adding oil. Do not overfill.
F060N02E-AATo Valve ClearanceInspect excessive valve noise and/or
engine vibration and adjust if necessary. A
qualified technician should perform the
operation.
Page 220 of 286
6
DO-IT-YOURSELF MAINTENANCE
5
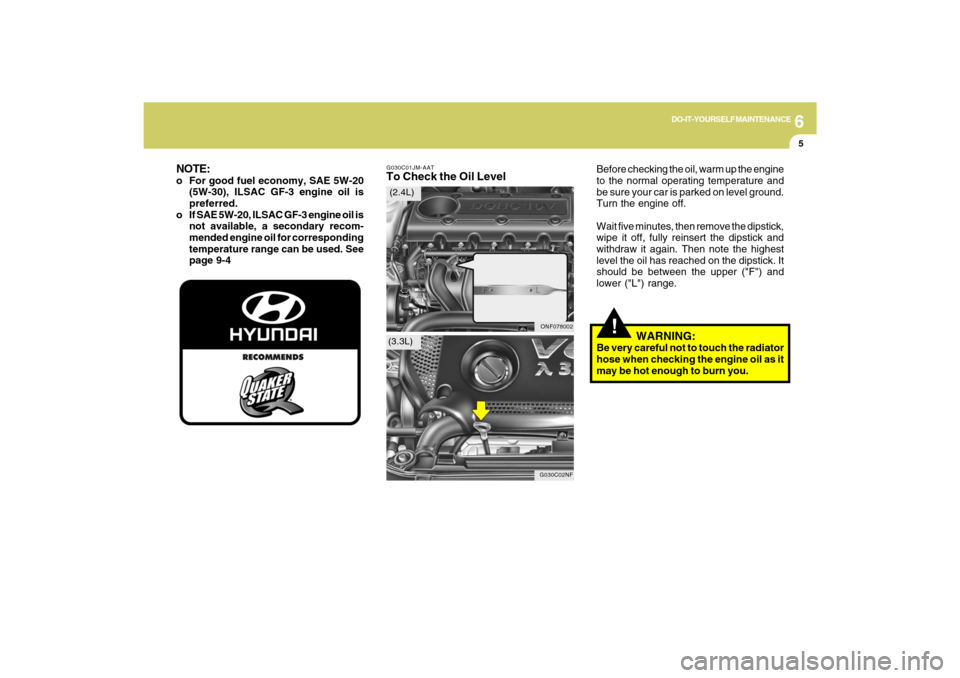
G030C01JM-AATTo Check the Oil Level
Before checking the oil, warm up the engine
to the normal operating temperature and
be sure your car is parked on level ground.
Turn the engine off.
Wait five minutes, then remove the dipstick,
wipe it off, fully reinsert the dipstick and
withdraw it again. Then note the highest
level the oil has reached on the dipstick. It
should be between the upper ("F") and
lower ("L") range.
!
WARNING:
Be very careful not to touch the radiator
hose when checking the engine oil as it
may be hot enough to burn you.
ONF078002
G030C02NF
(2.4L)
(3.3L)
NOTE:o For good fuel economy, SAE 5W-20
(5W-30), ILSAC GF-3 engine oil is
preferred.
o If SAE 5W-20, ILSAC GF-3 engine oil is
not available, a secondary recom-
mended engine oil for corresponding
temperature range can be used. See
page 9-4
Page 222 of 286
6
DO-IT-YOURSELF MAINTENANCE
7
!
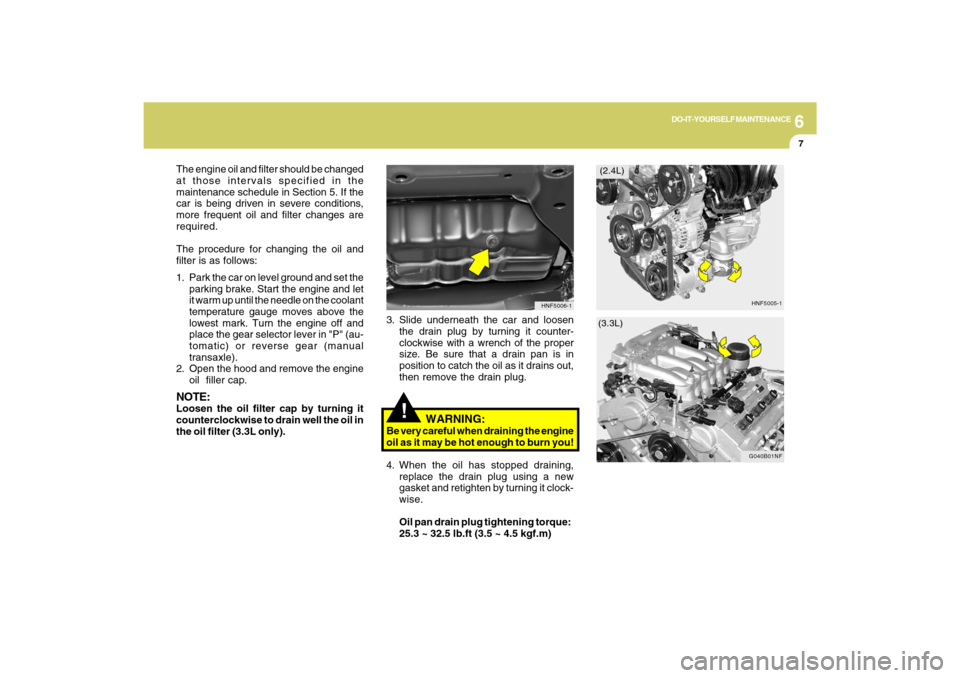
3. Slide underneath the car and loosen
the drain plug by turning it counter-
clockwise with a wrench of the proper
size. Be sure that a drain pan is in
position to catch the oil as it drains out,
then remove the drain plug.
4. When the oil has stopped draining,
replace the drain plug using a new
gasket and retighten by turning it clock-
wise.
Oil pan drain plug tightening torque:
25.3 ~ 32.5 lb.ft (3.5 ~ 4.5 kgf.m)
HNF5006-1
(2.4L)
(3.3L)
The engine oil and filter should be changed
at those intervals specified in the
maintenance schedule in Section 5. If the
car is being driven in severe conditions,
more frequent oil and filter changes are
required.
The procedure for changing the oil and
filter is as follows:
1. Park the car on level ground and set the
parking brake. Start the engine and let
it warm up until the needle on the coolant
temperature gauge moves above the
lowest mark. Turn the engine off and
place the gear selector lever in "P" (au-
tomatic) or reverse gear (manual
transaxle).
2. Open the hood and remove the engine
oil filler cap.NOTE:Loosen the oil filter cap by turning it
counterclockwise to drain well the oil in
the oil filter (3.3L only).
WARNING:
Be very careful when draining the engine
oil as it may be hot enough to burn you!
HNF5005-1
G040B01NF
Page 241 of 286
6
DO-IT-YOURSELF MAINTENANCE
26
G240A01A-AATPOWER STEERING HOSESIt is suggested that you check the power
steering hose connections for fluid leakage
at those intervals specified in the vehicle
maintenance schedule in Section 5.
The power steering hoses should be
replaced if there is severe surface crack-
ing, pulling, scuffing or worn spots.
Deterioration of the hose could cause
premature failure.
POWER STEERING FLUID
LEVELG230A01NF-AAT
Recommended FluidUse PSF-4 type fluidNOTE:Do not start the engine when the power
steering oil reservoir is empty.
ONF078007
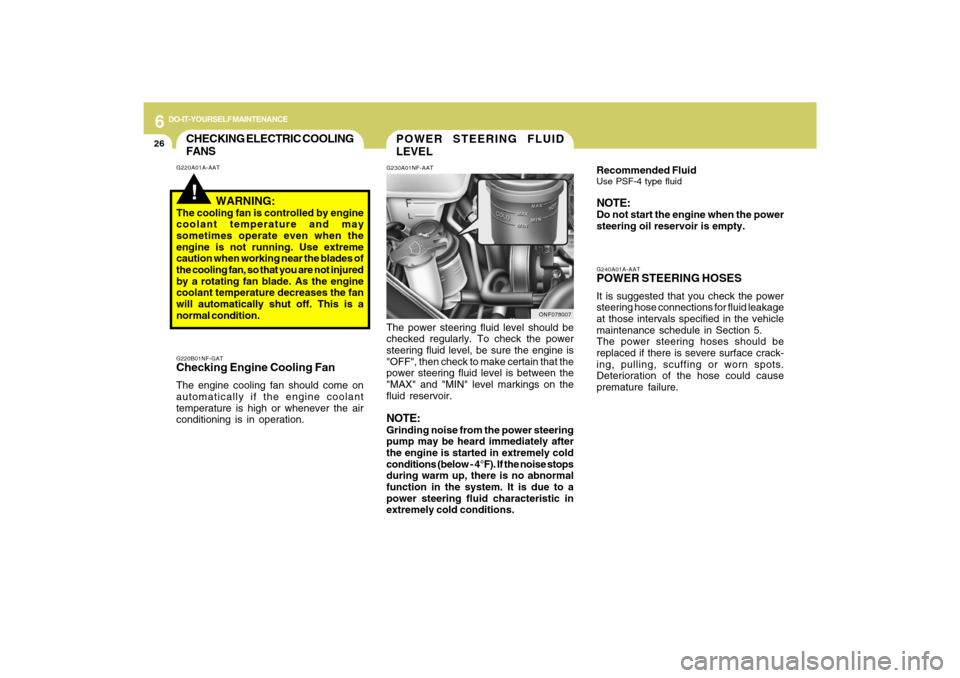
The power steering fluid level should be
checked regularly. To check the power
steering fluid level, be sure the engine is
"OFF", then check to make certain that the
power steering fluid level is between the
"MAX" and "MIN" level markings on the
fluid reservoir.NOTE:Grinding noise from the power steering
pump may be heard immediately after
the engine is started in extremely cold
conditions (below - 4°F). If the noise stops
during warm up, there is no abnormal
function in the system. It is due to a
power steering fluid characteristic in
extremely cold conditions.
CHECKING ELECTRIC COOLING
FANS!
G220A01A-AAT
WARNING:
The cooling fan is controlled by engine
coolant temperature and may
sometimes operate even when the
engine is not running. Use extreme
caution when working near the blades of
the cooling fan, so that you are not injured
by a rotating fan blade. As the engine
coolant temperature decreases the fan
will automatically shut off. This is a
normal condition.G220B01NF-GATChecking Engine Cooling FanThe engine cooling fan should come on
automatically if the engine coolant
temperature is high or whenever the air
conditioning is in operation.
Page 243 of 286
6
DO-IT-YOURSELF MAINTENANCE
28
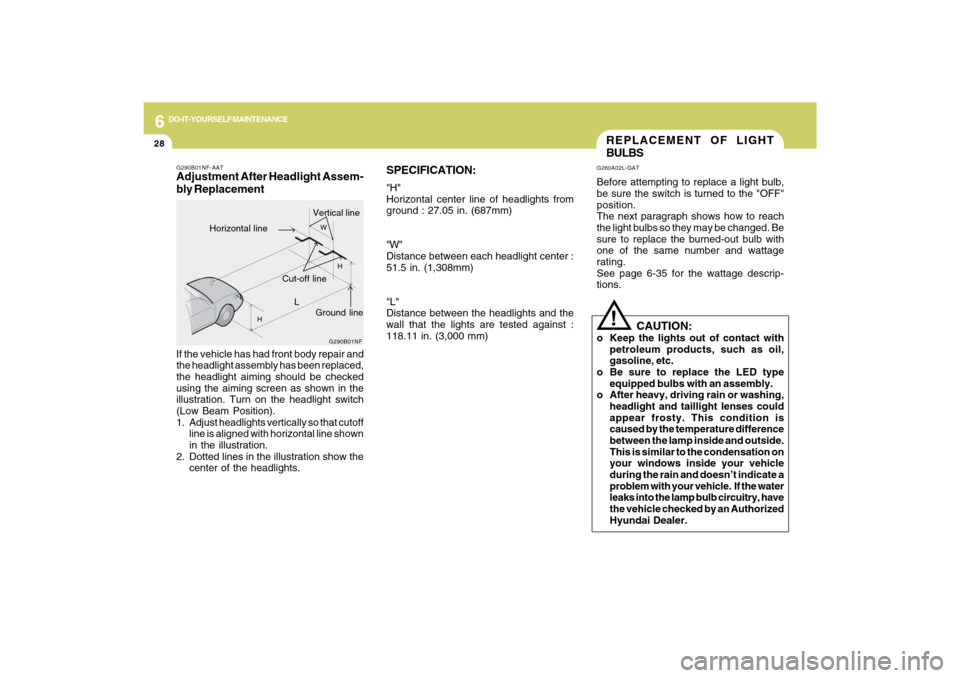
SPECIFICATION:"H"
Horizontal center line of headlights from
ground : 27.05 in. (687mm)
"W"
Distance between each headlight center :
51.5 in. (1,308mm)
"L"
Distance between the headlights and the
wall that the lights are tested against :
118.11 in. (3,000 mm)
REPLACEMENT OF LIGHT
BULBSG260A02L-GATBefore attempting to replace a light bulb,
be sure the switch is turned to the "OFF"
position.
The next paragraph shows how to reach
the light bulbs so they may be changed. Be
sure to replace the burned-out bulb with
one of the same number and wattage
rating.
See page 6-35 for the wattage descrip-
tions.
!
CAUTION:
o Keep the lights out of contact with
petroleum products, such as oil,
gasoline, etc.
o Be sure to replace the LED type
equipped bulbs with an assembly.
o After heavy, driving rain or washing,
headlight and taillight lenses could
appear frosty. This condition is
caused by the temperature difference
between the lamp inside and outside.
This is similar to the condensation on
your windows inside your vehicle
during the rain and doesn’t indicate a
problem with your vehicle. If the water
leaks into the lamp bulb circuitry, have
the vehicle checked by an Authorized
Hyundai Dealer.
G290B01NF-AATAdjustment After Headlight Assem-
bly Replacement
G290B01NF
L
W
H
H
Cut-off line
Ground line
Horizontal lineVertical line
If the vehicle has had front body repair and
the headlight assembly has been replaced,
the headlight aiming should be checked
using the aiming screen as shown in the
illustration. Turn on the headlight switch
(Low Beam Position).
1. Adjust headlights vertically so that cutoff
line is aligned with horizontal line shown
in the illustration.
2. Dotted lines in the illustration show the
center of the headlights.
Page 265 of 286
8
CONSUMER INFORMATION, REPORTING SAFETY DEFECTS & BINDING ARBITRATION OF WARRANTY CLAIMS
7
6. Maximum load rating
This number indicates the maximum
load in kilograms and pounds that
can be carried by the tire. When
replacing the tires on the vehicle,
always use a tire that has the same
load rating as the factory installed
tire.
7. Uniform Tire Quality Grading
(UTQG):
Tire manufacturers are required to
grade tires based on three perfor-
mance factors: treadwear, traction
and temperature resistance. For more
information, see Uniform Tire Qual-
ity Grading on page 8-14.
I030D01JM-AATTIRE TERMINOLOGY AND DEFINI-
TIONS
Air Pressure: The amount of air inside
the tire pressing outward on the tire. Air
pressure is expressed in pounds per
square inch (psi) or kilopascal (kPa).
Accessory Weight: This means the
combined weight of optional accesso-
ries. Some examples of optional ac-
cessories are, automatic transmission,
power seats, and air conditioning.
Aspect Ratio: The relationship of a
tire's height to its width.
Belt: A rubber coated layer of cords that
is located between the plies and the
tread. Cords may be made from steel or
other reinforcing materials.
Bead: The tire bead contains steel
wires wrapped by steel cords that hold
the tire onto the rim.
Bias Ply Tire: A pneumatic tire in which
the plies are laid at alternate angles
less than 90 degrees to the centerline of
the tread.Cold Tire Pressure: The amount of air
pressure in a tire, measured in pounds
per square inch (psi) or kilopascals
(kPa) before a tire has built up heat from
driving.
Curb Weight: This means the weight of
a motor vehicle with standard and op-
tional equipment including the maxi-
mum capacity of fuel, oil and coolant,
but without passengers and cargo.
DOT Markings: A code molded into the
sidewall of a tire signifying that the tire
is in compliance with the U.S. Depart-
ment of Transportation motor vehicle
safety standards. The DOT code in-
cludes the Tire Identification Number
(TIN), an alphanumeric designator which
can also identify the tire manufacturer,
production plant, brand and date of
production.
GVWR: Gross Vehicle Weight Rating
GAWR FRT: Gross Axle Weight Rating
for the front Axle.
GAWR RR: Gross Axle Weight Rating
for the rear axle.