2009 Hyundai Sonata suspension
[x] Cancel search: suspensionPage 105 of 340
447
Features of your vehicle
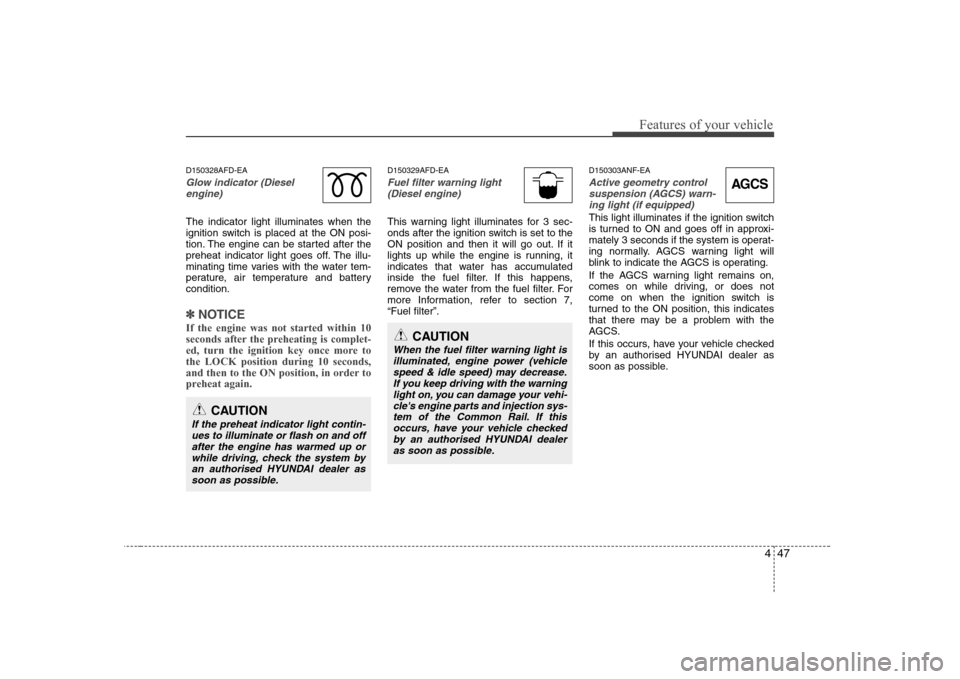
D150328AFD-EA
Glow indicator (Dieselengine)
The indicator light illuminates when the
ignition switch is placed at the ON posi-
tion. The engine can be started after the
preheat indicator light goes off. The illu-
minating time varies with the water tem-
perature, air temperature and batterycondition.
✽✽ NOTICE
If the engine was not started within 10
seconds after the preheating is complet-
ed, turn the ignition key once more tothe LOCK position during 10 seconds,
and then to the ON position, in order to
preheat again.
D150329AFD-EA
Fuel filter warning light (Diesel engine)
This warning light illuminates for 3 sec-
onds after the ignition switch is set to the
ON position and then it will go out. If it
lights up while the engine is running, it
indicates that water has accumulated
inside the fuel filter. If this happens,
remove the water from the fuel filter. For
more Information, refer to section 7,“Fuel filter”. D150303ANF-EA
Active geometry control
suspension (AGCS) warn-ing light (if equipped)
This light illuminates if the ignition switch
is turned to ON and goes off in approxi-
mately 3 seconds if the system is operat-
ing normally. AGCS warning light will
blink to indicate the AGCS is operating.
If the AGCS warning light remains on,
comes on while driving, or does not
come on when the ignition switch is
turned to the ON position, this indicates
that there may be a problem with the
AGCS.
If this occurs, have your vehicle checked
by an authorised HYUNDAI dealer as
soon as possible.
CAUTION
If the preheat indicator light contin-
ues to illuminate or flash on and off after the engine has warmed up orwhile driving, check the system by an authorised HYUNDAI dealer as
soon as possible.
CAUTION
When the fuel filter warning light isilluminated, engine power (vehicle speed & idle speed) may decrease.If you keep driving with the warning light on, you can damage your vehi-
cle's engine parts and injection sys-tem of the Common Rail. If thisoccurs, have your vehicle checked by an authorised HYUNDAI dealer
as soon as possible.
AGCS
Page 178 of 340
5
Before driving / 5-3 Key positions / 5-4
Starting the engine / 5-5Manual transaxle / 5-8
Automatic transaxle / 5-11Brake system / 5-17Suspension system / 5-26
Cruise control system / 5-28Economical operation / 5-32Special driving conditions / 5-34
Winter driving / 5-38
Trailer towing / 5-42
Vehicle weight / 5-50
Driving your vehicle
Page 203 of 340
Driving your vehicle
26
5
If your car is equipped with an auto-
matic transaxle, don't let your car
creep forward. To avoid creeping for-
ward, keep your foot firmly on the
brake pedal when the car is stopped.
Use caution when parking on a hill. Firmly engage the parking brake and
place the gear selector lever in P (auto-
matic transaxle) or in first or reverse
gear (manual transaxle). If your car is
facing downhill, turn the front wheels
into the kerb to help keep the car from
rolling. If your car is facing uphill, turn
the front wheels away from the kerb to
help keep the car from rolling. If there
is no kerb or if it is required by other
conditions to keep the car from rolling,
block the wheels.
Under some conditions your parking brake can freeze in the engaged posi-
tion. This is most likely to happen when
there is an accumulation of snow or ice
around or near the rear brakes or if the
brakes are wet. If there is a risk that the
parking brake may freeze, apply it only
temporarily while you put the gear
selector lever in P (automatic
transaxle) or in first or reverse gear
(manual transaxle) and block the rear
wheels so the car cannot roll. Then
release the parking brake. Do not hold the vehicle on the upgrade
with the accelerator pedal. This can
cause the transaxle to overheat.
Always use the brake pedal or parking
brake. Active geometry control suspen-
sion(AGCS) (if equipped)
The Active geometry control suspension
(AGCS) system is designed to stabilise
the vehicle during cornering manoeuvres
by controlling the rear wheel in order to
prevent oversteer. AGCS system is anelectronic system designed to help the
driver maintain vehicle control under
adverse conditions. It is not a substitute
for safe driving practices. Factors includ-
ing speed, road conditions and driver
steering input can all affect whether
AGCS will be effective in preventing a
loss of control. It is still your responsibili-
ty to drive and corner at reasonable
speeds and to leave a sufficient margin
of safety.SUSPENSION SYSTEM
Page 204 of 340
527
Driving your vehicle
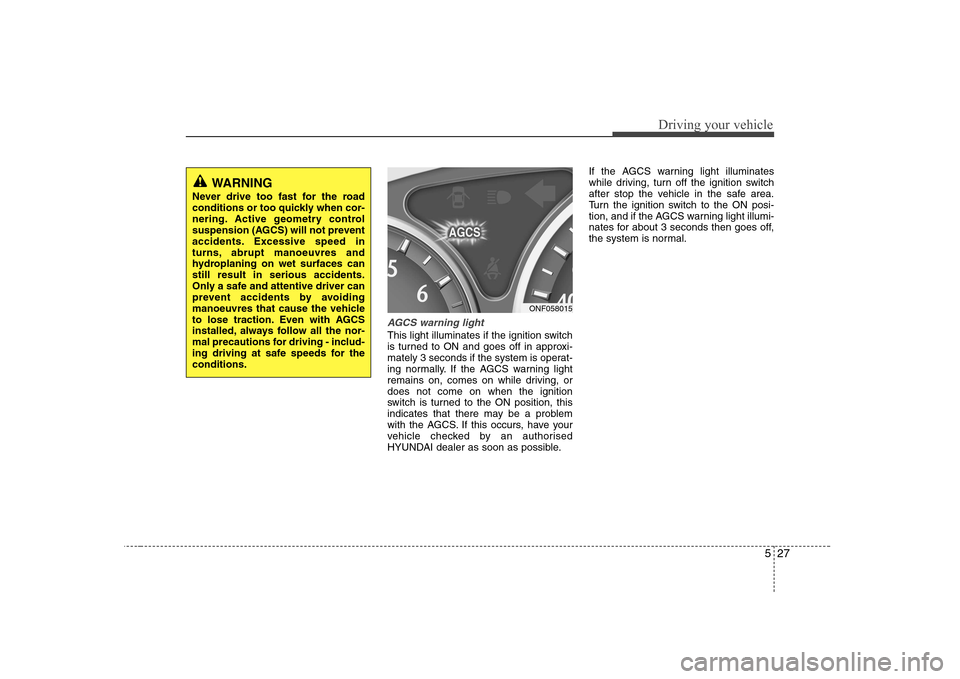
AGCS warning light
This light illuminates if the ignition switch
is turned to ON and goes off in approxi-
mately 3 seconds if the system is operat-
ing normally. If the AGCS warning light
remains on, comes on while driving, ordoes not come on when the ignition
switch is turned to the ON position, this
indicates that there may be a problem
with the AGCS. If this occurs, have your
vehicle checked by an authorised
HYUNDAI dealer as soon as possible.If the AGCS warning light illuminates
while driving, turn off the ignition switch
after stop the vehicle in the safe area.
Turn the ignition switch to the ON posi-
tion, and if the AGCS warning light illumi-
nates for about 3 seconds then goes off,
the system is normal.
WARNING
Never drive too fast for the road
conditions or too quickly when cor-
nering. Active geometry control
suspension (AGCS) will not prevent
accidents. Excessive speed in
turns, abrupt manoeuvres and
hydroplaning on wet surfaces canstill result in serious accidents.
Only a safe and attentive driver can
prevent accidents by avoiding
manoeuvres that cause the vehicle
to lose traction. Even with AGCS
installed, always follow all the nor-
mal precautions for driving - includ-
ing driving at safe speeds for theconditions.
ONF058015
Page 216 of 340
539
Driving your vehicle
E120102AUN-EA
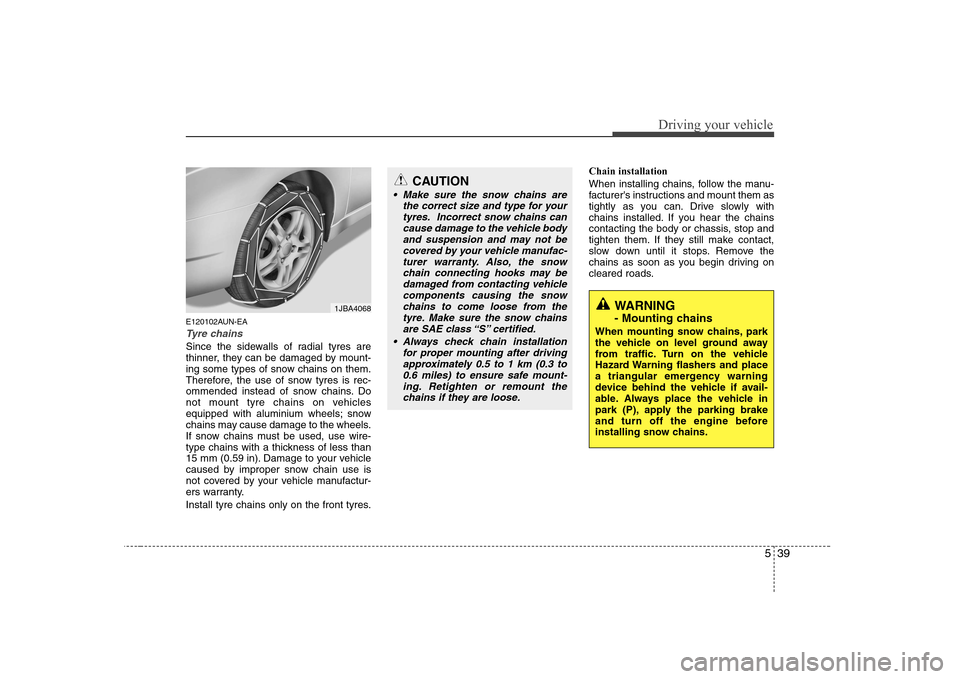
Tyre chains
Since the sidewalls of radial tyres are
thinner, they can be damaged by mount-
ing some types of snow chains on them.
Therefore, the use of snow tyres is rec-
ommended instead of snow chains. Do
not mount tyre chains on vehicles
equipped with aluminium wheels; snow
chains may cause damage to the wheels.
If snow chains must be used, use wire-
type chains with a thickness of less than
15 mm (0.59 in). Damage to your vehicle
caused by improper snow chain use is
not covered by your vehicle manufactur-
ers warranty.
Install tyre chains only on the front tyres.Chain installation
When installing chains, follow the manu-
facturer's instructions and mount them as
tightly as you can. Drive slowly with
chains installed. If you hear the chains
contacting the body or chassis, stop and
tighten them. If they still make contact,
slow down until it stops. Remove the
chains as soon as you begin driving on
cleared roads.
CAUTION
Make sure the snow chains are
the correct size and type for yourtyres. Incorrect snow chains cancause damage to the vehicle body
and suspension and may not becovered by your vehicle manufac- turer warranty. Also, the snowchain connecting hooks may be
damaged from contacting vehiclecomponents causing the snowchains to come loose from the tyre. Make sure the snow chains
are SAE class “S” certified.
Always check chain installation for proper mounting after drivingapproximately 0.5 to 1 km (0.3 to
0.6 miles) to ensure safe mount-ing. Retighten or remount the chains if they are loose.
WARNING
- Mounting chains
When mounting snow chains, park
the vehicle on level ground away
from traffic. Turn on the vehicle
Hazard Warning flashers and place
a triangular emergency warning
device behind the vehicle if avail-
able. Always place the vehicle in
park (P), apply the parking brake
and turn off the engine before
installing snow chains.1JBA4068
Page 255 of 340
Maintenance
12
7
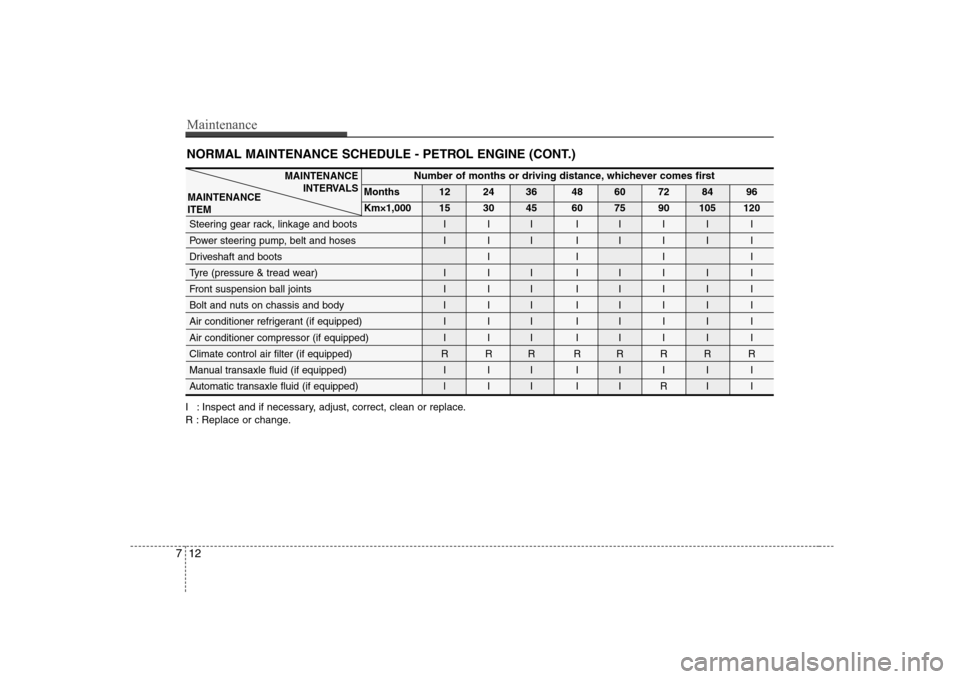
NORMAL MAINTENANCE SCHEDULE - PETROL ENGINE (CONT.)
I : Inspect and if necessary, adjust, correct, clean or replace.
R : Replace or change.
Number of months or driving distance, whichever comes first
Months 12 24 36 48 60 72 84 96
Km×1,000 15 30 45 60 75 90 105 120
Steering gear rack, linkage and boots I I I I I I I I
Power steering pump, belt and hoses I I I I I I I I
Driveshaft and boots I I I I
Tyre (pressure & tread wear) I I I I I I I I
Front suspension ball joints I I I I I I I I
Bolt and nuts on chassis and body I I I I I I I I
Air conditioner refrigerant (if equipped) I I I I I I I I
Air conditioner compressor (if equipped) I I I I I I I I
Climate control air filter (if equipped) R R R R R R R R
Manual transaxle fluid (if equipped) I I I I I I I I
Automatic transaxle fluid (if equipped)
III IIRI I
MAINTENANCE INTERVALS
MAINTENANCE ITEM
Page 257 of 340
Maintenance
14
7
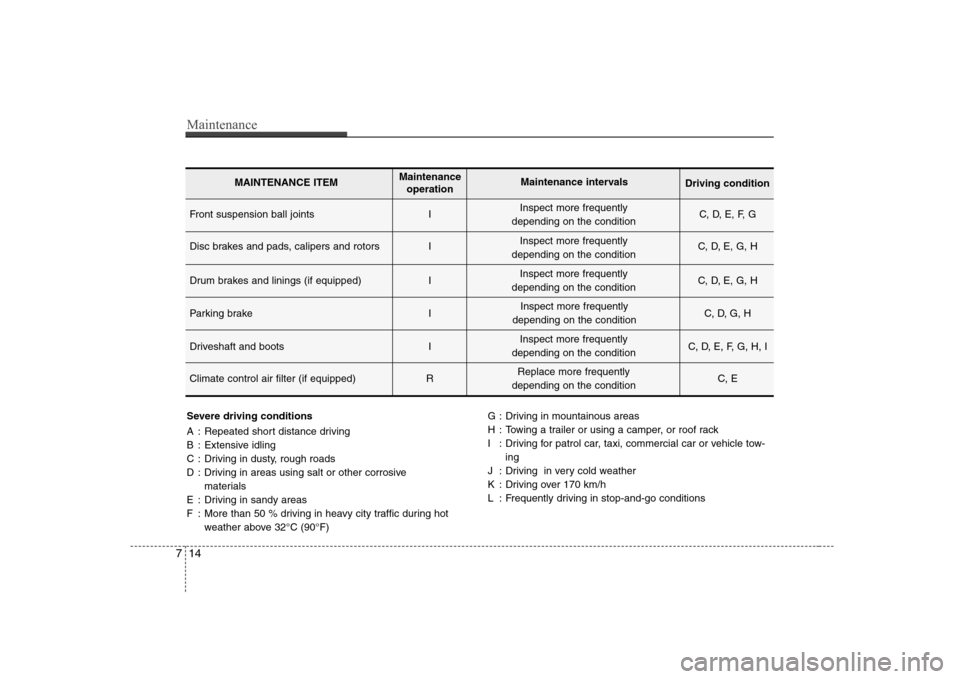
Severe driving conditions
A : Repeated short distance driving
B : Extensive idling
C : Driving in dusty, rough roads
D : Driving in areas using salt or other corrosive
materials
E : Driving in sandy areas
F : More than 50 % driving in heavy city traffic during hot weather above 32°C (90°F) G : Driving in mountainous areas
H : Towing a trailer or using a camper, or roof rack
I : Driving for patrol car, taxi, commercial car or vehicle tow-
ing
J : Driving in very cold weather
K : Driving over 170 km/h
L : Frequently driving in stop-and-go conditions
Front suspension ball joints I C, D, E, F, G
Disc brakes and pads, calipers and rotors I C, D, E, G, H
Drum brakes and linings (if equipped) I C, D, E, G, H
Parking brake I C, D, G, H
Driveshaft and boots I C, D, E, F, G, H, I
Climate control air filter (if equipped) R C, E
MAINTENANCE ITEMMaintenance
operation Maintenance intervals
Driving condition
Inspect more frequently
depending on the condition
Inspect more frequently
depending on the condition
Inspect more frequently
depending on the condition
Inspect more frequently
depending on the condition
Inspect more frequently
depending on the condition
Replace more frequently
depending on the condition
Page 261 of 340
Maintenance
18
7
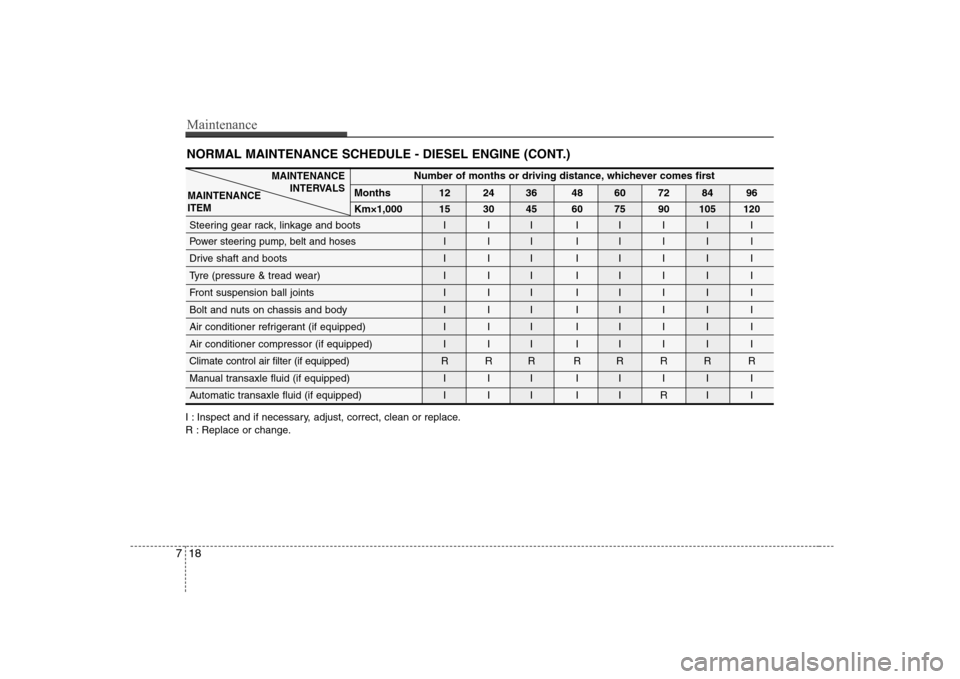
NORMAL MAINTENANCE SCHEDULE - DIESEL ENGINE (CONT.)
Number of months or driving distance, whichever comes first
Months 12 24 36 48 60 72 84 96 Km×1,000
15 30 45 60 75 90 105 120
Steering gear rack, linkage and boots I I I I I I I I
Power steering pump, belt and hoses I I I I I I I I
Drive shaft and boots I I I I I I I I
Tyre (pressure & tread wear) I I I I I I I I
Front suspension ball joints I I I I I I I I
Bolt and nuts on chassis and body I I I I I I I I
Air conditioner refrigerant (if equipped) I I I I I I I I
Air conditioner compressor (if equipped) I I I I I I I I
Climate control air filter (if equipped)RRR RRRRR
Manual transaxle fluid (if equipped) I I I I I I I I
Automatic transaxle fluid (if equipped) I I I I I R I I
MAINTENANCE INTERVALS
MAINTENANCE ITEM
I : Inspect and if necessary, adjust, correct, clean or replace.
R : Replace or change.