2009 HYUNDAI I10 h4 high
[x] Cancel search: h4 highPage 242 of 354
What to do in an emergency
4
6
EMERGENCY STARTING
F040000AUN
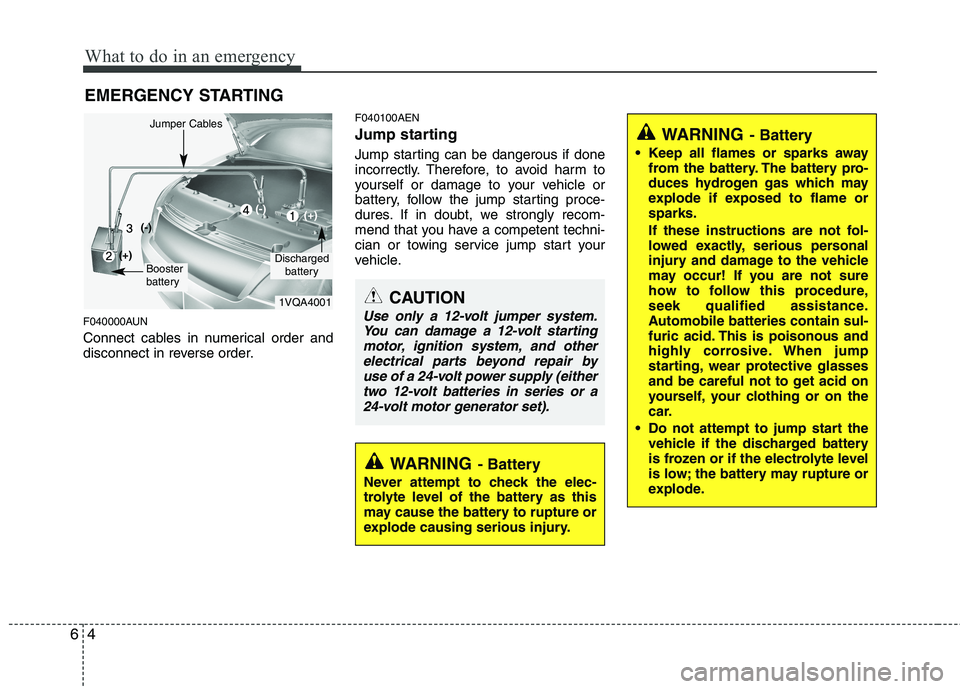
Connect cables in numerical order and
disconnect in reverse order. F040100AEN
Jump starting
Jump starting can be dangerous if done
incorrectly. Therefore, to avoid harm to
yourself or damage to your vehicle or
battery, follow the jump starting proce-
dures. If in doubt, we strongly recom-
mend that you have a competent techni-
cian or towing service jump start your
vehicle.
CAUTION
Use only a 12-volt jumper system.
You can damage a 12-volt starting
motor, ignition system, and otherelectrical parts beyond repair by use of a 24-volt power supply (eithertwo 12-volt batteries in series or a24-volt motor generator set).
WARNING - Battery
• Keep all flames or sparks away from the battery. The battery pro-
duces hydrogen gas which may
explode if exposed to flame orsparks.
If these instructions are not fol-
lowed exactly, serious personal
injury and damage to the vehicle
may occur! If you are not sure
how to follow this procedure,
seek qualified assistance.
Automobile batteries contain sul-
furic acid. This is poisonous and
highly corrosive. When jump
starting, wear protective glasses
and be careful not to get acid on
yourself, your clothing or on the
car.
Do not attempt to jump start the vehicle if the discharged battery
is frozen or if the electrolyte level
is low; the battery may rupture or
explode.
WARNING - Battery
Never attempt to check the elec-
trolyte level of the battery as this
may cause the battery to rupture or
explode causing serious injury.
1VQA4001
Discharged battery
Jumper CablesBooster
battery
(-)
(+)
(+)(-)
Page 245 of 354
67
What to do in an emergency
IF YOU HAVE A FLAT TIRE
F070100APA
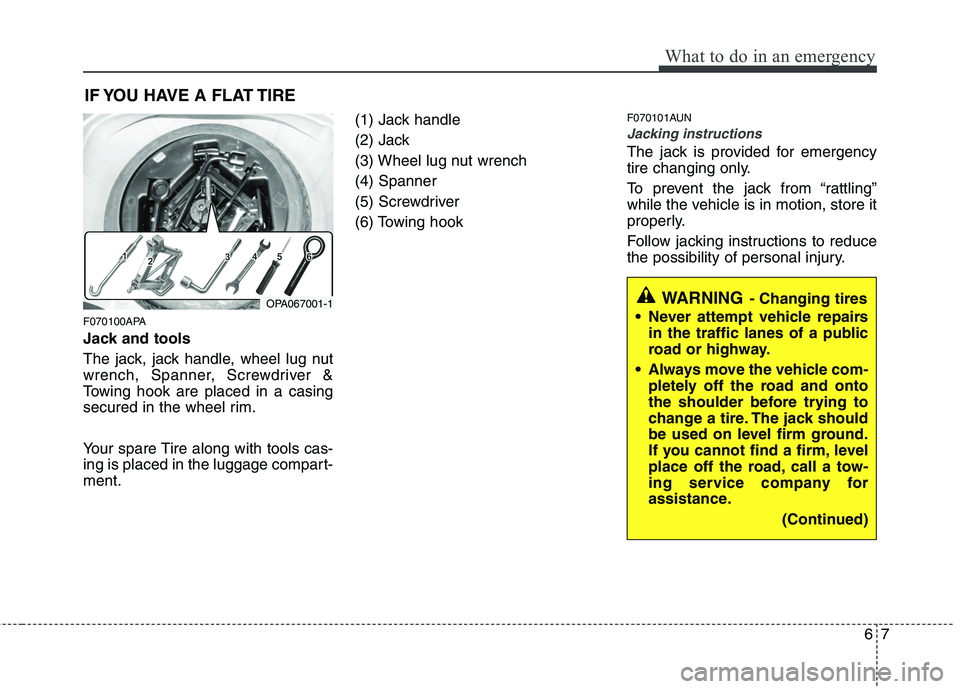
Jack and tools
The jack, jack handle, wheel lug nut
wrench, Spanner, Screwdriver &
Towing hook are placed in a casing
secured in the wheel rim.
Your spare Tire along with tools cas-
ing is placed in the luggage compart-ment. (1) Jack handle
(2) Jack
(3) Wheel lug nut wrench(4) Spanner
(5) Screwdriver
(6) Towing hook
F070101AUN
Jacking instructions
The jack is provided for emergency
tire changing only.
To prevent the jack from “rattling”
while the vehicle is in motion, store it
properly.
Follow jacking instructions to reduce
the possibility of personal injury.
WARNING
- Changing tires
Never attempt vehicle repairs in the traffic lanes of a public
road or highway.
Always move the vehicle com- pletely off the road and onto
the shoulder before trying to
change a tire. The jack should
be used on level firm ground.
If you cannot find a firm, level
place off the road, call a tow-
ing service company for
assistance.
(Continued)OPA067001-1
Page 250 of 354
What to do in an emergency
12
6
If you have a tire gauge, remove the
valve cap and check the air pressure.
If the pressure is lower than recom-
mended, drive slowly to the nearest
service station and inflate to the cor-
rect pressure. If it is too high, adjust
it until it is correct. Always reinstall
the valve cap after checking or
adjusting tire pressure. If the cap is
not replaced, air may leak from the
tire. If you lose a valve cap, buyanother and install it as soon as pos-
sible.
After you have changed wheels,
always secure the flat tire in its place
and return the jack and tools to their
proper storage locations. To prevent the jack, jack handle,
wheel lug nut wrench and spare tire
from rattling while the vehicle is in
motion, store them properly.CAUTION
Your vehicle has metric threads
on the wheel studs and nuts.Make certain during wheel removal that the same nuts thatwere removed are reinstalled -or, if replaced, that nuts with metric threads and the samechamfer configuration are used.Installation of a non-metricthread nut on a metric stud or vice-versa will not secure thewheel to the hub properly andwill damage the stud so that it must be replaced.
Note that most lug nuts do nothave metric threads. Be sure touse extreme care in checkingfor thread style before installing aftermarket lug nuts or wheels.If in doubt, consult an author-ized HYUNDAI dealer.
WARNING - Wheel studs
If the studs are damaged, they
may lose their ability to retain
the wheel. This could lead to theloss of the wheel and a collisionresulting in serious injuries.
WARNING - Inadequate
spare tire pressure
Check the inflation pressures as
soon as possible after installing
the spare tire. Adjust it to the
specified pressure, if necessary.
Refer to “Tires and wheels” sec-tion 9.
Page 251 of 354
613
What to do in an emergency
F070301AUN
Important - use of compact spare tire(if equipped)
Your vehicle is equipped with a com-
pact spare tire. This compact spare
tire takes up less space than a regu-
lar-size tire. This tire is smaller than a
conventional tire and is designed for
temporary use only.
The compact spare should be inflat-
ed to 420 kPa (60 psi).
✽✽NOTICE
Check the inflation pressure after
installing the spare tire. Adjust it to
the specified pressure, as necessary.
When using a compact spare tire,
observe the following precautions:
Under no circumstances should you exceed 80 km/h (50 mph); a higher speed could damage the
tire.
Ensure that you drive slowly enough for the road conditions to
avoid all hazards. Any road hazard,
such as a pothole or debris, could
seriously damage the compact
spare.
Any continuous road use of this tire could result in tire failure, loss of
vehicle control, and possible per-
sonal injury.
Do not exceed the vehicle’s maxi- mum load rating or the load-carry-
ing capacity shown on the sidewall
of the compact spare tire.
Avoid driving over obstacles. The compact spare tire diameter issmaller than the diameter of a con-
ventional tire and reduces the
ground clearance approximately25 mm (1 inch), which could result
in damage to the vehicle.
CAUTION
You should drive carefully
when the compact spare is inuse. The compact spareshould be replaced by theproper conventional tire and rim at the first opportunity.
The operation of this vehicle is not recommended withmore than one compact sparetire in use at the same time.
WARNING
The compact spare tire is for
emergency use only. Do not
operate your vehicle on this
compact spare at speeds over
80 km/h (50 mph). The originaltire should be repaired or
replaced as soon as is possible
to avoid failure of the spare
possibly leading to personal
injury or death.
Page 255 of 354
617
What to do in an emergency
Using the TireMobilityKit
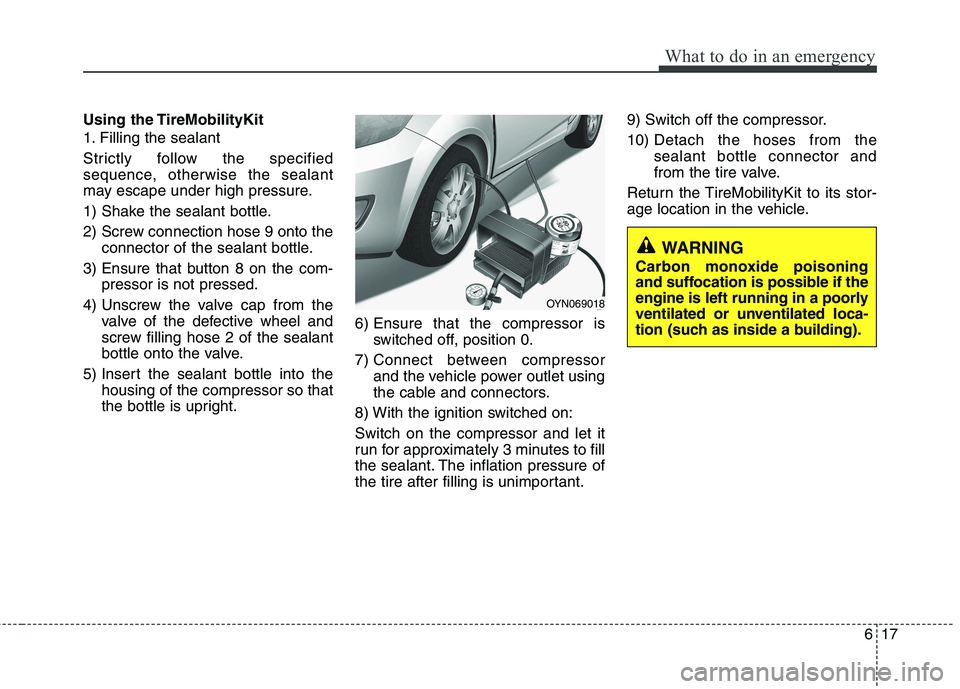
1. Filling the sealant
Strictly follow the specified
sequence, otherwise the sealant
may escape under high pressure.
1) Shake the sealant bottle.
2) Screw connection hose 9 onto theconnector of the sealant bottle.
3) Ensure that button 8 on the com- pressor is not pressed.
4) Unscrew the valve cap from the valve of the defective wheel and
screw filling hose 2 of the sealant
bottle onto the valve.
5) Insert the sealant bottle into the housing of the compressor so that
the bottle is upright. 6) Ensure that the compressor is
switched off, position 0.
7) Connect between compressor and the vehicle power outlet using
the cable and connectors.
8) With the ignition switched on: Switch on the compressor and let it
run for approximately 3 minutes to fill
the sealant. The inflation pressure of
the tire after filling is unimportant. 9) Switch off the compressor. 10)
Detach the hoses from the sealant bottle connector and
from the tire valve.
Return the TireMobilityKit to its stor-
age location in the vehicle.
WARNING
Carbon monoxide poisoning
and suffocation is possible if the
engine is left running in a poorly
ventilated or unventilated loca-
tion (such as inside a building).
OYN069018
Page 262 of 354
What to do in an emergency
24
6
EMERGENCY COMMODITY (IF EQUIPPED)
F110000AUN There are some emergency commodities
in the vehicle to help you respond to theemergency situation.
F110100AUN
Fire extinguisher
If there is small fire and you know how to
use the fire extinguisher, take the follow-
ing steps carefully.
1. Pull the pin at the top of the extin- guisher that keeps the handle from being accidentally pressed.
2. Aim the nozzle toward the base of the fire.
3. Stand approximately 2.5 m (8 ft) away from the fire and squeeze the handle
to discharge the extinguisher. If you
release the handle, the discharge will
stop.
4. Sweep the nozzle back and forth at the base of the fire. After the fire appears
to be out, watch it carefully since it
may re-ignite. F110200AUN
First aid kit
There are some items such as scissors,
bandage and adhesive tape and etc. in
the kit to give first aid to an injured per-son.
F110300AUN
Triangle reflector
Place the triangle reflector on the road to
warn oncoming vehicles during emer-
gencies, such as when the vehicle is
parked by the roadside due to any prob-
lems.
F110400AUN
Tire pressure gauge (If equipped)
Tires normally lose some air in day-to-
day use, and you may have to add a few
pounds of air periodically and it is not
usually a sign of a leaking tire, but of nor-
mal wear. Always check tire pressurewhen the tires are cold because tire pres-
sure increases with temperature. To check the tire pressure, take the fol-
lowing steps;
1. Unscrew the inflation valve cap that is
located on the rim of the tire.
2. Press and hold the gauge against the tire valve. Some air will escape as you
begin and more will escape if you don't
press the gauge in firmly.
3. A firm non-leaking push will activate the gauge.
4. Read the tire pressure on the gauge to know whether the tire pressure is lowor high.
5. Adjust the tire pressures to the speci- fied pressure. Refer to “Tires and
wheels” in section 9.
6. Reinstall the inflation valve cap.
Page 267 of 354
75
Maintenance
MAINTENANCE SERVICES
G020000AEN
You should exercise the utmost care to
prevent damage to your vehicle and
injury to yourself whenever performing
any maintenance or inspection proce-
dures.
Should you have any doubts concerning
the inspection or servicing of your vehi-
cle, we strongly recommend that you
have an authorized HYUNDAI dealer
perform this work.
An authorized HYUNDAI dealer has fac-
tory-trained technicians and genuine
HYUNDAI parts to service your vehicle
properly. For expert advice and quality
service, see an authorized HYUNDAI
dealer.
Inadequate, incomplete or insufficient
servicing may result in operational prob-
lems with your vehicle that could lead to
vehicle damage, an accident, or person-
al injury. G020100AEN
Owner’s responsibility
✽✽
NOTICE
Maintenance Service and Record
Retention are the owner's responsibility.
You should retain documents that show
proper maintenance has been performed
on your vehicle in accordance with the
scheduled maintenance service charts
shown on the following pages. You need
this information to establish your compli-
ance with the servicing and maintenance
requirements of your vehicle warranties.
Detailed warranty information is provided
in your Service Passport. Repairs and adjustments required as a
result of improper maintenance or a lack
of required maintenance are not covered.
We recommend you have your vehicle
maintained and repaired by an author-
ized HYUNDAI dealer. An authorized
HYUNDAI dealer meets HYUNDAI’s high
service quality standards and receives
technical support from HYUNDAI in
order to provide you with a high level of
service satisfaction. G020200APA Owner maintenance precautions
Improper or incomplete service may
result in problems. This section gives
instructions only for the maintenance
items that are easy to perform.
As explained earlier in this section, sev-
eral procedures can be done only by an
authorized HYUNDAI dealer with special
tools.
✽✽
NOTICE
Improper owner maintenance during
the warranty period may affect warran-
ty coverage. For details, read the sepa-
rate Service Passport provided with the
vehicle. If you're unsure about any serv-
icing or maintenance procedure, have it
done by an authorized HYUNDAI deal-
er.
Page 285 of 354

723
Maintenance
G050600AUN
Vapor hose and fuel filler cap
The vapor hose and fuel filler cap should
be inspected at those intervals specified
in the maintenance schedule. Make sure
that a new vapor hose or fuel filler cap iscorrectly replaced.
G050700AUN
Vacuum crankcase ventilation hoses (if equipped)
Inspect the surface of hoses for evidence
of heat and/or mechanical damage. Hard
and brittle rubber, cracking, tears, cuts,
abrasions, and excessive swelling indi-
cate deterioration. Particular attention
should be paid to examine those hose
surfaces nearest to high heat sources,
such as the exhaust manifold. Inspect the hose routing to assure that the hoses do not come in contact with
any heat source, sharp edges or movingcomponent which might cause heat dam-
age or mechanical wear. Inspect all hose
connections, such as clamps and cou-
plings, to make sure they are secure, and
that no leaks are present. Hoses should
be replaced immediately if there is any
evidence of deterioration or damage.G050800AEN
Air cleaner filter
A Genuine HYUNDAI air cleaner filter is recommended when the filter isreplaced.
G050900AUN Spark plugs
Make sure to install new spark plugs of
the correct heat range. G051000AEN
Valve clearance (if equipped)
Inspect excessive valve noise and/or
engine vibration and adjust if necessary.
An authorized HYUNDAI dealer should
perform the operation.
G051100AUN Cooling system
Check cooling system components, such
as radiator, coolant reservoir, hoses and
connections for leakage and damage.
Replace any damaged parts.
G051200AUN Coolant The coolant should be changed at the
intervals specified in the maintenance
schedule.
G051300AUN
Manual transaxle fluid (if equipped)
Inspect the manual transaxle fluid
according to the maintenance schedule.
G051400AUN
Automatic transaxle fluid (if equipped)
The fluid level should be in the "HOT"
range of the dipstick, after the engine
and transaxle are at normal operating
temperature. Check the automatic
transaxle fluid level with the engine run-
ning and the transaxle in neutral, with the
parking brake properly applied.
G051500AUN Brake hoses and lines
Visually check for proper installation,
chafing, cracks, deterioration and any
leakage. Replace any deteriorated or
damaged parts immediately.