2009 Hyundai H-1 (Grand Starex) clock
[x] Cancel search: clockPage 150 of 303
489
Features of your vehicle
5. Best Station Memory (BSM)Button
When the BSM button is pressed, the six channels from the highest field intensity
are selected next and stored in memory.The stations selected are stored in thesequence frequency from the first preset
key.
6. EQ Button
Press the EQ button to select the CLAS-
SIC, POP, ROCK, JAZZ and OFF MODE
for the desired tone quality. Each press of
the button changes the display as fol-
lows;
7. PRESET STATION Select Buttons
Six stations for AM(MW, LW), FM1 and
FM2 respectively can be preset in the
electronic memory circuit. HOW TO PRESET STATIONS
Six AM(MW, LW) and twelve FM stations
may be programmed into the memory of
the radio. Then, by simply pressing the
AM(MW, LW) / FM select button and/or
one of the six station select buttons, you
may recall any of these stations instantly.
To program the stations, follow thesesteps:
Press AM(MW, LW)/FM selector to set
the band for AM(MW, LW), FM1 and FM2.
Select the desired station to be stored by seek or manual tuning.
Determine the preset station select button you wish to use to access thatstation.
Press the station select button for more than two seconds. A select button indi-
cator will show in the display indicating
which select button you have
depressed. The frequency display willflash after it has been stored into the
memory. You should then release the
button, and proceed to program the
next desired station. A total of 24 sta-
tions can be programmed by selecting
one AM(MW, LW) and two FM station
per button. When completed, any preset station
may be recalled by selecting AM(MW,
LW), FM1 or FM2 band and the appro-
priate station button.
8. AUDIO Mode select Button
Pressing the AUDIO Mode select button
changes the BASS, MIDDLE, TREBLE,
FADER and BALANCE mode. The mode
selected is shown on the display.
After selecting the each mode, rotate the
TUNE knob clockwise or counterclock-
wise.
CLASSIC ➟POP ➟ROCK ➟JAZZ ➟DEFEATCAUTION
Do not place beverages close to
the audio system. The audio sys-tem mechanism may be damaged if you spill them.
Do not strike or allow anything to impact the audio system, damageto the system mechanisms couldoccur.
Page 153 of 303
Features of your vehicle
92
4
7. MARK (Bookmark) Button
When the CD player unit is operating, the
desired track on the disc can be book-
marked by using the MARK button.
Press the MARK button for more than
one second to bookmark the desired
track. "M" will be displayed on the LCD
and "MEMORY NO." will display for
approximately five seconds with a
beep sound. To play the bookmarked
tracks, press the MARK button withinone second and select the book-
marked track to play.
To erase a bookmarked track, press the MARK button for more than one
second. This will erase the bookmarkwith a beep sound.
If you want to delete all tracks stored on
Mark Memory, press FILE SEARCH
knob in the Mark Play mode for more
than one second. You will hear a beep
sound and all tracks will be deleted from
Mark Memory with "MARK DELETE
ALL" displayed on the LCD.
✽✽ NOTICE
Tracks stored on Mark Memory will be
automatically erased after you eject CDsthat contain those tracks.
8. RPT (Repeat) Button
To repeat the track you are currently listening to, press the RPT button. To
cancel, press it again. If it is pressed
for more than one second, it will repeat
all tracks within the currently played
CD.
To repeat the music within currently played folder, press the RPT button for
more than one second. Then it willrepeat in sequential order within the
currently played folder. To cancel,
press it again. (MP3 CD only)
If you do not release RPT operation when the track ends, it will automati-
cally be replayed. This process will
continue until you push the buttonagain.
9. RDM (Random) Button
To listen to the music in random order, press the RDM Button with a beep
sound for more than one second. Tocancel, press it again.
To listen to the music within the cur- rently played folder in random order,press the RDM Button within one sec-ond. To cancel, press it again within one
second. If it is pressed for more than
one second, it will be played in random
order within currently played CD (MP3CD only).
10. FILE SEARCH Knob (TUNE Select Knob)
You can move through the track by turning the FILE SEARCH knob clock-
wise or counterclockwise.
After moving through the desired file, press the FILE SEARCH knob to play-
back in the selected file.
If you do not press the FILE SEARCH knob within five seconds, the filesearching function will be released.
11. FLDR (FOLDER Search) Button
You can move through the folder by pushing the FLDR button to up ( )
and down ( ).
After moving the desired folder, press the FILE SEARCH knob to play back in
the selected folder. If you do not pressthe FILE SEARCH knob within 5 sec-
onds, the folder searching function will
be released. It is not operated in a sin-
gle folder.
Page 209 of 303
What to do in an emergency
8
6
F070200AEN-UK
Removing and storing the spare tyre
Your spare tyre is stored underneath
your vehicle, directly below the cargoarea.
To remove the spare tyre:
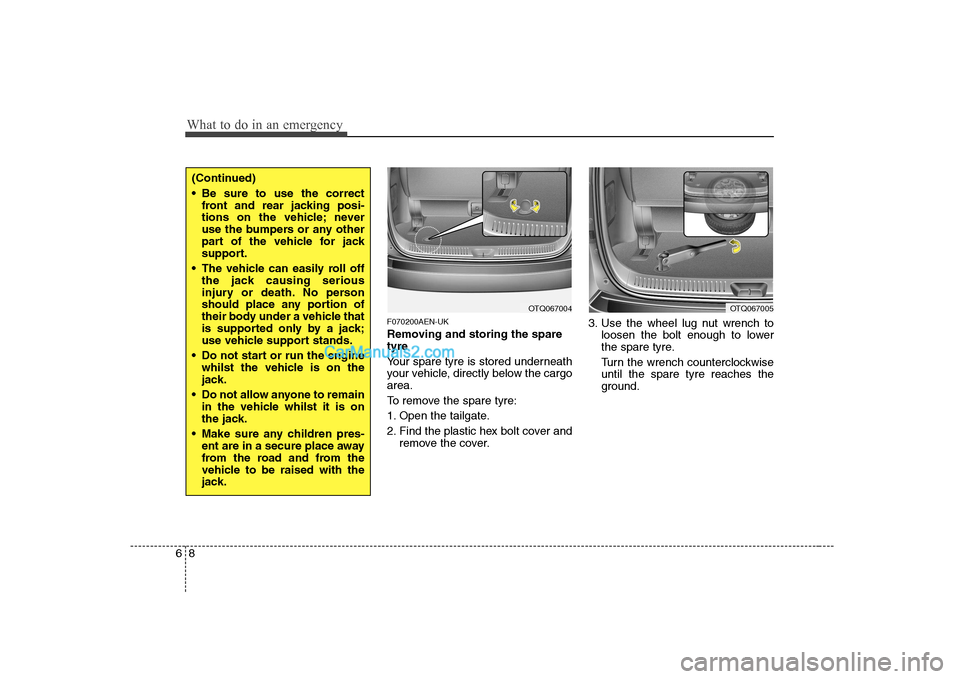
1. Open the tailgate.
2. Find the plastic hex bolt cover and
remove the cover. 3. Use the wheel lug nut wrench to
loosen the bolt enough to lower
the spare tyre.
Turn the wrench counterclockwise until the spare tyre reaches the
ground.
OTQ067004OTQ067005
(Continued)
Be sure to use the correctfront and rear jacking posi-
tions on the vehicle; never
use the bumpers or any other
part of the vehicle for jack
support.
The vehicle can easily roll off the jack causing serious
injury or death. No person
should place any portion of
their body under a vehicle that
is supported only by a jack;
use vehicle support stands.
Do not start or run the engine whilst the vehicle is on the
jack.
Do not allow anyone to remain in the vehicle whilst it is on
the jack.
Make sure any children pres- ent are in a secure place away
from the road and from the
vehicle to be raised with the
jack.
Page 210 of 303
69
What to do in an emergency
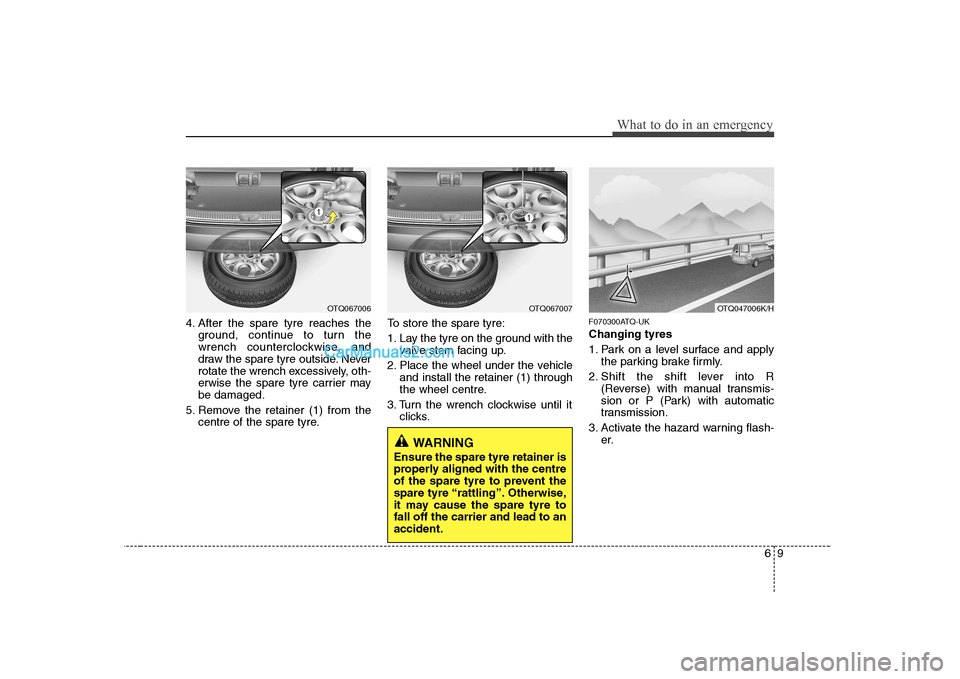
4. After the spare tyre reaches theground, continue to turn the
wrench counterclockwise, and
draw the spare tyre outside. Never
rotate the wrench excessively, oth-
erwise the spare tyre carrier maybe damaged.
5. Remove the retainer (1) from the centre of the spare tyre. To store the spare tyre:
1. Lay the tyre on the ground with the
valve stem facing up.
2. Place the wheel under the vehicle and install the retainer (1) through
the wheel centre.
3. Turn the wrench clockwise until it clicks. F070300ATQ-UK Changing tyres
1. Park on a level surface and apply
the parking brake firmly.
2. Shift the shift lever into R (Reverse) with manual transmis-
sion or P (Park) with automatic
transmission.
3. Activate the hazard warning flash- er.
OTQ067006OTQ067007
WARNING
Ensure the spare tyre retainer is
properly aligned with the centre
of the spare tyre to prevent the
spare tyre “rattling”. Otherwise,
it may cause the spare tyre tofall off the carrier and lead to anaccident.
OTQ047006K/H
Page 211 of 303
What to do in an emergency
10
6
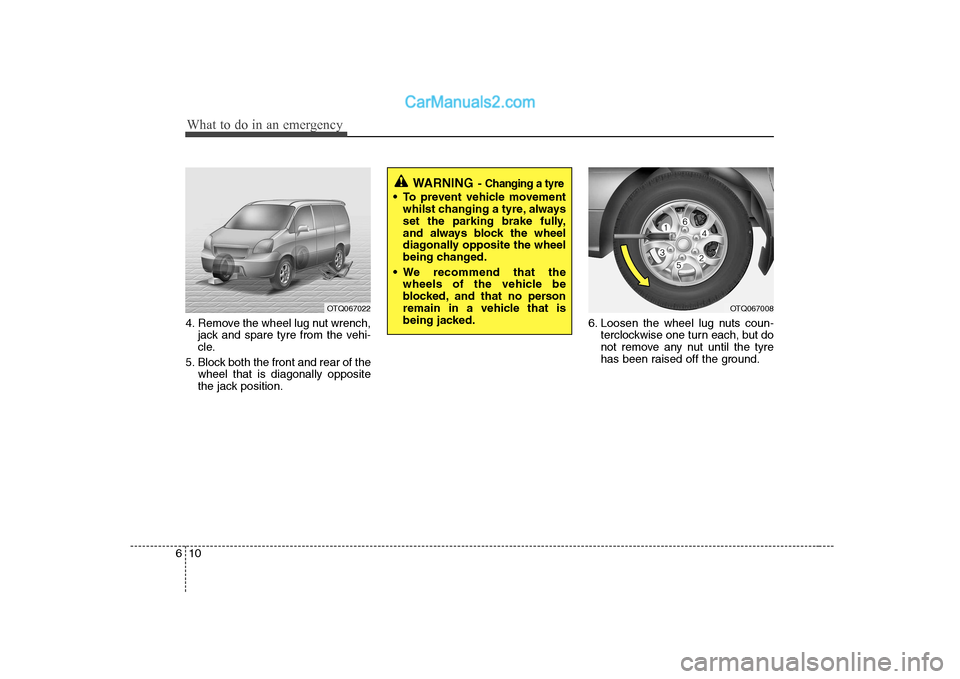
4. Remove the wheel lug nut wrench,
jack and spare tyre from the vehi-
cle.
5. Block both the front and rear of the wheel that is diagonally opposite
the jack position. 6. Loosen the wheel lug nuts coun-
terclockwise one turn each, but do
not remove any nut until the tyre
has been raised off the ground.
OTQ067022OTQ067008
WARNING - Changing a tyre
To prevent vehicle movement
whilst changing a tyre, always
set the parking brake fully,
and always block the wheel
diagonally opposite the wheel
being changed.
We recommend that the wheels of the vehicle be
blocked, and that no person
remain in a vehicle that is
being jacked.
Page 212 of 303
611
What to do in an emergency
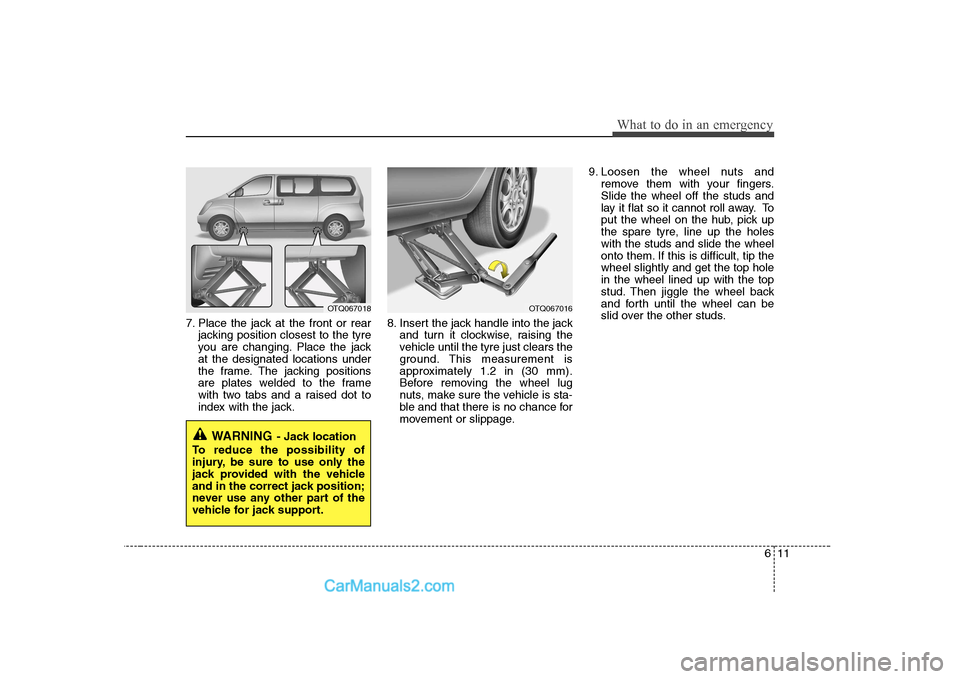
7. Place the jack at the front or rearjacking position closest to the tyre
you are changing. Place the jackat the designated locations under
the frame. The jacking positions
are plates welded to the frame
with two tabs and a raised dot to
index with the jack. 8. Insert the jack handle into the jack
and turn it clockwise, raising the
vehicle until the tyre just clears the
ground. This measurement is
approximately 1.2 in (30 mm).
Before removing the wheel lug
nuts, make sure the vehicle is sta-
ble and that there is no chance for
movement or slippage. 9. Loosen the wheel nuts and
remove them with your fingers.Slide the wheel off the studs and
lay it flat so it cannot roll away. To
put the wheel on the hub, pick up
the spare tyre, line up the holeswith the studs and slide the wheel
onto them. If this is difficult, tip thewheel slightly and get the top holein the wheel lined up with the top
stud. Then jiggle the wheel back
and forth until the wheel can be
slid over the other studs.
WARNING - Jack location
To reduce the possibility of
injury, be sure to use only the
jack provided with the vehicle
and in the correct jack position;
never use any other part of the
vehicle for jack support.
OTQ067018OTQ067016
Page 213 of 303
What to do in an emergency
12
6
10. To reinstall the wheel, hold it on
the studs, put the wheel nuts on the studs and tighten them finger
tight. The nuts should be installedwith their tapered small diameter
ends directed inward. Jiggle thetyre to be sure it is completely
seated, then tighten the nuts as
much as possible with your fin-gers again.
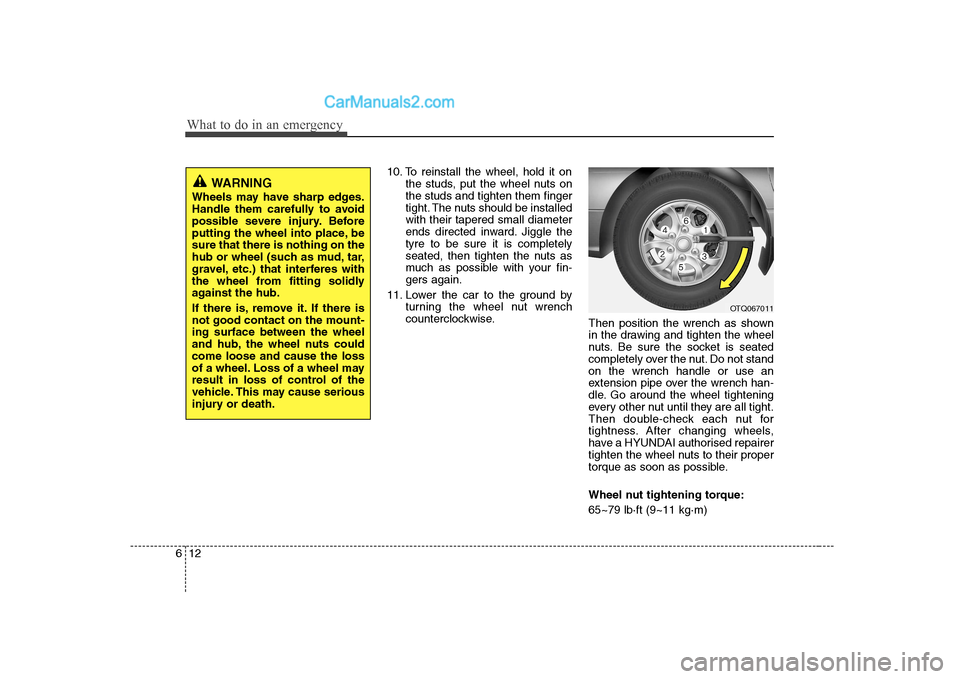
11. Lower the car to the ground by turning the wheel nut wrench
counterclockwise. Then position the wrench as shown
in the drawing and tighten the wheel
nuts. Be sure the socket is seated
completely over the nut. Do not standon the wrench handle or use an
extension pipe over the wrench han-
dle. Go around the wheel tightening
every other nut until they are all tight.
Then double-check each nut for
tightness. After changing wheels,
have a HYUNDAI authorised repairer
tighten the wheel nuts to their proper
torque as soon as possible.
Wheel nut tightening torque: 65~79 lb·ft (9~11 kg·m)
WARNING
Wheels may have sharp edges.
Handle them carefully to avoid
possible severe injury. Before
putting the wheel into place, besure that there is nothing on the
hub or wheel (such as mud, tar,
gravel, etc.) that interferes with
the wheel from fitting solidly
against the hub.
If there is, remove it. If there is not good contact on the mount-ing surface between the wheel
and hub, the wheel nuts couldcome loose and cause the loss
of a wheel. Loss of a wheel may
result in loss of control of the
vehicle. This may cause serious
injury or death.
OTQ067011
Page 216 of 303
615
What to do in an emergency
When towing your vehicle in an emer- gency without wheel dollies :
1. Set the ignition switch in the ACC posi-tion.
2. Place the transmission shift lever in N (Neutral).
3. Release the parking brake.
F080200ATQ
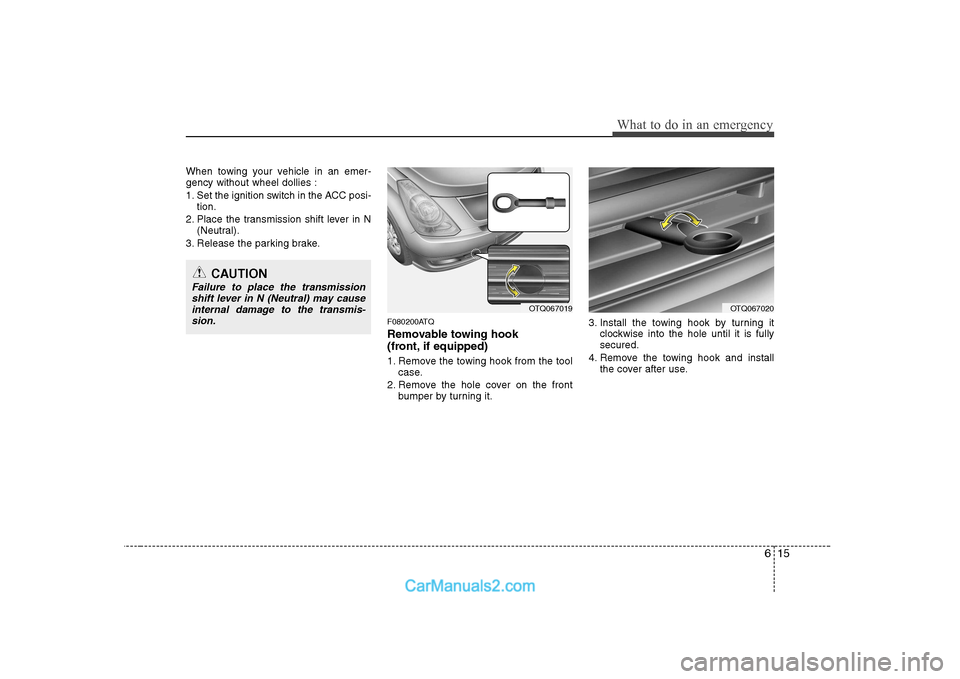
Removable towing hook
(front, if equipped)
1. Remove the towing hook from the toolcase.
2. Remove the hole cover on the front bumper by turning it. 3. Install the towing hook by turning it
clockwise into the hole until it is fully secured.
4. Remove the towing hook and install the cover after use.
CAUTION
Failure to place the transmission
shift lever in N (Neutral) may causeinternal damage to the transmis-sion.
OTQ067019OTQ067020