2009 Hyundai Azera spare wheel
[x] Cancel search: spare wheelPage 236 of 335
3
WHAT TO DO IN AN EMERGENCY
5
TIRE PRESSURE MONITORING SYSTEM (TPMS)
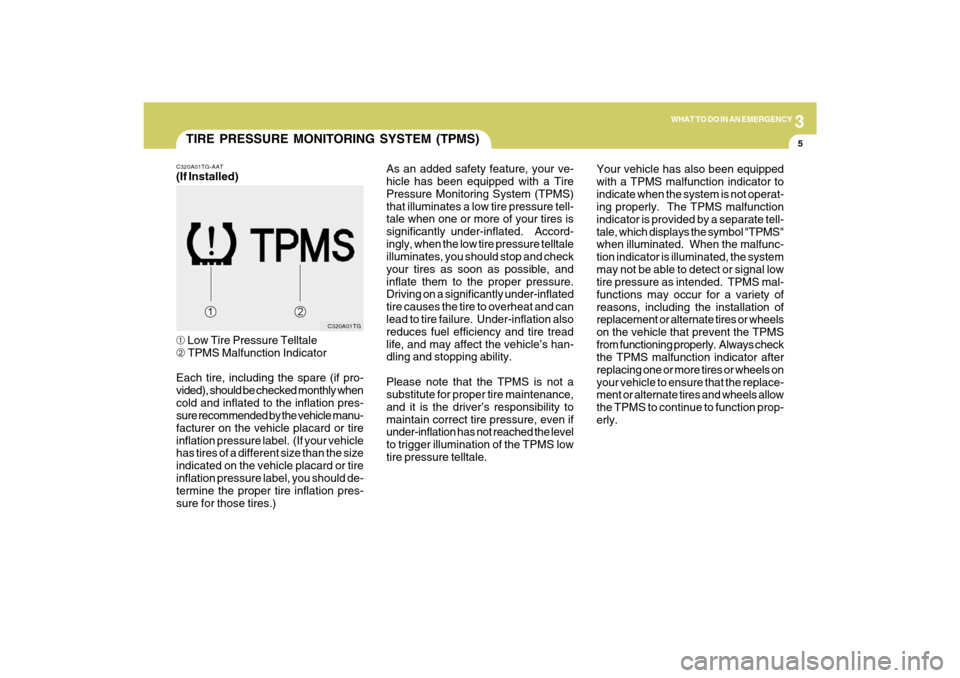
C320A01TG C320A01TG-AAT
(If Installed)
➀ Low Tire Pressure Telltale
➁ TPMS Malfunction Indicator
Each tire, including the spare (if pro-
vided), should be checked monthly when
cold and inflated to the inflation pres-
sure recommended by the vehicle manu-
facturer on the vehicle placard or tire
inflation pressure label. (If your vehicle
has tires of a different size than the size
indicated on the vehicle placard or tire
inflation pressure label, you should de-
termine the proper tire inflation pres-
sure for those tires.)As an added safety feature, your ve-
hicle has been equipped with a Tire
Pressure Monitoring System (TPMS)
that illuminates a low tire pressure tell-
tale when one or more of your tires is
significantly under-inflated. Accord-
ingly, when the low tire pressure telltale
illuminates, you should stop and check
your tires as soon as possible, and
inflate them to the proper pressure.
Driving on a significantly under-inflated
tire causes the tire to overheat and can
lead to tire failure. Under-inflation also
reduces fuel efficiency and tire tread
life, and may affect the vehicle’s han-
dling and stopping ability.
Please note that the TPMS is not a
substitute for proper tire maintenance,
and it is the driver’s responsibility to
maintain correct tire pressure, even if
under-inflation has not reached the level
to trigger illumination of the TPMS low
tire pressure telltale.Your vehicle has also been equipped
with a TPMS malfunction indicator to
indicate when the system is not operat-
ing properly. The TPMS malfunction
indicator is provided by a separate tell-
tale, which displays the symbol "TPMS"
when illuminated. When the malfunc-
tion indicator is illuminated, the system
may not be able to detect or signal low
tire pressure as intended. TPMS mal-
functions may occur for a variety of
reasons, including the installation of
replacement or alternate tires or wheels
on the vehicle that prevent the TPMS
from functioning properly. Always check
the TPMS malfunction indicator after
replacing one or more tires or wheels on
your vehicle to ensure that the replace-
ment or alternate tires and wheels allow
the TPMS to continue to function prop-
erly.
Page 238 of 335

3
WHAT TO DO IN AN EMERGENCY
7
Have the system checked by an autho-
rized Hyundai dealer as soon as pos-
sible to determine the cause of the
problem.
NOTE:
o The TPMS malfunction indicator
may be illuminated if the vehicle
is moving around electric power
supply cables or radio transmit-
ters such as police stations, gov-
ernment and public offices, broad-
casting stations, military installa-
tions, airports, or transmitting tow-
ers, etc. which can interfere with
normal operation of the Tire Pres-
sure Monitoring System (TPMS).
o The TPMS malfunction indicator
may be illuminated if snow chains
or some electronic devices, such
as notebook computers, are used
in the vehicle. This can interfere
with normal operation of the Tire
Pressure Monitoring System
(TPMS).Changing a tire with TPMS
If you have a flat tire, the Low Tire
Pressure telltale will turn on. Have the
flat tire repaired by an authorized Hyundai
dealer as soon as possible or replace
the flat tire with the temporary spare
tire.
NOTE:
NEVER use a puncture-repairing
agent to repair and/or inflate a low
pressure tire. If used, you will have
to replace the tire pressure sensor.
Each wheel is equipped with a tire
pressure sensor mounted inside the tire
behind the valve stem. You must use
TPMS specific wheels. It is recom-
mended that you always have your tires
serviced by an authorized Hyundai dealer
as soon as possible.
After you replace the low pressure tire
with the temporary spare tire, the TPMS
malfunction indicator may illuminate
and the low tire pressure telltale still
illuminate after restarting and about 20
minutes of continuous driving.Once the low pressure tire is re-inflated
to the recommended pressure and in-
stalled on the vehicle, the TPMS mal-
function indicator and the low tire pres-
sure telltale will be extinguished. If the
low pressure and TPMS malfunction
indicators are not extinguished after
about 20 minutes of continuous driving,
please visit an authorized Hyundai
dealer.
You may not be able to identify a low tire
by simply looking at it. Always use a
good quality tire pressure gauge to
measure the tire's inflation pressure.
Please note that a tire that is hot (from
being driven) will have a higher pres-
sure measurement than a tire that is
cold (from sitting stationary for at least
3 hours and driven less than 1 mile
during that 3 hour period). Allow the tire
to cool before measuring the inflation
pressure.
Always be sure the tire is cold before
inflating to the recommended pressure.
A cold tire means the vehicle has been
sitting for 3 hours and driven for less
than 1 mile in that 3 hour period.
Page 239 of 335
38WHAT TO DO IN AN EMERGENCY
!
!
!
CAUTION:
o Do not use any tire sealant if your
vehicle is equipped with a Tire
Pressure Monitoring System. The
liquid sealant can damage the tire
pressure sensors.
o In order for the system to correctly
monitor tires for under-inflation,
there should be a total of exactly 4
sensors fitted to each of the four
driven wheel positions. There
should be no other sensors in the
vehicle including spare tire since
this could cause the system to
monitor the wrong sensors.
WARNING:
Tampering with, modifying, or dis-
abling the Tire Pressure Monitoring
System (TPMS) components may
interfere with the system's ability to
warn the driver of low tire pressure
conditions and/or TPMS malfunc-
tions. Tampering with, modifying,
or disabling the Tire Pressure Moni-
toring System (TPMS) components
may void the warranty for that por-
tion of the vehicle.
!
WARNING - TPMS
o The TPMS cannot alert you to se-
vere and sudden tire damage
caused by external factors such as
nails or road debris.
o If you feel any vehicle instability,
immediately take your foot off the
accelerator, apply the brakes
gradually and with light force, and
slowly move to a safe position off
the road.This device complies with Part 15 of
the FCC rules.
Operation is subject to the following two
conditions:
1. This device may not cause harmful
interference, and
2. This device must accept any inter-
ference received, including interfer-
ence that may cause undesired op-
eration.
WARNING:
Changes or modifications not ex-
pressly approved by the party re-
sponsible for compliance could void
the user’s authority to operate the
equipment.
Page 240 of 335
3
WHAT TO DO IN AN EMERGENCY
9
SPARE TIRED040A03GK-AATTEMPORARY SPARE TIRE
The following instructions for the TEM-
PORARY spare tire should be observed:
1. Check inflation pressure as soon as
practical after installing the spare
tire, and adjust to the specified pres-
sure. The tire pressure should be
periodically checked and maintained
at the specified pressure while the
tire is stored.Tire Size
Inflation Pressure
T125/80D16
420 kPa(60 psi)
4. As the temporary spare tire is spe-
cifically designed for your car, it
should not be used on any other
vehicle.
5. The temporary spare tire should not
be used on any other wheels, nor
should standard tires, snow tires,
wheel covers or trim rings be used
with the temporary spare wheel. If
such use is attempted, damage to
these items or other car components
may occur.
6. The temporary spare tire pressure
should be checked once a month
while the tire is stored.
2. The spare tire should only be used
temporarily and should be returned
to the luggage compartment as soon
as the original tire can be repaired or
replaced.
3. Continuous use at speeds of over 50
mph (80 km/h) is not recommended. Spare Tire Pressure
CAUTION:
o Do not use snow chains with your
temporary spare tire.
o Do not use more than one tempo-
rary spare tire at a time.
o Do not tow a trailer while the tem-
porary spare tire is installed.
!
!
WARNING:
The temporary spare tire is for emer-
gency use only. Do not operate your
vehicle on this temporary spare at
speeds over 50 mph (80 km/h). The
original tire should be repaired or
replaced as soon as is possible to
avoid failure of the spare possibly
leading to personal injury or death.
Page 242 of 335
3
WHAT TO DO IN AN EMERGENCY
11
CHANGING A FLAT TIRED060A01TG-AATThe procedure described on the follow-
ing pages can be used to rotate tires as
well as to change a flat tire. When
preparing to change a flat tire, check to
be sure the gear selector lever is in "P"
and that the parking brake is set, then:
D060A01TG-A
D060B01NF-GAT1. Obtain Spare Tire and Tool
7D060B01NF-A
Take out the tool receptacle and turn
the installation bolt counterclockwise
to remove spare tire from the trunk.
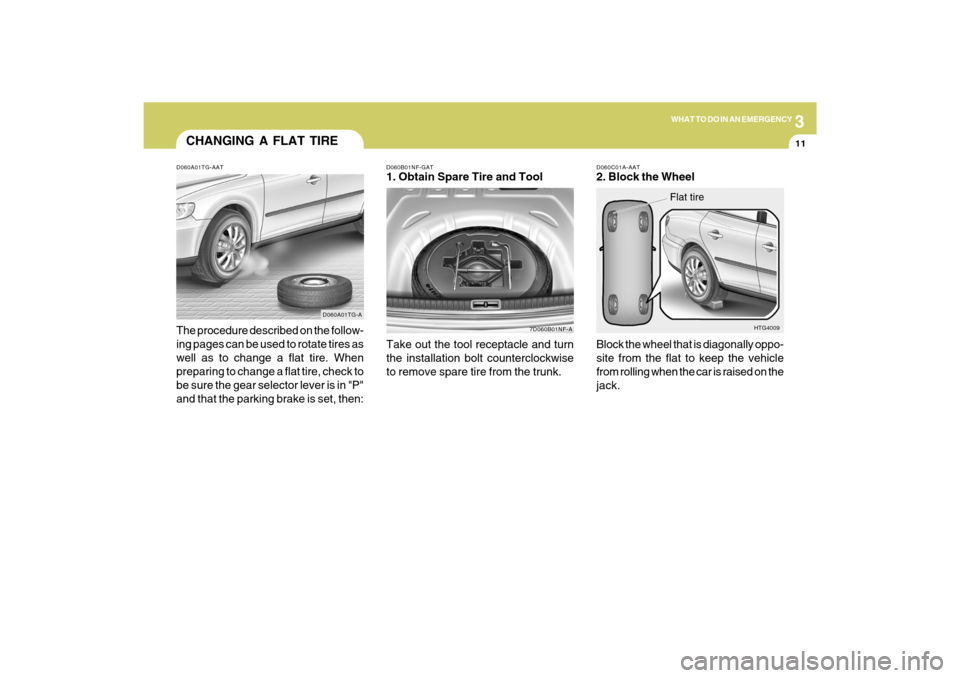
D060C01A-AAT2. Block the Wheel
Block the wheel that is diagonally oppo-
site from the flat to keep the vehicle
from rolling when the car is raised on the
jack.
HTG4009
Flat tire
Page 243 of 335
312
WHAT TO DO IN AN EMERGENCY
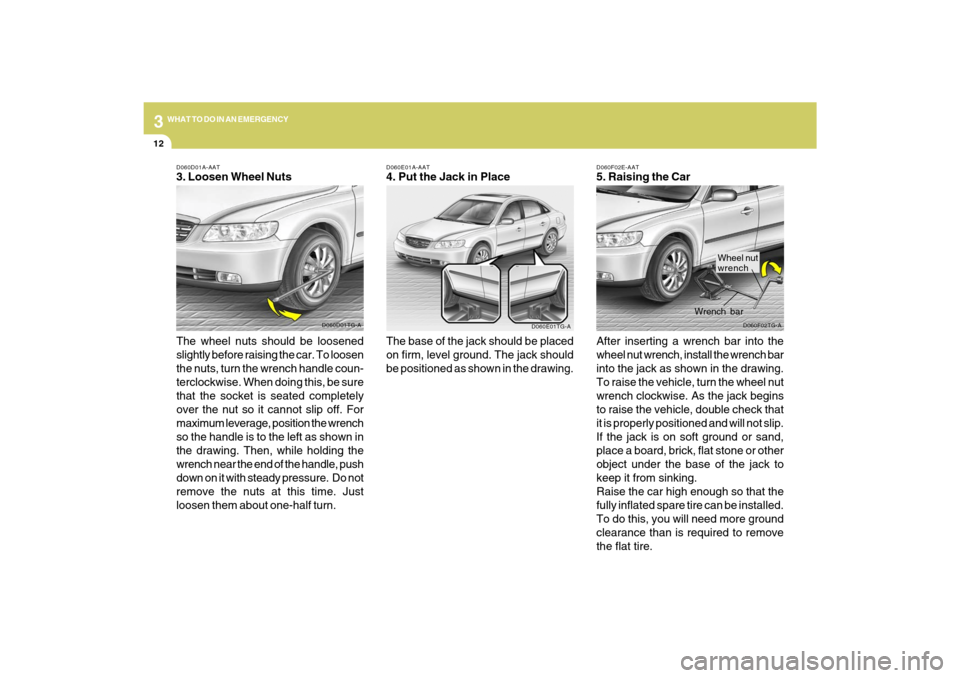
D060F02E-AAT5. Raising the Car
After inserting a wrench bar into the
wheel nut wrench, install the wrench bar
into the jack as shown in the drawing.
To raise the vehicle, turn the wheel nut
wrench clockwise. As the jack begins
to raise the vehicle, double check that
it is properly positioned and will not slip.
If the jack is on soft ground or sand,
place a board, brick, flat stone or other
object under the base of the jack to
keep it from sinking.
Raise the car high enough so that the
fully inflated spare tire can be installed.
To do this, you will need more ground
clearance than is required to remove
the flat tire.
D060F02TG-A
Wrench bar
D060E01A-AAT4. Put the Jack in Place
The base of the jack should be placed
on firm, level ground. The jack should
be positioned as shown in the drawing.
D060E01TG-A
Wheel nut
wrench
D060D01A-AAT3. Loosen Wheel Nuts
The wheel nuts should be loosened
slightly before raising the car. To loosen
the nuts, turn the wrench handle coun-
terclockwise. When doing this, be sure
that the socket is seated completely
over the nut so it cannot slip off. For
maximum leverage, position the wrench
so the handle is to the left as shown in
the drawing. Then, while holding the
wrench near the end of the handle, push
down on it with steady pressure. Do not
remove the nuts at this time. Just
loosen them about one-half turn.
D060D01TG-A
Page 244 of 335
3
WHAT TO DO IN AN EMERGENCY
13
!
WARNING:
Do not get under the car when it is
supported by the jack! This is very
dangerous as the vehicle could fall
and cause serious injury or death.
No one should stay in the car while
the jack is being used.
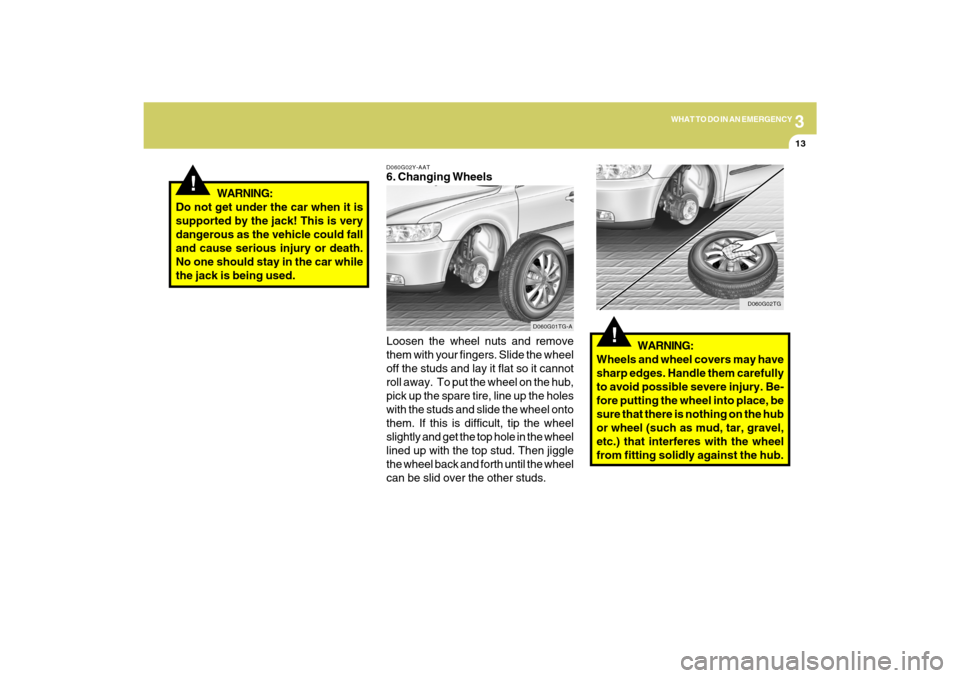
D060G02Y-AAT6. Changing Wheels
Loosen the wheel nuts and remove
them with your fingers. Slide the wheel
off the studs and lay it flat so it cannot
roll away. To put the wheel on the hub,
pick up the spare tire, line up the holes
with the studs and slide the wheel onto
them. If this is difficult, tip the wheel
slightly and get the top hole in the wheel
lined up with the top stud. Then jiggle
the wheel back and forth until the wheel
can be slid over the other studs.
D060G01TG-A
!
WARNING:
Wheels and wheel covers may have
sharp edges. Handle them carefully
to avoid possible severe injury. Be-
fore putting the wheel into place, be
sure that there is nothing on the hub
or wheel (such as mud, tar, gravel,
etc.) that interferes with the wheel
from fitting solidly against the hub.
D060G02TG
Page 269 of 335
6
DO-IT-YOURSELF MAINTENANCE
3
G020C01TG-AATVehicle InteriorThe following should be checked each
time when the vehicle is driven:
o Lights operation
o Windshield wiper operation
o Horn operation
o Defroster, heating system operation
(and air conditioning, if installed)
o Steering operation and condition
o Mirror condition and operation
o Turn signal operation
o Accelerator pedal operation
o Brake operation, including parking
brake
o Automatic transaxle operation, includ-
ing "Park" mechanism operation
o Seat control condition and operation
o Seat belt condition and operation
o Sun visor operation
If you notice anything that does not operate
correctly or appears to be functioning cor-
rectly, inspect it carefully and seek assis-
tance from your Hyundai dealer if service
is needed.
G020B01A-AATVehicle ExteriorThe following should be checked monthly:
o Overall appearance and condition
o Wheel condition and wheel nut torque
o Exhaust system condition
o Light condition and operation
o Windshield glass condition
o Wiper blade condition
o Paint condition and body corrosion
o Fluid leaks
o Door and hood lock condition
o Tire pressure and condition
(including spare tire)
GENERAL CHECKSG020A01NF-AATEngine CompartmentThe following should be checked regu-
larly:
o Engine oil level and condition
o Transaxle fluid level and condition
o Brake fluid level
o Engine coolant level
o Windshield washer fluid level
o Accessory drive belt condition
o Engine coolant hose condition
o Fluid leaks (on or below components)
o Power steering fluid level
o Battery condition
o Air cleaner filter condition
o Engine vibration