2009 Hyundai Accent spare tire
[x] Cancel search: spare tirePage 181 of 266
3
WHAT TO DO IN AN EMERGENCY
13
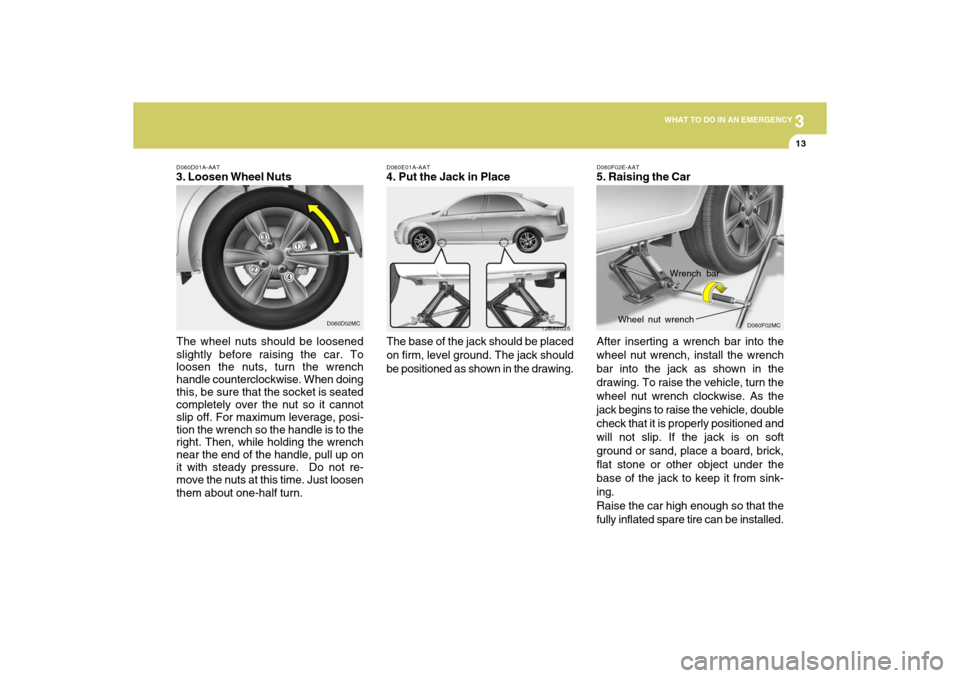
D060E01A-AAT4. Put the Jack in Place
The base of the jack should be placed
on firm, level ground. The jack should
be positioned as shown in the drawing.
1JBA6025
D060D01A-AAT3. Loosen Wheel Nuts
The wheel nuts should be loosened
slightly before raising the car. To
loosen the nuts, turn the wrench
handle counterclockwise. When doing
this, be sure that the socket is seated
completely over the nut so it cannot
slip off. For maximum leverage, posi-
tion the wrench so the handle is to the
right. Then, while holding the wrench
near the end of the handle, pull up on
it with steady pressure. Do not re-
move the nuts at this time. Just loosen
them about one-half turn.
D060D02MC
D060F02E-AAT5. Raising the Car
After inserting a wrench bar into the
wheel nut wrench, install the wrench
bar into the jack as shown in the
drawing. To raise the vehicle, turn the
wheel nut wrench clockwise. As the
jack begins to raise the vehicle, double
check that it is properly positioned and
will not slip. If the jack is on soft
ground or sand, place a board, brick,
flat stone or other object under the
base of the jack to keep it from sink-
ing.
Raise the car high enough so that the
fully inflated spare tire can be installed.
Wrench bar
Wheel nut wrench
D060F02MC
Page 182 of 266
314
WHAT TO DO IN AN EMERGENCY
!
To do this, you will need more ground
clearance than is required to remove
the flat tire.
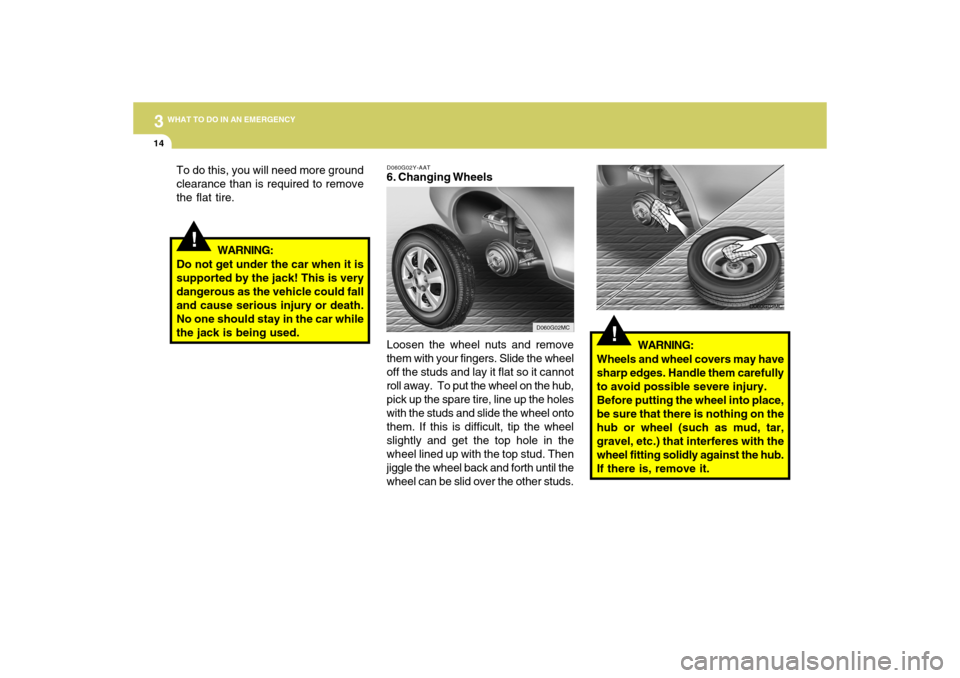
D060G02Y-AAT6. Changing Wheels
Loosen the wheel nuts and remove
them with your fingers. Slide the wheel
off the studs and lay it flat so it cannot
roll away. To put the wheel on the hub,
pick up the spare tire, line up the holes
with the studs and slide the wheel onto
them. If this is difficult, tip the wheel
slightly and get the top hole in the
wheel lined up with the top stud. Then
jiggle the wheel back and forth until the
wheel can be slid over the other studs. WARNING:
Do not get under the car when it is
supported by the jack! This is very
dangerous as the vehicle could fall
and cause serious injury or death.
No one should stay in the car while
the jack is being used.
!
WARNING:
Wheels and wheel covers may have
sharp edges. Handle them carefully
to avoid possible severe injury.
Before putting the wheel into place,
be sure that there is nothing on the
hub or wheel (such as mud, tar,
gravel, etc.) that interferes with the
wheel fitting solidly against the hub.
If there is, remove it.
D060G03MC
D060G02MC
Page 187 of 266
3
WHAT TO DO IN AN EMERGENCY
19
CAUTION:
- Automatic Transaxle
If the car is being towed with all four
wheels on the ground, it can be towed
only from the front. Be sure that the
transaxle is in neutral. Do not tow at
speeds greater than 30 mph (50 km/h)
and for more than 15 miles (25 km). Be
sure the steering is unlocked by plac-
ing the key in the "ACC" position. A
driver must be in the towed vehicle to
operate the steering and brakes.
!
OMC045013
OMC045014
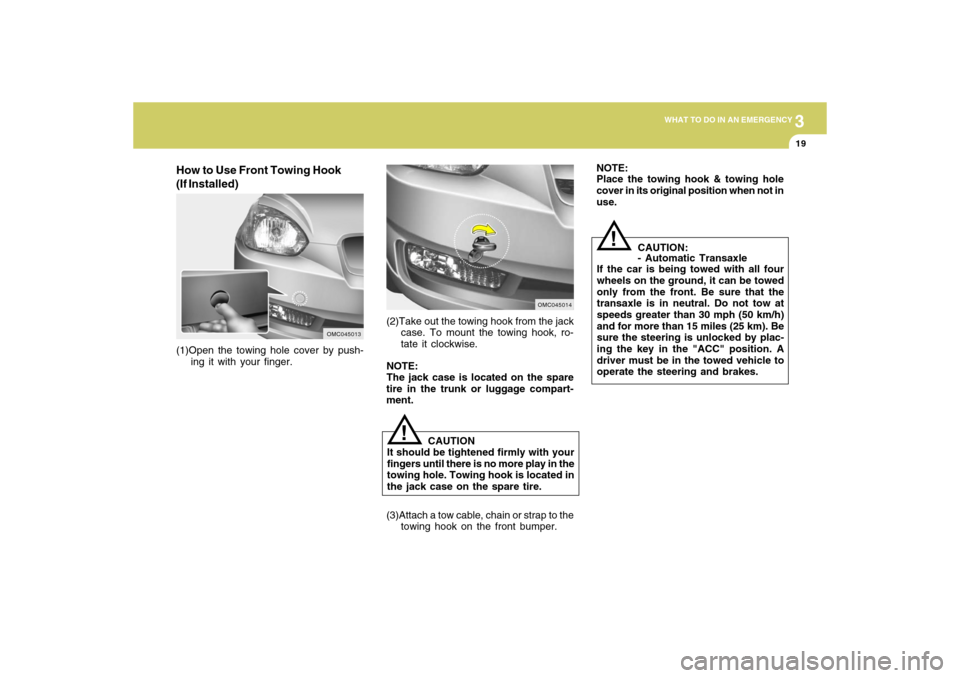
(1)Open the towing hole cover by push-
ing it with your finger.(2)Take out the towing hook from the jack
case. To mount the towing hook, ro-
tate it clockwise.
NOTE:
The jack case is located on the spare
tire in the trunk or luggage compart-
ment.
!
CAUTION
It should be tightened firmly with your
fingers until there is no more play in the
towing hole. Towing hook is located in
the jack case on the spare tire.
How to Use Front Towing Hook
(If Installed)
NOTE:
Place the towing hook & towing hole
cover in its original position when not in
use.
(3)Attach a tow cable, chain or strap to the
towing hook on the front bumper.
Page 208 of 266

6
DO-IT-YOURSELF MAINTENANCE
3
GENERAL CHECKS
G020C01A-AATVehicle InteriorThe following should be checked each
time when the vehicle is driven:
o Light operation
o Windshield wiper operation
o Horn operation
o Defroster, heater system operation (and
air conditioning, if installed)
o Steering operation and condition
o Mirror condition and operation
o Turn signal operation
o Accelerator pedal operation
o Brake operation, including parking
brake
o Manual transaxle operation, including
clutchoperation
o Automatic transaxle operation, includ-
ing "Park" mechanism operation
o Seat control condition and operation
o Seat belt condition and operation
o Sun visor operation
If you notice anything that does not oper-
ate correctly or appear to be functioning
correctly, inspect it carefully and seek
assistance from your Hyundai dealer if
service is needed.
G020A01A-AATEngine Compartment
The following should be checked regu-
larly:
o Engine oil level and condition
o Transaxle fluid level and condition
o Brake fluid level
o Clutch fluid level
o Engine coolant level
o Windshield washer fluid level
o Accessory drive belt condition
o Engine coolant hose condition
o Fluid leaks (on or below components)
o Power steering fluid level and condi-
tion
o Battery condition
o Air cleaner filter condition
G020B01A-AATVehicle ExteriorThe following should be checked monthly:
o Overall appearance and condition
o Wheel condition and wheel nut tight-
ness
o Exhaust system condition
o Light condition and operation
o Windshield glass condition
o Wiper blade condition
o Paint condition and body corrosion
o Fluid leaks
o Door and hood lock condition
o Tire pressure and condition
(including spare tire)
Page 239 of 266
CONSUMER INFORMATION, REPORTING
SAFETY DEFECTS & BINDING
ARBITRATION OF WARRANTY CLAIMS
Vehicle Identification Number (VIN) ............................. 8-2
Engine Number ............................................................. 8-3
Tire Information ............................................................. 8-3
Recommended Cold Tire Inflation Pressures .............. 8-3
Checking Tire Inflation Pressure .................................. 8-6
Tire Sidewall Labeling ................................................... 8-6
Tire Terminology and Definitions .................................. 8-8
All Season Tires .........................................................8-10
Snow Tires..................................................................8-10
Tire Chains ................................................................. 8-11
Tire Rotation ...............................................................8-11
Tire Balancing.............................................................8-12
Tire Traction................................................................8-12
When to Replace Tires ...............................................8-12
Tire Maintenance........................................................8-13
Spare Tire and Tools..................................................8-14
Warranties for Your Hyundai Vehicle.........................8-15
Consumer Information................................................8-15
Reporting Safety Defects ...........................................8-18
Binding Arbitration of Warranty Claims...................... 8-18
8
8
Page 243 of 266
8
CONSUMER INFORMATION, REPORTING SAFETY DEFECTS & BINDING ARBITRATION OF WARRANTY CLAIMS
5
!
!
o Worn tires can cause accidents.
Replace tires that are worn, show
uneven wear, or are damaged.
See page 8-12.
o Remember to check the pressure
of your spare tire. Hyundai rec-
ommends that you check the
spare every time you check the
pressure of the other tires on
your vehicle.
WARNING:
Overinflation or underinflation can
reduce the tire life, adversely affect
vehicle handling, and lead to sud-
den tire failure. This could rusult in
loss of vehicle control and potential
injury.CAUTION:
Always observe the following:
o Check pressures when the tires
are cold. (After the vehicle has
been parked for at least three
hours or hasn't been driven more
than one mile (1.6 km) since start-
ing up.)
o Check the pressure of your spare
tire each time you check the pres-
sure of other tires.
o Never overload your vehicle. Be
especially careful about overload-
ing if you equip your vehicle with
a luggage rack.
o Worn, old tires can cause acci-
dents. If your tread is badly worn,
or if your tires have been dam-
aged, replace them.
!
WARNING:NOTE:
o Underinflation also results in ex-
cessive wear, poor handling and
reduced fuel economy. Wheel de-
formation also is possible. Keep
your tire pressures at the proper
levels. If a tire frequently needs
refilling, have it checked by your
Hyundai Dealer.
o Overinflation produces a harsh
ride, excessive wear at the center
of the tire tread, and a greater
possibility of damage from road
hazards.
Page 244 of 266
8
CONSUMER INFORMATION, REPORTING SAFETY DEFECTS & BINDING ARBITRATION OF WARRANTY CLAIMS6
If you overfill the tire, release air by
pushing on the metal stem in the
center of the tire valve. Recheck the
tire pressure with the tire gauge. Be
sure to put the valve caps back on the
valve stems. They help prevent leaks
by keeping out dirt and moisture.
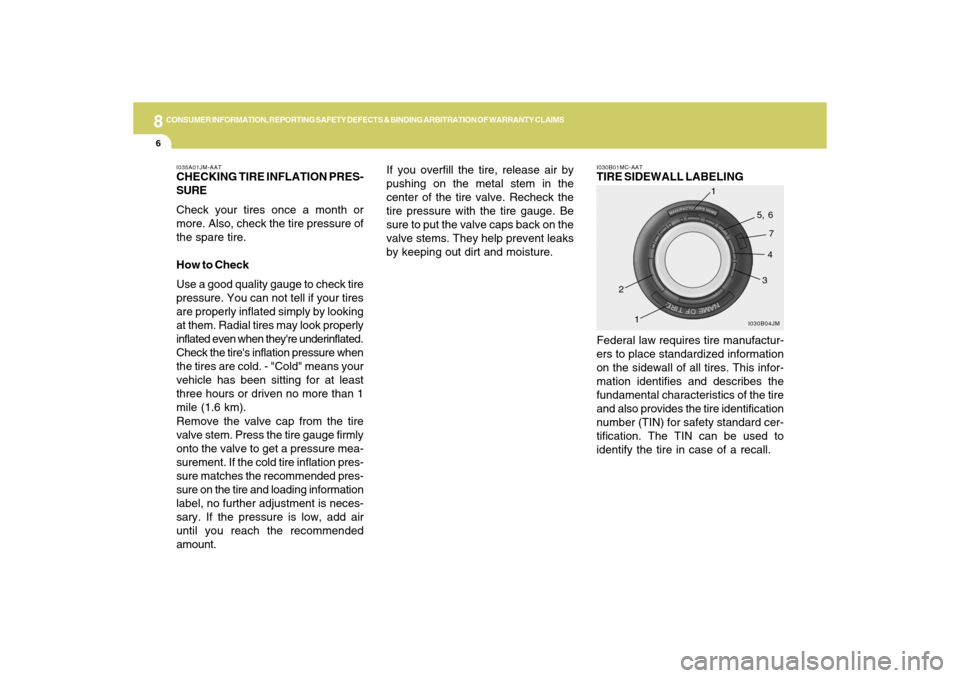
Federal law requires tire manufactur-
ers to place standardized information
on the sidewall of all tires. This infor-
mation identifies and describes the
fundamental characteristics of the tire
and also provides the tire identification
number (TIN) for safety standard cer-
tification. The TIN can be used to
identify the tire in case of a recall.
I030B01MC-AATTIRE SIDEWALL LABELING
I030B04JM
1
234 5, 6
7
1
I035A01JM-AATCHECKING TIRE INFLATION PRES-
SURE
Check your tires once a month or
more. Also, check the tire pressure of
the spare tire.
How to Check
Use a good quality gauge to check tire
pressure. You can not tell if your tires
are properly inflated simply by looking
at them. Radial tires may look properly
inflated even when they're underinflated.
Check the tire's inflation pressure when
the tires are cold. - "Cold" means your
vehicle has been sitting for at least
three hours or driven no more than 1
mile (1.6 km).
Remove the valve cap from the tire
valve stem. Press the tire gauge firmly
onto the valve to get a pressure mea-
surement. If the cold tire inflation pres-
sure matches the recommended pres-
sure on the tire and loading information
label, no further adjustment is neces-
sary. If the pressure is low, add air
until you reach the recommended
amount.
Page 245 of 266

8
CONSUMER INFORMATION, REPORTING SAFETY DEFECTS & BINDING ARBITRATION OF WARRANTY CLAIMS
7
1. Manufacturer or Brand name
o Manufacturer or Brand name is
shown.
2. Tire size (example: P175/70R14)
o The "P" indicates the tire is de-
signed for passenger vehicles. A
"T" is the designation for a tempo-
rary spare tire.
o Three-digit number (175): This
number gives the width in millime-
ters of the tire from sidewall edge
to sidewall edge.
o Two-digit number (70): This num-
ber, known as the aspect ratio,
gives the tire's ratio of height to
width.
o R: The "R" stands for radial.
o Two-digit number (14): This num-
ber is the wheel or rim diameter in
inches.
o Two (or three) digit number (84):
This number is the tire's load in-
dex. It is a measurement of how
much weight each tire can sup-
port.o T: Speed Rating. The speed rat-
ing denotes the speed at which a
tire is designed to be driven for
extended periods of time. The
ratings range from "A" to "Z" (98
to 186 MPH).
3. TIN (Tire Identification Number) for
new tire (example: DOT XX XX
XXX XXXX)
o DOT: Abbreviation for the "De-
partment of Transportation". The
symbol can be placed above, be-
low or to the left or right of the Tire
Identification Number. Indicates
tire is in compliance with the U.S.
Department of Transportation
Motor Vehicle Safety Standards.
o 1st two-digit code: Manufacturer's
identification mark
o 2nd two-digit code: Tire size
o 3rd three-digit code: Tire type code
(Optional)
o 4th four-digit code: Date of Manu-
facture
o Four numbers represent the week
and year the tire was built. For
example, the numbers 3108
means the 31st week of 2008.4. Tire ply composition and mate-
rial
The number of layers or plies of
rubbercoated fabric in the tire. Tire
manufacturers also must indicate
the materials in the tire, which in-
clude steel, nylon, polyester, and
others. The letter "R" means radial
ply construction; the letter "D" means
diagonal or bias ply construction;
and the letter "B" means belted-bias
ply construction.
5. Maximum permissible inflation
pressure
This number is the greatest amount
of air pressure that should be put in
the tire. Do not exceed the maxi-
mum permissible inflation pressure.
Refer to the Tire and Loading Infor-
mation label for recommended infla-
tion pressure.