2009 Hyundai Accent stop start
[x] Cancel search: stop startPage 136 of 232
2
DRIVING YOUR HYUNDAI
9
2
DRIVING YOUR HYUNDAI
9
C090B01A-DAT The Function of Each Position Is As Follows: o P (Park): Use to hold the vehicle in place when parking or while starting the engine. Whenever parking the car, apply the hand brake and shift the selector leverto the "P" (Park) position.
! CAUTION:
Never place the selector lever in the "P" (Park) position unless the ve-hicle is fully stopped. Failure to observe this caution will cause se- vere damage to the transaxle. C090C01A-AAT o R(Reverse): Use for backing up the vehicle. Bring the car to a complete stop before shift-ing the selector lever to "R" position. C090D02A-AAT o N (Neutral): In the "N" position, the transaxle is in neutral, which means that no gears are engaged. The engine can be startedwith the shift lever in "N" position, although this is not recommended ex- cept if the engine stalls while the car ismoving.
C090F01A-AAT o 2 (Second gear): Use for driving on a slippery road, hill climbing or engine braking downhill."2" automatically shifts between first and second gears. This means that no shift-up to 3rd gearis performed. However, the shift-up to third gear is done when the car speed exceeds a certain value to prevent the
engine from over-revving. Manually move the selector to "D" returning to normal driving condition.
C090E02A-GAT o D (Drive): Use for normal driving. Bring the car to a complete stop before shifting the selector to "D" position. The transaxle will automatically shift through a four-gear sequence. Never downshift manu- ally to "2" position or "L" position when vehicle speed is more than 95 km/h (60mph). C090G01A-GAT o L (Low gear): Use for driving up a very steep grade or for engine braking when descendingsteep hills. When downshifting to "L", the transaxle will temporarily remain in second gear until the vehicle hasslowed enough for low gear to engage. Do not exceed 50 km/h (30 mph) in low gear.
Page 140 of 232
2
DRIVING YOUR HYUNDAI
13
2
DRIVING YOUR HYUNDAI
13
C310B01JM-AAT ESP ON/OFF Mode When the ESP is operating, the ESP indicator in the instrument cluster willblink. If you turn the system off by pressing the ESP switch, the ESP-OFF indica-tor will come on and stay on. In the ESP-OFF mode, the stability control will be deactivated. Adjust your drivingaccordingly. To turn the system back on, press the switch again. The ESP- OFF indicator should go off. NOTE: The ESP mode will automatically be turned ON after the engine is turnedoff and restarted. C310D01JM-DAT Indicators and Warning The indicators should illuminate when the ignition key is turned to ON orSTART but should go out after three seconds. If the indicators do not illuminate, or theESP or ESP-OFF indicator does not go out after 3 seconds, have the vehicle checked by an authorised dealer. Should there be any unusual conditions in the device while driving, ESP-OFFindicator illuminates as a warning. If ESP-OFF indicator illuminates, pull your car to a safe place and stop theengine. Then, start the engine again to check if the ESP-OFF indicator goes out. If the indicator remains lit even after the engine has been started, have your carchecked by an authorised Hyundai dealer.
!
CAUTION:
Driving with varying tyre or wheel size may cause the ESP system tomalfunction. When replacing tyres, make sure they are the same size as your original tyres.!
Factors including speed, road condi- tions and driver steering input can allaffect whether ESP will be effective in preventing a loss of control. It is still your responsibility to drive and cornerat reasonable speeds and to leave a sufficient margin of safety.
WARNING:
Electronic stability program is only a driving aid; all normal precautions for driving in bad weather and on slippery road surfaces should beobserved.
Page 144 of 232
2
DRIVING YOUR HYUNDAI
17
2
DRIVING YOUR HYUNDAI
17DRIVING FOR ECONOMY
C140A01A-DAT You can save fuel and get more kilo- meters from your car if you follow these suggestions:
o Drive smoothly. Accelerate at a moderate rate. Don't make "kanga- roo" starts or full-throttle shifts.Maintain a steady cruising speed. Don't race between stoplights. Try to adjust your speed to that of theother traffic so you don't have to change speeds unnecessarily. Avoid heavy traffic whenever possible.Always maintain a safe distance from other vehicles so you can avoid unnecessary braking. Thisalso reduces brake wear.
o Drive at a moderate speed. The
faster you drive, the more fuel yourcar uses. Driving at a moderate speed, especially on the highway, is one of the most effective ways toreduce fuel consumption.
o Don't "ride" the brake. This can in-
crease fuel consumption and alsoincrease wear on these components.
o Use caution when parking on a hill.
Engage the hand brake and place the gear selector lever in "P" (automatic transaxle) or in first or reverse gear (manual transaxle). If your car is facing downhill, turn the front wheels into the curb to help keep the car from rolling. If your car is facing uphill, turn the front wheels away from the curb to help keep the car from rolling. If there is no curb or if it is required by other conditions to keep the car from rolling, block the wheels.
o Under some conditions your hand brake can freeze in the engaged position. This is most likely to hap- pen when there is an accumulation of snow or ice around or near the rear brakes or if the brakes are wet. If there is a risk that the hand brake may freeze, apply it only temporarily while you put the gear selector lever in "P" (automatic) or in first or re- verse gear (manual transaxle) and block the rear wheels so the car cannot roll. Then release the hand brake.
o Do not hold the vehicle on the up- grade with the accelerator pedal. This can cause the transaxle to overheat. Always use the brake pedal or hand brake. o In addition, driving with your foot
resting on the brake pedal may cause the brakes to overheat, which re- duces their effectiveness and may lead to more serious consequences.
o Take care of your tyres. Keep them inflated to the recommended pres-sure. Incorrect inflation, either toomuch or too little, results in unneces- sary tyre wear. Check the tyre pres- sures at least once a month.
o Be sure that the wheels are aligned correctly. Improper alignment canresult from hitting curbs or driving toofast over irregular surfaces Poor align- ment causes faster tyre wear and may also result in other problems aswell as greater fuel consumption.
o Keep your car in good condition. For
better fuel economy and reducedmaintenance costs, maintain your car in accordance with the mainte- nance schedule in Section 5. If youdrive your car in severe conditions, more frequent maintenance is re- quired (see Section 5 for details).
Page 151 of 232
2 DRIVING YOUR HYUNDAI
24
8. When parking your car and trailer,especially on a hill, be sure to follow all the normal precautions. Turn your front wheel into the curb, set the hand brake firmly, and put thetransaxle in 1st or Reverse (manual) or Park (automatic). In addition, place wheel chocks at each of thetrailer's tyres.
9. If the trailer has electric brakes,
drive your vehicle with the trailerattached, and then apply the trailer brakes by hand. This test confirms the operation of the trailer brakesand also checks your electrical con- nection at the same time.
10. During your trip, check occasionally to be sure that the load is secure,and that the lights and any trailer brakes are still working.
11.Avoid jerky starts, sudden accel- eration or sudden stops.
12.Avoid sharp turns and rapid lane changes.
13.Avoid holding the brake pedal down
too long or too frequently. This couldcause the brakes to overheat, re- sulting in reduced braking efficiency.
!WARNING:
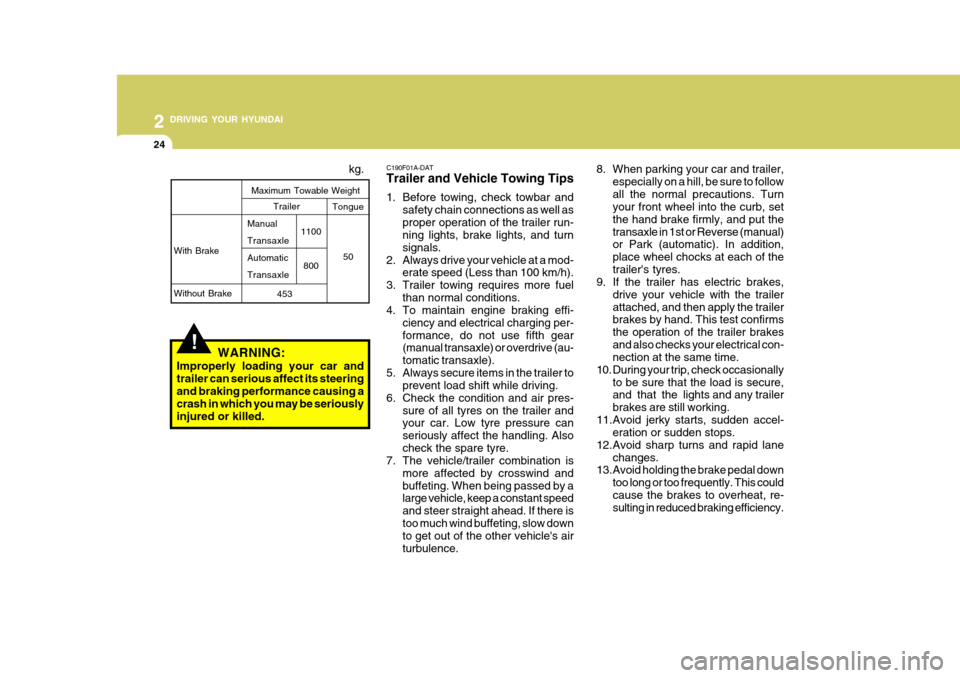
Improperly loading your car and trailer can serious affect its steeringand braking performance causing a crash in which you may be seriously injured or killed. kg.
With Brake Without Brake
Maximum Towable Weight
1100800
Trailer Tongue
50
453
Manual TransaxleAutomaticTransaxle C190F01A-DAT Trailer and Vehicle Towing Tips
1. Before towing, check towbar and
safety chain connections as well as proper operation of the trailer run- ning lights, brake lights, and turn signals.
2. Always drive your vehicle at a mod- erate speed (Less than 100 km/h).
3. Trailer towing requires more fuel than normal conditions.
4. To maintain engine braking effi-
ciency and electrical charging per-formance, do not use fifth gear (manual transaxle) or overdrive (au- tomatic transaxle).
5. Always secure items in the trailer to prevent load shift while driving.
6. Check the condition and air pres- sure of all tyres on the trailer and your car. Low tyre pressure can seriously affect the handling. Alsocheck the spare tyre.
7. The vehicle/trailer combination is
more affected by crosswind andbuffeting. When being passed by a large vehicle, keep a constant speed and steer straight ahead. If there istoo much wind buffeting, slow down to get out of the other vehicle's air turbulence.
Page 156 of 232
3 WHAT TO DO IN AN EMERGENCY
4IF THE ENGINE OVERHEATS
D030A01A-DAT If your temperature gauge indicates overheating, you experience a loss of power, or hear loud pinging or knock- ing, the engine is probably too hot. Ifthis happens, you should:
1. Pull off the road and stop as soon as it is safe to do so.
2. Place the gear selector lever in "P"
(automatic), or neutral (manual transaxle) and set the hand brake. If the air conditioning is on, turn it off.
3. If coolant is running out under the car or steam is coming out from thebonnet, stop the engine. Do not open the bonnet until the coolant hasstopped running or the steaming has stopped. If there is no visible loss of coolant and no steam, leave theengine running and check to be sure the engine cooling fan is operating. If the fan is not running, turn the engineoff.
4. Check to see if the water pump drive
belt is missing. If it is not missing,check to see that it is tight. If the drive belt seems to be satisfactory, check for coolant leaking from theradiator, hoses or under the car.
6. Carefully remove the jumper cables
in the reverse order of attachment.
If you do not know why your batterybecame discharged (because the lightswere left on, etc.), have the charging system checked by your Hyundai dealer.
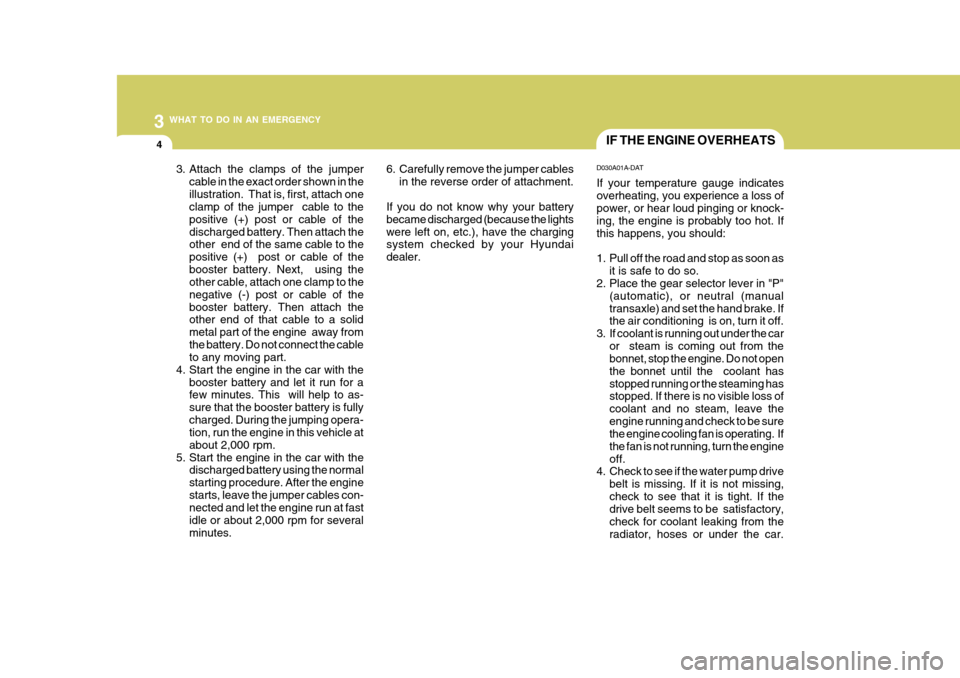
3. Attach the clamps of the jumper
cable in the exact order shown in theillustration. That is, first, attach one clamp of the jumper cable to the positive (+) post or cable of thedischarged battery. Then attach the other end of the same cable to the positive (+) post or cable of thebooster battery. Next, using the other cable, attach one clamp to the negative (-) post or cable of thebooster battery. Then attach the other end of that cable to a solid metal part of the engine away fromthe battery. Do not connect the cable to any moving part.
4. Start the engine in the car with the booster battery and let it run for afew minutes. This will help to as- sure that the booster battery is fullycharged. During the jumping opera- tion, run the engine in this vehicle at about 2,000 rpm.
5. Start the engine in the car with the discharged battery using the normalstarting procedure. After the enginestarts, leave the jumper cables con- nected and let the engine run at fast idle or about 2,000 rpm for severalminutes.
Page 181 of 232
5
VEHICLE MAINTENANCE REQUIREMENTS
9
F070L01A-AAT
o Suspension Mounting Bolts
Check the suspension connections for looseness or damage. Retighten to the specified torque. F070M01A-AAT
o Steering Gear Box, Linkage &
Boots / Lower Arm Ball Joint
With the vehicle stopped and engineoff, check for excessive free-play in the steering wheel. Check the linkage for bends or dam- age. Check the dust boots and ball joints for deterioration, cracks, or dam- age. Replace any damaged parts. F070N01A-AAT
o Power Steering Pump, Belt
and Hoses
Check the power steering pump and
hoses for leakage and damage. Re- place any damaged or leaking parts immediately. Inspect the power steer-ing belt for evidence of cuts, cracks, excessive wear, oiliness and proper tension. Replace or adjust it if neces-sary. F070P01A-AAT
o Drive Shafts and Boots
Check the drive shafts, boots andclamps for cracks, deterioration, or damage. Replace any damaged parts and, if necessary, repack the grease. F070Q01A-AAT
o Air Conditioning Refrigerant Check the air conditioning lines and connections for leakage and damage. Check air conditioning performanceaccording to the relevant shop manual if necessary.
F070J01A-AAT
o Brake Pads, Calipers and
Rotors
Check the pads for excessive wear,
discs for run out and wear, and cali-pers for fluid leakage.
F070K01A-AAT
o Exhaust Pipe and Muffler
Visually inspect the exhaust pipes,
muffler and hangers for cracks, dete- rioration, or damage. Start the engineand listen carefully for any exhaust gas leakage. Tighten connections or replace parts as necessary.
Page 203 of 232
6 DO-IT-YOURSELF MAINTENANCE
22HEADLIGHT AIMING ADJUSTMENT
G290A03A-DAT Before performing aiming adjustment, make sure of the following.
1. Keep all tyres inflated to the correct
pressure.
2. Place the vehicle on level ground and press the front bumper & rear bumper down several times. Placethe vehicle at a distance of 3,000 mm (118 in.) from the test wall.
3. See that the vehicle is unloaded (except for full levels of coolant,engine oil and fuel, and spare tyre, jack, and tools).Have the driver or equivalent weight placed in driver's seat.
4. Clean the head light lenses and turn on the headlights (low beam).
NOTE:
o Grinding noise from the power
steering pump may be heard im- mediately after the engine is startedin extremely cold conditions (be- low - 20°C). If the noise stops during warm up, there is no ab-normal function in the system. It is due to a power steering fluid characteristic in extremely coldconditions.
o Do not start the engine when the
power steering oil reservoir isempty. G240A01A-DAT POWER STEERING HOSES It is suggested that you check the power steering hose connections forfluid leakage at those intervals speci- fied in the vehicle maintenance sched- ule in Section 5. The power steeringhoses should be replaced if there is severe surface cracking, pulling, scuff- ing or worn spots. Deterioration of thehoses could cause premature failure.
Page 213 of 232
6 DO-IT-YOURSELF MAINTENANCE
32
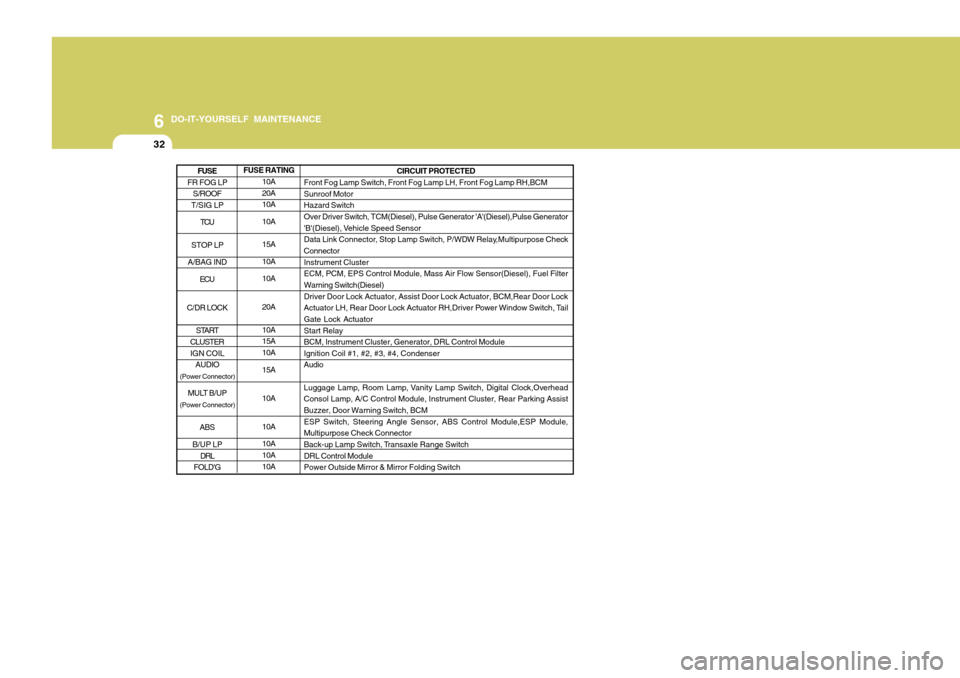
FUSE RATING10A 20A10A 10A 15A 10A10A 20A 10A 15A 10A 15A 10A10A 10A 10A 10A CIRCUIT PROTECTED
Front Fog Lamp Switch, Front Fog Lamp LH, Front Fog Lamp RH,BCM Sunroof Motor Hazard SwitchOver Driver Switch, TCM(Diesel), Pulse Generator 'A'(Diesel),Pulse Generator
'B'(Diesel), Vehicle Speed Sensor
Data Link Connector, Stop Lamp Switch, P/WDW Relay,Multipurpose CheckConnector Instrument Cluster ECM, PCM, EPS Control Module, Mass Air Flow Sensor(Diesel), Fuel FilterWarning Switch(Diesel) Driver Door Lock Actuator, Assist Door Lock Actuator, BCM,Rear Door Lock
Actuator LH, Rear Door Lock Actuator RH,Driver Power Window Switch, TailGate Lock Actuator Start Relay BCM, Instrument Cluster, Generator, DRL Control ModuleIgnition Coil #1, #2, #3, #4, CondenserAudio
Luggage Lamp, Room Lamp, Vanity Lamp Switch, Digital Clock,Overhead Consol Lamp, A/C Control Module, Instrument Cluster, Rear Parking Assist Buzzer, Door Warning Switch, BCM ESP Switch, Steering Angle Sensor, ABS Control Module,ESP Module,Multipurpose Check Connector
Back-up Lamp Switch, Transaxle Range Switch DRL Control ModulePower Outside Mirror & Mirror Folding Switch
FR FOG LP S/ROOF
T/SIG LP
TCU
STOP LP
A/BAG IND ECU
C/DR LOCK START
CLUSTER IGN COIL AUDIO
(Power Connector)
MULT B/UP
(Power Connector)
ABS
B/UP LP DRL
FOLD'G
FUSE