Page 305 of 427
CONT INUED
Insert the connector securely into
the socket.
Hook the retaining tab on the
inner side of the lid against the
retaining tab of the connector to
prevent disconnection during
operation.
Your vehicle has a class 3 trailer
hitch as standard equipment. The 7-pin trailer connector is needed
f or the trailer lights. To connect the
connector, do this:
Make sure the connector and the
socketarefreeof dirt,moisture,
or other f oreign material.
Open the socket lid by pulling it up.
Also see page f or trailer-related
inf ormation.
1.
2.3.
4.
299
Except RT models
Towing Equipment
Towing a Trailer
Connect ing t he T railer Connect ors
Driving
301
TRAILER HITCH
7-PIN TRAILER CONNECTOR
7-PIN TRAILER CONNECTORLID
RETAINING
TAB
SOCKET RETAINING TAB
�\f���—�\f���—�\f���y���\f�������
���y���
�(���������\f�y�\f���\f���y
2009 Ridgeline
Page 307 of 427

The added weight, length, and
height of a trailer will af f ect your
vehicle’s handling and perf ormance,
so driving with a trailer requires
some special driving skills and
techniques.
The vehicle has been properly
serviced, and the tires, brakes,
suspension, cooling system, and
lights are in good operating
condition.
The trailer has been properly
serviced and is in good condition.
All weights and loads are within
limits.
Thehitch,safetychains,andany
other attachments are secure.
Allitemsonandinthetrailerare
properly secured and cannot shif t
while you drive.
When preparing to tow, and bef ore
driving away, be sure to check the
f ollowing:
Towing perf ormance can be
af f ected by high altitude, high
temperature, or when climbing
steep grades. Theref ore, premium
f uel (premium unleaded gasoline
with pump octane number of 91 or
higher) is recommended when
towing more than 3,500 lbs (1,590
kg).
The trailer tires and spare are in
good condition and inf lated as
recommended by the trailer
maker.
Your vehicle tires and spare are in
good condition and properly
inf lated.
The lights and brakes on your
vehicle and the trailer are working
properly.Foryoursafetyandthesafetyof
others,taketimetopracticedriving
maneuvers bef ore heading f or the
open road, and f ollow the guidelines
on the f ollowing page.
CONT INUED
Driving Saf ely With a T railer
Pre-T ow Checklist
Towing a Trailer
Driving
303
�\f���—�\f���—�\f���y���\f���������
�y���
�(���������\f�y�\f���\f���y
2009 Ridgeline
Page 330 of 427

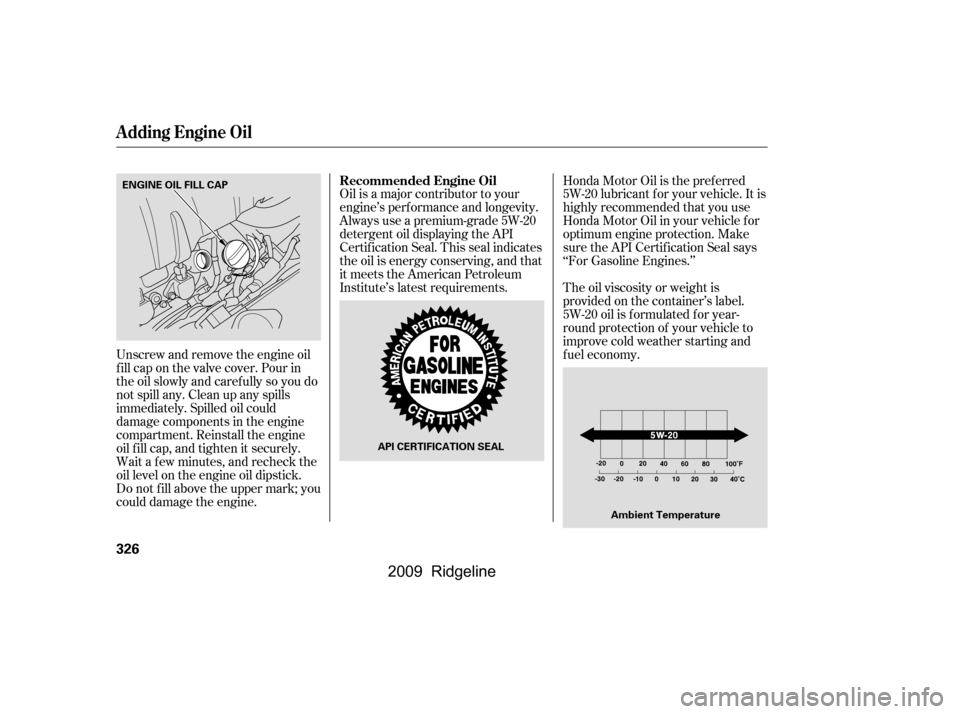
Oil is a major contributor to your
engine’s perf ormance and longevity.
Always use a premium-grade 5W-20
detergent oil displaying the API
Certif ication Seal. This seal indicates
the oil is energy conserving, and that
it meets the American Petroleum
Institute’s latest requirements.Honda Motor Oil is the pref erred
5W-20 lubricant f or your vehicle. It is
highly recommended that you use
Honda Motor Oil in your vehicle f or
optimum engine protection. Make
sure the API Certif ication Seal says
‘‘For Gasoline Engines.’’
The oil viscosity or weight is
provided on the container’s label.
5W-20 oil is f ormulated f or year-
round protection of your vehicle to
improve cold weather starting and
f uel economy.
Unscrew and remove the engine oil
fill cap on the valve cover. Pour in
the oil slowly and caref ully so you do
not spill any. Clean up any spills
immediately. Spilled oil could
damage components in the engine
compartment. Reinstall the engine
oil f ill cap, and tighten it securely.
Wait a f ew minutes, and recheck the
oil level on the engine oil dipstick.
Do not f ill above the upper mark; you
could damage the engine. Recommended Engine Oil
A dding Engine Oil
326
API CERTIFICATION SEAL
Ambient Temperature
ENGINE OIL FILL CAP
�\f���—�\f���—�\f���y���\f�����������y���
�(���������\f�y�\f�����
�y
2009 Ridgeline
Page 336 of 427

Insert the dipstick all the way back
in the transmission.
If you are not sure how to add f luid,
contact your dealer.
If the level is below the lower
mark, remove the f ill plug, then
add the f luid into the f ill hole to
bring it to the level between the
upper and lower marks on the
dipstick.
Pour the f luid slowly and caref ully so
you do not spill any. Clean up any
spill immediately; it could damage
components in the engine
compartment.
Always use Honda Genuine ATF-Z1
(automatic transmission f luid).
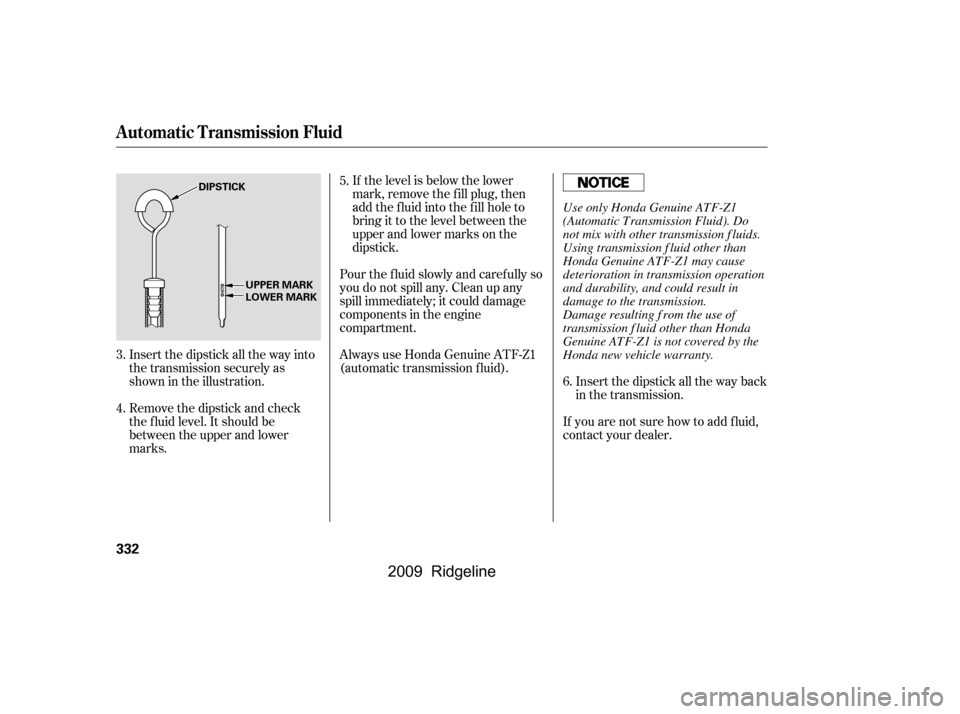
Insert the dipstick all the way into
the transmission securely as
shown in the illustration.
Remove the dipstick and check
the f luid level. It should be
between the upper and lower
marks. 6.
5.
3.
4.
Automatic Transmission Fluid
332
DIPSTICK UPPER MARKLOWER MARK
Use only Honda Genuine ATF-Z1
(Automatic Transmission Fluid). Do
not mix with other transmission f luids.
Using transmission f luid other than
Honda Genuine ATF-Z1 may cause
deterioration in transmission operation
and durability, and could result in
damage to the transmission.
Damage resulting f rom the use of
transmission f luid other than Honda
Genuine ATF-Z1 is not covered by the
Honda new vehicle warranty.
�\f���—�\f���—�\f���y���\f���������\f�y���
�(���������\f�y�\f�������y
2009 Ridgeline
Page 341 of 427
Remove the electrical connector
f rom the bulb by pulling the
connector straight back.
Remove the rubber weather seal
by pulling on the tab.
Unclip the end of the hold-down
wire f rom its slot. Pivot it out of
the way, and remove the bulb.Install the new bulb into the hole,
making sure the tabs are in their
slots. Pivot the hold-down wire
back in place, and clip the end into
the slot.
Install the rubber weather seal
over the back of the headlight
assembly. Make sure it is right
side up.
Push the electrical connector onto
the new bulb. Make sure it is
connected securely. Turn on the
headlights to test the new bulb.
1.
2.
3. 4.
5.
6.
Lights
Maint enance
337
WEATHER SEAL
CONNECTOR HOLD-DOWN WIRE
BULB
�\f���—�\f���—�\f���y���\f����\f��\f���y���
�(���������\f�y�\f�������y
2009 Ridgeline
Page 344 of 427
Remove the socket by turning it
one-quarter turn counterclockwise.
Remove the burned-out bulb by
pulling it straight out of the socket.
Drop open the tailgate.
Remove the two bolts, and remove
the rear light assembly f rom the
rear pillar.
Determine which of the three
bulbs is burned out: brake/
taillight, turn signal/hazard light,
or back-up light.
Install the new bulb into the hole
and turn it one-quarter turn
clockwise to lock it in place.
Push the electrical connector back
onto the bulb. Make sure it is on
all the way.
Turn on the lights to test the new
bulb.
Reinstall the inner f ender. Make
sure it is installed under the edge
of the f ront bumper.
Reinstall the holding clip, and push
in its head, then install the bolts
and tighten them securely.
1.
2.
3. 4.
5.
5.
6.
7.
8.
9.
Replacing Rear Bulbs
Lights
340
BULB
SOCKET
�\f���—�\f���—�\f���y���\f����\f����
�y���
�(���������\f�y�\f�������y
2009 Ridgeline
Page 345 of 427
Remove the three mounting
screws f rom the light assembly.
Remove the lens f rom the light
assembly.
Pull the bulb straight out of its
socket. Push the new bulb straight
into the socket until it bottoms.
Place a cloth on the edge of the
lens segment. Remove each lens
segment by caref ully prying on its
edge with a small f lat-tipped
screwdriver.
Remove the screw under each lens.
Pull the high-mount brake light
assembly out of the vehicle.
Install the new bulb into the
socket.
Push the socket into the light
assembly, and turn it clockwise
until it locks.
Turn on the lights to make sure
the new bulb is working.
Install the rear light assembly in
the rear pillar. Tighten the two
bolts securely.
1.
2.
3. 4.
5.
6.
6.
7.
8.
9.
CONT INUED
Replacing a High-mount Brake
Light Bulb
Lights
Maint enance
341
LENS SEGMENT
SCREW SCREW
BULB
�\f���—�\f���—�\f���y���\f����\f������y���
�(���������\f�y�\f�������y
2009 Ridgeline
Page 346 of 427
Pull the bulb straight out of its
socket. Push the new bulb straight
into the socket until it bottoms.
Push the socket into the light
assembly, and turn it clockwise
until it locks.
Remove the license plate light
assembly by pulling it towards you,
and then pulling the f ront edge
upward.
Remove the socket f rom the light
assembly by turning it one-quarter
turn counterclockwise.
Put the lens back on the light
assembly, and tighten the
mounting bolts securely.
Turn on the lights to make sure
the new bulb is working.
Put the light assembly back into
the vehicle. Install the screws and
tighten them securely.
Reinstall the lens segments.
1.
2. 3.
4.
8.
7.
9.
Lights
Replacing a Rear License Plate
Bulb
342
BULB
SOCKET
�\f���—�\f���—�\f���y���\f����\f����
�y���
�(���������\f�y�\f�������y
2009 Ridgeline